Cloud Native Kubernetes: Flusso e opportunità di lavoro

Questo nuovo articolo vuole indicare le nuove opportunità di lavoro create da un ambiente cloud-native.

L’immagine n°1 mostra i quattro livelli principali necessari all’architettura per funzionare correttamente (parte rettangolare sinistra).

Sul lato destro (cerchi) sono rappresentati le occupazioni dell’operatore rispetto ad ogni singolo livello.
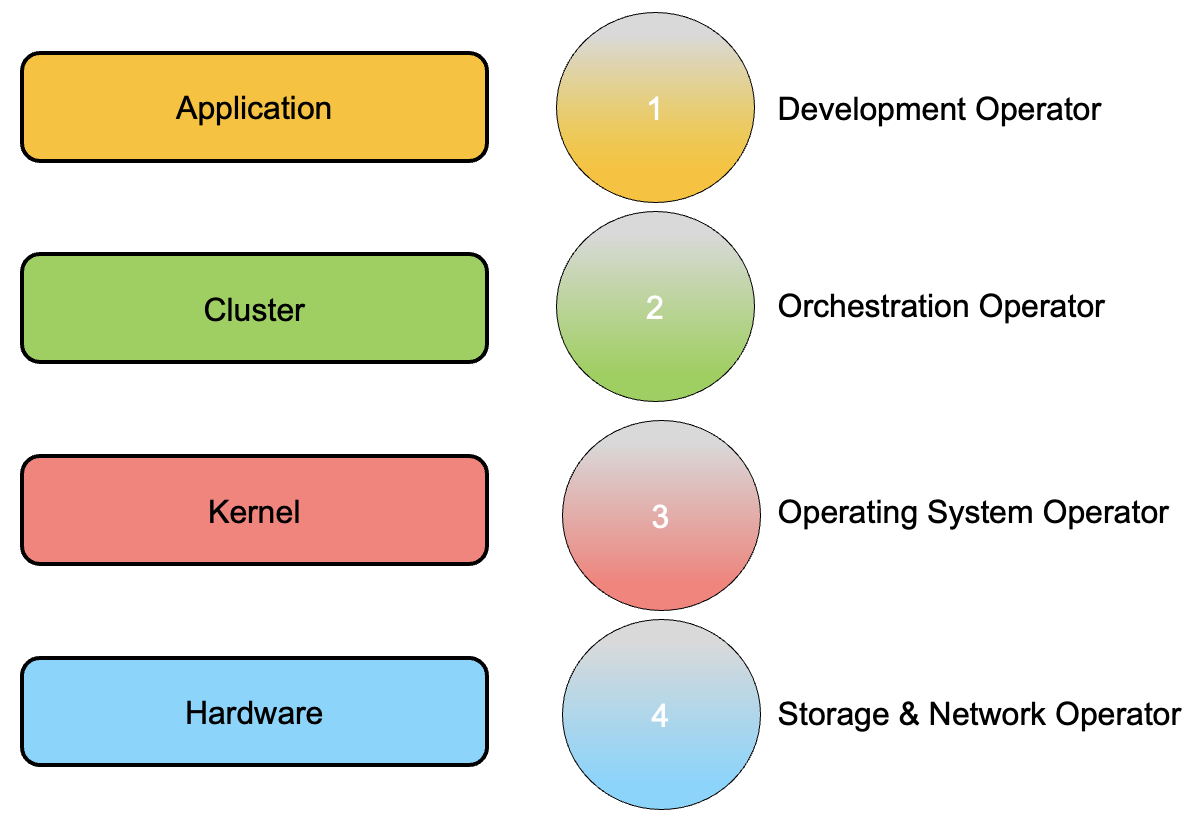
Immagine 1

Dal basso verso l’alto:

1- Gli Storage and Network Operator (SNO) hanno la responsabilità di gestire l’architettura hardware.

Il numero dell’attività del ruolo può diminuire in caso di implementazione in un cloud pubblico o IaaS (Infrastructure as a Service)

2- L’Operatore del sistema operativo (OSO) lavora al livello del sistema operativo in cui viene eseguito il servizio k8s.

L’OSO ha bisogno di competenza in Linux e Windows. Sono spesso richieste competenze nell’architettura di virtualizzazione come VMware, RedHat, Nutanix, ecc.

Se l’architettura è stata affittata dal cloud pubblico o in generale in un IaaS, le competenze devono coprire questa nuova architettura.

3- L’operatore di orchestrazione (OO) lavora con il nucleo dell’ambiente di amministrazione cloud-native. Questo mondo ha bisogno di molte nuove abilità.

L’automazione è il figlio dell’orchestrazione.

Il concetto principale è che l’OO dovrebbe avere competenze sufficienti per riuscire a seguire tutti i processi di “Integrazione Continua” e “Consegna Continua” (spesso chiamata CI/CD).

L’immagine 2 dà un’idea a riguardo

Le frecce centrali mostrano il flusso per consentire l’erogazione di un servizio.

Per ogni singola freccia ci sono nuovi strumenti da conoscere per gestire l’intero rilascio del servizio.

Solo alcuni esempi: per testare l’ambiente è possibile lavorare con cetriolo o Cypress.io, per la distribuzione e la costruzione è possibile utilizzare Jenkins… e così via…
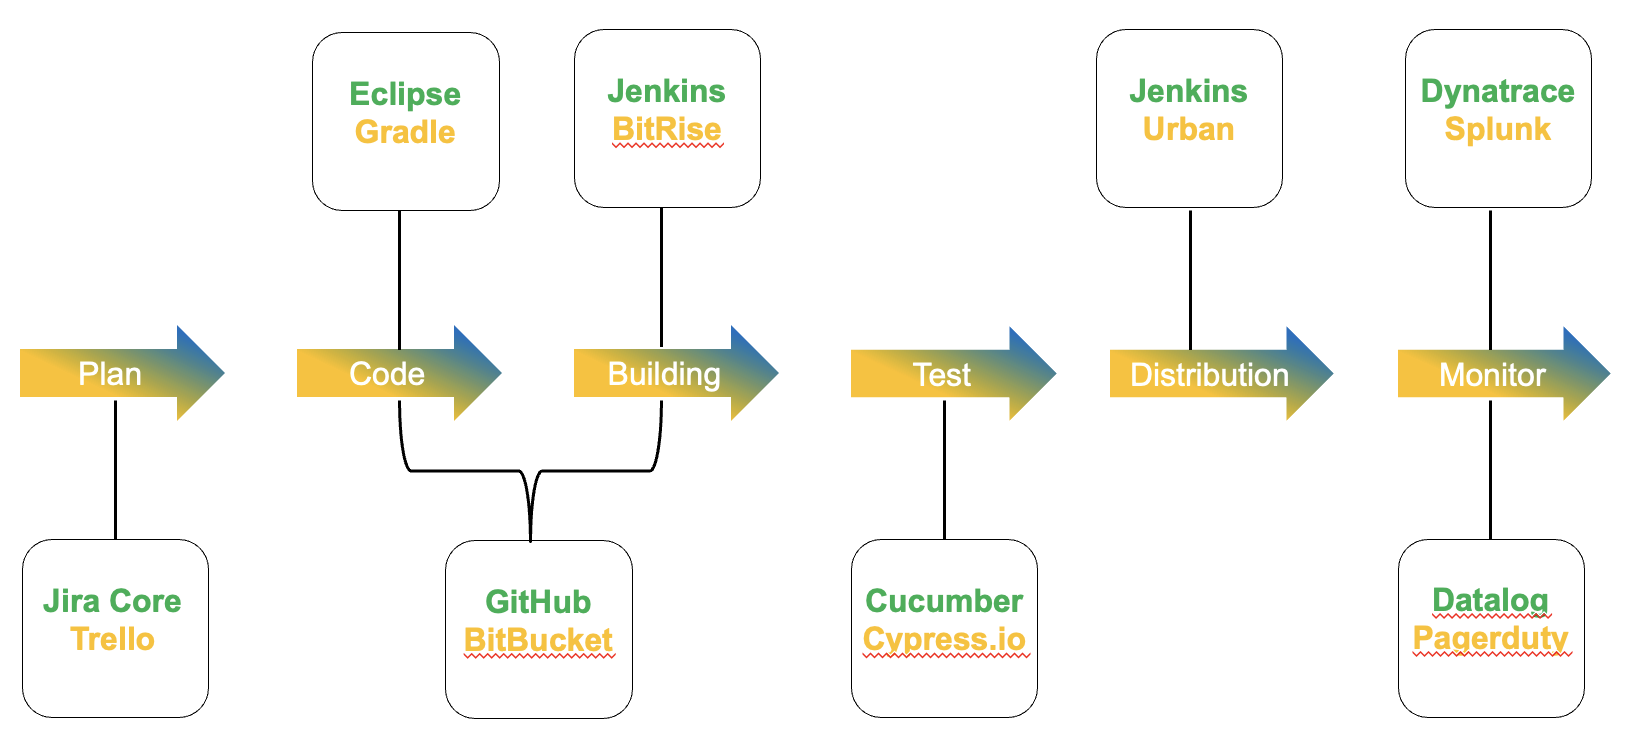
Immagine 2

Nota 1: ci sono così tante piattaforme disponibili che la scelta di quella giusta potrebbe essere molto impegnativa

4- L’operatore di sviluppo è il ruolo delle persone che sono scritte righe di codice. Spesso usano software per gestire attività come Jira Core e Trello.

Nota 2: A mio parere personale, il fornitore che crea un livello software in grado di gestire centralmente tutte queste 6 attività principali avrà un vantaggio competitivo rispetto ai concorrenti.

I grandi fornitori stanno già giocando: RedHat sta lavorando dall’inizio con la sua piattaforma (OpenStack), VMware ha rilasciato Tanzu, Nutanix con Carbonite e Microsoft giocherà il suo ruolo con la nuova versione di Windows 2022.

L’unico buon suggerimento che posso darti è quello di studiare questo nuovo e fantastico mondo.

A presto e abbi cura di te
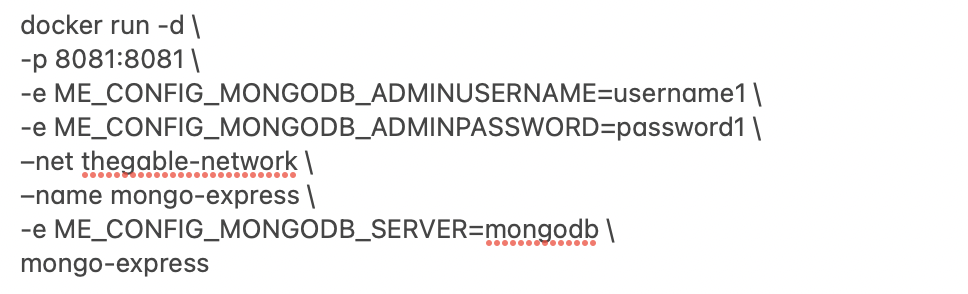
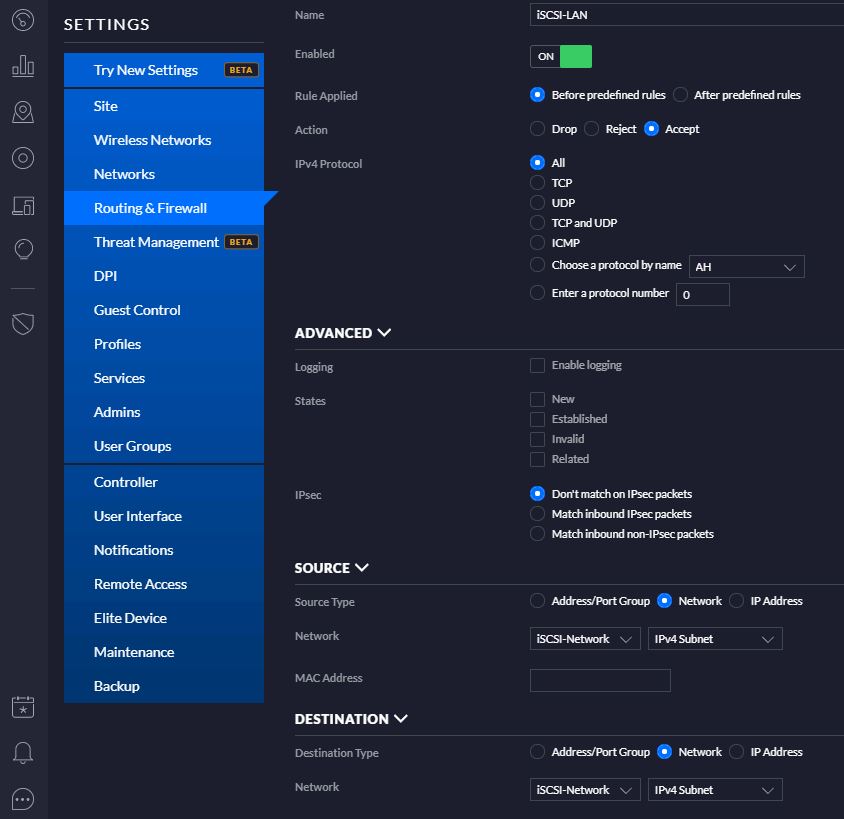
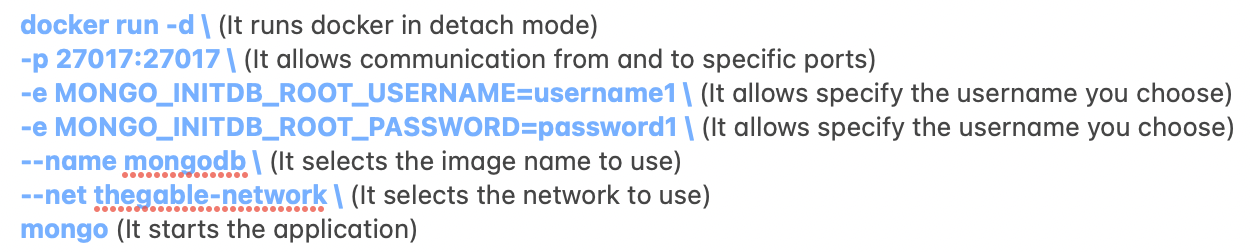
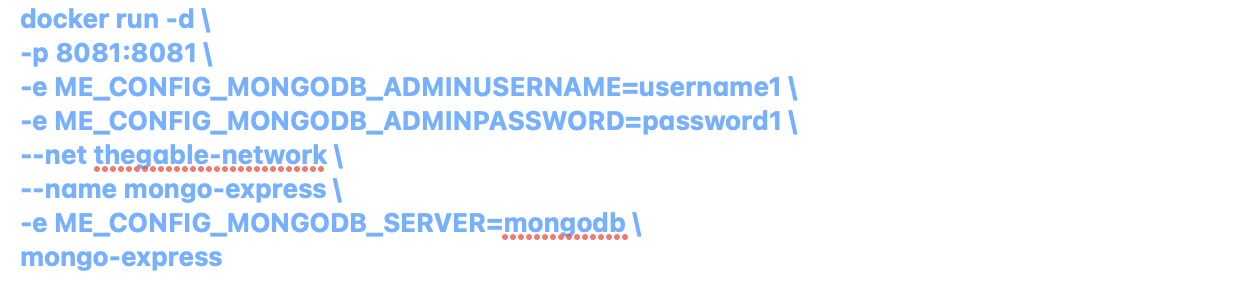
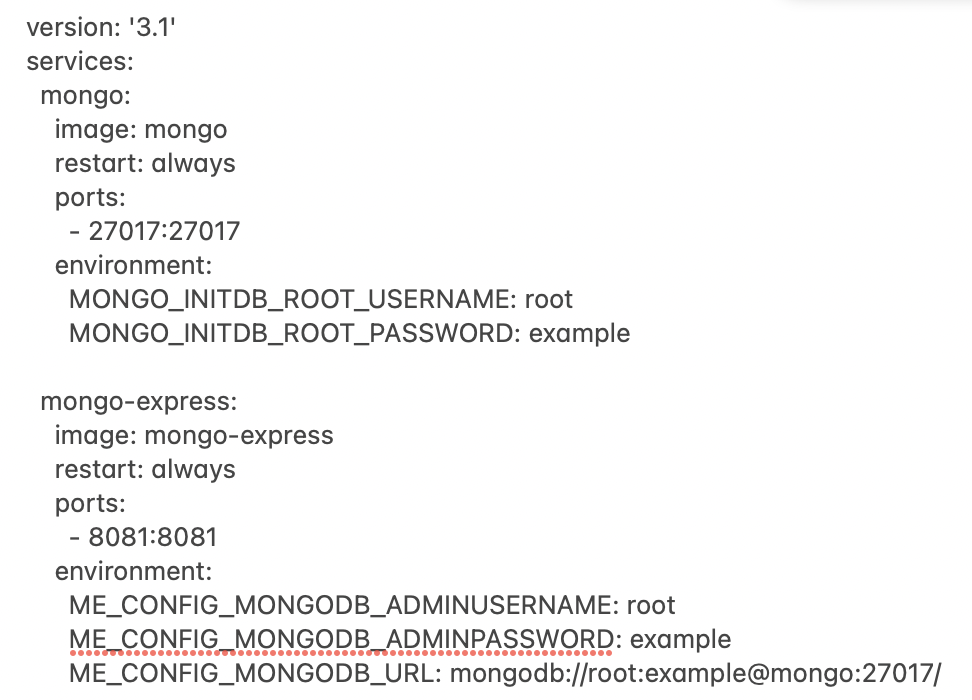
Modern Applications – Episod 4: Docker Compose – YAML

The topic of this article is understanding how to automatize the delivery of a micro-service.

In the previous one, I showed the flow process of a service. This flow requires typing a lot of commands to launch any single container.

Is there a way to automatize the entire process making it easier?

Yes, Docker-compose is a tool for defining and running an environment multi-container.

Docker-compose works with a describing file that includes all the configurations. The file has the extension YAML (human-readable data-serialization language).

After writing the YAML file (in this example it is named mypersonalfile.yaml), the syntax of the command is:

docker-compose -f mypersonalfile.yaml

Let’s see an easy example using the article I wrote in the last episode as a source.

I had to type all these commands to implement the service:

a. Mongo DB commands

b. Mongo Express commands

In their place,  it’s possible to use the following yaml file.

mypersonalfile.yaml

We will find yaml files again when writing about Kubernetes architecture and its protection.

That’s all for now, take care guys

Modern Applications – Episod 3: Service workflow

The first two articles explained what a container is (article 1) and how they can talk to each other (article 2).

In this third article, I’m going to show how to deploy a service through this new and amazing container technology.

Note 1: I won’t cover the image flow deployment part (Git – Jenkins, Docker repository, and so on) because my goal is to explain how to implement a service, not how to write lines code.

Main Point:

  • As many of you already know, a service is a logical group of applications that talk to each other
  • Every single application can run as an image
  • Any image can run to a container
  • Conclusion: Deploying container technology is possible to build up any service

An example could clarify the concept.

Example: Web application

A classical web application is composed of a Front-End, a Back-End, and a DB.

In the traditional world, every single application runs on a single server (virtual or physical it doesn’t matter).

This old scenario required to work with every single brick of the wall. It means that to design correctly the service the deployers and engineers have to pay attention to all the objects of the stack, starting from OS, drivers, networks, firewall, and so on.

Why?

Because they are a separate group of objects that need a compatibility and feasibility study to work properly together and they require great security competencies also.

Furthermore, when the service is deployed and every single application is going to be installed, it often happens that remote support from the developer team is required. The reason is that some deployment steps are not clear enough just because they are not well documented (developers are not as good at writing documentation as they are at writing codes). The result is that opening a ticket to customer service is quite normal.

Someone could object and ask to deploy a service just using one server. Unfortunately, it doesn’t solve the issue, actually, it amplifies it up just because in that scenario, it’s common to meet scalability problems.

Let’s continue our example by talking about the architecture design and the components needed (Picture 1)

Picture 1

Note 2: In the next rows, I will skip how to deploy the front and backend architecture as well as the docker technology because:

  • Writing HTML and Javascript files for creating a website is quite easy. On Internet, you can find a lot of examples that will meet your needs.
  • Node.js is a very powerful open-source product downloadable from the following website where it’s possible to get all the documentation needed to work with it.
  • Docker is open-source software; it can also be downloaded from the official open-source website. The installation is a piece of cake.

My focus here is explaining how to deploy and work with docker images. Today’s example is the Mongo DB and Mongo Express applications.

I wrapped up the steps in 4 main stages:

a. First point: Creating a Network

It allows communication from and to the images.

In our example, the network will be named “thegable-network”.

From the console (terminal, putty….) just run the following commands:

b. Download from docker hub the images needed

c) Running the mongo DB image with the correct settings:

d) Run the mongo-Express image with the correct settings:

Note 3: The configurable settings are available directly from the docker images.

For example, to mongo-express, picture 2  shows the common settings. (https://hub.docker.com/_/mongo-express)

Picture 2

Connecting to the main web page of mongo-express (localhost: port), have to appear the mongo default Databases  as shown in picture 3

Picture 2

Now creating new Mongo DBs (through the Mongo-Express web interface just for example create the DB named “my-GPDB“) and managing your javascript file, it’s possible to build up your own web application.

In the javascript file (normally is named server.js) the main points to connect to the DB are:

(Please refer to a javascript specialist to get all details needed)

Is it easy? Yes, and this approach allows having a fast and secure deployment.

In just a word, it is amazing!

That’s all folks for now.

The last article of this first series on modern applications is Docker Compose

See you soon and take care

NUC upgrade to ESXi 7.0.1 – Part 2

Phase 2: Upgrading ESXi Host

In the previous article, I described how to prepare a customized ISO. If you lost it please click on this link.

Let’s continue!

Requirements: the task I performed before starting the procedure here described has been the vCenter upgrade to 7.0.1-c. I remind you that my starting point was Esxi 7.0.0.b that is fully supported by vCenter 7.0.1-c.

There are two main ways to upgrade the ESXi Hosts.

The first is related to the use of a VMware feature. It’s the vSphere Lifecycle Manager (vLCM) and you can taste part of its potential by watching this video guide.

Instead, I preferred to use an old approach working with a bootable USB pen with the custom ISO prepared in the previous article. The steps are:

1. Shutdown ESXi Hosts
2. Remove the USB-NIC
3. Insert the Pen Drive with custom ISO
4. Upgrade the host following the wizard (The main point is shown in Picture 1)

Picture 1

5. Reboot the host.

6. Now it’s time to install the USB-Nic Driver. It is available from “USB Network Native Driver for ESXi” web site and this article allows me to say thx to the excellent job of  Songtao Zheng and William Lam

Before proceeding please read the instruction carefully and DO NOT insert all the USB cards together. (I have got three USB-NIC cards)

Why? Because during the procedure, I have had more than one purple screen and after a deep analysis I discovered that it depended on the USB-NIC cards.

To get over this issue I created the following procedure.

Picture 2

7. Switch off the ESXi NUC and insert the first USB-NIC card in port-1 and the second in port-4 (please refer to picture 2 to know the nomenclature of the port)

8. Now switch on the NUC and check if it boots correctly.

9. Switch off the NUC and insert the third USB-NUC on port-2.

10. Reboot NUC and check if it works as aspected.

Before ending this article I suggest creating a map between vmks and the physical MAC Address of the USB NIC. The main advantage is that it allows maintaining the same vmkusb address after a reboot also.

Some useful commands:

To Identify the Mac Address:
# esxcli network nic list |grep vusb |awk ‘{print $1, $8}’

To Check persisting binding:
# esxcli system module parameters list -m vmkusb_nic_fling

NUC upgrade to ESXi 7.0.1- Part 1

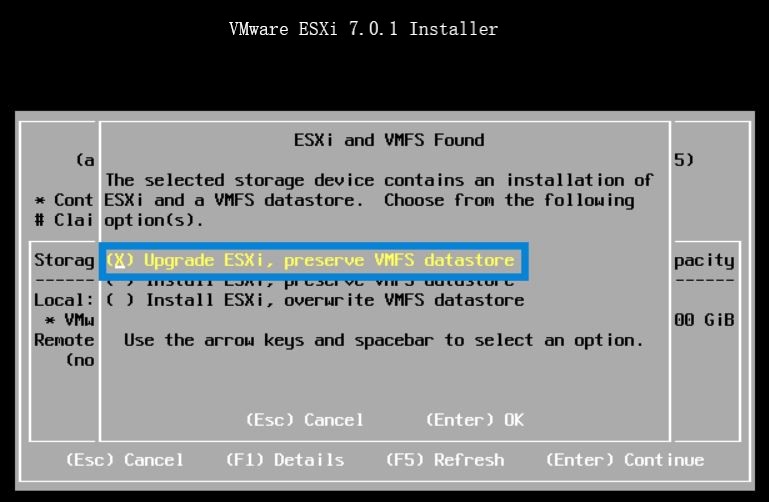
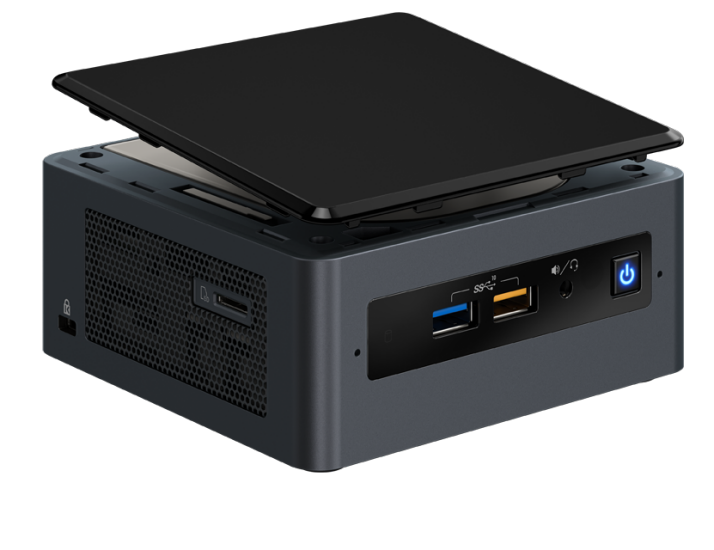
Last weekend I upgraded all my Servers to the last VMware ESXi release (7.0.1 C) and this article is meant to describe all steps I performed.

Just a recommendation before starting. I worked in my lab that it’s not a production environment.

MyLAB before upgrade:

  1. NUC8i7beh2
  2. VMware ESXi 7.0.0 (Build 16324942)
  3. Every NUC has three more network cards added to the embedded standard NIC. They have been obtained through the USB ports leveraging three adapter USB/Ethernet and the flings driver.  Please refer to the FLINGS website to get all info.

The procedure is composed of two main phases and this article will cover the first part.

Phase 1: Creating a customize ISO

Is this step required?

Oh well, it depends if the Standard ESXi VMware ISO has already the driver of your embedded network card inside. The standard ISO, unfortunately, does not contain the NUC8i7BEH network drive (it is named ne1000)

If you upgrade the ESXi through the standard ISO, the process fails with the error shown in picture 1.

Picture 1

How to get over it?

Before upgrading it, it’s necessary to know the driver used by the embedded NIC Card. If you don’t know it, please read the next instructions carefully (they are command launched on host ESXi you are going to upgrade):

1.   lspci -v | grep -A1 -i ethernet
take a note of the string composed of 4:4 values ( xxxx:yyyy)

2.   lspci -n | grep xxx:yyy
take a note of how the nic is named (in my case [vmnic0])

The next step is getting the name of the driver directly from the VMware website (Matrix compatibility).

From that web page, filling up the empty field with the value yyyy and filtering the result by IO Devices, it’s possible to get the device driver name.

For my LAB the result is shown in picture 2 where I highlighted the device driver name in yellow.

Picture 2

The last command to check if the driver is already installed (It should be present) is:

3.   vmkload_mod -l | grep “Device Driver”

In my case: vmkload_mod -l | grep ne1000
                          ne1000          1          352

Optional: if you use the USB ports to add more NIC, please uninstall the fling drivers before proceeding.

4.   esxcli software vib remove  –vibname=vmkusb-nic-fling (before vibname two scores –   –  )

It’s time to create our custom ISO

a- Download the offline bundle from VMware Site, for example:

VMware- ESXi-7.0U1c-17325551-depot.zip

b- Download the NUC ethernet driver for your device (ne1000 in my case).

I found an useful PowerShell script to get it:

#add the software repository
Add-EsxSoftwareDepot https://hostupdate.vmware.com/software/VUM/PRODUCTION/main/vmw-depot-index.xml
#define as variable the name of the driver
$vib = Get-EsxSoftwarePackage ne1000
$vib | select Name,Version | ft -AutoSize
$vib[4] | fl
#Get the driver
Invoke-WebRequest $vib[4].SourceUrls[0] -OutFile d:\pkg\ne1000_0.8.4-10vmw.700.1.0.15843807.vib

c- The PowerShell script to create a custom ISO is available on VMware Front Experience Site.

This great script has a lot of options; please refer to the official documentation to see how to create the ISO.

In my case I just launched the following command:

.\ESXi-Customizer-PS-v2.6.0.ps1 -v701 -izip D:\ISO\ESXi-7-0-1\VMware-ESXi-7.0U1c-17325551-depot.zip -pkgDir D:\pkg\ -OutDir D:\ISO\ESXi-7-0-1\ -nsc

d- The last step is creating a bootable USB pen using the just created custom ISO as a source.

I have chosen Rufus to perform this task.

In the next article, we are going to see the final step to upgrade the NUC

Unifi USG – VLAN and Routing Configuration

INTRODUCTION:

A virtual LAN (vLAN) is any broadcast domain that is partitioned and isolated in a computer network at the data link layer (OSI layer 2) (wikipedia)

vLANs works by applying tags to network frames and handling these tags in networking systems.

——

I love how USG has faced up the vLAN challenge.

Their starting point is working with vLAN as if it were a layer 3 object and not layer 2 of the OSI model.

The idea behind USG is thinking vLAN is a new LAN with a different IP Address”.  Are you a little bit confused? Yes? I also was at the beginning but now I’m enthusiastic of this new approach.

Let’s explain better with an example directly from my Lab Network.

In my Environment I needed to create 2 vLAN. The first one to address the iSCSI protocol and the second to manage the Backup traffic.

I chose #40 to point up iSCSI vLAN and #50 the Backup.

I went directly to USG user interface and created the vLANs from Network menu  as shown in figure 1, 2 and 3

Figure 1

Figure 2

Figure 3

The next step is enabling routing between the new networks and the original  LAN.

The task is performing selecting Switch ports from Profiles Menu.

As shown on figure 4 I set up  an easy rule to let the networks talk to “each other”. In this case LAN to iSCSI as Figure 4

Figure 4

Now the last step. Enabling traffic from and to the Networks. In a simple word I worked at Firewall level.

I spent some hours to understand the options the USG can offer to their customers because it’s possible to set up many rules to manage traffic among LAN (LAN-IN and OUT), WAN (WAN-IN and OUT), GUEST (IN and OUT) and LOCAL (WAN/LAN/GUEST)

Really many many options but with a little patience, you can tune your networks answering to any security design.

In this example, I just created rules to manage the traffic LAN IN (FIGURE 5 and 6)

https://lnx.gable.it/wp-content/uploads/2020/05/4-vlan.jpg

FIGURE 5

FIGURE 6

Before ending this article two more notes:

If you want to grant the Servers connected to LAN to surf on Internet,  you just  need to set up a LAN-IN and a LAN-OUT rule.

To work with vLAN you need to buy an Ethernet Switch vLAN compliant