Configurare OpenWebUI per generare allenamenti con RAG

Nei precedenti articoli abbiamo visto come funziona il Retrieval Augmented Generation (RAG) nel nostro laboratorio AI basato su Kubernetes.

In questo articolo vedremo come configurare OpenWebUI per permettere al modello di generare allenamenti di nuoto realistici utilizzando una knowledge base costruita con allenamenti reali.

Obiettivo: trasformare OpenWebUI in un assistente di coaching basato su AI.

Architettura del sistema

Il flusso di lavoro creato è il seguente:

Utente

OpenWebUI

RAG Engine

Qdrant (knowledge base)

Ollama (LLM locale)

Quando l’utente chiede di generare un allenamento:

  1. OpenWebUI interroga la knowledge base
  2. Qdrant restituisce i documenti più simili
  3. Il modello LLM utilizza quei documenti come contesto
  4. Viene generata una nuova seduta di allenamento

Preparazione della Knowledge Base

Il primo passo consiste nel caricare nella piattaforma gli allenamenti reali; nel nostro caso la libreria contiene diverse sedute organizzate per settimana:

week21_sessionA, week22_sessionB, week23_sessionC, week24_sessionA, week25_sessionB, week26_sessionA, week27_sessionA

Ogni documento contiene una seduta completa con la seguente struttura:

  • WARMUP
  • SENSITIVITY
  • TECHNIQUE
  • ACTIVATION
  • MAIN SET
  • COOLDOWN

Questi documenti costituiscono il corpus di conoscenza che il sistema utilizzerà per generare nuovi allenamenti.

Caricare i documenti nella sezione Knowledge

Dall’interfaccia di OpenWebUI:

  1. Aprire il menu laterale
  2. Selezionare Workspace
  3. Entrare nella sezione Knowledge
  4. Creare una nuova knowledge base

Nel mio lab dove le sessioni di allenamento sono specifiche per il nuoto la libreria è stata nominata swim_training_library.

Una volta creata la knowledge base è possibile caricare i documenti:

  • coach_training_rules.txt
  • week21_sessionA.txt
  • week22_sessionB.txt
  • week23_sessionC.txt

Durante l’upload OpenWebUI esegue automaticamente:

  • creazione degli embeddings
  • indicizzazione nel vector database Qdrant

In questo modo i documenti diventano interrogabili tramite ricerca semantica.

Creare un Prompt Skill

Una volta caricata la libreria è utile creare uno skill dedicato alla generazione degli allenamenti.

Gli Skills permettono di definire prompt riutilizzabili che guidano il comportamento del modello.

Nel nostro caso creiamo uno skill chiamato:

swim_workout_generator

All’interno dello skill possiamo inserire un prompt come il seguente.

“Generate a swim workout using the CSS methodology.

Rules:
– use only patterns from the knowledge base
– use zones A1 A2 B1 B2 C1 C2
– include sections:
WARMUP
SENSITIVITY
TECHNIQUE
ACTIVATION
MAIN SET
COOLDOWN
– total distance between 2000m and 2800m
– rest intervals between 10 and 30 seconds
– avoid generic descriptions”

Questo prompt permette di stabilizzare il comportamento del modello.

Collegare la Knowledge allo Skill

Durante la configurazione dello skill è possibile specificare la knowledge base da utilizzare.

Nel nostro caso selezioniamo:

swim_training_library

In questo modo ogni volta che lo skill viene utilizzato:

  • OpenWebUI esegue una ricerca nella knowledge base
  • i documenti più rilevanti vengono passati al modello

Questo è il cuore del RAG workflow.

Utilizzo dei Tools

OpenWebUI permette anche di aggiungere Tools.

I tools sono funzioni che il modello può richiamare per eseguire operazioni esterne.

Nel laboratorio verranno utilizzati per:

  • generare allenamenti
  • convertire gli allenamenti in formato Garmin
  • esportare i workout

Ad esempio nel prossimo step verrà aggiunto un tool Python per generare file di tipo .tcx compatibili con Garmin Connect.

Creare una Workspace dedicata

Per organizzare il lavoro è utile creare un workspac dedicato.

Ad esempio: AI Swim Coach

All’interno della workspace possiamo raccogliere:

  • la knowledge base degli allenamenti
  • gli skills di generazione
  • i tools di esportazione

Così facendo possiamo trasformare OpenWebUI in un vero ambiente di coaching AI.

Test del sistema

Una volta completata la configurazione possiamo testare il sistema.

Ad esempio con una richiesta come:

“Generate a 2500m swim workout using the CSS training methodology”.

Il sistema recupererà i documenti più rilevanti dalla libreria e produrrà un nuovo allenamento coerente con gli esempi reali.

NB: Il file coach_training_rules.txt è quello che spiega al modello come ragiona l’allenatore. Non contiene allenamenti, ma le regole del metodo

  • come sono strutturate le sedute
  • cosa significano le zone
  • quali esercizi sono ammessi
  • che stile deve avere l’allenamento

NUC upgrade to ESXi 7.0.1 – Part 2

Phase 2: Upgrading ESXi Host

In the previous article, I described how to prepare a customized ISO. If you lost it please click on this link.

Let’s continue!

Requirements: the task I performed before starting the procedure here described has been the vCenter upgrade to 7.0.1-c. I remind you that my starting point was Esxi 7.0.0.b that is fully supported by vCenter 7.0.1-c.

There are two main ways to upgrade the ESXi Hosts.

The first is related to the use of a VMware feature. It’s the vSphere Lifecycle Manager (vLCM) and you can taste part of its potential by watching this video guide.

Instead, I preferred to use an old approach working with a bootable USB pen with the custom ISO prepared in the previous article. The steps are:

1. Shutdown ESXi Hosts
2. Remove the USB-NIC
3. Insert the Pen Drive with custom ISO
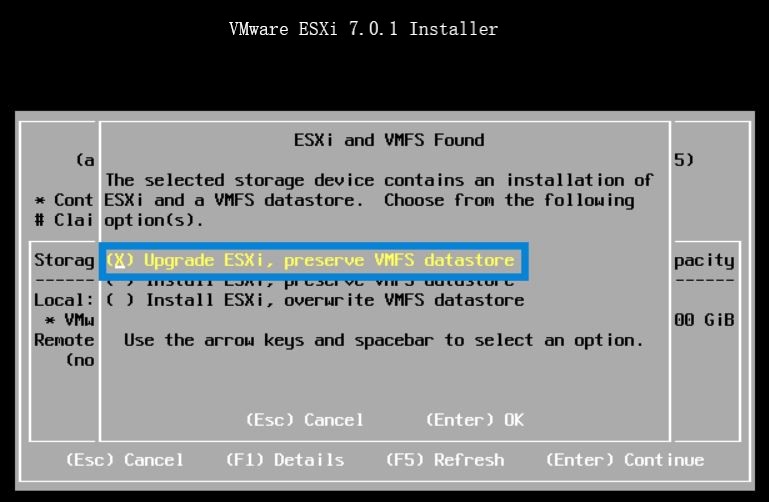
4. Upgrade the host following the wizard (The main point is shown in Picture 1)

Picture 1

5. Reboot the host.

6. Now it’s time to install the USB-Nic Driver. It is available from “USB Network Native Driver for ESXi” web site and this article allows me to say thx to the excellent job of  Songtao Zheng and William Lam

Before proceeding please read the instruction carefully and DO NOT insert all the USB cards together. (I have got three USB-NIC cards)

Why? Because during the procedure, I have had more than one purple screen and after a deep analysis I discovered that it depended on the USB-NIC cards.

To get over this issue I created the following procedure.

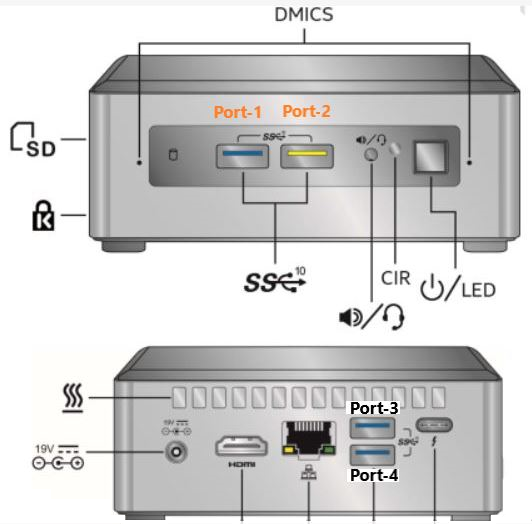
Picture 2

7. Switch off the ESXi NUC and insert the first USB-NIC card in port-1 and the second in port-4 (please refer to picture 2 to know the nomenclature of the port)

8. Now switch on the NUC and check if it boots correctly.

9. Switch off the NUC and insert the third USB-NUC on port-2.

10. Reboot NUC and check if it works as aspected.

Before ending this article I suggest creating a map between vmks and the physical MAC Address of the USB NIC. The main advantage is that it allows maintaining the same vmkusb address after a reboot also.

Some useful commands:

To Identify the Mac Address:
# esxcli network nic list |grep vusb |awk ‘{print $1, $8}’

To Check persisting binding:
# esxcli system module parameters list -m vmkusb_nic_fling

NUC upgrade to ESXi 7.0.1- Part 1

Last weekend I upgraded all my Servers to the last VMware ESXi release (7.0.1 C) and this article is meant to describe all steps I performed.
Just a recommendation before starting. I worked in my lab that it’s not a production environment.

MyLAB before upgrade:

  1. NUC8i7beh2
  2. VMware ESXi 7.0.0 (Build 16324942)
  3. Every NUC has three more network cards added to the embedded standard NIC. They have been obtained through the USB ports leveraging three adapter USB/Ethernet and the flings driver.  Please refer to the FLINGS website to get all info.

The procedure is composed of two main phases and this article will cover the first part.

Phase 1: Creating a customize ISO

Is this step required?

Oh well, it depends if the Standard ESXi VMware ISO has already the driver of your embedded network card inside. The standard ISO, unfortunately, does not contain the NUC8i7BEH network drive (it is named ne1000)

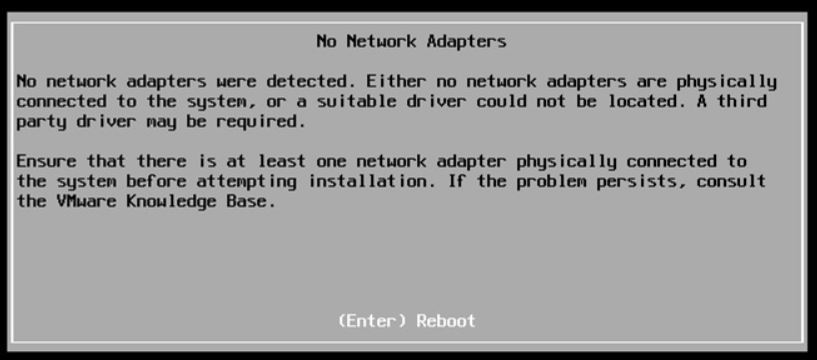
If you upgrade the ESXi through the standard ISO, the process fails with the error shown in picture 1.

Picture 1

How to get over it?

Before upgrading it, it’s necessary to know the driver used by the embedded NIC Card. If you don’t know it, please read the next instructions carefully (they are command launched on host ESXi you are going to upgrade):

1.   lspci -v | grep -A1 -i ethernet
take a note of the string composed of 4:4 values ( xxxx:yyyy)

2.   lspci -n | grep xxx:yyy
take a note of how the nic is named (in my case [vmnic0])

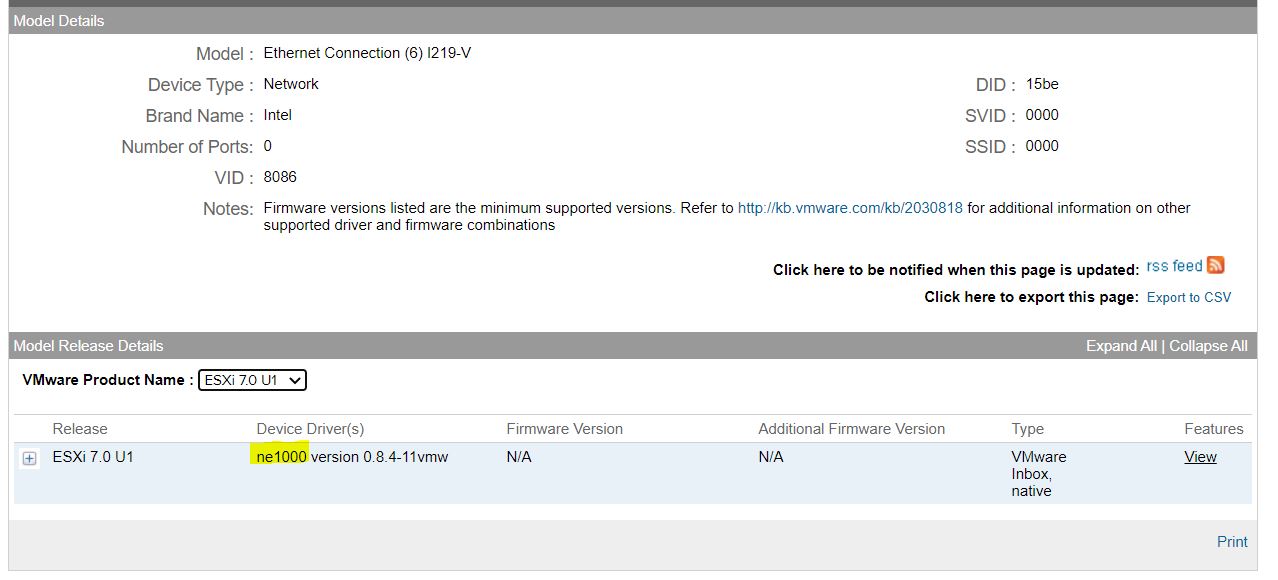
The next step is getting the name of the driver directly from the VMware website (Matrix compatibility).

From that web page, filling up the empty field with the value yyyy and filtering the result by IO Devices, it’s possible to get the device driver name.

For my LAB the result is shown in picture 2 where I highlighted the device driver name in yellow.

Picture 2

The last command to check if the driver is already installed (It should be present) is:

3.   vmkload_mod -l | grep “Device Driver”

In my case: vmkload_mod -l | grep ne1000
                          ne1000          1          352

Optional: if you use the USB ports to add more NIC, please uninstall the fling drivers before proceeding.

4.   esxcli software vib remove  –vibname=vmkusb-nic-fling (before vibname two scores –   –  )

It’s time to create our custom ISO

a- Download the offline bundle from VMware Site, for example:

VMware- ESXi-7.0U1c-17325551-depot.zip

b- Download the NUC ethernet driver for your device (ne1000 in my case).

I found an useful PowerShell script to get it:

#add the software repository
Add-EsxSoftwareDepot https://hostupdate.vmware.com/software/VUM/PRODUCTION/main/vmw-depot-index.xml
#define as variable the name of the driver
$vib = Get-EsxSoftwarePackage ne1000
$vib | select Name,Version | ft -AutoSize
$vib[4] | fl
#Get the driver
Invoke-WebRequest $vib[4].SourceUrls[0] -OutFile d:\pkg\ne1000_0.8.4-10vmw.700.1.0.15843807.vib

c- The PowerShell script to create a custom ISO is available on VMware Front Experience Site.

This great script has a lot of options; please refer to the official documentation to see how to create the ISO.

In my case I just launched the following command:

.\ESXi-Customizer-PS-v2.6.0.ps1 -v701 -izip D:\ISO\ESXi-7-0-1\VMware-ESXi-7.0U1c-17325551-depot.zip -pkgDir D:\pkg\ -OutDir D:\ISO\ESXi-7-0-1\ -nsc

d- The last step is creating a bootable USB pen using the just created custom ISO as a source.

I have chosen Rufus to perform this task.

In the next article, we are going to see the final step to upgrade the NUC