The DR plan is a sum of more Orchestration plans. This article is going to explain how to create them.
Just a small and important note before continuing: it’s mandatory to have already completed the steps described in the last article.
Let’s start!
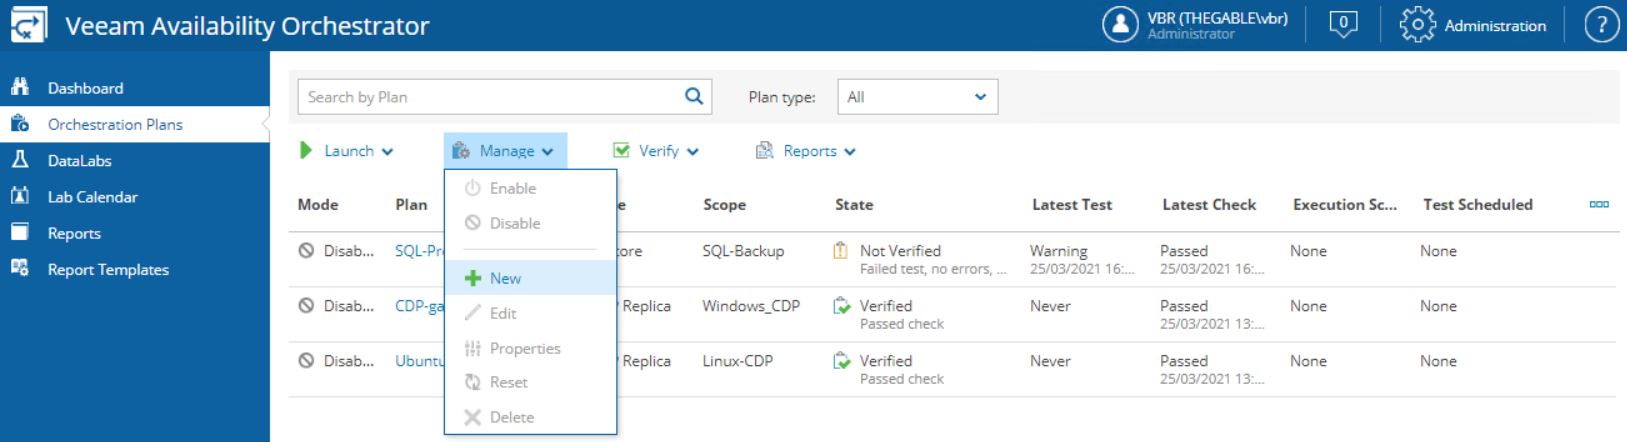
From the main menu of the VAO server select the Manage button.
Now click on New as shown in picture 1.
Picture 1
The easy wizard is going to ask to choose a scope.
In our example, we use Linux-CDP as shown in picture 2.
Picture 2
Now fill up the plan info with the Plan Name, the description, the contact name of the plan (picture 3),
Picture 3
Select the type of Plans. In this article choose the CDP replica (picture 4)
Picture 4
In the next step please check if the correct “VM Group” appears.
If it doesn’t, it’s necessary to go back to the setup phase (please read the previous article) and fix the issue.
In our example, it appears correctly (Ubuntu-CDP) as shown in the next two pictures (5 and 6).
Picture 5
Picture 6
The next step shows the VM Recovery options (picture 7).
It gives the operator control of the plan. For example, stopping the plan if something goes wrong.
Picture 7
In “New VM Template” menu the VAO user can add additional steps to the orchestration process; for example, starting the CDP replica job first and shut down the source VMafter (Picture 8)
Picture 8
Tips I: I created a customized script to change the IP Address of the VM.
Tips II: it’s possible to set up the accesscredential directly from this page by clicking the button on the bottom of the page. It is available for Windows VM only.
The next step defines the RTO & RPO.
The most important thing to remember here is that the RPO has to be equal or major than the RPO set in the CDP replica job (picture 9).
Picture 9
The last steps define when the plan report shall be automatically generated (picture 10) and if the readiness check has to run at the end of every single wizard (recommended option) (picture 11).
Picture 10
Picture 11
The result is shown in picture 12
Picture 12
The next article is going to be a video to see VDrO in action.
In this article, I’m going to show you how to set up an orchestration plan using as a source a CDP replica Job.
This article will not cover how to create and run a CDP replica job from VBR console. If you need a guide please refer to the official guide.
There are four main parts:
Create a Business Category
Setup the Environment
Create an Orchestration Plan
Launch the Orchestration Plan
The first and the second topics will be described in this article. The third and the fourth ones in the next articles.
A. To create a business category for CDP replica, just open the Veeam ONE interface from the VAO server (picture 1).
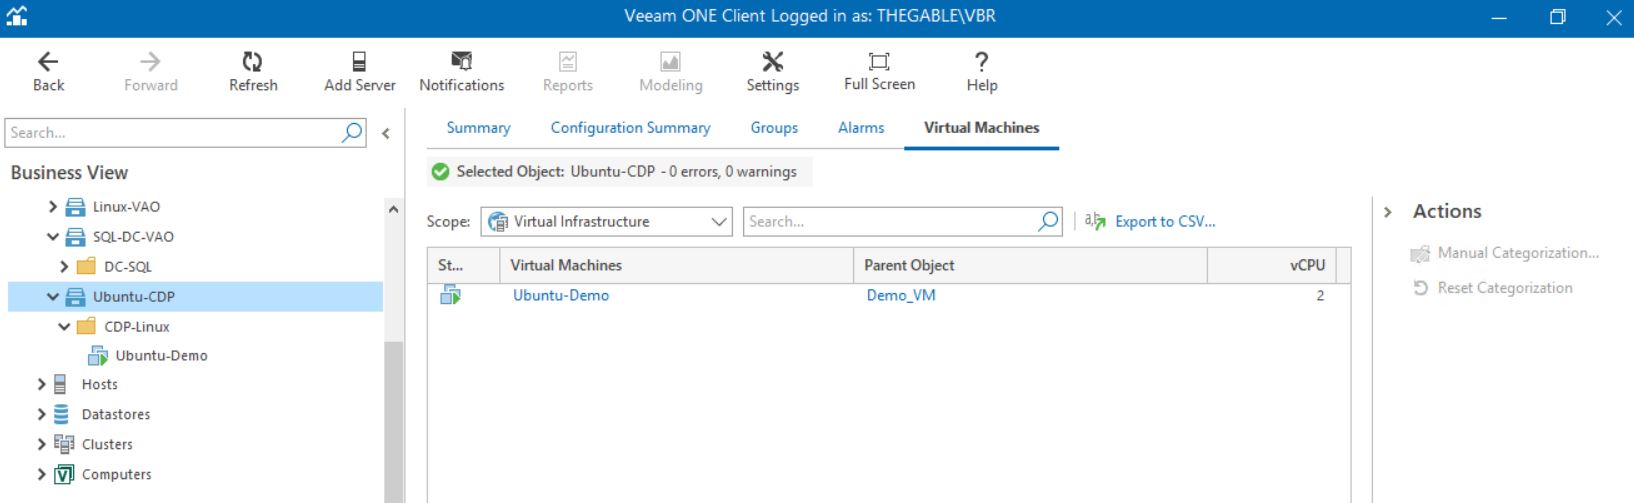
In this example, the business category is called Ubuntu-CDP , the resource group is called CDP-Linux (Picture 2).
Picture 1
Picture 2
B. After opening the VAO web interface it’s necessary to follow the next four steps.
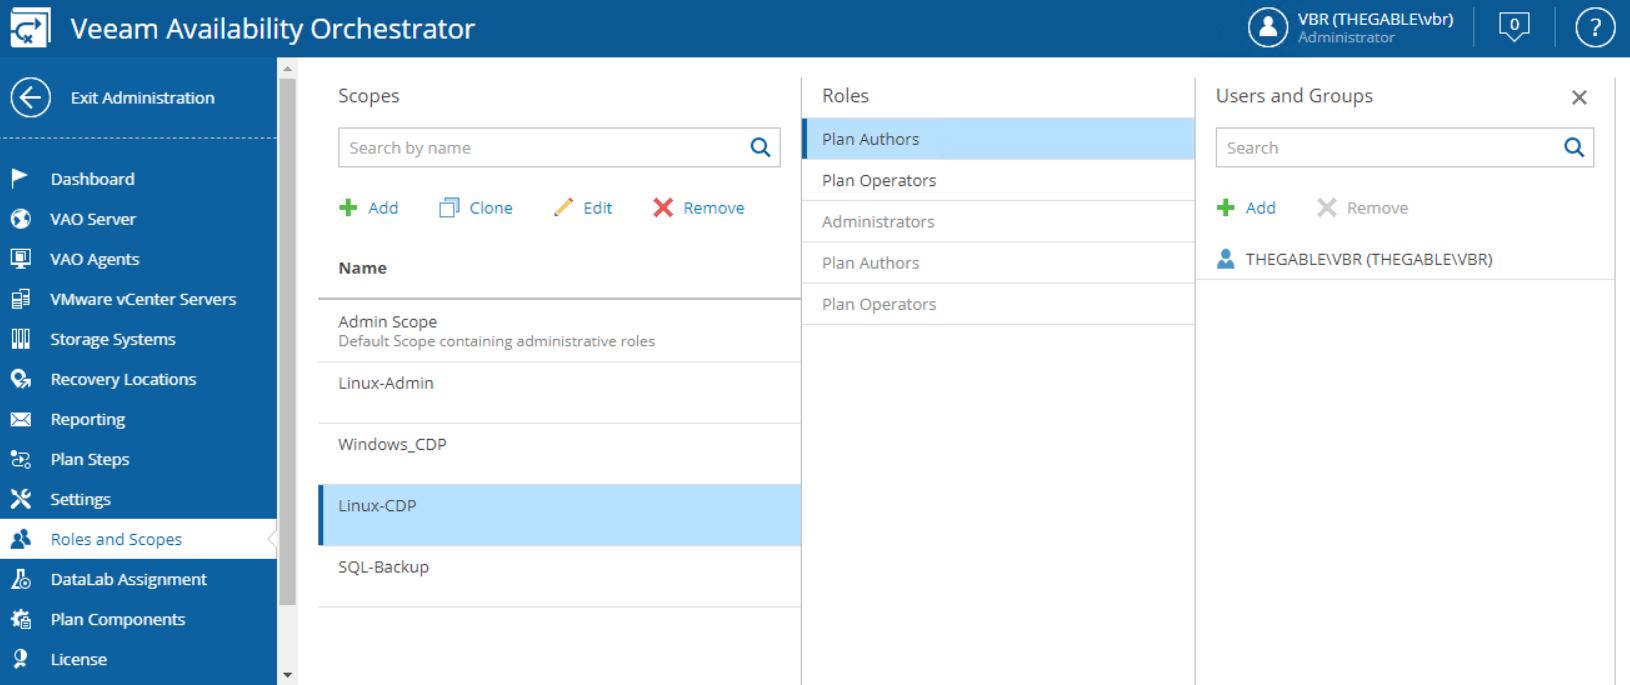
1. Add a Role and Scope (picture 3).
In my example, the scope is named Linux-CDP.
The plan Author/Operator is VBR.
Picture 3
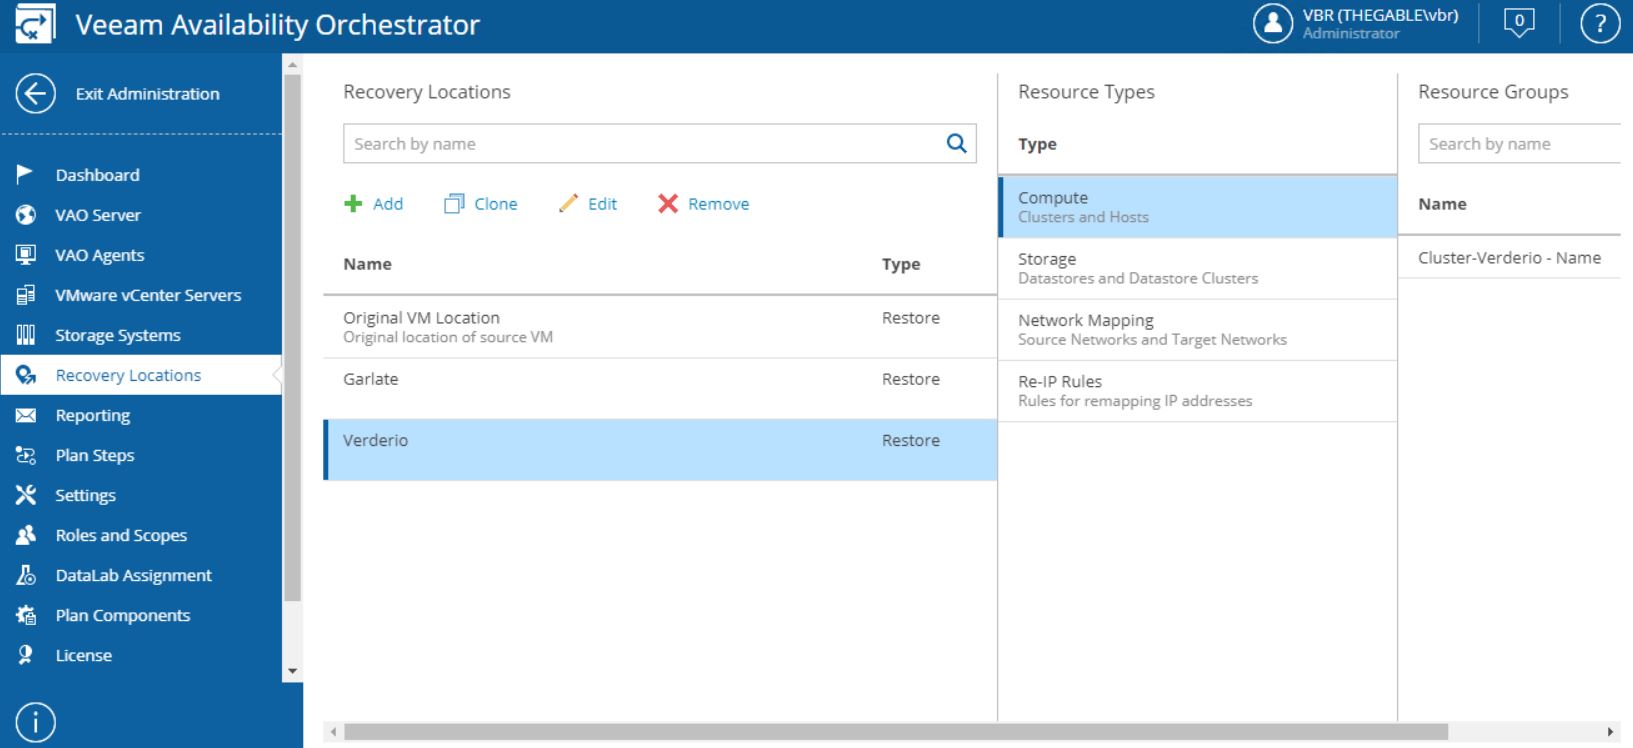
2. Add or modify the Recovery Location (picture 4).
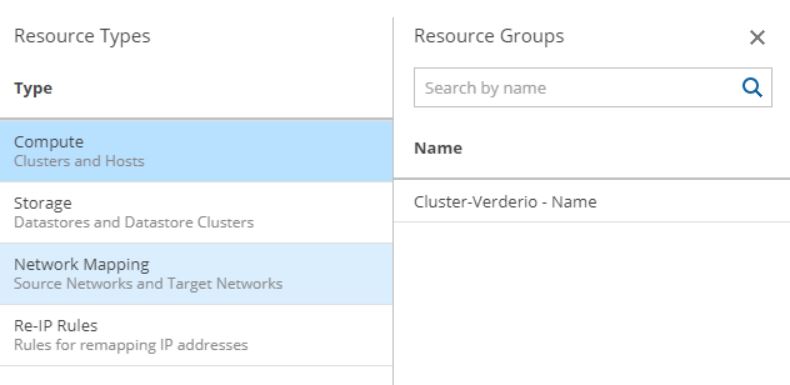
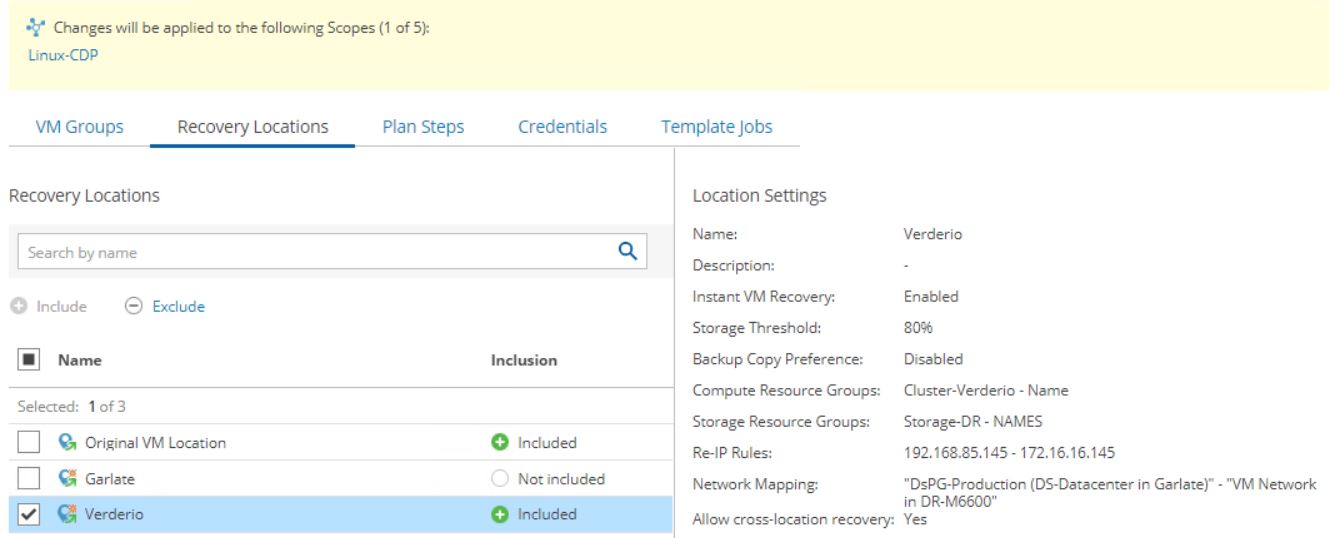
In my example, the recovery location is Verderio and has the Cluster-Verderio as Compute resource (Picture 5).
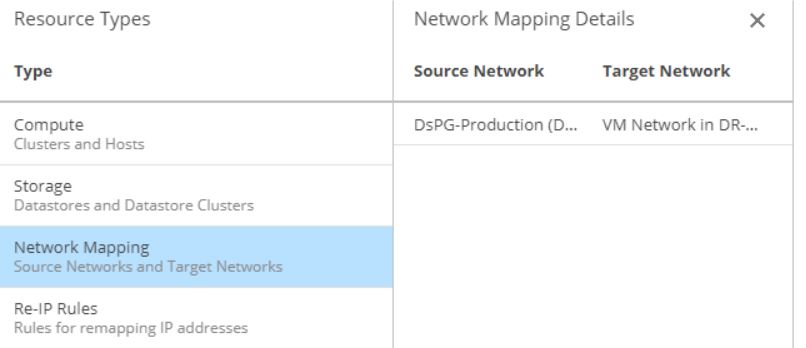
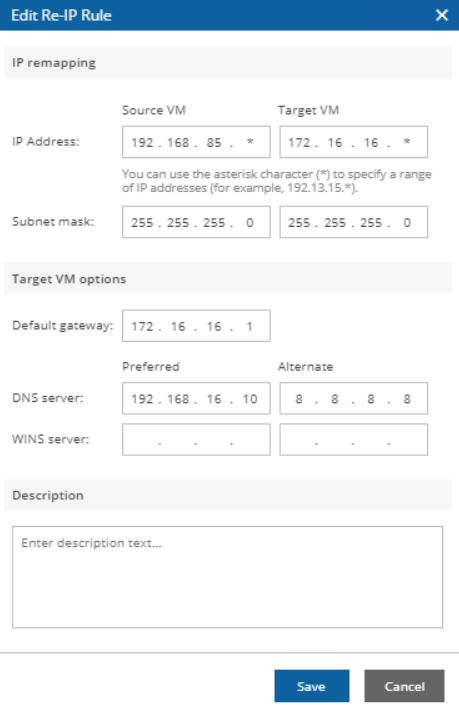
Pictures 6 and 7 show how to remap the Networking and how to set up the changing IP address rules.
Picture 4
Picture 5
Picture 6
Picture 7
Note1: The Re-IP feature is available just for Windows VMs (please have a look at the official documentation to get all detail (user guide). For Linux VMs it’s necessary creating a custom script.
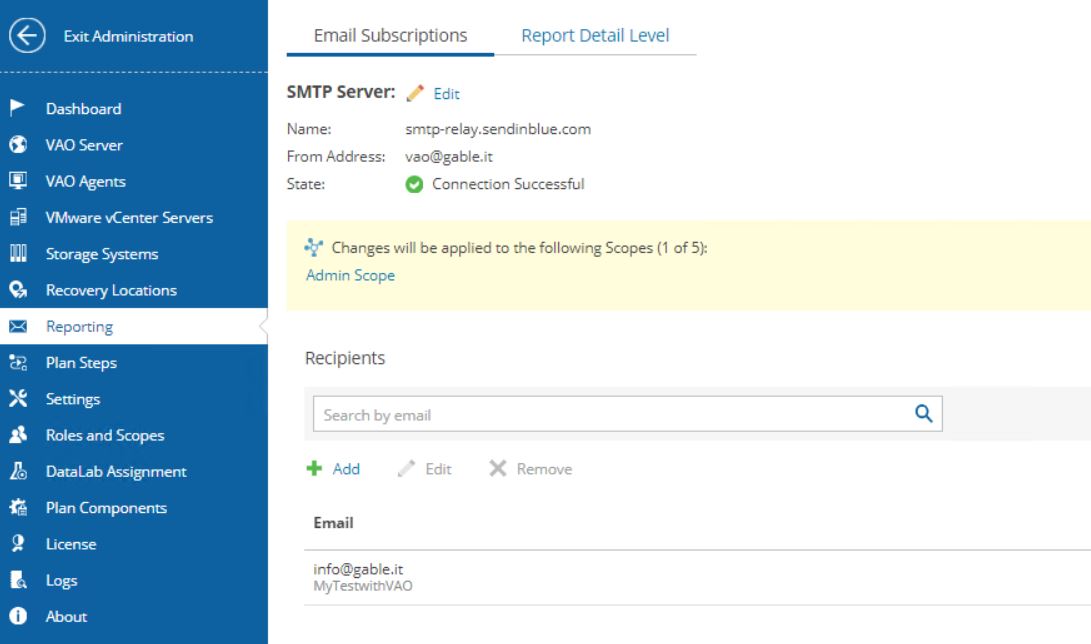
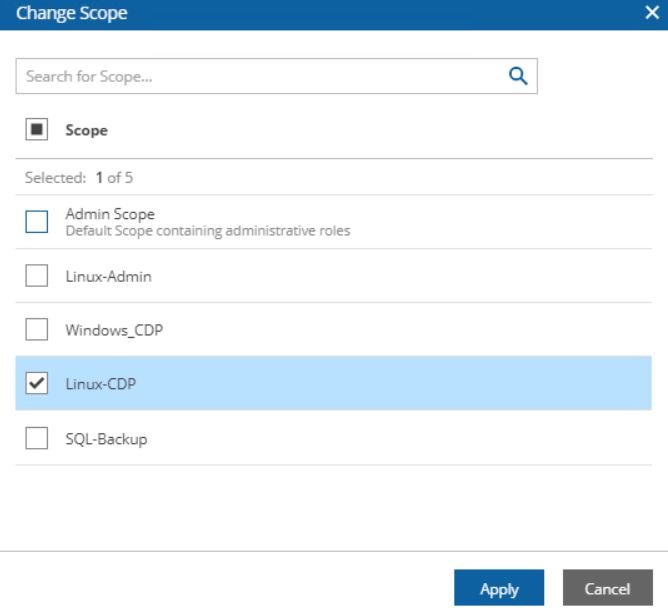
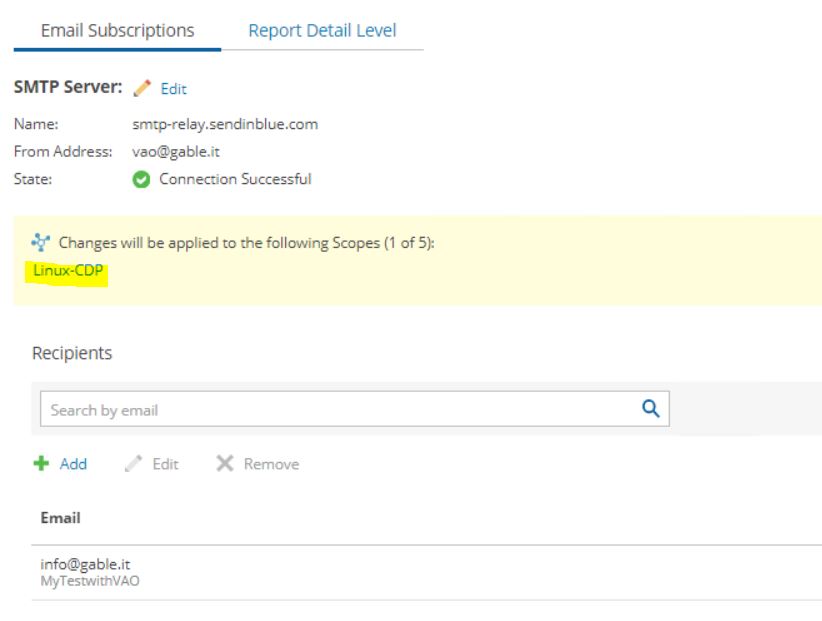
3. Reporting
Pictures 8, 9, and 10 show how to assign the Linux-CDP scope to your custom reports.
Picture 8
Picture 9
Picture 10
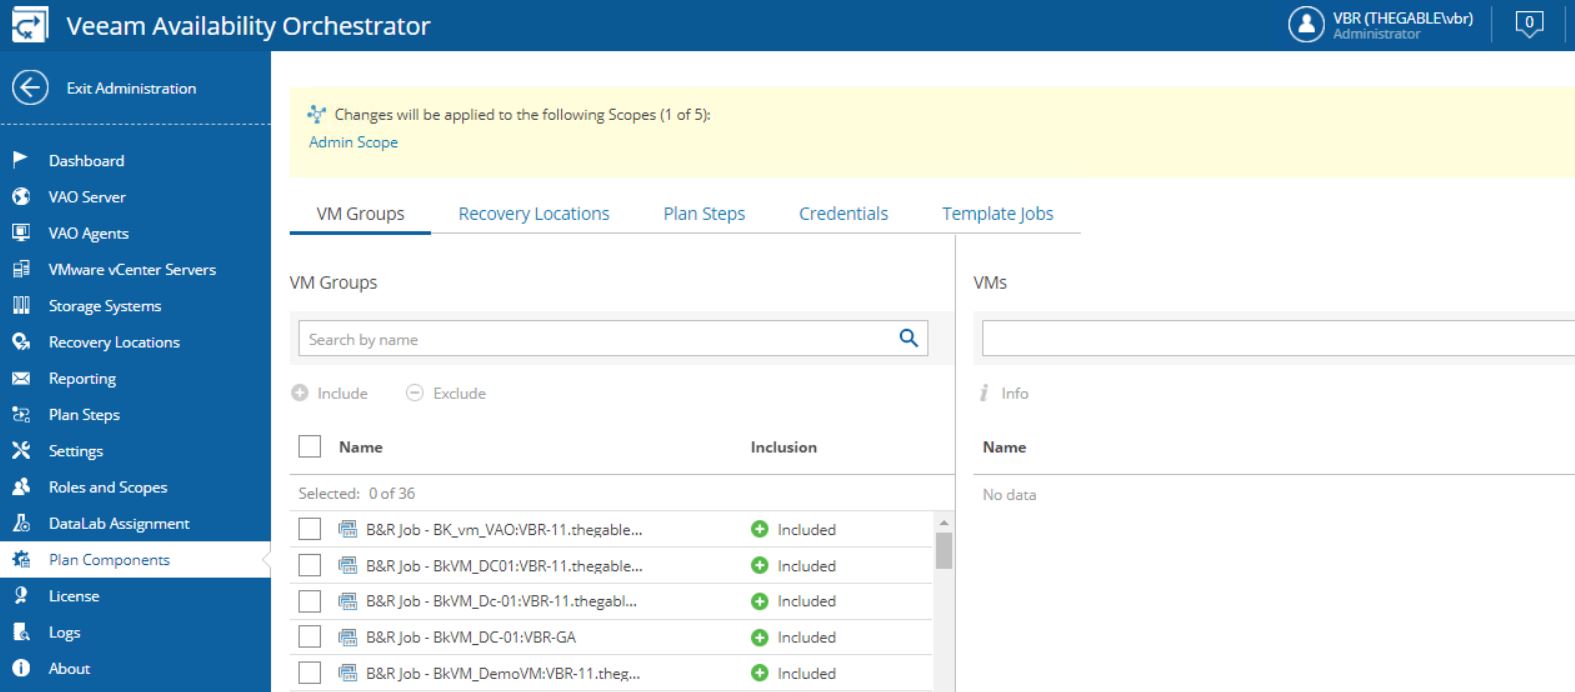
4. Assign the plan Components
Picture 11
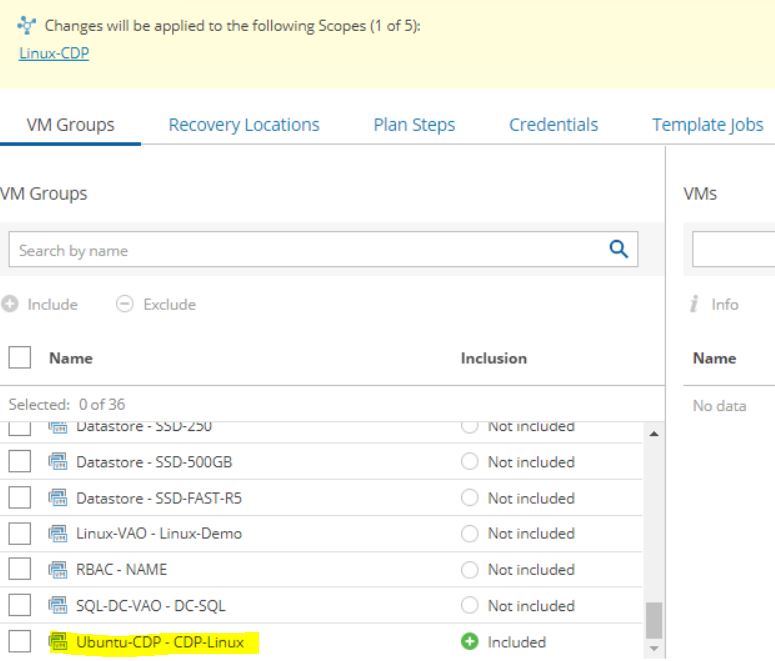
Picture 12 shows how to add the VM group called Ubuntu-CDP to the scope Linux-CDP.
Picture 12
Picture 13 shows how to add a recovery location, i.e. Verderio.
Picture 13
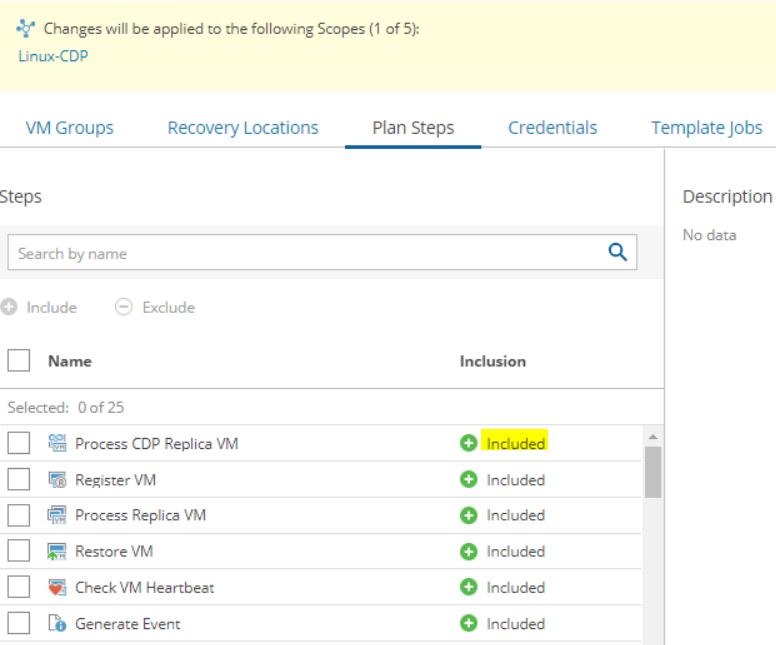
Picture 14 shows how to add the plan steps to the orchestration plan (In my example I included all the plan steps).
Picture 14
The next article shows how to create an Orchestration Plan and run it.
Suggestion: If you can’t wait and want to do it immediately, just read the previous articles 🙂
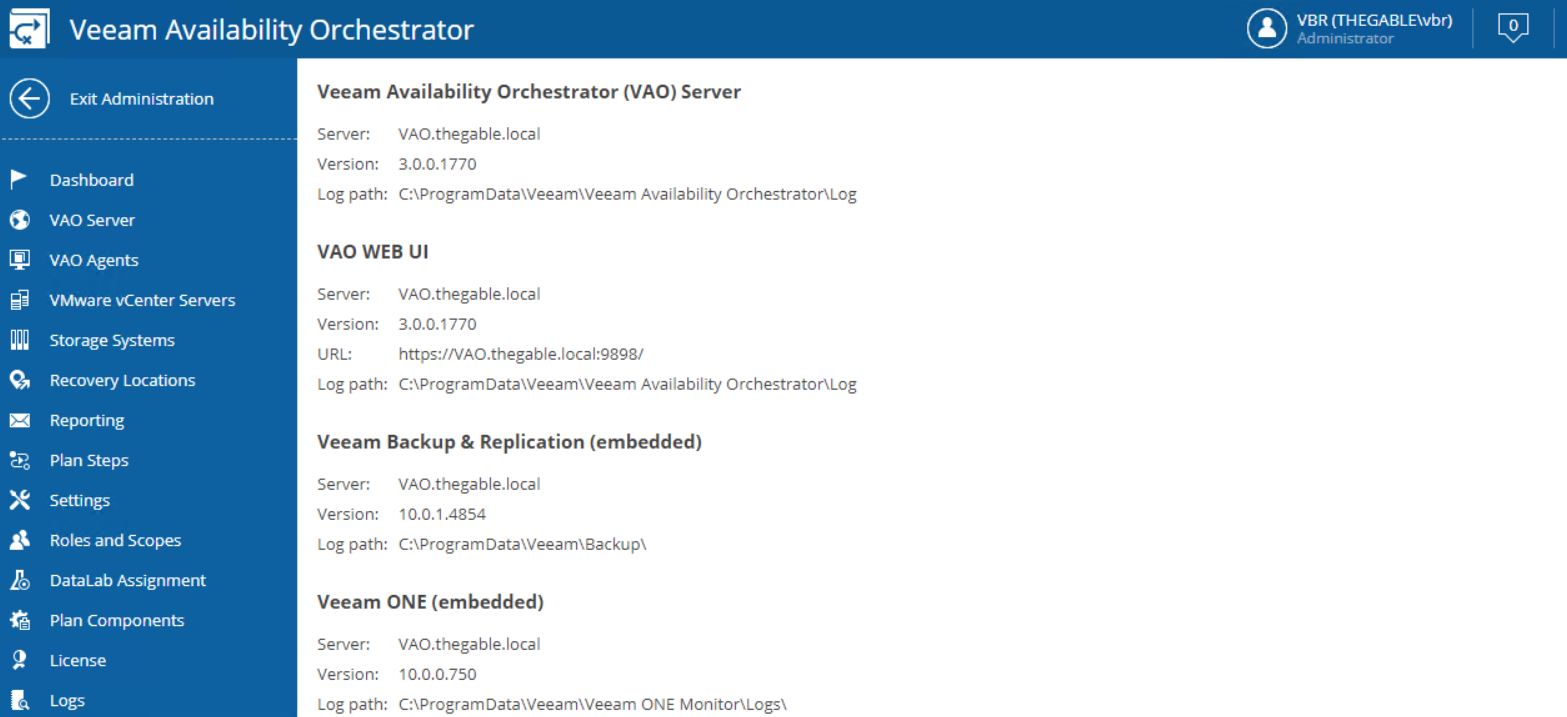
Before proceeding please check that the VAO current version on the server is 3.0 (picture 1).
Picture 1
After downloading the ISO file from the Veeam website and mounting it (picture 2)
Picture 2
just select the “Setup” voice; the wizard immediately begins the upgrade (picture 3).
Picture 3
Please check that the previous version of VAO has been discovered. If so the upgrade button is available (picture 4).
Picture 4
The setup checks if Visual C++ 2019 Redistributable package is already installed. If not it will automatically be deployed. This procedure requires the server reboot (pictures 5 and 6).
Picture 5
Picture 6
After reboot is completed, relaunch the setup. The wizard will show which components will be automatically upgraded (picture 7).
picture 7
Now the wizard will ask for a valid license (picture 8) and will install the missing components (Pictures 9 and 10).
Picture 8
picture 9
picture 10
The next steps are about the Veeam Databases.
The wizard will ask to connect to them and update the VBR one if necessary (pictures 11 and 12).
Picture 11
Picture 12
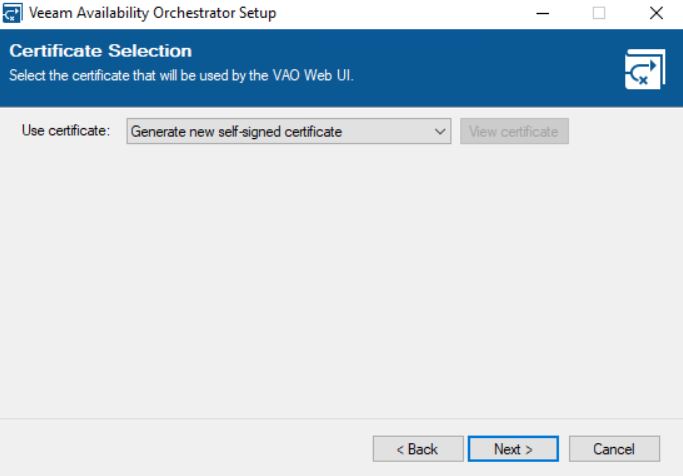
The main point of the upgrade procedure is the certification step.
As shown in picture 13, the wizard will ask the VAO administrator which certificate to use. It can be a self-signed and autogenerated or an own certificate created from an external authority.
My suggestion is to ask your security specialist to know which is the best choice for your company.
Picture 13
Picture 14
Clicking on the install button it will complete the upgrade wizard as shown in pictures 15 & 16.
Picture 15
Picture 16
After upgrading please check the versions of VAO (4.0.0.2088), VBR (11.0.0.837), ONE (11.0.0.1379) now installed.
Just a note before ending the article: has already said, VAO (Veeam Availability Orchestrator) has changed its name to VDrO (Veeam Disaster Recovery Orchestrator).
The web pages of the product still show the old name. It will be updated in the next release.
The scope is recapping the different technology available for NAS backup pointing in which scenario they can be adopted.
The following table has the scope of helping and discovering which VBR technology can better fit with the NAS protection service.
Technology
v.11 and later NAS Backup
File to Tape
NDMP
Backup to Disk
Yes
No
No
Backup to Tape
No
Yes
Yes
Restore Files
Yes
Yes
No
Restore Entire NAS
Yes
Yes
Yes
Speed Backup
High
Low
Medium
Speed Restore
High
Low
Medium
Second copy
Yes to Disk
v.11 (Tape cloning)
v.11 (Tape cloning)
Archiving copy
Yes
No
No
Immutability
v.11 (Hardened Repository)
Yes
Yes
Object Storage
Yes
No
No
Scheduling
Yes
Yes
Yes
Licensing
VUL
Any
Enterprise Plus
Table 1
An example:
Your managers are asking for a NAS backup architecture able to answer very astringent requests of backup and restore.
Watching table 1 and looking for the word speed it is possible to assess which VBR technology can answer the request of your managers better (in this case v.10 and later NAS backup).
Note-1: For sure the table can be improved by adding more details.
Note-2: The second tape copy and harden repository will be available with VBR v.11. Further details are available on the following web pages:
knowing local account’s credential (remote computer)
Important Note: File copy is a copy. It means that if you launch the same job twice, the second time it will delete the files previously saved. It’s like launching two times a copy command without changing any option. To be clearer, it’s not a backup so it can not manage retentionpolicy, nor deduplication/compression.
Note-4: I don’t know if this scenario is supported by Veeam, open a ticket before proceeding.
The following video will explain the steps to set up the environment, perform backup and restore (ps-tools are located to c:\Users\VBR\Desktop\PStools)
This article’s topic is how to set up and work VBR when it is combined with the NDMP protocol.
This type of configuration is part of the category “file to tape” I treated in my last article “A flexible file backup Strategy – Part 2”.
One more note before starting: VBR requires NDMP version 4 and later.
How does it work?
Picture 1
The architecture is quite easy.
Files are gathered from the File Server through the data mover present on the Gateway server. Then they are sent to the Tape Server that performs the write on Tape.
The Datamover installed on Tape Server has the ownership of managing the data traffic to Tape Device.
VBR has the task of enumerating the Volumes and launch the command to Tape Devices.
Point-1: VBR works with a 3 layer backup architecture. It means there is nodirect connection betweenFile Servers and Tape Devices. All Data have to pass through the tape Sever.
In this article, I’m not covering the procedure to set up the NAS correctly. Please ask your storage vendor specialist to get all details needed.
How to add the NDMP server to VBR and set up a backup job?
The next video will answer the question.
Video 1
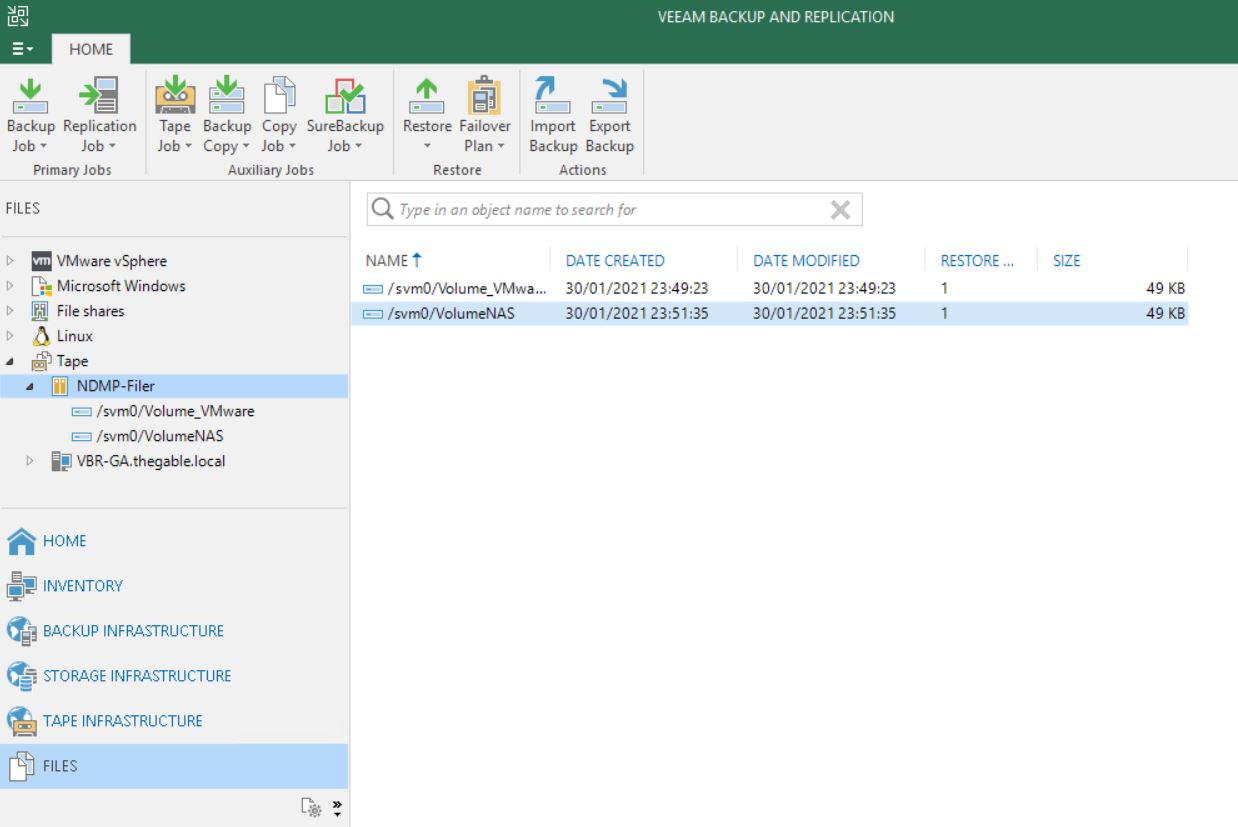
After the backup is completed how to perform a restore?
NDMP backup files are available to perform restores from the FILE menu at the voice Tape and then NDMP as shown in picture 2
Picture 2
Please have a look at the next short video (video 2) to see the easy step to perform a restore.
Video 2
Point-2: The backup chain stored on tapes will consist of 10 restore points maximum. On the 11th run, VBR will force an active full.
Common scenarios
One of the main characteristics of NDMP backup is that it allows to perform backup and restore of entire volumes.
The most common scenario is the Disaster Recovery of the entire Filer. Imagine the case in which the customer NAS filer is completely out of order and the only way to restart the file sharing service is formatting all the disks and then restoring the volumes (or the worst case is getting a new NAS).
In this case, NDMP volume restores from tape is an excellent low-cost solution.
Main Pro:
NDMP servers backup to tape is available in the Enterprise Plus Edition of VBR.
It means that there is no limit on the amount of data that can be saved. Could be 1 TB or 100 PB it doesn’t matter.
Veeam Universal License (VUL) has the Enterprise Plus Edition available. Is it time to move your old sockets license to the subscription model (VUL)?
Cons:
The granular restore (files and folders) it’s not an available option with VBR and NDMP backup.
Please note that NAS backup is now completely supported by VBR (please refer to article 1 of this series) and it’s the fastest way to perform the granular restores.
Point-3: Even if the NAS device supporting NDMP protocol is already added to VBR, you need to add the NDMP server as a separate procedure. Otherwise, you will not be able to perform file backup to tape.
The next article will cover a recap of the different techniques and show a hidden gem of VBR.

 Picture 1
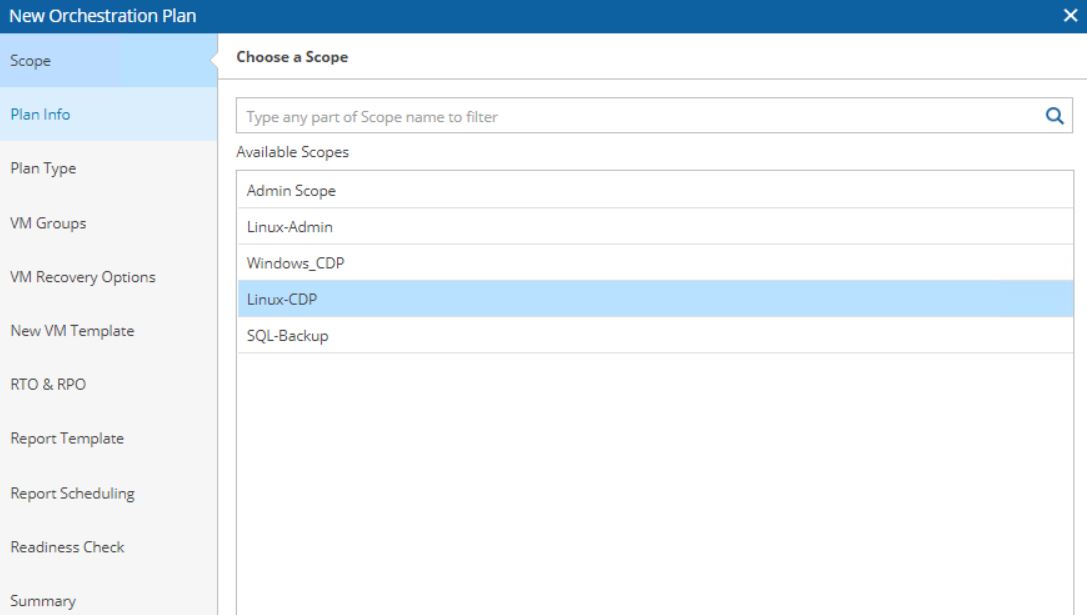 Picture 2
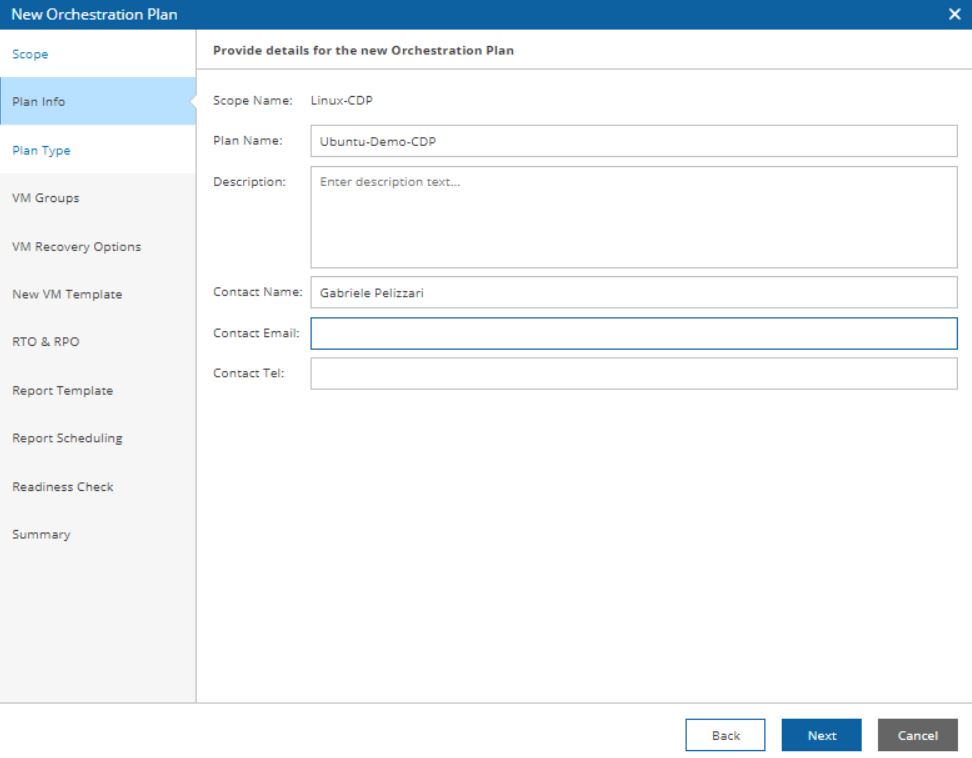 Picture 3
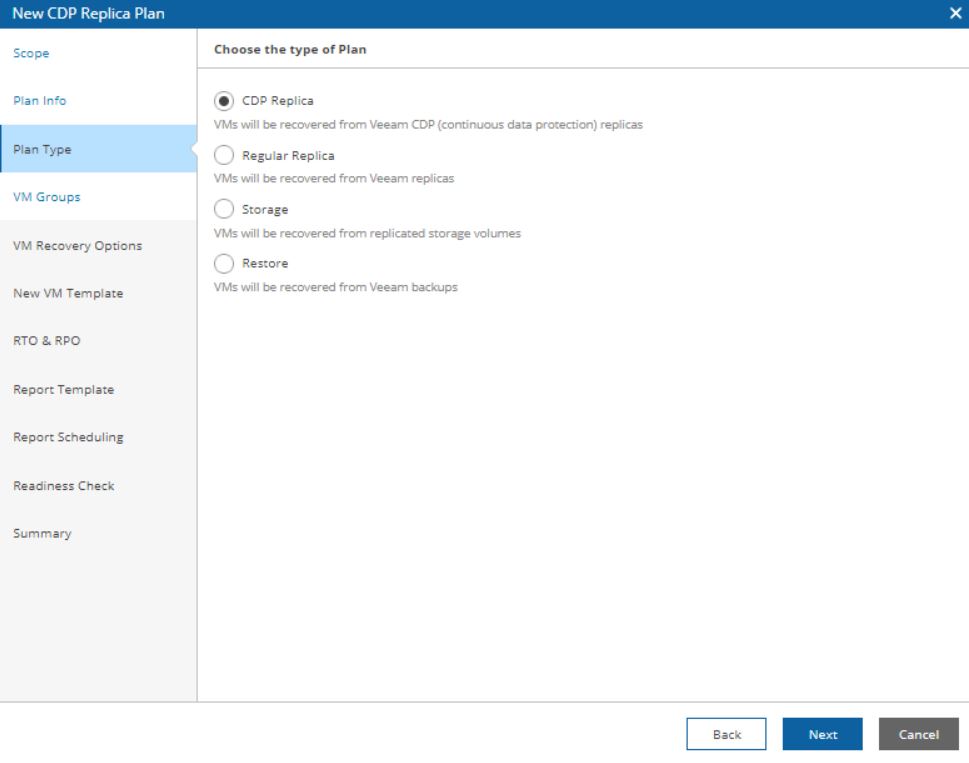 Picture 4
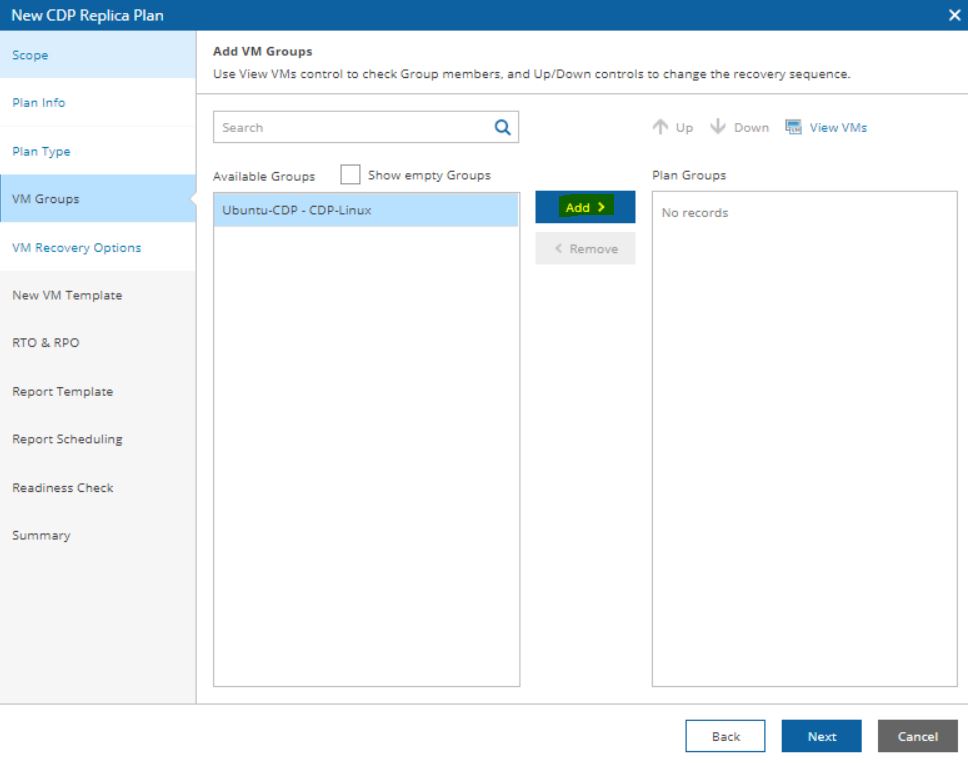 Picture 5
 Picture 6
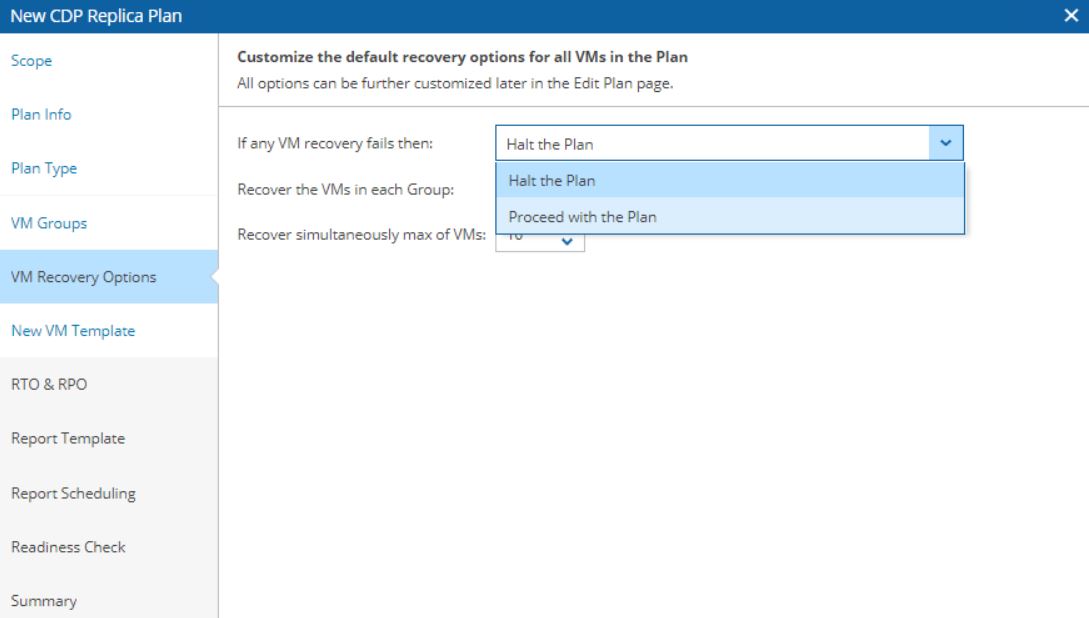 Picture 7
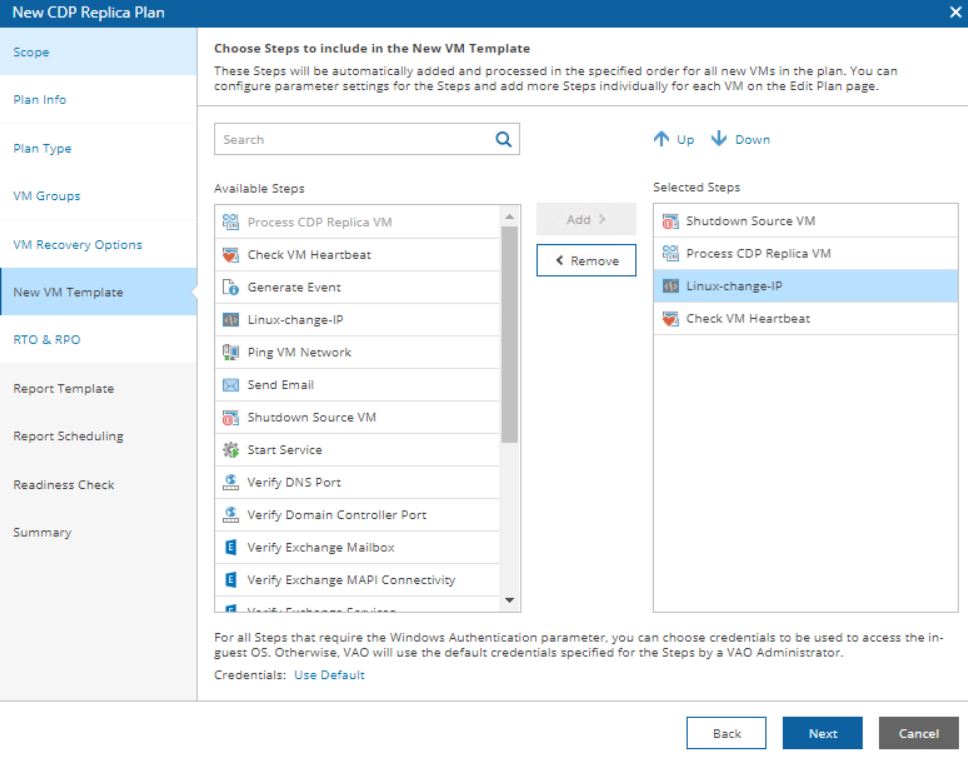 Picture 8
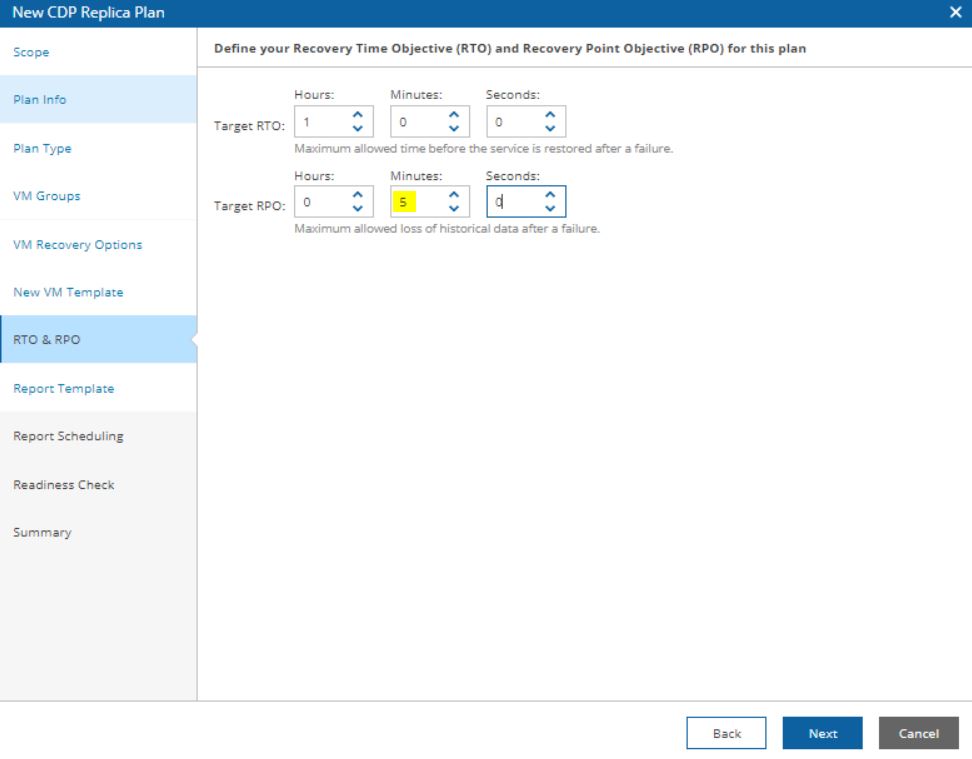 Picture 9
 Picture 10
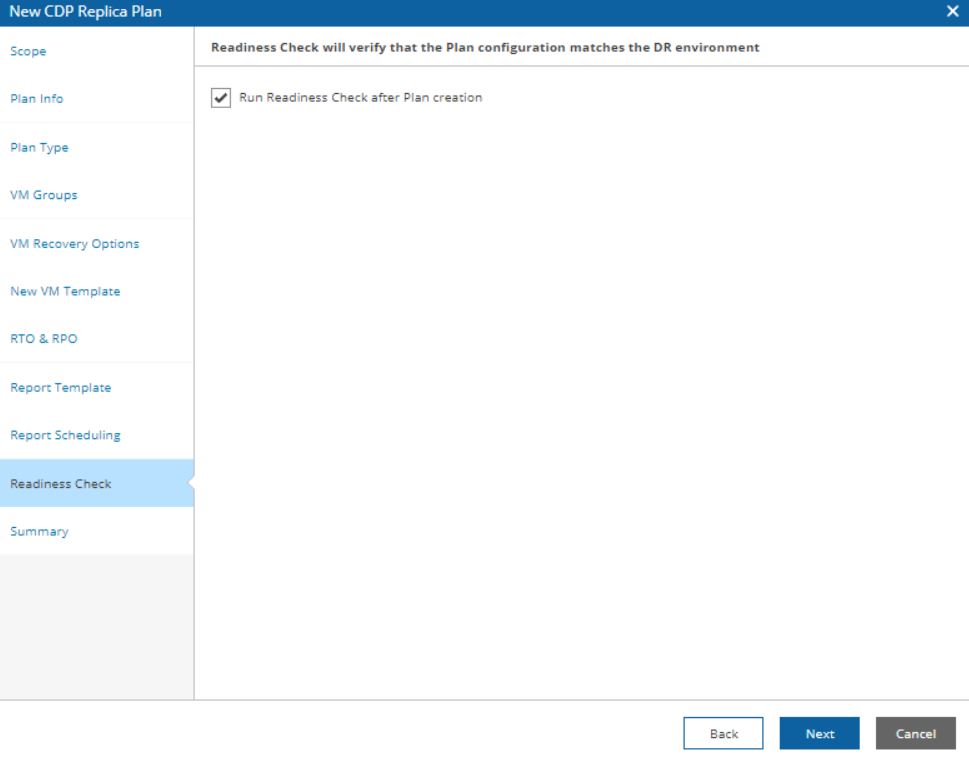 Picture 11
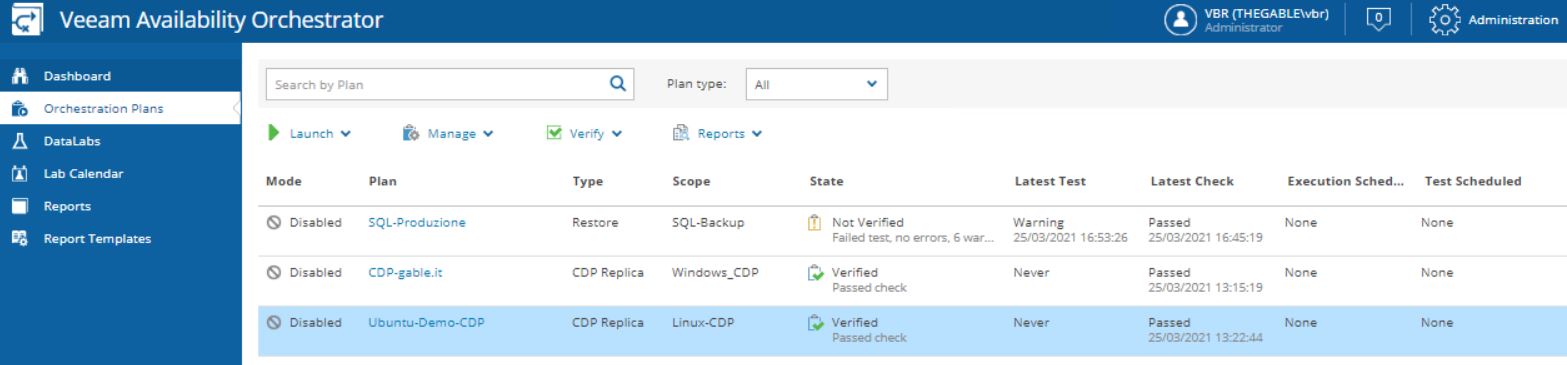 Picture 12
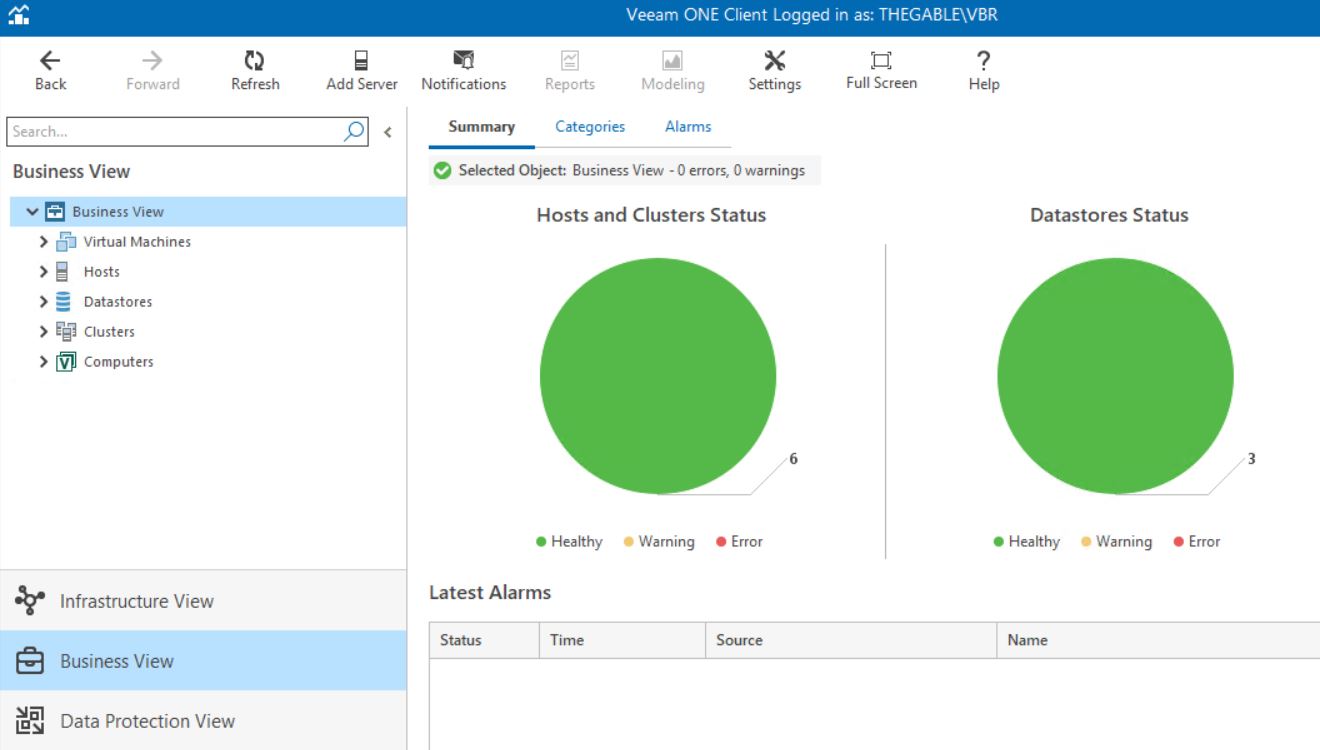
 Picture 1
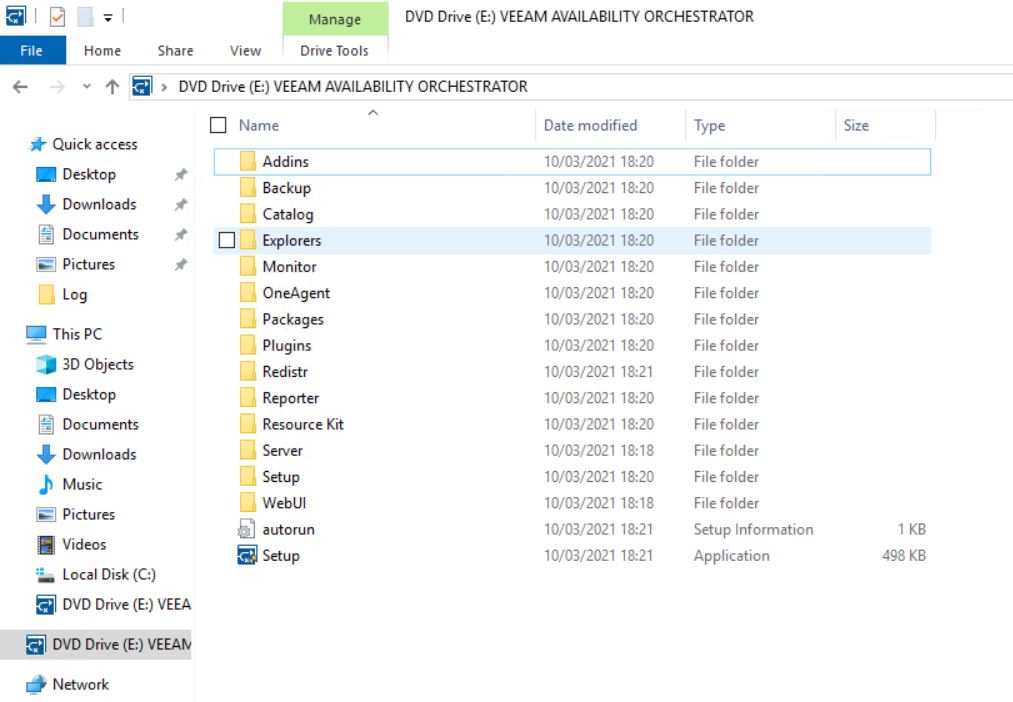 Picture 2
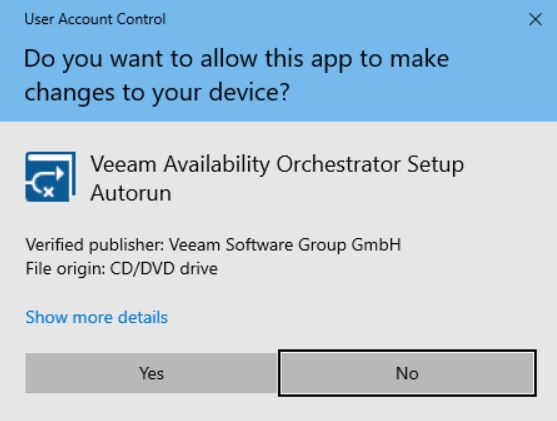 Picture 3
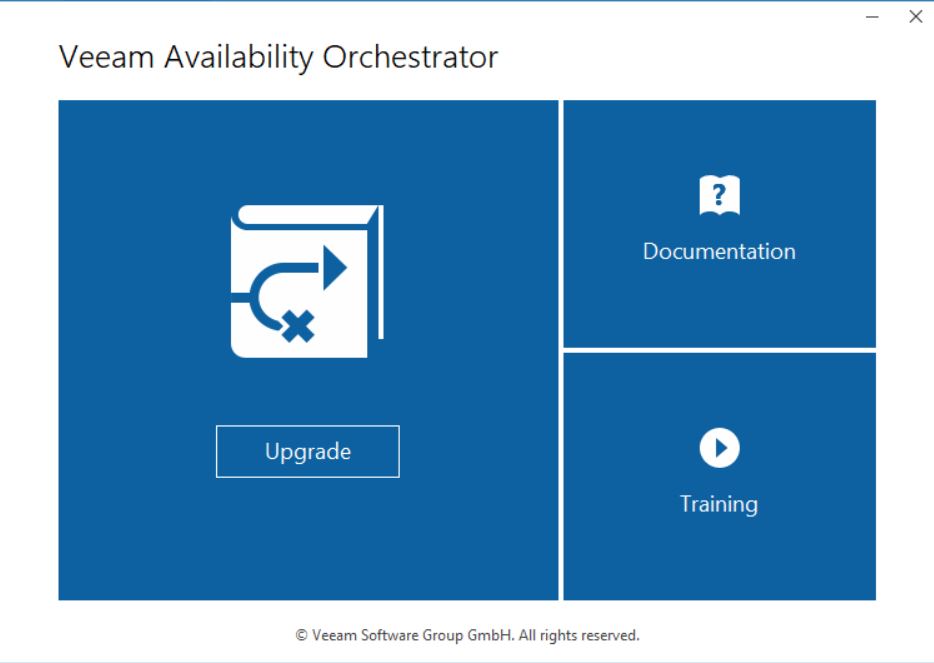 Picture 4
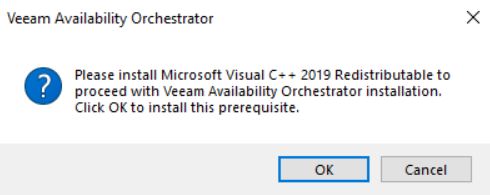 Picture 5
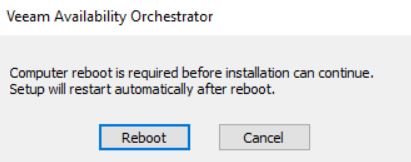 Picture 6
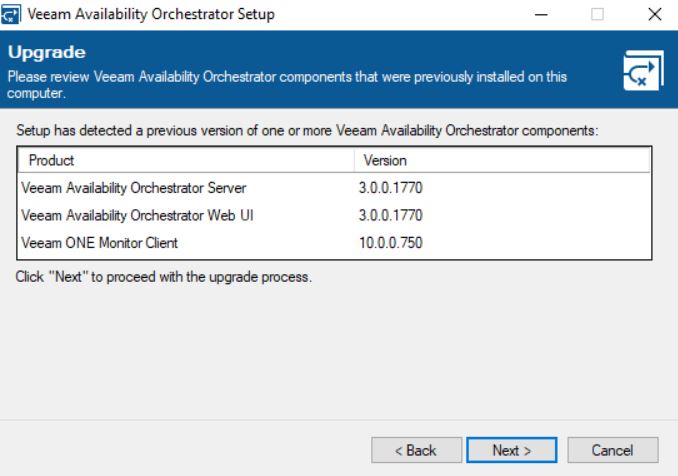 picture 7
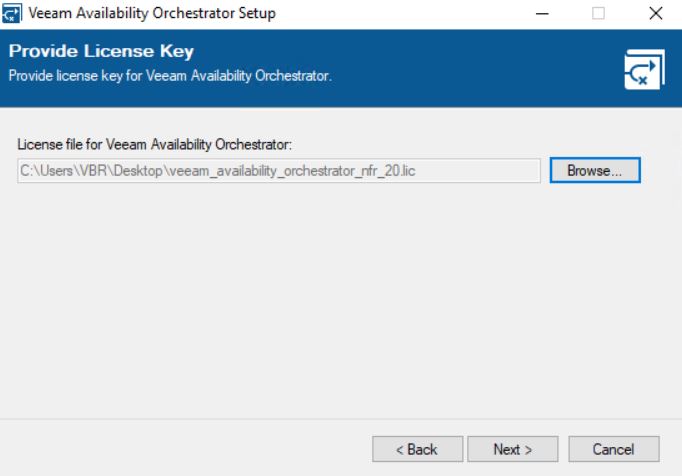 Picture 8
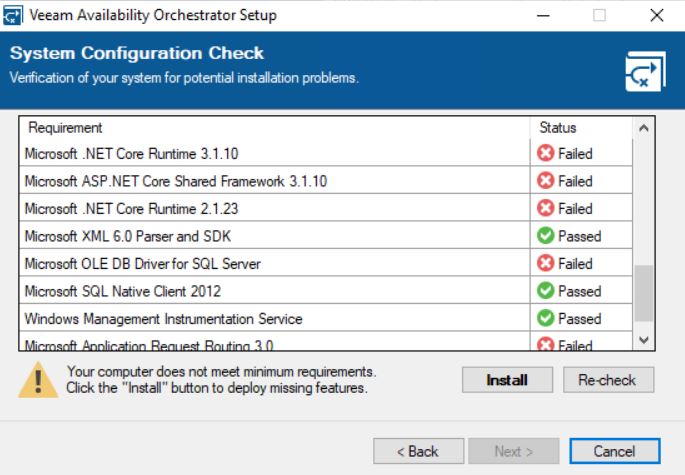 picture 9
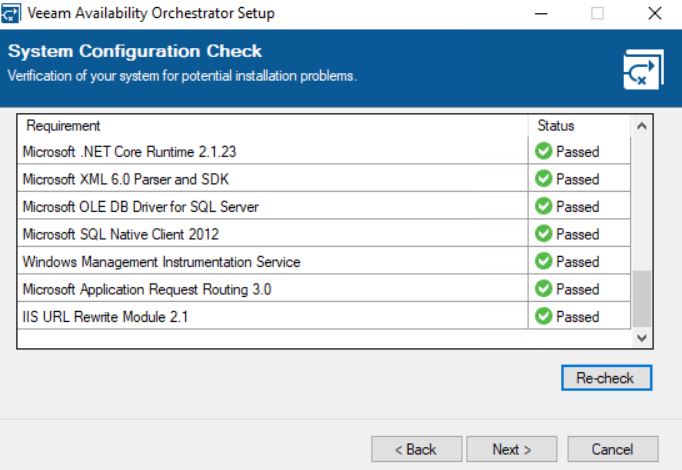 picture 10
 Picture 11
 Picture 13
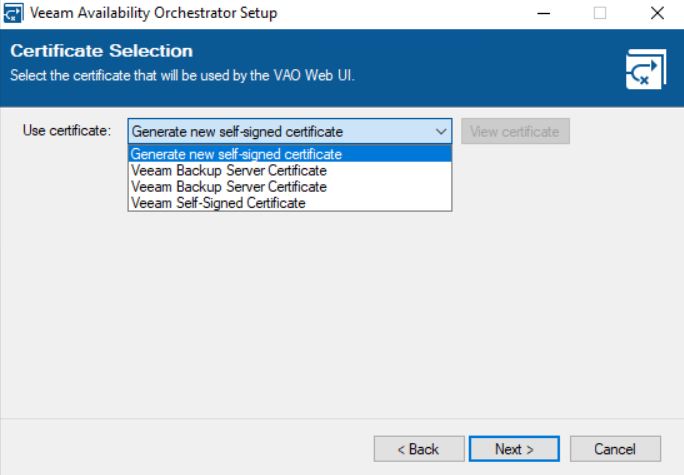 Picture 14
 Picture 15
 Picture 16
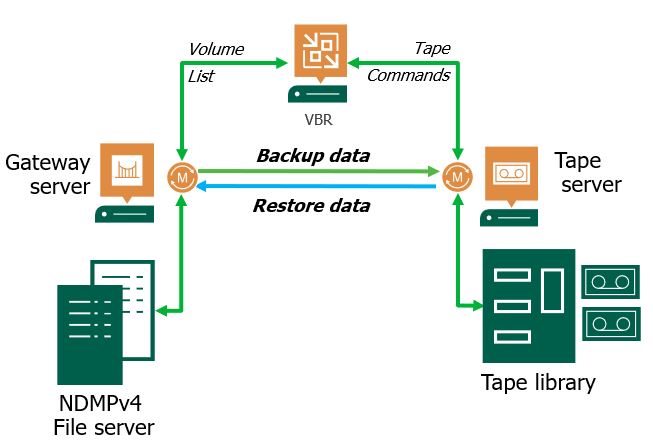
 Picture 2