NUC upgrade to ESXi 7.0.1- Part 1

Last weekend I upgraded all my Servers to the last VMware ESXi release (7.0.1 C) and this article is meant to describe all steps I performed.

Just a recommendation before starting. I worked in my lab that it’s not a production environment.

MyLAB before upgrade:

  1. NUC8i7beh2
  2. VMware ESXi 7.0.0 (Build 16324942)
  3. Every NUC has three more network cards added to the embedded standard NIC. They have been obtained through the USB ports leveraging three adapter USB/Ethernet and the flings driver.  Please refer to the FLINGS website to get all info.

The procedure is composed of two main phases and this article will cover the first part.

Phase 1: Creating a customize ISO

Is this step required?

Oh well, it depends if the Standard ESXi VMware ISO has already the driver of your embedded network card inside. The standard ISO, unfortunately, does not contain the NUC8i7BEH network drive (it is named ne1000)

If you upgrade the ESXi through the standard ISO, the process fails with the error shown in picture 1.
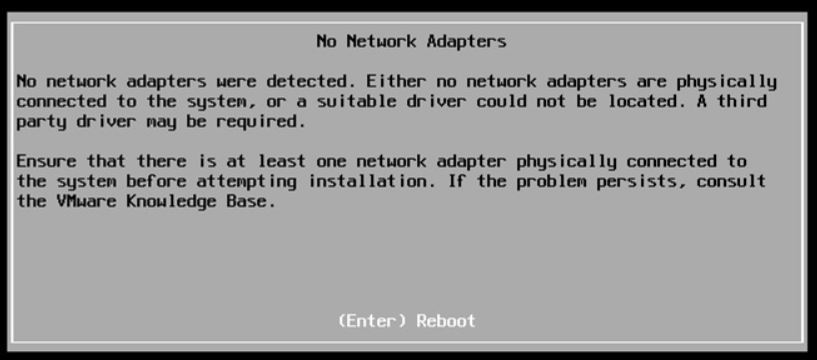
Picture 1

How to get over it?

Before upgrading it, it’s necessary to know the driver used by the embedded NIC Card. If you don’t know it, please read the next instructions carefully (they are command launched on host ESXi you are going to upgrade):

1.   lspci -v | grep -A1 -i ethernet
take a note of the string composed of 4:4 values ( xxxx:yyyy)

2.   lspci -n | grep xxx:yyy
take a note of how the nic is named (in my case [vmnic0])

The next step is getting the name of the driver directly from the VMware website (Matrix compatibility).

From that web page, filling up the empty field with the value yyyy and filtering the result by IO Devices, it’s possible to get the device driver name.

For my LAB the result is shown in picture 2 where I highlighted the device driver name in yellow.
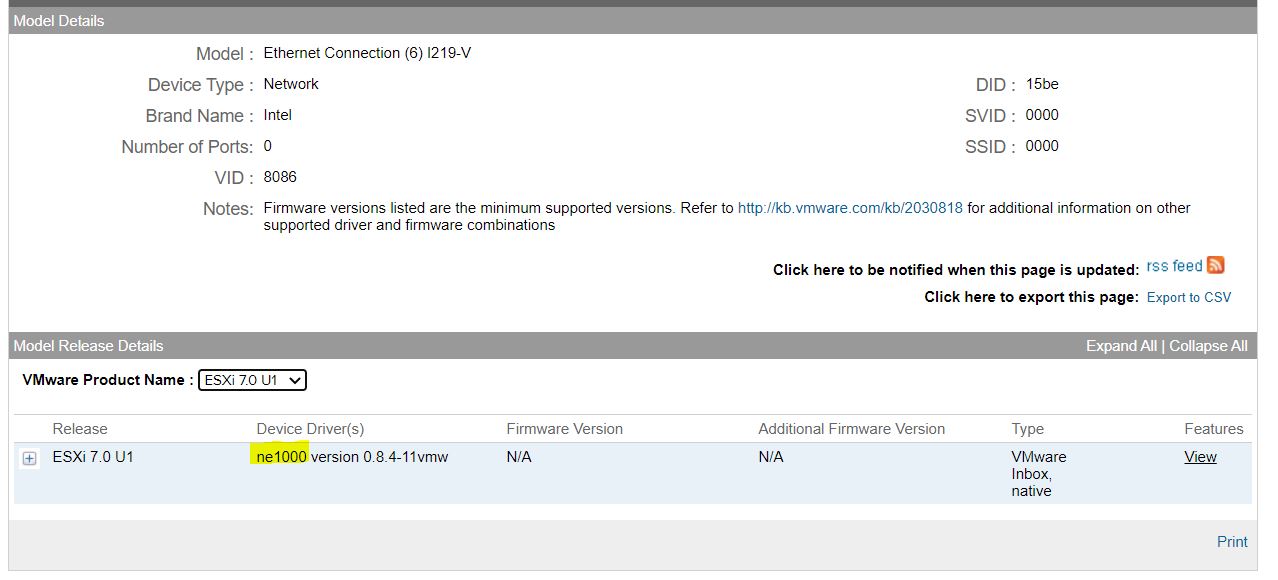
Picture 2

The last command to check if the driver is already installed (It should be present) is:

3.   vmkload_mod -l | grep “Device Driver”

In my case: vmkload_mod -l | grep ne1000
                          ne1000          1          352

Optional: if you use the USB ports to add more NIC, please uninstall the fling drivers before proceeding.

4.   esxcli software vib remove  –vibname=vmkusb-nic-fling (before vibname two scores –   –  )

It’s time to create our custom ISO

a- Download the offline bundle from VMware Site, for example:

VMware- ESXi-7.0U1c-17325551-depot.zip

b- Download the NUC ethernet driver for your device (ne1000 in my case).

I found an useful PowerShell script to get it:

#add the software repository
Add-EsxSoftwareDepot https://hostupdate.vmware.com/software/VUM/PRODUCTION/main/vmw-depot-index.xml
#define as variable the name of the driver
$vib = Get-EsxSoftwarePackage ne1000
$vib | select Name,Version | ft -AutoSize
$vib[4] | fl
#Get the driver
Invoke-WebRequest $vib[4].SourceUrls[0] -OutFile d:\pkg\ne1000_0.8.4-10vmw.700.1.0.15843807.vib

c- The PowerShell script to create a custom ISO is available on VMware Front Experience Site.

This great script has a lot of options; please refer to the official documentation to see how to create the ISO.

In my case I just launched the following command:

.\ESXi-Customizer-PS-v2.6.0.ps1 -v701 -izip D:\ISO\ESXi-7-0-1\VMware-ESXi-7.0U1c-17325551-depot.zip -pkgDir D:\pkg\ -OutDir D:\ISO\ESXi-7-0-1\ -nsc

d- The last step is creating a bootable USB pen using the just created custom ISO as a source.

I have chosen Rufus to perform this task.

In the next article, we are going to see the final step to upgrade the NUC

Veeam NAS Backup – Scripts for Demo live

BR v.10 introduced a great new feature. 

NAS Backup allows managing the protection of the environment where files and folders are a focus point for a company.

This article does not cover how a Nas Backup job works or how to set it up. Please refer to the official documentation to have all details.

What is the scope of the next lines?

It will show how easy it is to realize a script to create dummy files
before launching an incremental backup.
Why? Because the scope of this article is showing how fast a backup job can be.

1. The script is composed of four parts (in every box line 1 describes the actions that will be performed after).

#working path
$mypath=”C:\Users\VBR\Documents\NAS-Folder”
Set-Location -Path $mypath
#creating folder to copy to share
$folders_new = New-Item “$((get-date).toString(‘yyyyMMddhhmmss’))” -ItemType directory
Set-Location -Path $folders_new
# Creating 100 files
$baseFile = $rootDir + “base.txt”
$desiredFileSize = 2*10KB
$fileCount = 100
“start” | Out-File -Filepath $baseFile
While ($(Get-ChildItem -path $baseFile).Length -lt $desiredFileSize)
{
$(Get-ChildItem -path $baseFile).Length | Out-File $baseFile -APPEND
}
for($i=1;$i -lt $fileCount;$i++)
{
Copy-Item $baseFile “File-NAS$i.txt”
}
#copy to network share
Set-Location -Path $mypath
$pathtocopy= $folders_new.Name
copy-item -path $pathtocopy -Destination \\ip-address\cifs-destination -Recurse

2. Let’s see how to integrate the script in VBR.

The next pictures will show the Nas Backup job wizard pointing out the main point (picture 3, 4 and 5)

Pictures 1 and 2 show one of my favorite advance options: the possibility to select the file topology to save. For example, protecting the pdf files only. It supports wild-cat character so it’s very flexible and useful.

Picture 1

Picture 2

From picture 3 to 5, highlighted in yellow the step to set-up the script:

Picture 3

Picture 4

Picture 5

Pictures 6 and 7 show the result of the job modified in this way.
Please put your attention to the last yellow line where 195 MB of the source data is processed in 20 seconds. (In my small lab it’s a great result !!!)

Picture 6

Picture 7

Note: If you need to change the script time execution from default 15 mins (900 secs), just add a REG-DWORD named “PreJobScriptTimeoutSec”(Computer\HKEY_LOCAL_MACHINE\SOFTWARE\Veeam\Veeam Backup and Replication). The amount has to be in seconds (Picture 8)

Picture 8

That’s all folks 

Check Replica Status – Before deleting it – Part 1

Last month, a partner had to face up a strange VBR behavior.

From the VBR console he deleted a VM’s replica (Picture 1), and suddenly the production VM has been also erased (don’t worry, before doing any activity he tested the backups using sure backup technology).

Picture 1

The reason why it happened become clear to me once I read the logs.

To do it shortly, some weeks before someone started a Failover directly from vCENTER console without doing any communication to the internal IT team.

This article wants to explain how to avoid this common mistake.

The first step is understanding some basic concepts:

a) VMware identify any single VM with a number named MorefID and a UUID.

b) Any single operating system has an identifier named Instance UUID (Universal Unique IDentifier); in my lab, I set-up  more than one replica job for a single VM

Table 1. row 2. shows the name of production VM (Ubuntu-02), its morefID  (vm2270), where it is running (Milan), the UUID (…bcc12) and its VM UUID … f58b.

Table 1. row 3-4 shows the name of  VMs replicas,  morefID, instance UUID and its UUID.

All tables shown in these articles have been created using Veeam One

Name PCName morefID DataCenter Instance UUID UUID
Ubuntu-02 ubuntu-02 vm-2270 Milan 502d2405-cc8f-de73-1a19-57e8496bcc12 564d013a-7835-9d1b-841e-32855790f58b
Ubuntu-02_Rep_VC01 ubuntu-02 vm-2694 Milan 502d2d90-d08f-08aa-efcf-d9feaa1d13f8 564d013a-7835-9d1b-841e-32855790f58b
Ubuntu-02_Rep_VCDR ubuntu-02 vm-399 Venice 501d517b-672e-30e0-665a-fd4b4af7dcb6 564d013a-7835-9d1b-841e-32855790f58b

Table-1

Picture 2 shows the VM  source (highlighted in yellow) from vCENTER console.

Picture 2

After checking up that the VM source is switched off, it’s possible to start a Failover (Picture 3).

Picture 3

The next five pictures show the step-by-step wizard to complete the procedure correctly.  As you can see from picture 4 the VM that has been replicated with two different jobs (Picture 5) is always Ubuntu-02.

Picture 4

Picture 5

Pictures 6-8 show the result of the failover.

Picture 6

Picture 7

Picture 8

What happens when you complete the task with the Permanent failover? (Picture 9/10/11)

Picture 9

Picture 10

Picture 11

First of all, comparing picture 3 with 12 it is possible to see that one of the Replica Ready VM, and precisely the VM in permanent failover, has been deleted.

Picture 12

Picture 13 shows that now the replica job contains 0 objects. The right behavior is confirmed by pictures 14,15,16 and 17  where it is shown that the replica is not available anymore.

Picture 13

Picture 14

Picture 15

Picture 16

Picture 17

The cloning job option didn’t change the correct behavior (Pictures 18 and 19)

Picture 18

Picture 19

Let’s sum up. Following the right procedure, the Failover works as aspected

Now …. why the VM has been deleted? The next article will explain it in detail.

Check Replica Status – Before deleting it – Part 2

My previous article explained the procedure to perform a failover from VBR console explaining why it is safe (Click here to read it)

In this second article, I’ll show you what can happen if you try a failover in a different way, answering the behavior that a partner had during a cleanup procedure.

In my lab, I created a new Replica Job where the original VM is still Ubuntu-02 (Picture 1) and the replica VM has the suffix _Rep_vc01-1-1 (Picture 2).

Picture 1

Picture 2

After the VM has been created (Picture 3) It is switched it on directly from the vCENTER console (Picture 4). To be sure it works as expected, it is possible to connect remotely.

Picture 3

Picture 4

Picture 5

Going back to VBR console it’s possible to see that nothing has changed (Picture 6) just because the power-on action has been performed directly from the  VMware console,

Picture 6

Attention point: If you try to perform a replica task it fails because the VM is running (picture 7)

Picture 7

Now the main point of the two articles:

It’s a bad choice to delete VMs from VBR “Ready Replica VM”  menu (picture 8/9) without knowing if the VMs have been started from vCENTER console. Why? Because also the production VM gets deleted as shown in picture 10.

Picture 8

Picture 9

Picture 10

Let’s get a little wild with some supposing:

1. If you see the “active” status icon switched on ( from VBR console) it means the failover is started (picture 11)

Picture 11

2. If a permanent failover was performed, the VM disappears from “Replica Ready” menu and replica job results to be empty (Picture 12)

Picture 12

3. If the replica job works fine it means that no permanent failover has been performed

4. If the replica Job works fine but when clicking on the delete button (from “Replica ready menu” of VBR console) (picture 13) the production VM disappears, it means that a new replica job has been re-created after the manual failover has been launched (picture 14).

Picture 13

Picture 14

Knowing that deleting a VM replicated from VBR console needs a little attention, especially if you do not have the continuous and complete control of the VMware architecture, the question is: is it possible to think an easy checking-up before deleting VM?

The answer is Yes and Veeam One can easily help just creating them.

a. From vCENTER: setting up a report that checks if the VM to be deleted is running (power state status) (Table 1)

b. From VBR: if a Replication job is setted-up for that VM (Table 2)

Table 1

Table2

Is there another way to check it up?

Yes. using Powershell scripts.

The example you can find here below is just the first idea that can be polished with a little bit of your effort.

NB1: I’m not a PowerShell expert, I just love writing scripts easy to read by anyone.

NB2: Before trying it please ask your PowerShell expert a consultant!

NB3: It is meant to be launched from VBR.

NB4: If you think that it can be a feature request write to me!

Table 3

That’s all for now guys!