Nel mio laboratorio è presente un server Ubuntu 22.04.4 LTS, sul quale è installato il software Veeam di protezione degli ambienti Salesforce (Veeam Backup for Salesforce).
Durante l’operazione mensile di aggiornamento del sistema operativo, sono apparsi alcuni errori che non mi hanno permesso il completamento dell’operazione.
L’ output del comando “sudo apt update”, mostrava tre errori evidenziati nell’immagine 1 con le frecce di colore blue, verde e rosso.
Immagine 1
1. Il primo, (freccia blue) indicava che la firma digitale legata al repository Veeam (“https://repository.veeam.com/apt stable/amd64/ In Release”) non fosse più valida.
2. Il secondo (freccia verde) indicava che anche per il sito Ubuntu-security (“http://security.ubuntu.com/ubuntu bionic-security InRelease”) la firma digitale fosse scaduta.
3. Il terzo errore (nella realtà un warning, freccia rossa), indicava che la metodologia di gestione delle chiavi denominata “apt-key” è deprecata consigliando l’ utilizzo di un metodo più sicuro denominato “trusted.gpg.d”.
—
Navigando su internet ho trovato le soluzioni che hanno risposto alle mie necessità:
1. Sul sito Veeam è presente la KB2654 che indica come importare una nuova chiave. L’unica vera attenzione è avviare il comando da utente root (vedi immagine 2).
Immagine 2
2. Come mostrato nell’ immagine 3, è sufficiente richiedere l’aggiornamento della chiave inserendo a fine comando l’identificativo richiesto nell’output dell’immagine 1 (freccia verde).
immagine 3
Nota 1: apt-key è un comado utilizzato per gestire un portachiavi di chiavi gpg per apt sicuro. Il portachiavi è conservato nel file ‘/etc/apt/trusted.gpg’ (da non confondere con il correlato ma non molto interessante /etc/apt/trustdb.gpg). Il comando apt-key può essere utilizzato per mostrare le chiavi nel portachiavi e per aggiungere o rimuovere le chiavi.
3. Nell’ultima riga dell’immagine 4 viene indicato il comando che indirizza il warning di sicurezza. Si tratta di copiare il portachiavi (trusted.gpg) all’interno della cartella trusted.gpg.d.
Immagine 4
Nell’articolo “Handeling the apt-key deprecation” trovete tutti i dettagli che illustrano i vantaggi in ambito di sicurezza del nuovo approccio.
In the last few days, I have been contacted by a Service Provider to design a solution to back up the Microsoft Office 365 environment.
Actually, four months ago, I wrote three articles to show how to set up the environment using a great job of Niels and Timothy, creators and deployers the Martini project.
Why the Service Provider needs a different way to implement this service?
I think that the two main reasons were:
1) SP has already a Cloud Connect architecture and it wants to use it in all possible scenarios.
2) SP needs always official support from Vendor before implementing any project and the Martini is not. To be clearer, the RestFul Api technology inside VBO is totally supported, the Martini portal isn’t because it is not a Veeam product.
Before continuing the read, there is one requirement to respect: VBR Cloud Connect and VBO-365 have to be installed on the same server (a Windows Server).
Let’s start!
Picture 1 shows the high-level architecture.
Picture 1
The service provider architecture is shown on the right part of picture 1 and it is composed of VBO-365 and the Cloud Connect architectures, while the left part shows the tenant architecture where VBR Server has been installed.
Which are the actions that can be performed by the Tenant?
– Backup: the tenant can’t access the VBO-365 console. It means the Tenat can’t set up or launch any sort of backup. In other words, the backup tasks are a managed services.
– Restore: The tasks can be driven by the administrator of the Microsoft Office 365 organization through the use of Veeam Explores. The Cloud Connect technology creates the tunnel to connect the two entities.
Note 1: When VBR is installed by default all Veeam Explorers are installed.
I mean that not just the traditional Veeam Explorers (for Active Directory, SQL, Oracle, Exchange, Share-points) are installed but also the Explorer for One Drive and Teams. that are specific for Microsoft 365 technology.
Note 2: Does this scenario require VBR license?
Yes, but you can use the free community edition.
The point to highlight during the setup is the authentication task that allows the explorer to communicate with VBO-365:
From the VBO-365 console selecting “General Options” (Picture 2) and from the authentication tab enabling the tenant authentication you can catch your goal (please for security reason use your own certificate) (Picture 3)
Picture 2
Picture 3
Let’s switch to my demo environment:
1. The Service Provider VBO-365 console, has three Microsoft 365 organizations with a backup job each (Picture 4). Two of those use modern authentication, the third the basic one.
Picture 4
2. The Cloud-Connect architecture has been set up in order to create a tenant called Demo-VBO (Picture 5).
Picture 5
The VBR Tenant Console shows how the connection towards the service provider has been set up (Picture 6).
Picture 6
The following video shows the tasks performed by the tenant to restore his data (Exchange/Sharepoint/One-Drive/Teams items) located at the Service Provider site.
This third part will cover the restoration options.
If you need to know how to set the portal up or the option it can provide, please read the previous articles (Part-1 – Part-2)
Let’s start with Exchange Environment:
Clicking on the Exchange voice located on the top part of the web page (in picture 1 it is highlighted with a green arrow )
Picture 1
After selecting the organization you want to restore data from (in my case is myTEST-Environment as shown in picture 2), just choose the restore point you need (Picture 3).
Picture 2
Picture 3
Picture 4 shows the mail-boxes previously saved that you can restore.
Picture 4
What’s happening on VBO-365? As shown in picture 5 the portal has triggered a classical restore task.
Picture 5
Which are the restore option available in the portal for the Exchange environment? As shown in picture 6, you can download the mail as a pst file (it requires outlook client installed) or restore to the original or different location as shown in picture 7.
Picture 6
Picture 7
To finish the restore tasks just click on stop restore (Picture 8 and 9).
Picture 8
Picture 9
And what about restore of One-Drive and Sharepoint items?
The procedure is very similar and the restore options are shown in pictures 10 and 11.
Picture 10
Picture 11
VBO-365 v.5 has introduced support for Microsoft-365 Teams. It is not still available in this portal and I hope it will come soon. Stay tuned 🙂
This second article will complete the deployment scenario that began with Part 1. If you didn’t read it yet just click here.
The first important step is to enable VBO-365 to work with RestFul-API. Pictures 1 to 4 show the steps to perform the task
Picture 1
Picture 2
Picture 3
Picture 4
Now from a web browser insert the IP Address of the VBO-Portal.
Picture 5
The login credentials are: username Admin, password the one you choose during the setup ( ‘new_password‘).
After completing the login phase, add a name to the tenant and its e-mail address (don’t worry, nothing will be sent to that e-mail address for now). Click the save button and make a note of the automatically generated. password (Picture 7)
Picture 6
Picture 7
Now it’s time to add your VBO installation to the portal
On the left menu, click on “create instance” and after selecting the just created tenant (My-Lab-Environment), at the voice Instance Type select choose “Existing instance” as shown in Picture 3.
Picture 8
In the last blanks insert the data of your VBO installation.
Picture 9
Now log out and re-login with the credentials just created (new tenant) as shown in picture 10
Picture 10
The Dashboard is still empty (Picture 11), don’t worry it’s because the portal is not still connected to VBO.
Picture 11
On the left menu, select list instances and from there just select connect (Picture 12)
Picture 12
After the connection has been successfully completed (Picture 13), the dashboard is filled up (Picture 14) and you are ready to work with it.
Picture 13
Picture 14
Some interesting items to watch from now:
At the jobs menu, you can see the scheduling, disabling, or start the job (Picture 15)
Picture 15
Picture 16 shows the license status and 17 the activity restore logs.
Picture 16
Picture 17
In my next article, I’ll write about restoration options.
Stay tuned and see you soon.
8th December update: If you see the connection is looping please download from this link the securerestore.php file and replace the old one.
Restart the configuration steps from picture 5.
8th January update: Good news, it works with VBO-365 v.5 too!
The only modify to perform is to change an entry inside the file named veeam.vbo.class.php located in /var/www/html/core.
At line 35
From: ‘base_uri’ => ‘https://’.$host.’:’.$port.’/v3/’
A service provider asked me to help him to design a backup service where the main topic was Microsoft 365.
I’m sure many of you already know and already use Veeam Backup for Office 365.
It is an excellent solution to address an end-user request and to allow a Service provider to supply a managed service.
But what about unmanaged service?
In other words: is it possible to give an admin of an organization a way to perform backup and restore by himself in a multi-tenant architecture?
The answer came from the great job of two Veeam guys.
Niels Engelen and Timothy De Win have developed a web portal leveraging the native VBO-365 RESTFul-API that allows the service provider to score the goal. The project is called MARTINI.
Just a note before starting: the articles have been written “for dummy”; the scope is explaining step by step the procedure I followed to design service.
To remember:
This is not a Veeam Project so it is NOT officially supported.
It requires and automatically installs the following packages:
apache2, mysql-server mysql-client, PHP, php-xml, composer, zip unzip php-mysql and Terraform.
At the end of this setup the screen output shows the following output.
#MySQL commands:
CREATE DATABASE martini;
CREATE USER ‘martinidbo’@’localhost’ IDENTIFIED WITH mysql_native_password BY ‘mypasswordthatissupersecret’;
GRANT ALL ON martini.* TO ‘martinidbo’@’localhost’;
# Ubuntu older
GRANT USAGE ON *.* TO ‘martinidbo’@’localhost’ WITH MAX_QUERIES_PER_HOUR 0;
# Ubuntu 20.04
GRANT USAGE ON *.* TO ‘martinidbo’@’localhost’;
Now connect to mySQL DB using the following command:
mysql -u root -p
If the error shown in picture 1 appears it is necessary to follow the procedure described below:
Picture 1
– sudo mysql – select user,host,plugin from mysql.user; output -> root | localhost | auth_socket
the output is shown in picture 2 and it checks the plugin used for any MySQL users.
Picture 2
If it is auth_socket to user root just change it with the following command
– update mysql.user set plugin=’mysql_native_password’ where user=’root’; – select user,host,plugin from mysql.user; output root | localhost | mysql_native_password
the output shown in picture 3 confirms it is correctly changed.
Picture 3
– flush privileges;
– quit
Now retype the previous command (mysql -u root -p) and please continue with the procedure if it still doesn’t work as shown in picture 4 :
– ALTER USER ‘root’@’localhost’ IDENTIFIED BY ‘new_password‘;
– flush privileges; – quit
at this point reboot the server.
The command mysql -u root -p shows the following output:
Copyright (c) 2000, 2020, Oracle and/or its affiliates. All rights reserved. Oracle is a registered trademark of Oracle Corporation and/or its affiliates. Other names may be trademarks of their respective owners. Type ‘help;’ or ‘\h’ for help. Type ‘\c’ to clear the current input statement.
Let’s go back to martini checking if the database and the new user have been created with the command:
mysql> show databases;
If it doesn’t appear use the following steps: – use mysql – show tables; – CREATE USER ‘martinidbo’@’localhost’ IDENTIFIED BY ‘mypassword-‘; – GRANT ALL PRIVILEGES ON * . * TO ‘martinidbo’@’localhost’; – FLUSH PRIVILEGES; – CREATE DATABASE martini;
Now re-launch the martini setup command
– sudo martini-cli setup
selecting no when the prompt asks if it is the first run and follow the easy wizard as shown in picture 5.
New articles to show which are the common business models that leverage the Veeam cloud technologies.
Today I’m going to cover two kinds of services:
A) Remoting Backup Data (RBD)
B) Disaster Recovery as a Service (DRaaS)
For every above service, the article will show the two options available:
1) Un-managed Service
2) Managed Service
The scope of these articles is to explain Roles, Tasks, Responsibilities, license management to have a big picture of the service models.
Note-1: If you need technical details on how to deploy and how to use these functions please refer to the official documentation and ask the local Veeam representative.
It’s the way in which the service provider installs, maintains and manages hardware and software in its “sites” providing a reliable service.
The customer must handle all his configuration tasks to use the services bought from Service Provider.
The following example is an easy way to fix in mind what an un-managed service is.
Office365 (now Microsoft 365) provides e-mail, SharePoint, teams, one drive services. Microsoft itself is responsible to maintain the service up and running, but all the tasks to use it are in charge of the customer.
If you need more details about data & service responsibility on Microsoft 365 environment just take a look at the following pdf, if you want to know more about how to implement a service, please click here
AB-1) Un-managed Service & Remoting Backup Data & DRaaS
The technology supplying a Veeam Service is named cloud connect. The idea is creating a private and secure connection from the Tenant to the Service Provider side that makes shared resources available.
Picture 1 shows the backup flows and resources (Repositories) for RDB. Picture 2 shows the DRaaS flows and resources (Virtual Hosts).
Picture 1
Picture 2
Tasks and responsibilities:
SP administrator (Cloud Connect):
Deploying the front-end CC Architecture (Gateway)
Deploying the back-end CC architecture (Backup Server/Repository/Wan-Accelerator/vCD/VSPC/SQL…)
For each Tenant, defining the resources to be provided (multi-tenant model)
Using the VSPC to monitor and report on resource use
Tenant Administrator (From VBR console):
Adding the Service Provider service discovering the purchased resources
Setting up local backup jobs
Setting up the backup copy job where the repository is the SP site
Setting up the Replica job for DRaaS
Performed Restore activities
Performed Partial and Full Failover
How is it possible to measure the services?
Is it possible to show both the use to service provider & Tenant?
The answer is yes just using the Veeam Service Provider Console (if you are a Service Provider please take your life easier deploying the VSPC).
Which sort of measure can I get from it? Very detailed usage report that can be automatically sent to a Reseller and to the tenant (via e-mail also).
VCSP can be used also to create and manage invoices.
Note-2: VSPC is the license manager focal point where you can see through reports the license Status (Approved, Waiting for Approval) for a specific period of time (details available clicking toVCSP license and to the last article of this serie)
2) What is a managed service?
Managed services are the practice of outsourcing the responsibility for maintaining, and anticipating the need for a range of processes.
The schema used for 1AB can be used for 2AB as well
Tasks and responsibilities:
SP administrator (Cloud Connect):
Deploying the front-end CC Architecture (Gateway)
Deploying the back-end CC architecture (Backup Server/Repository/Wan-Accelerator/vCD/VSPC/SQL…)
For each Tenant, defining the resources to be provided (multi-tenant model)
Using the VSPC to monitor and report on resource use
SP administrator for Tenant Administrator (From VBR console):
Adding the Service Provider service discovering the purchased resources
Setting up local backup jobs
Setting up the backup copy job where the repository is the SP site
Setting up the Replica job for DRaaS
Performed Restore activities
Performed Partial and Full Failover
Here also the VSPC can be used as a central point of service management
Note-3:
The service providers using the pairing vCloud Director (vCD) technology and Veeam Cloud connect, can replicate production VMs directly inside the tenant virtual Data Center (vDC) as shown in Picture 3.
Picture 3
This approach simplifies not just network management (NSX) but also the cloud Service provider adoption.
A natural extension is the migration services of the tenant workload from on-premises to Cloud through Cloud Connect.
Is there a different way if a Service Provider/Tenant does not implement/use the Replicas job?
The answer is sure, and I named the use case as “Cold Disaster Recovery“.
The idea behind itis restoring the backup tenant files on SP virtual architecture.
To allow it to work it’s necessary:
a.The tenant has provided the backup file encryption password.
b. Since from the VBR console the SP can’t browse the tenant backup files (The VBR SP console in fact can just show if a backup is running), the SP has to implement a script to import backup data to SP Backup Server. Luckily you can get the script from Github (Thx to an Andrea Borella works).
c. Just now from the SP-VBR console at the menu “imported backup copy” will appear all backup copy job of the tenant, and the SP can restore VMs.
That’s all for today guys.
My next article will cover topics about vCLOUD DIRECTOR backup as an un-managed service.
The last one will talk about all you need to know about the licensing.

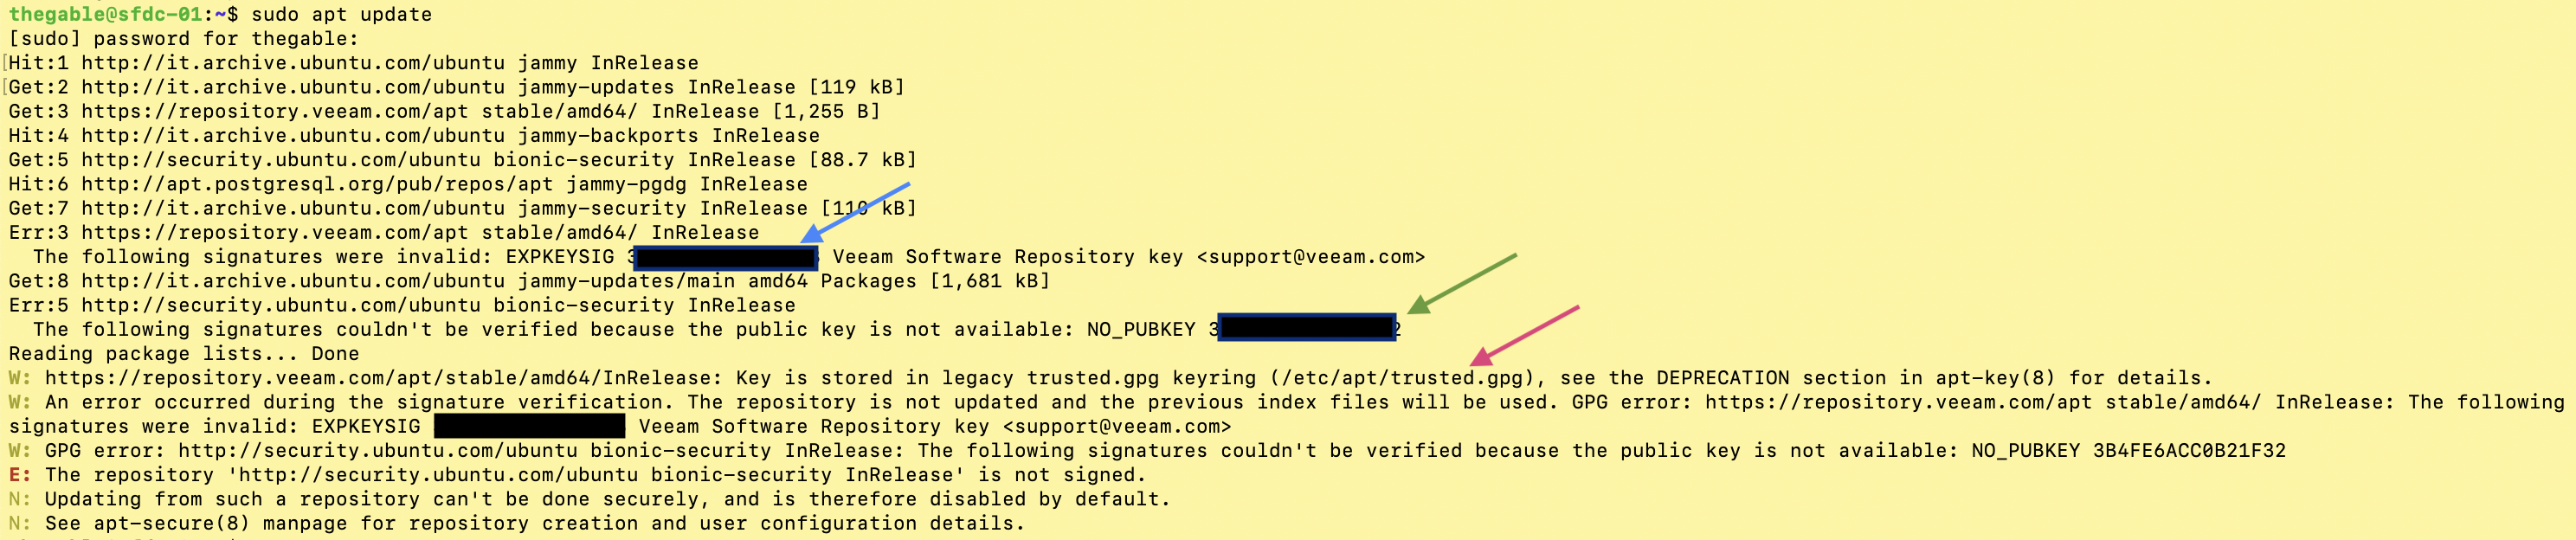 Immagine 1
 Immagine 2
 immagine 3
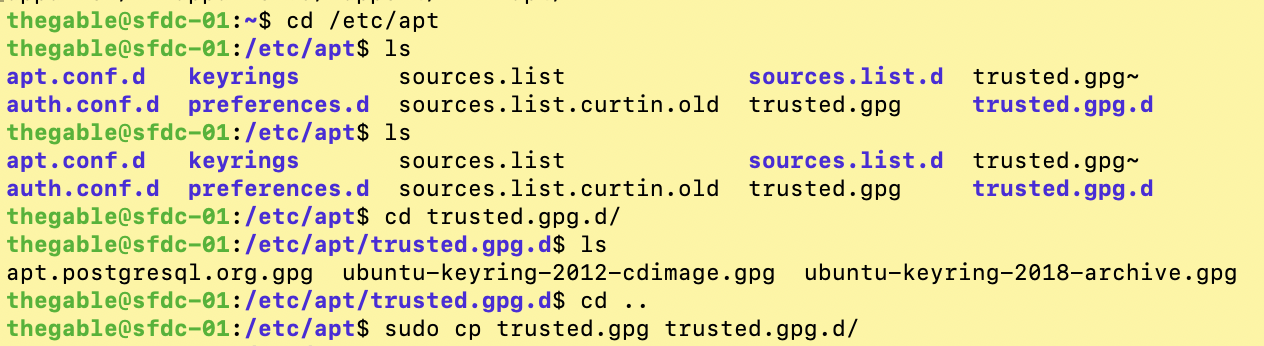 Immagine 4
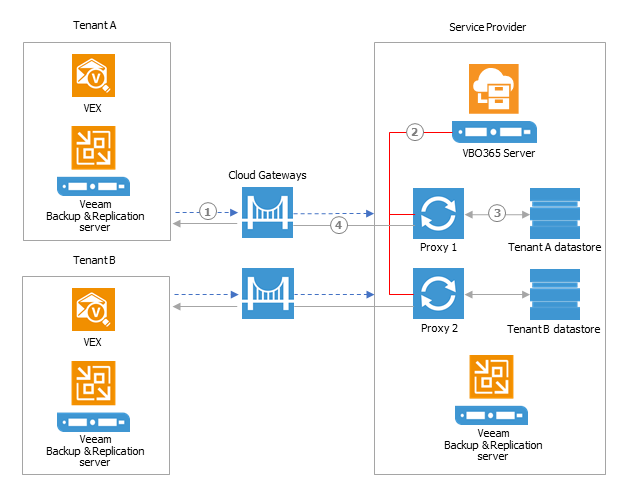 Picture 1
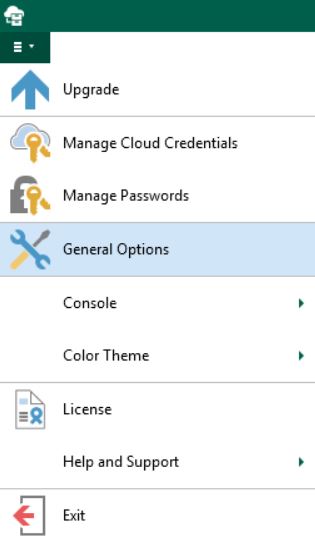 Picture 2
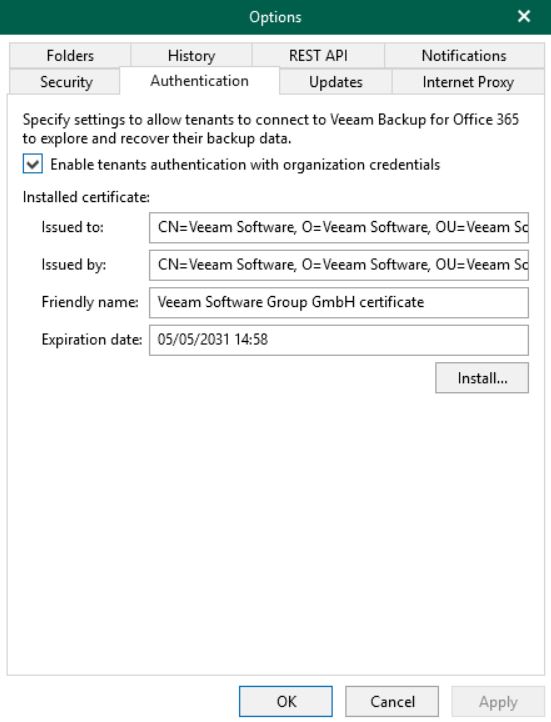 Picture 3
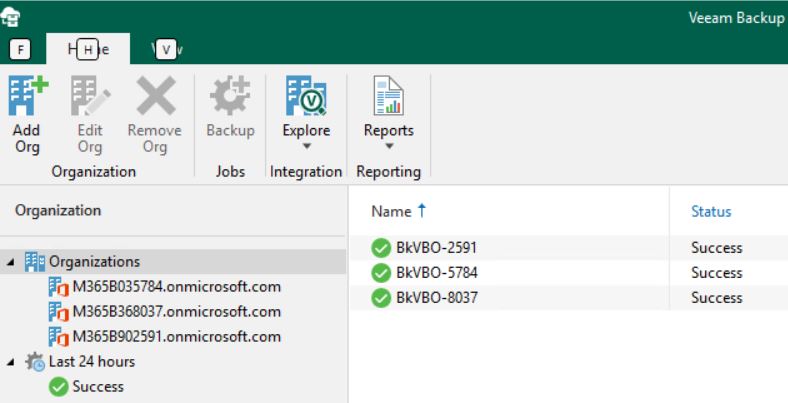 Picture 4
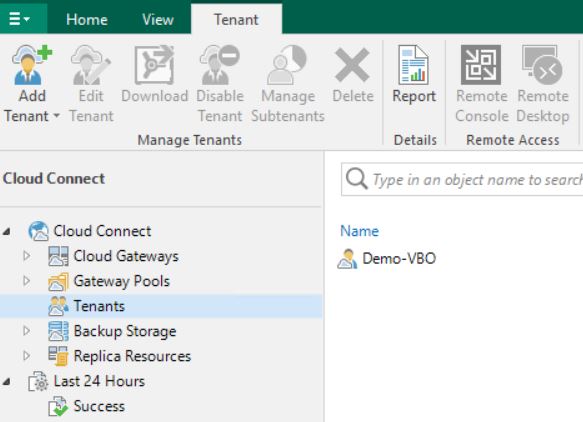 Picture 5
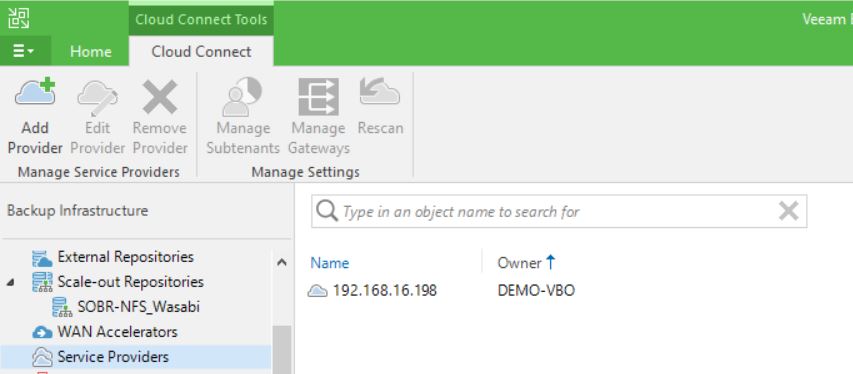 Picture 6
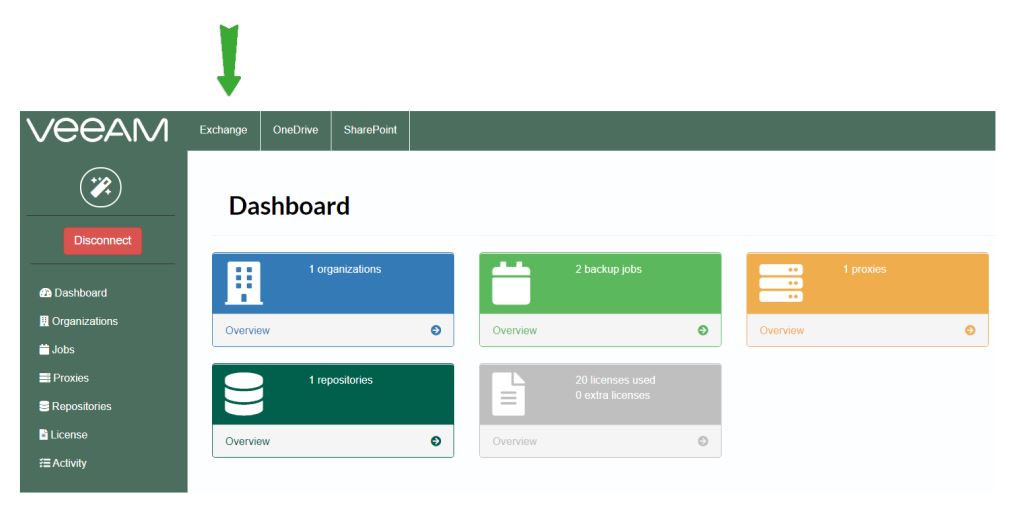 Picture 1
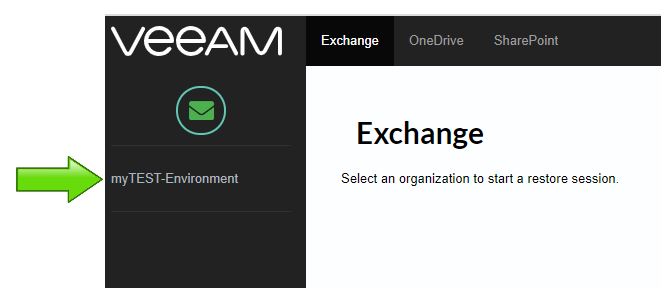 Picture 2
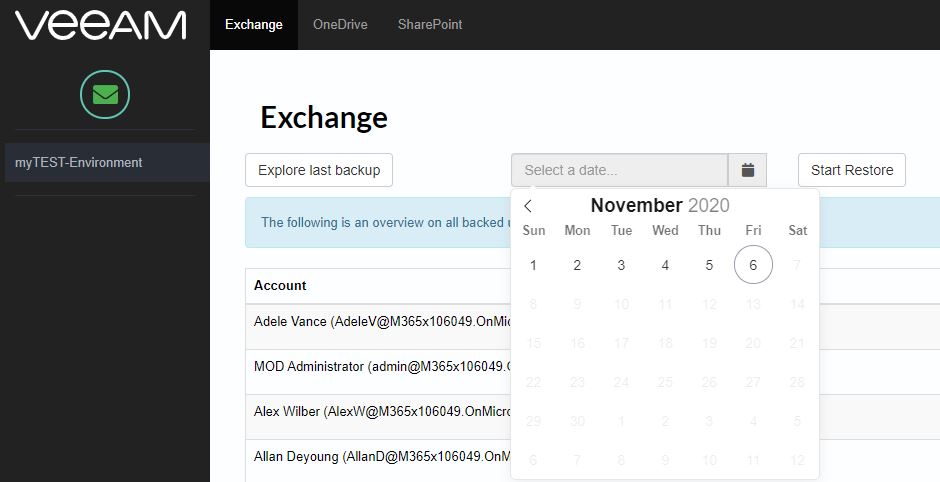 Picture 3
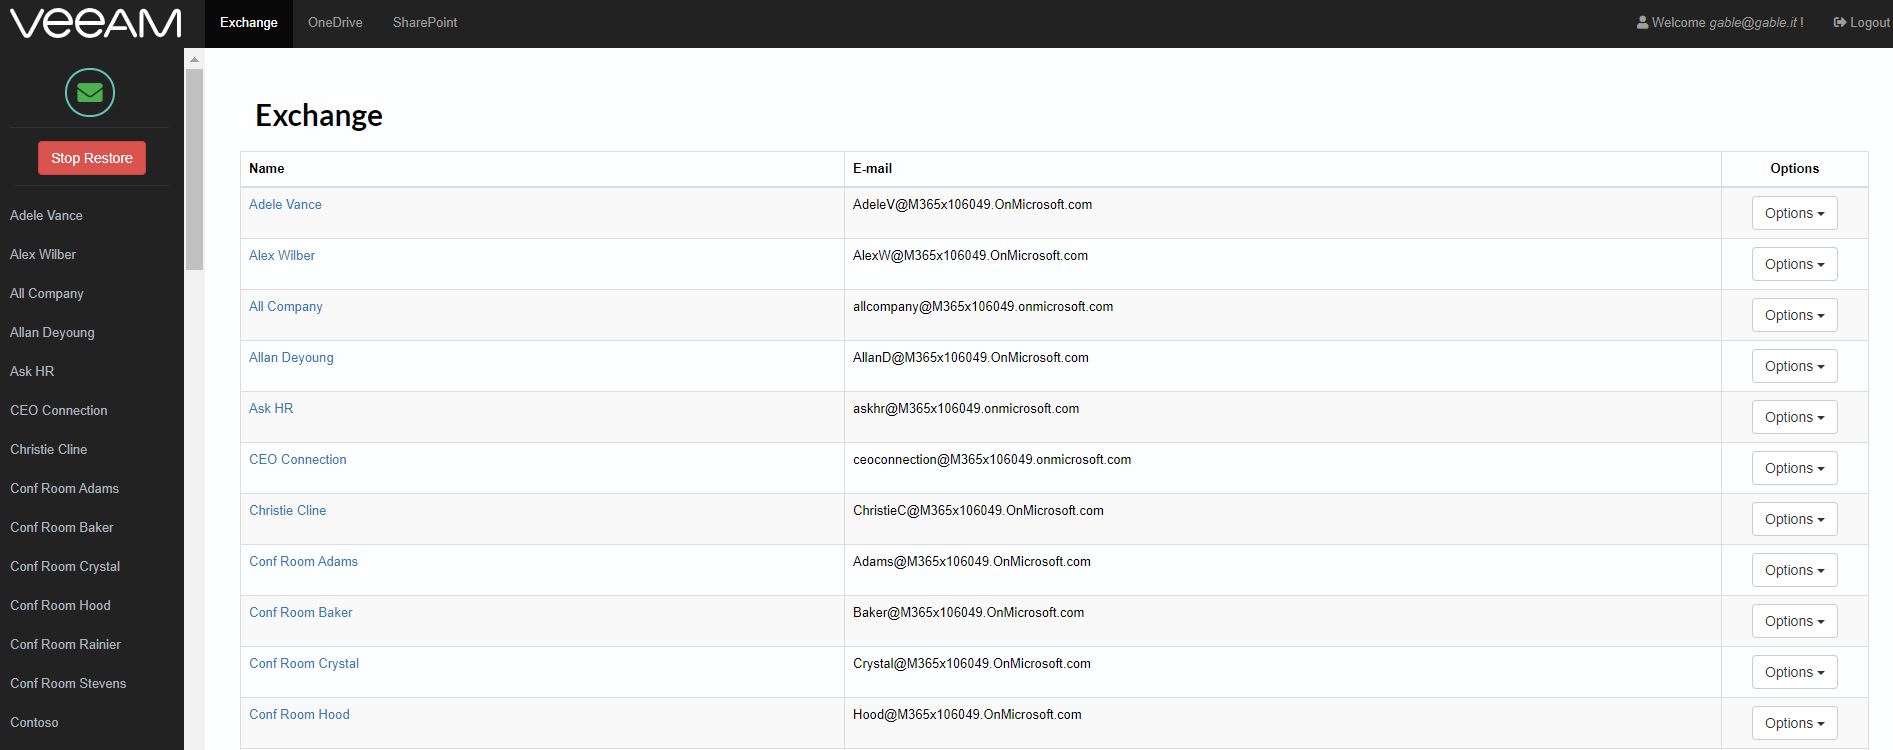 Picture 4
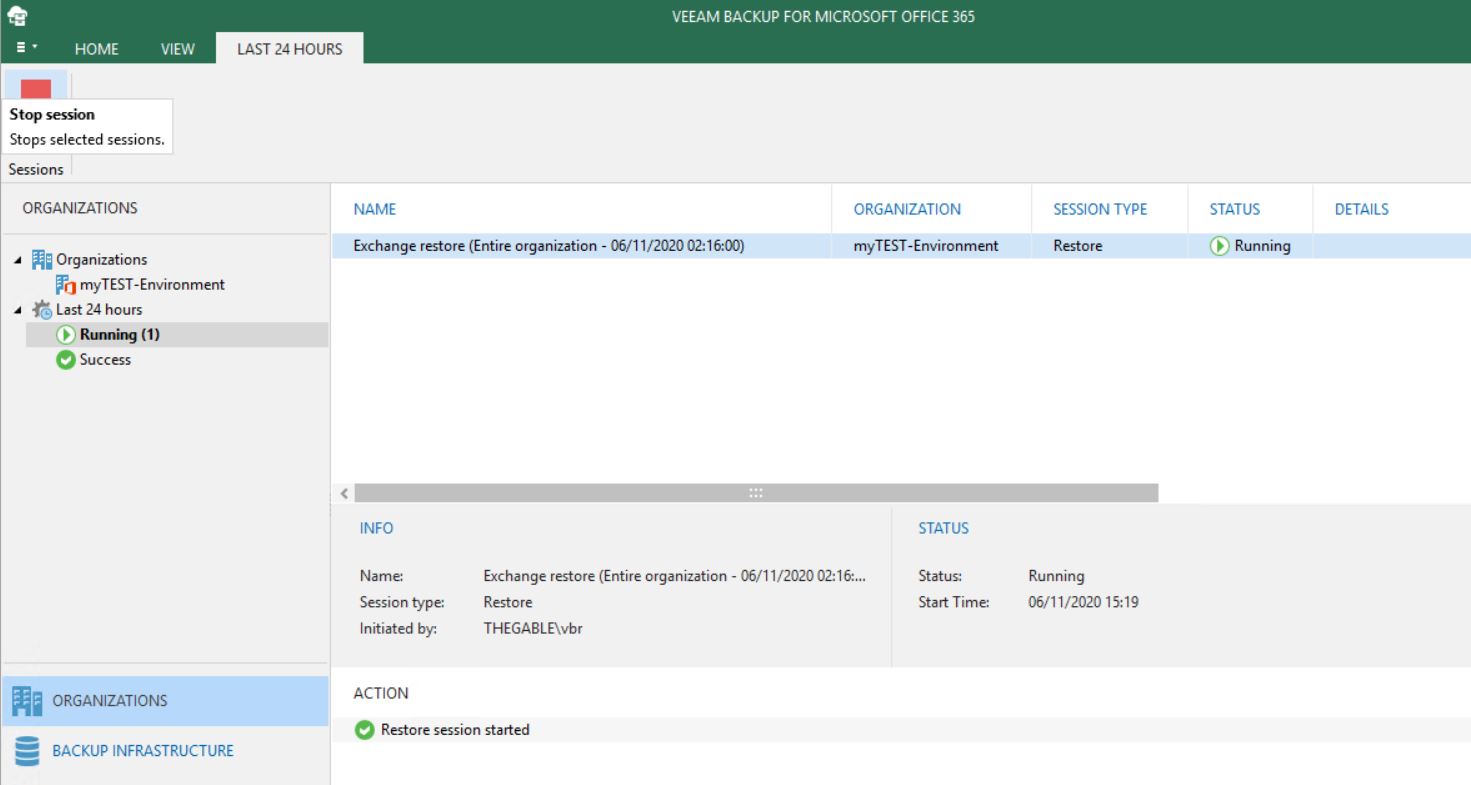 Picture 5
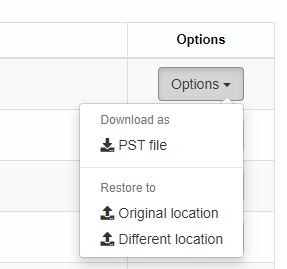 Picture 6
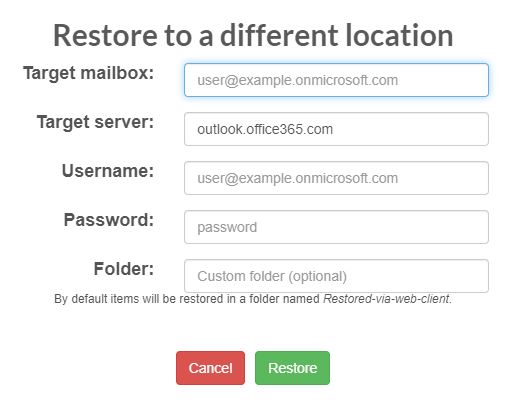 Picture 7
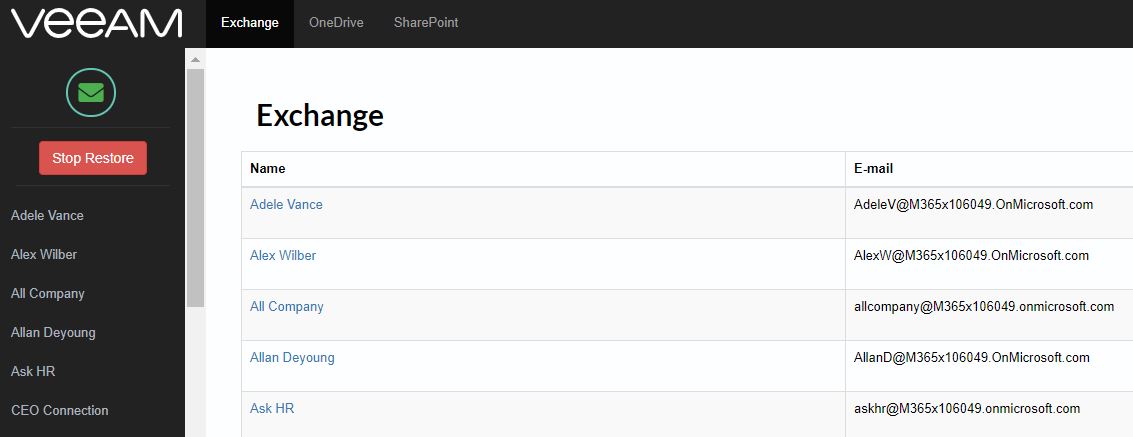 Picture 8
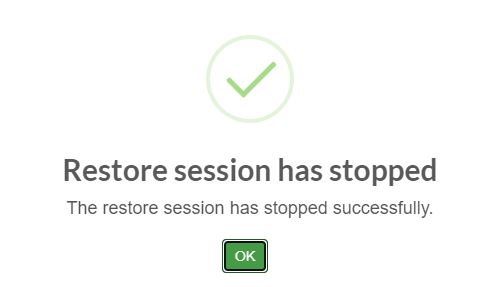 Picture 9
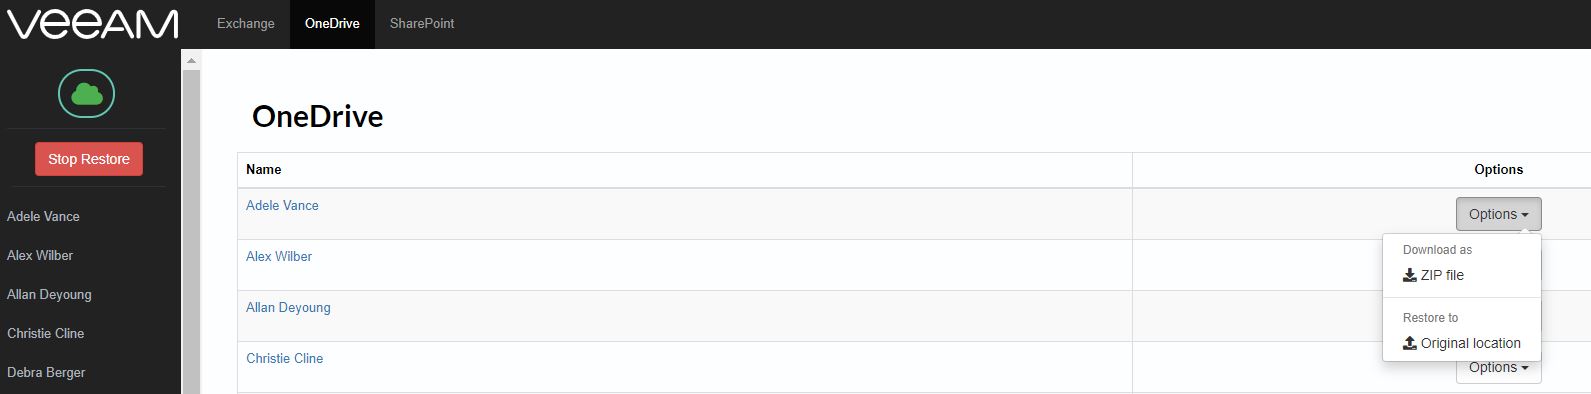 Picture 10
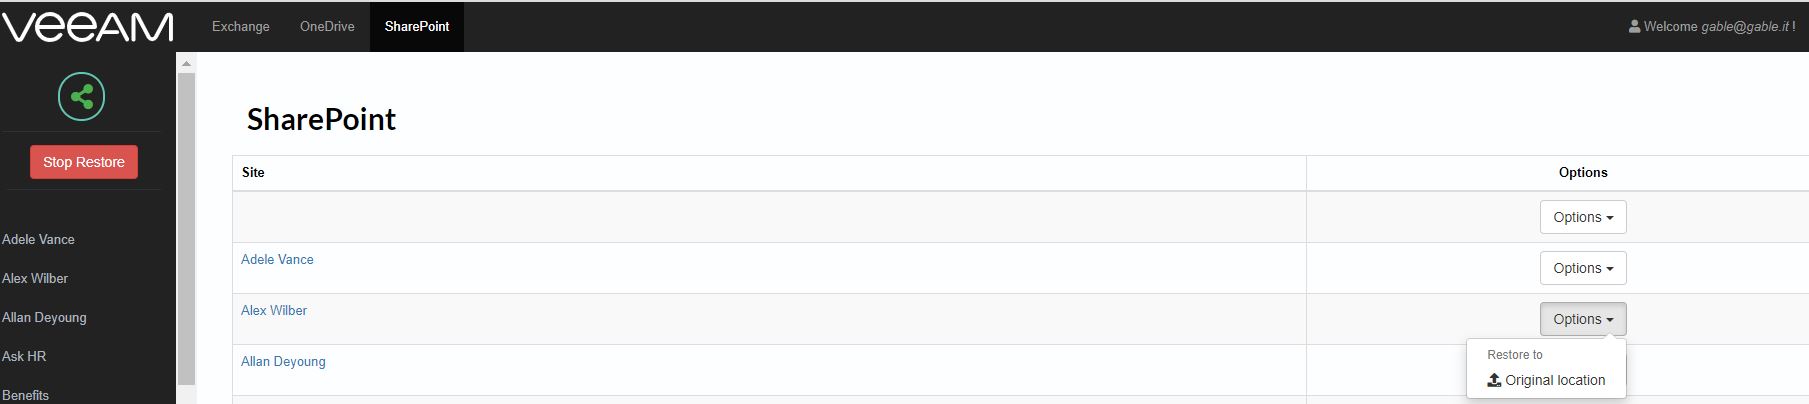 Picture 11
 Picture 1
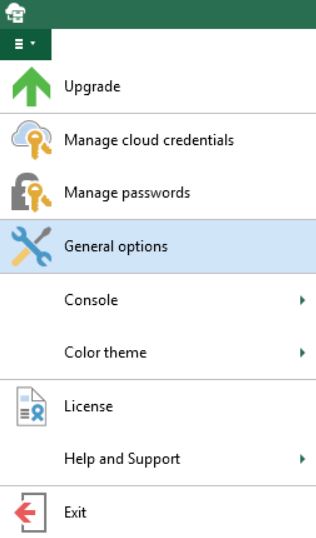 Picture 2
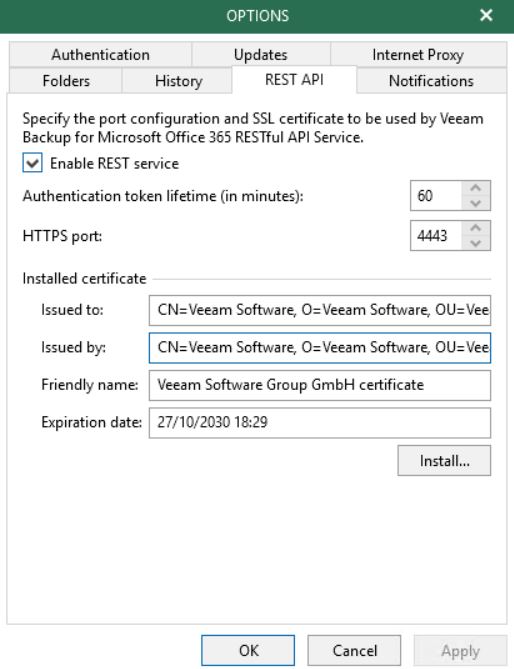 Picture 3
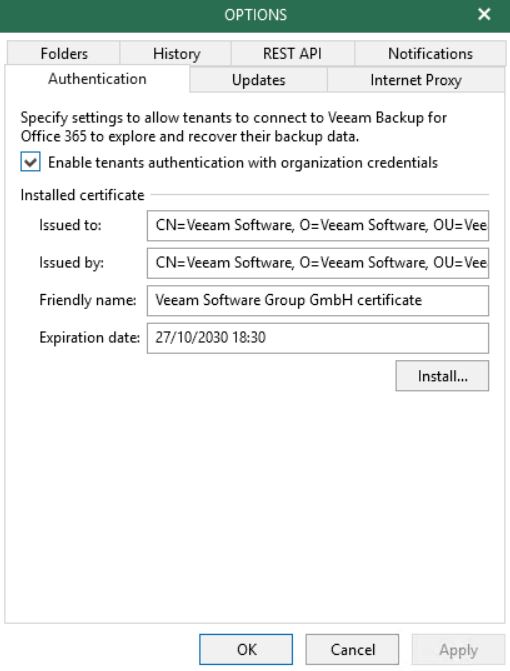 Picture 4
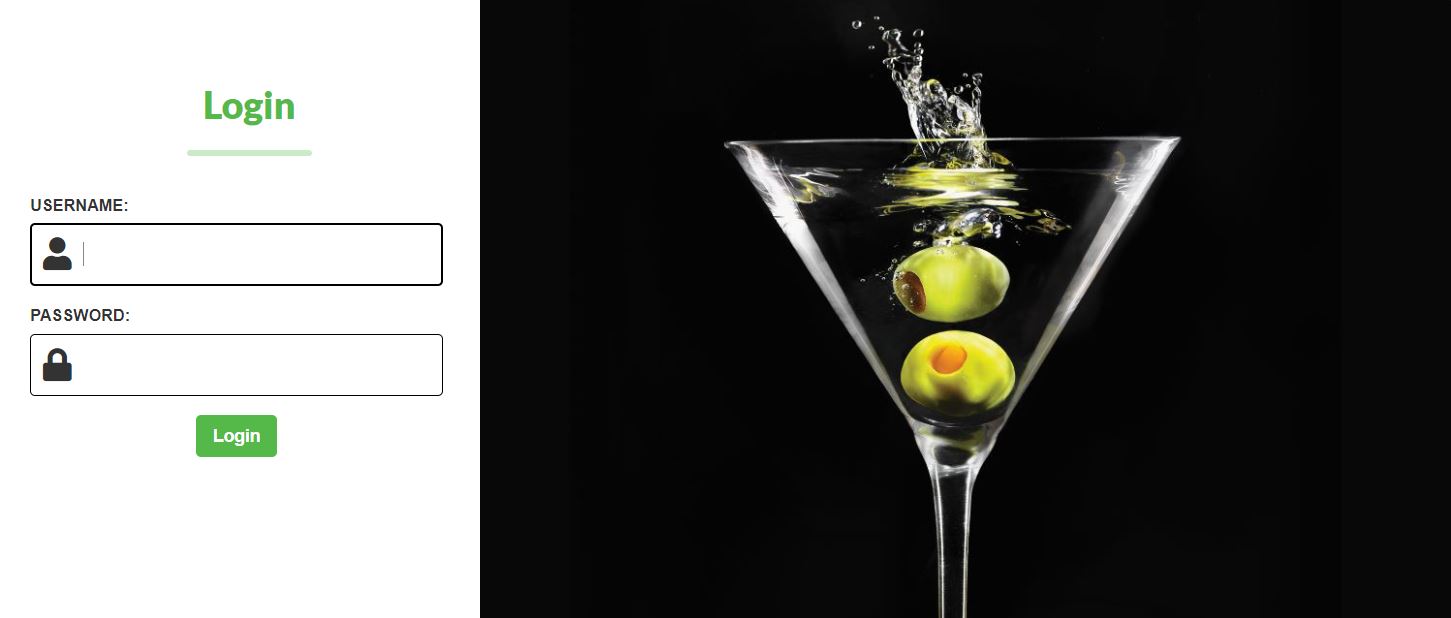 Picture 5
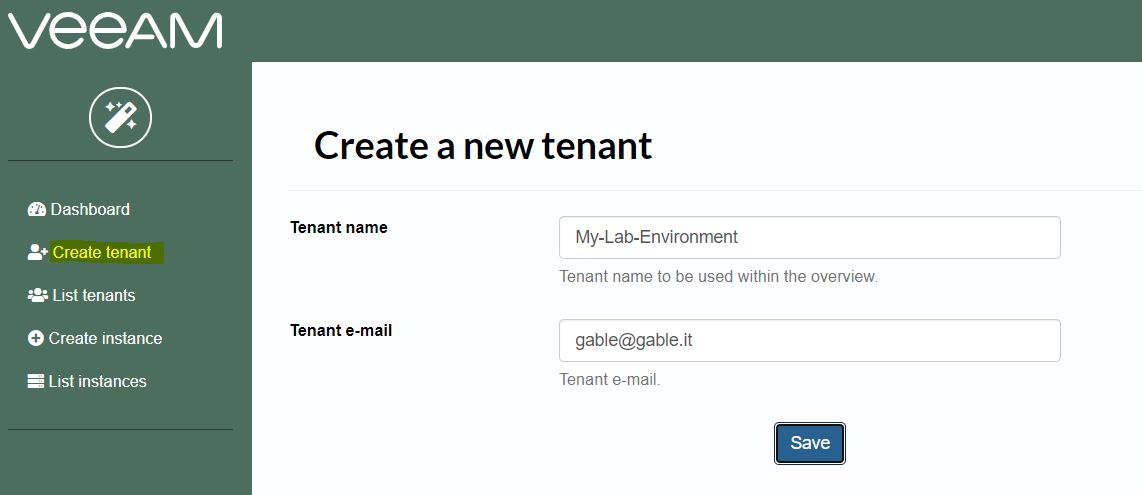 Picture 6
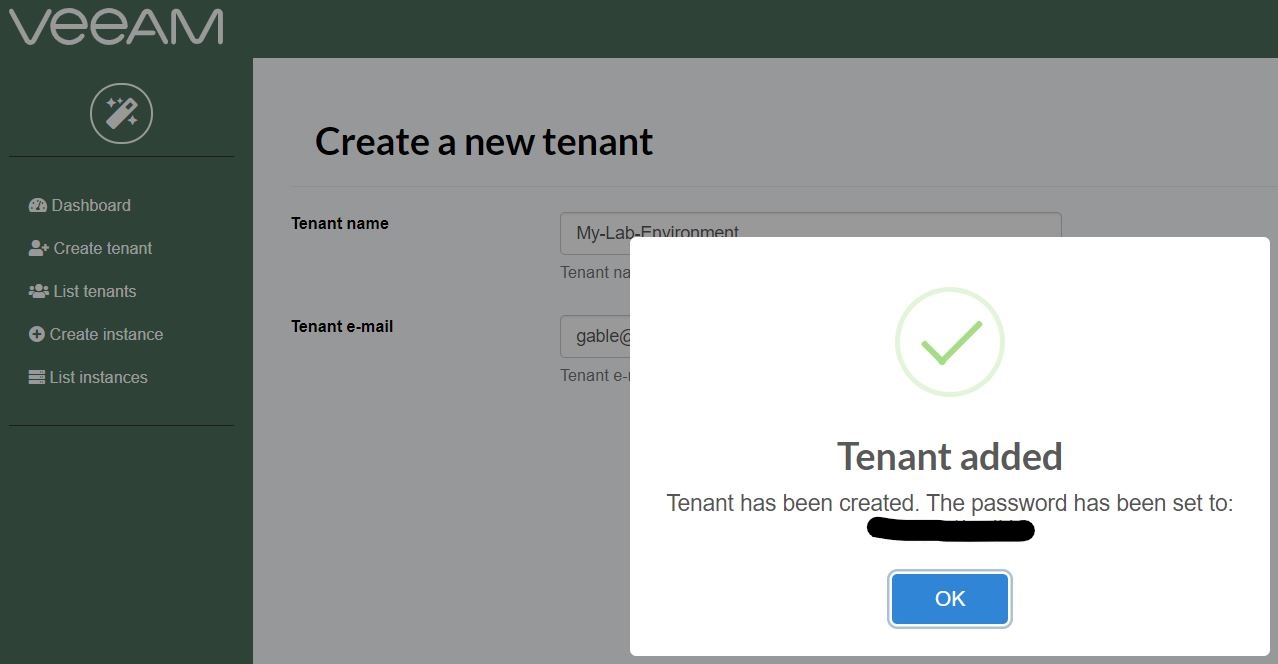 Picture 7
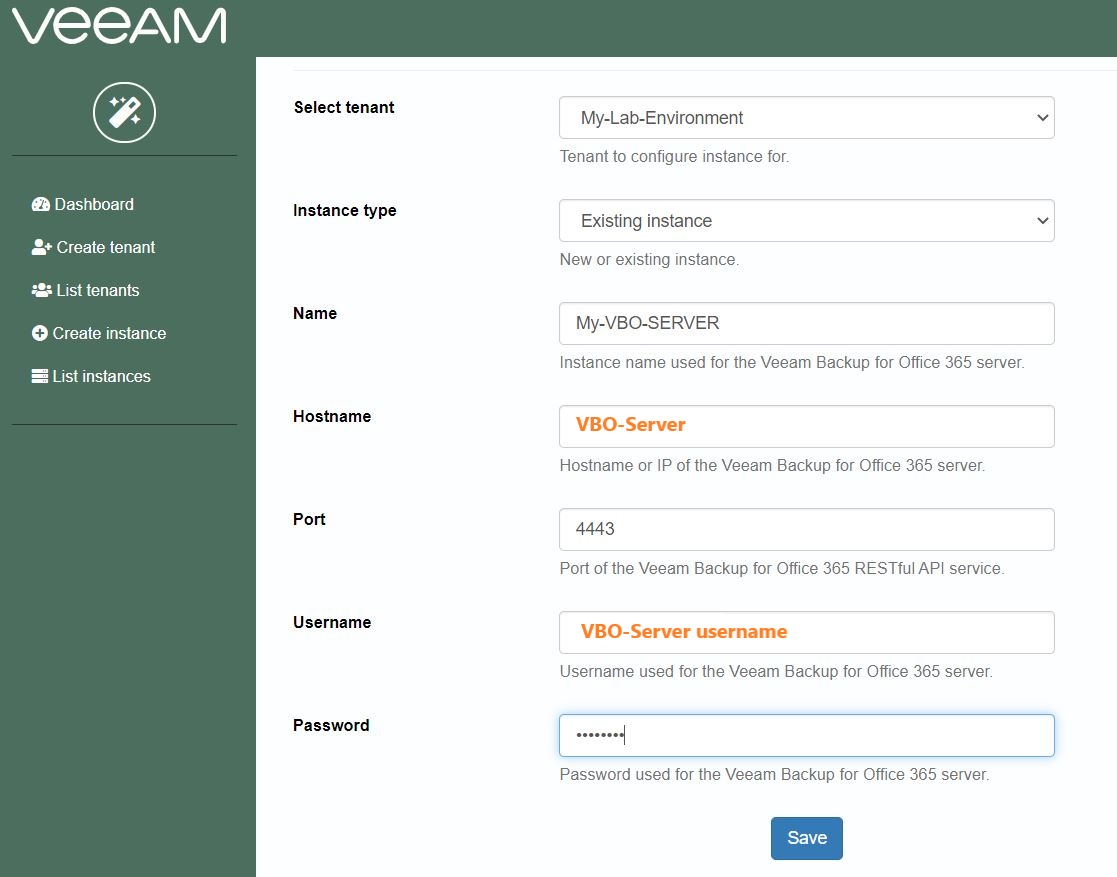 Picture 8
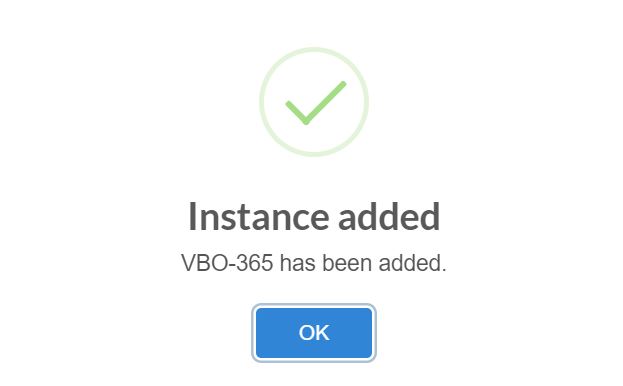 Picture 9
 Picture 10
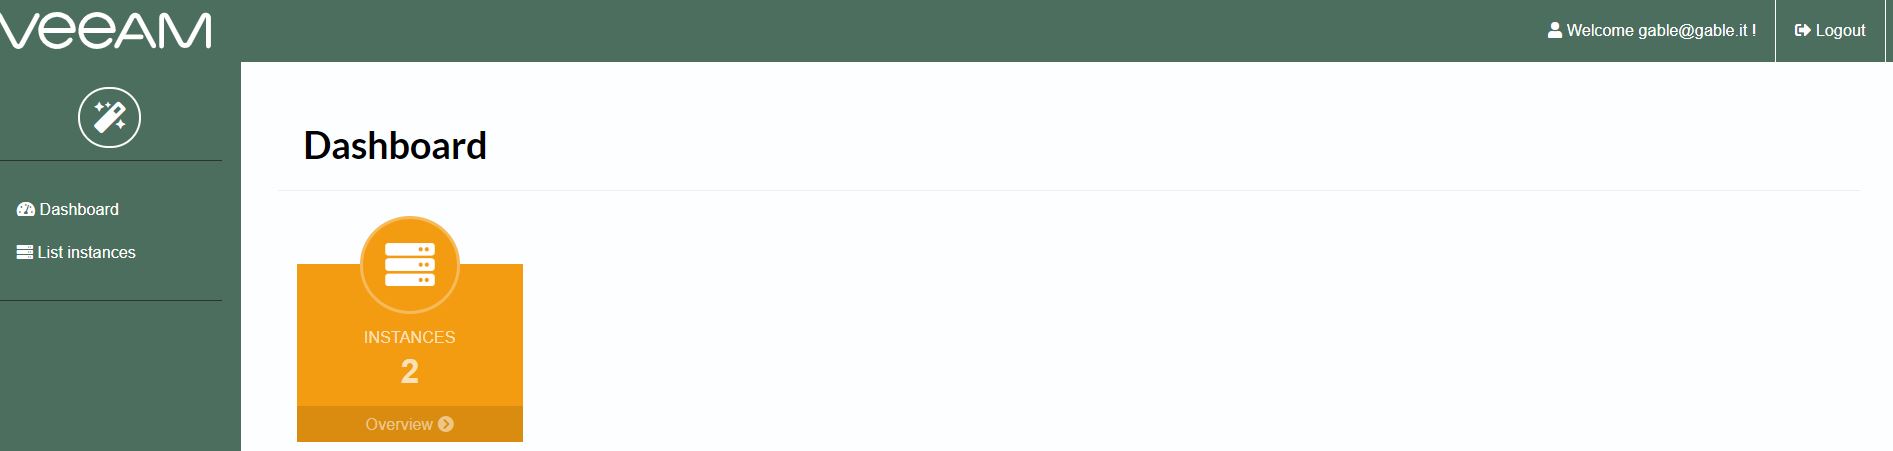 Picture 11
 Picture 12
 Picture 13
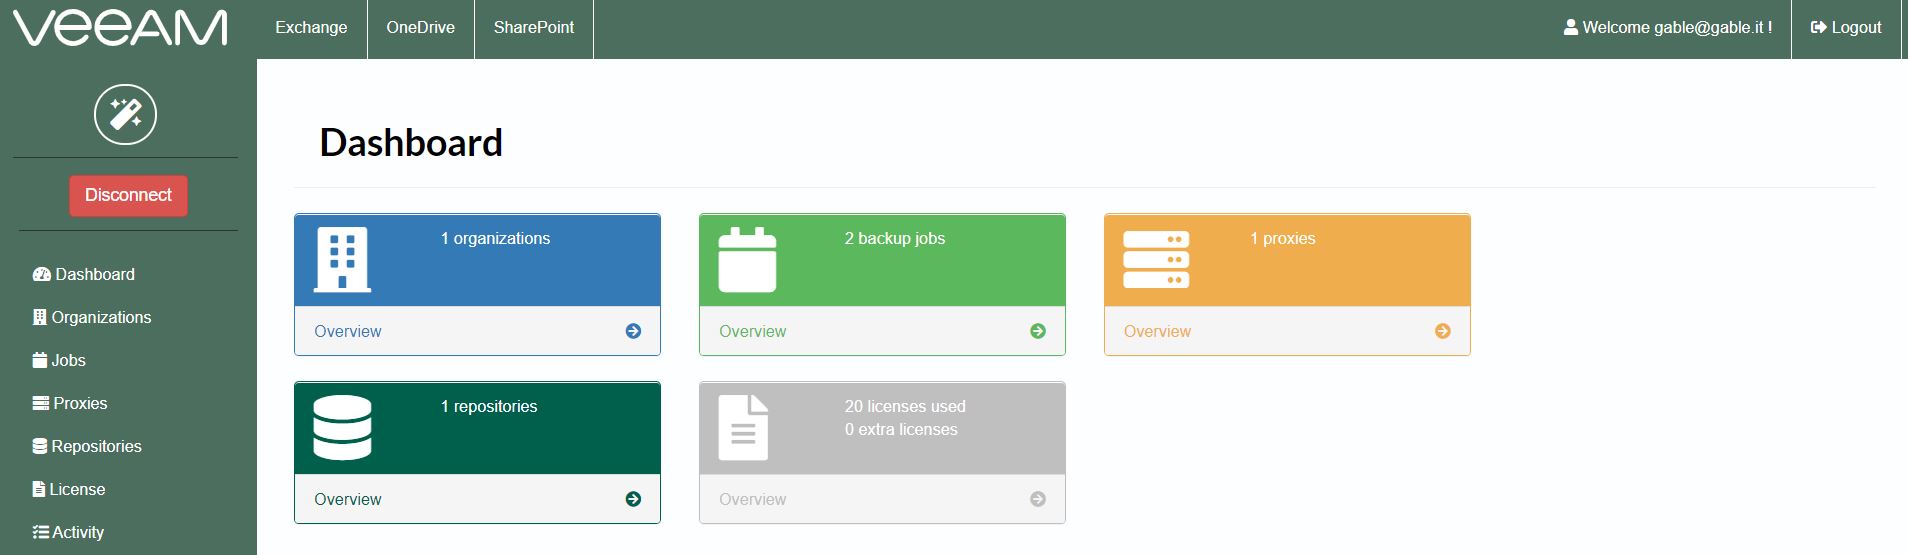 Picture 14
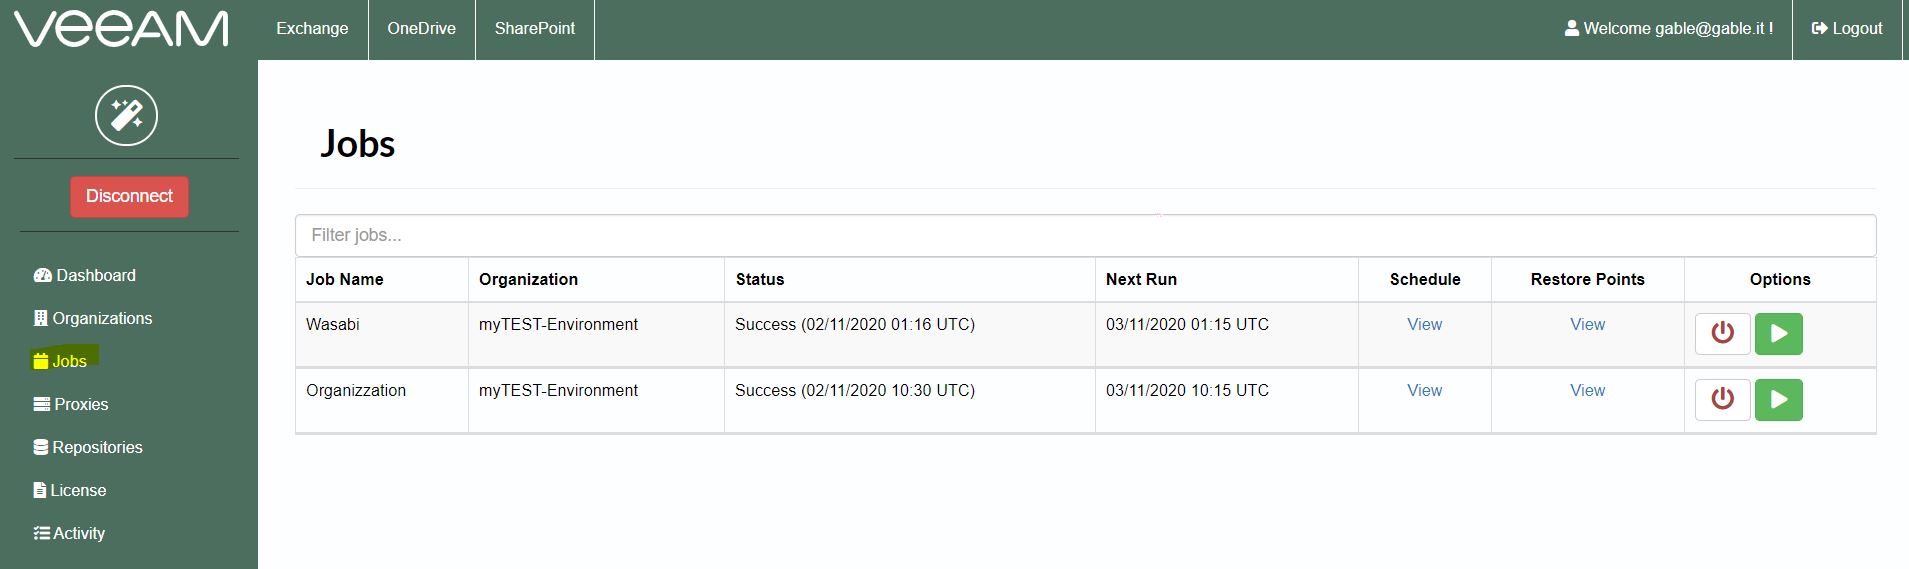 Picture 15
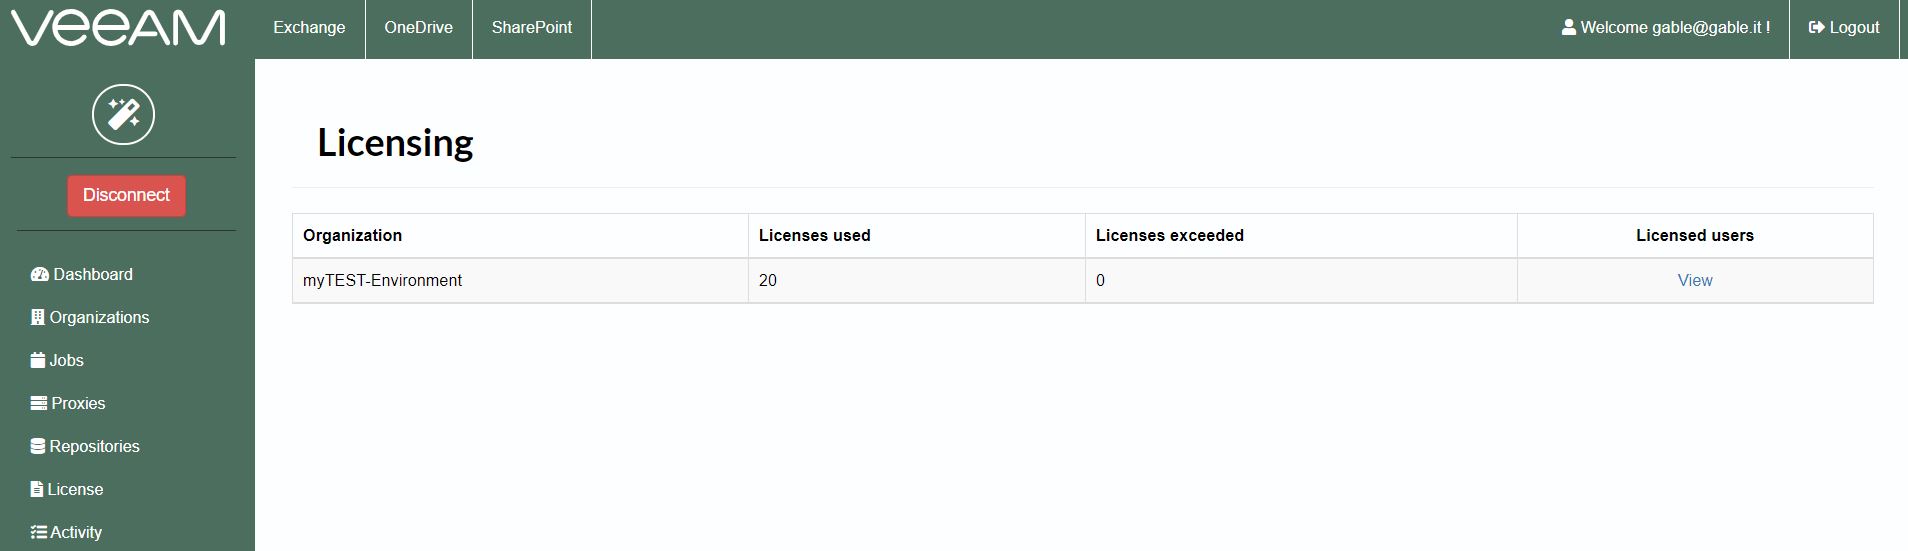 Picture 16
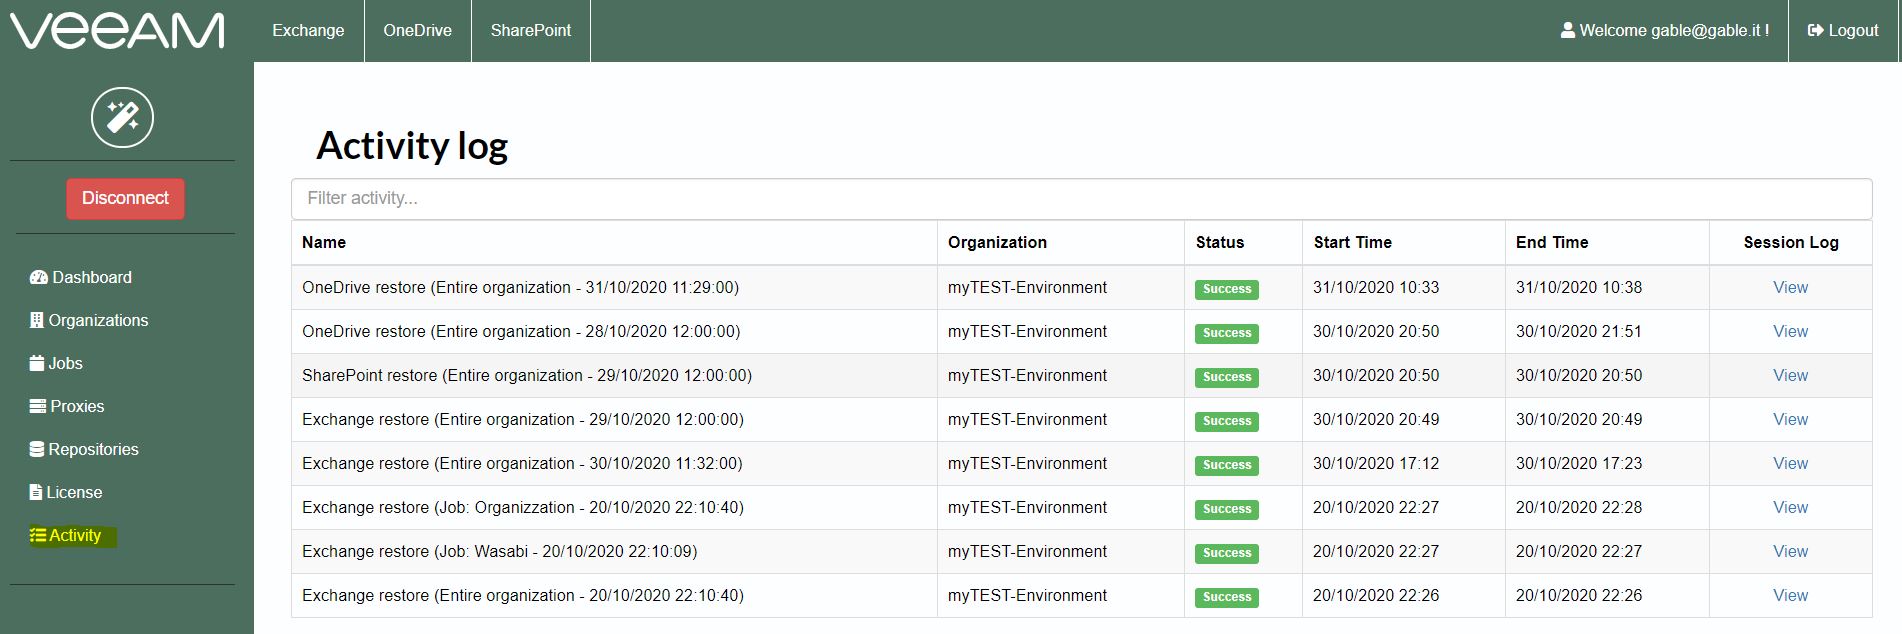 Picture 17
 Picture 1
 Picture 2
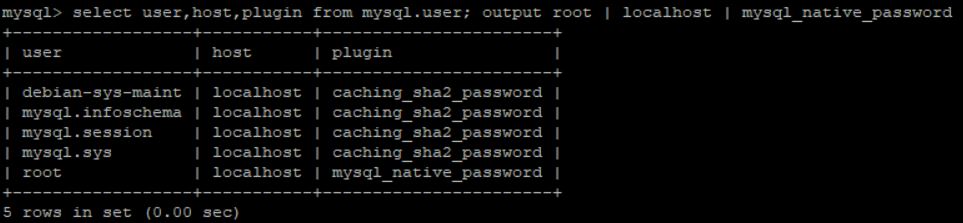 Picture 3
 Picture 4
 Picture 5
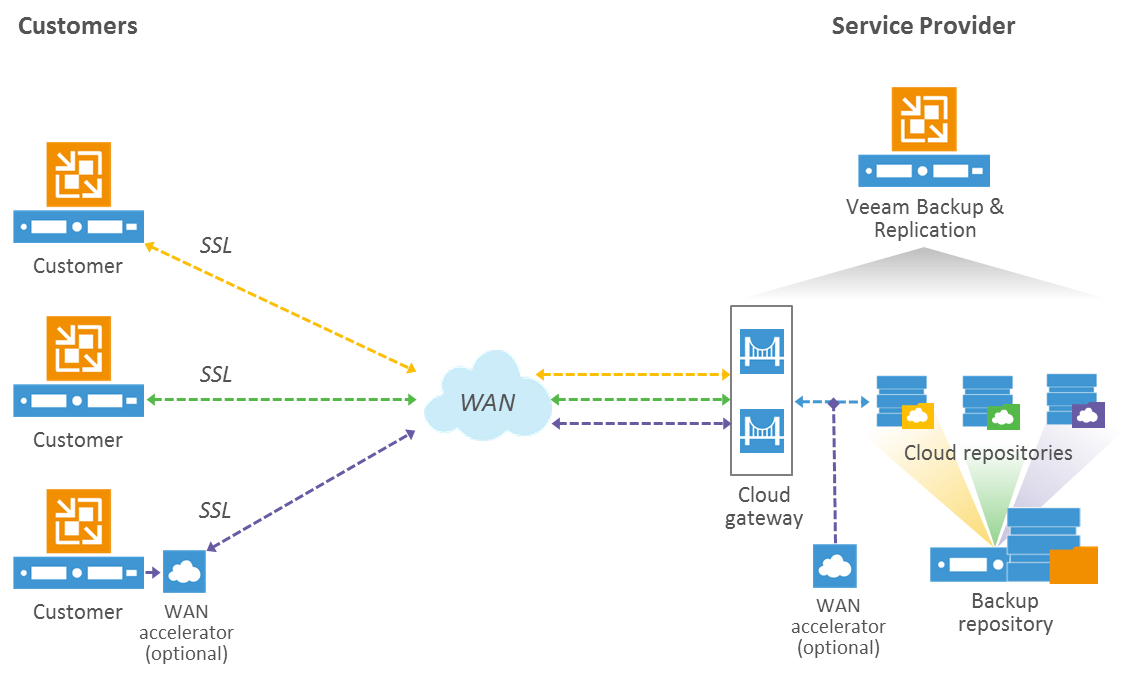 Picture 1
 Picture 2
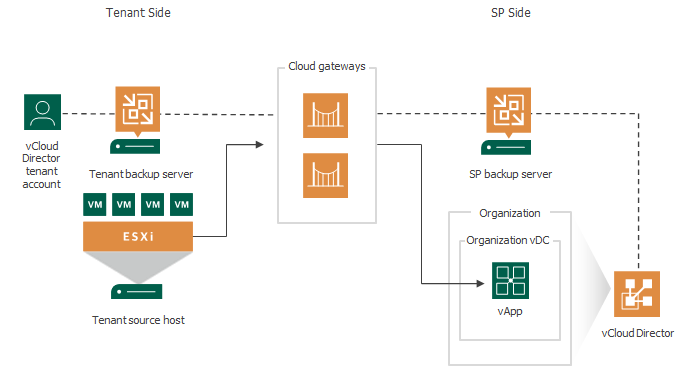 Picture 3