In the Veeam Backup & Replication environment, it may be necessary to expand the allocated space of a Linux repository.
In my environment, there is an Ubuntu 22.04 server to which a second disk(dev/sdb) was added, formatted as xfs, and made available as mount point /mnt/backup/ .
The packages to install are cloud-guest-utils and gdisk: “sudo apt -y install cloud-guest-utils gdisk”
To find out the structure of the file system use the command: “sudo lsblk”
The result shows the sizing, and mount point of Ubuntu server file system:
NAMEMAJ:MIN RMSIZE RO TYPE MOUNTPOINTS sda 8:00 16G0 disk ├─sda18:101M0 part ├─sda28:201.8G0 part /boot └─sda38:30 14.2G0 part └─ubuntu–vg-ubuntu–lv 253:00 10G0 lvm/ sdb 8:16 0100G0 disk. └─sdb18:17 0 80G0 part /mnt/backup sr011:01 1024M0 rom
To find out if the file system has additional space to allocate: “sudo growpart /dev/sdb 1”
The result shows the item changed
CHANGED: partition=1 start=2048 old: size=167770079 end=167772126 new: size=209713119 end=209715166
The final command that widens the file system is: sudo “xfs_growfs /mnt/backup/”
Check the result through the command already seen: “sudo lsblk”
ReFS is the advanced file system from Microsoft that improves data availability through technologies that can:
Ensuring greater resilience of data stored on the file system.
Increase the performance in reading and writing.
Improve the scalability (we are talking about millions of TB).
One of the most useful and widely used features in backup is the technology of Block-Cloning which allows Veeam Backup & Replication to create full backups equal in size to an incremental.
The operation logic is simple and consists of 3 phases:
TheBackup copies to the target Repository (ReFS), the incremental data of the VM / Instances / Physical Servers/ Clients To be protected.
The File System ReFS will take care of storing the new blocks and creating the metadatarelated to the newly written data.
The option “create a Syntethic-full” actually triggers anoperation at the level of metadata. ReFS adds to the metadata just created, those related to previous backups, thus creating a new full child of the union of all the necessary metadata. To further simplify, a logical full is created without any block being copied/moved.
Note 1: The result is not only a saving in space but also in the time it takes to make the full.
Well, how is it possible to quantify the disk space saved in the repository (ReFS)?
Timothy DeWin has made a tool (blockstat.exe) perfect for this calculation, to which I refer you for all possible options.
In my case, I solved the client’s need through:
Creation through powershell of a text file (Unicode format) that would search all the Backup files generated by Veeam Backup & Replication within the ReFS repository. (See image 1)
Captured the output of the bloclstat command. (see image 2)
Veeam One is a splendid Advanced Analysis and Reporting tool for virtual and backup environments.
In an Enterprise architecture, the Veeam One roles are distributed on different Servers.
Let’s talk about the DataBase ( MS-SQL ), the Reporting Server ( SSRS ) and obviously the Veeam ONE Server ( VOS )
In this article, I will illustrate how you can streamline your reporting by creating an encrypted connection between Veeam ONE and the Reporting Server at the same time.
The procedure consists of three macro phases.
The first creates the certificate that enables the HTTPS encrypted connection on the SSRS server.
In the second, you configure SSRS to accept HTTPS connections.
In the third, we configure the Veeam ONE server to use SSRS for reporting.
1- Creation of the certificate
If there is no certificate authority installed in your domain (like mine), you need to create a Self-Signed certificate.
Let’s see how to proceed:
On the SSRS , start a PowerShell console as administrator and run the following commands:
New-SelfSignedCertificate -CertStoreLocation cert: \ LocalMachine \ my -dnsname NAMESERVER -NotAfter (Get-Date) .AddMonths (60) (replace NAMESERVER with your Server name).
$ pwd = ConvertTo-SecureString ” yourpassword ” -asplainText -force (replace yourpassword with a complicated one of your choice).
$ file = ” C: \ MyFolder \ SQLcertificate.pfx ” (this is the location where the certificate will be exported ).
Export-PFXCertificate -cert cert: \ LocalMachine \ My \< Thumbprint created from the output of the first command> -file $ file -Password $ pwd ( Copy the certificate to the file created in step 3 ).
Import-PfxCertificate -FilePath $ file cert: \ LocalMachine \ root -Password $ pwd ( imports the certificate into the SSRS ).
Now it’s time to copy the SQLcertificate.pfx file (point 3) into the VOS and proceed with its installation as indicated in the next lines.
Double click on the file and in the first window choose ” Local Machine “.
When prompted for the password , provide the one set in step 2.
On the next screen select ” Place all certificates in the following store “, and after selecting Browse, select from the ” Trusted Root Certification Authorities ” list.
Ok and after selecting Next, finish the installation.
2- SSRS configuration
Using the SSRS configuration manager it is possible to set the HTTPS connection as shown in images 1,2 and 3.
Picture 1
picture 2
Picture 3
3- Veeam ONE configuration
Images 4 and 5 show how to configure VOS to use SSRS to generate reports.
Picture 4
Picture 5
Note 1: From image 5 we can see that it is possible to test the connection via the Test Connection button.
Note 2: The details on which ports open in the firewalls are documented in the guide. ( helpcenter.veeam.com) ; remember to add port 443 🙂
This article will show you how to implement a data protection strategy in MySQL environments.
Let’s start with a consideration.
To create consistent backups from an application point of view, it is necessary that before the copy process is started, the application has written all the data in memory to disk ( flush ).
For example, Microsoft® applications use a technology called Shadow Copy which, through the coordination of VSS drivers , achieves application consistency.
A similar technology is not available on Linux and in addition MySQL does not support it in the Microsoft® environment.
How to remedy?
Through the creation of scripts that automate application consistency before starting the creation of the Snapshot .
Having understood this aspect, let’s return to the scope of the article, introducing the options available for MySQL .
Note 1 : Application consistency occurs before snapshot creation.
1. Logical Backup : The script creates a file with the .sql extension which in case of restore allows the re-creation of the database and its data.
The file . sql is created through the native MySQL command ” mysqldump “ .
The advantages of logical backup can be summarized in:
There are no dependencies on third-party software.
Backups can be restored to other servers.
2. Physical / Cold Backup : Cold copies of the DB files are created (for example: ibdata, .ibd, .frm, ib_logfile, my.cnf).
To be sure that the backups are made in ” application consistency ” mode, before taking the snapshot, it is essential to stop the MySQL services.
It is a backup strategy typically implemented in environments that do not require 24×7 operations.
Note 2 : The service is stopped only for the time necessary to create the snapshot and not for the entire duration of the backup.
3. Physical / Hot Backup : If the InnoDB engine is running, the script allows the creation of consistent copies without stopping the services (using for example the command mysqlbackup component of the MySQL Enterprise suite ( MySQL Product) ).
Now that we know the scripting options available, let’s see how Veeam solutions can natively integrate with MySQL environments.
The first available option is the Veeam Agent for Linux ( VAL ) which automates the following four steps:
Flush data from memory to disk (application consistency).
Creation of the snasphot.
Release of tables.
Start the Backup process.
Note 3 : As indicated in the first part of the article, if the DB is of the MyISAM type, it is possible to backup with the blocking of all the tables.
The pre-requisites of the VAL are:
MySQL version is greater than or equal to 5.8.
The operating system is Linux.
Question: Is it possible to backup in Windows environments where the MySQL version is lower than version 5.8?
The answer is yes and the available scenarios are:
Physical / Cold Backup –> Cold-Backup Database Shutdown -> Temporary stop of the Services.
Physical / Hot Backup –> Hot-Backup Database Freeze -> Native mysql commands.
Note4 : There is also the possibility of making Partial Backups . In this scenario, specific tables and databases are backed up. It is useful when different protectionstrategies have to be implemented on the same Server.
In the next article, we will find out how to create scripts and how to integrate them into Veeam Backup & Replication.
On January 24th I completed the VMCE 2021 training course.
In this article, I will describe the methodology I used in order to pass the final exam.
The six cornerstones of the preparation were:
1- Pay maximum attention to Veeam Backup & Replication components (Backup Server, Proxy, Wan Acceleration, Gateway) understanding their purpose, operation, and limitations. For example, for proxies to know the usage scenarios of the different transport modes (SAN, Virtual Appliance, Direct NFS, Network).
2- Understand the RPO (Recovery Point Object) and RTO (Recovery Time Object) theme by analyzing:
Type and topology of protection (Backup, Replica, and Backup Copy Job)
Type of repositories involved (Stand-alone, XFS / ReFS, Immutable, SOBR, capacity Tier and Archive Tier)
Backup chain (Forever Forward Incremental, Reversed Incremental and Forward Incremental)
Note 1 : to verify the preparation the advice is to respond to imaginary requests for protection; for example, thegable.it customer requested a daily primary backup of their VMs with an RPO of 31 days, with a GFS retention of 8 Weeks and 12 Months. In addition, the backup data will have to be copied to a second site …
3- Reinforce the knowledge on the available recovery options (VBR manual), through the Veeam Explorer, also in this case paying particular attention to the usage scenarios and limitations.
4- Massively use the laboratory to establish not only theoretical aspects but also real implementation scenarios.
5- Know the Veeam ONE features (Infrastructure, Data Protection, Business View).
Note 2: Laboratories simplify learning by often turning theory into a wonderful game of trial and error.
Preparation time was 42 days roughly divided into 2 hours/day on average during the week and 4 hours/day on average on weekends.
6- To check your progress and for the final review, the following are available:
Pearson-Vue test platform certifies VMCE-2021 competency.
You cantake the exam either at a Pearson-Vue center or from your home and office.
While recognizing that online is a very convenient approach that eliminates all logistical problems, in my case a small problem presented itself.
My method of recalling stored information and its processing to answer questions often requires the use of a pen and inkwell *.
Well, the exam with the “home and office” option does not allow the use of any pencil and sheet of paper while in Paerson-Vue authorized centers it is often possible to use a small whiteboard of the re-writable type.
In addition, by applying to a licensed center, you will also be helping Pearson-Vue centers to pay back their investment.
*: To take and digitize notes, I have been using Remarkable 2 with utmost satisfaction for 6 months, which I highly recommend to all readers.
On January 24th I completed the VMCE 2021 training course.
In this article, I will describe the methodology I used in order to pass the final exam.
The six cornerstones of the preparation were:
1- Pay maximum attention to Veeam Backup & Replication components (Backup Server, Proxy, Wan Acceleration, Gateway) understanding their purpose, operation, and limitations. For example, for proxies to know the usage scenarios of the different transport modes (SAN, Virtual Appliance, Direct NFS, Network).
2- Understand the RPO (Recovery Point Object) and RTO (Recovery Time Object) theme by analyzing:
Type and topology of protection (Backup, Replica, and Backup Copy Job)
Type of repositories involved (Stand-alone, XFS / ReFS, Immutable, SOBR, capacity Tier and Archive Tier)
Backup chain (Forever Forward Incremental, Reversed Incremental and Forward Incremental)
Note 1 : to verify the preparation the advice is to respond to imaginary requests for protection; for example, thegable.it customer requested a daily primary backup of their VMs with an RPO of 31 days, with a GFS retention of 8 Weeks and 12 Months. In addition, the backup data will have to be copied to a second site …
3- Reinforce the knowledge on the available recovery options (VBR manual), through the Veeam Explorer, also in this case paying particular attention to the usage scenarios and limitations.
4- Massively use the laboratory to establish not only theoretical aspects but also real implementation scenarios.
5- Know the Veeam ONE features (Infrastructure, Data Protection, Business View).
Note 2: Laboratories simplify learning by often turning theory into a wonderful game of trial and error.
Preparation time was 42 days roughly divided into 2 hours/day on average during the week and 4 hours/day on average on weekends.
6- To check your progress and for the final review, the following are available:
Pearson-Vue test platform certifies VMCE-2021 competency.
You cantake the exam either at a Pearson-Vue center or from your home and office.
While recognizing that online is a very convenient approach that eliminates all logistical problems, in my case a small problem presented itself.
My method of recalling stored information and its processing to answer questions often requires the use of a pen and inkwell *.
Well, the exam with the “home and office” option does not allow the use of any pencil and sheet of paper while in Pearson-Vue authorized centers it is often possible to use a small white board of the re-writable type.
In addition, by applying to a licensed center, you will also help Pearson-Vue centers pay back their investment.
*: To take and digitize notes, I have been using Remarkable 2 with utmost satisfaction for 6 months, which I highly recommend to all readers.

 Picture 1
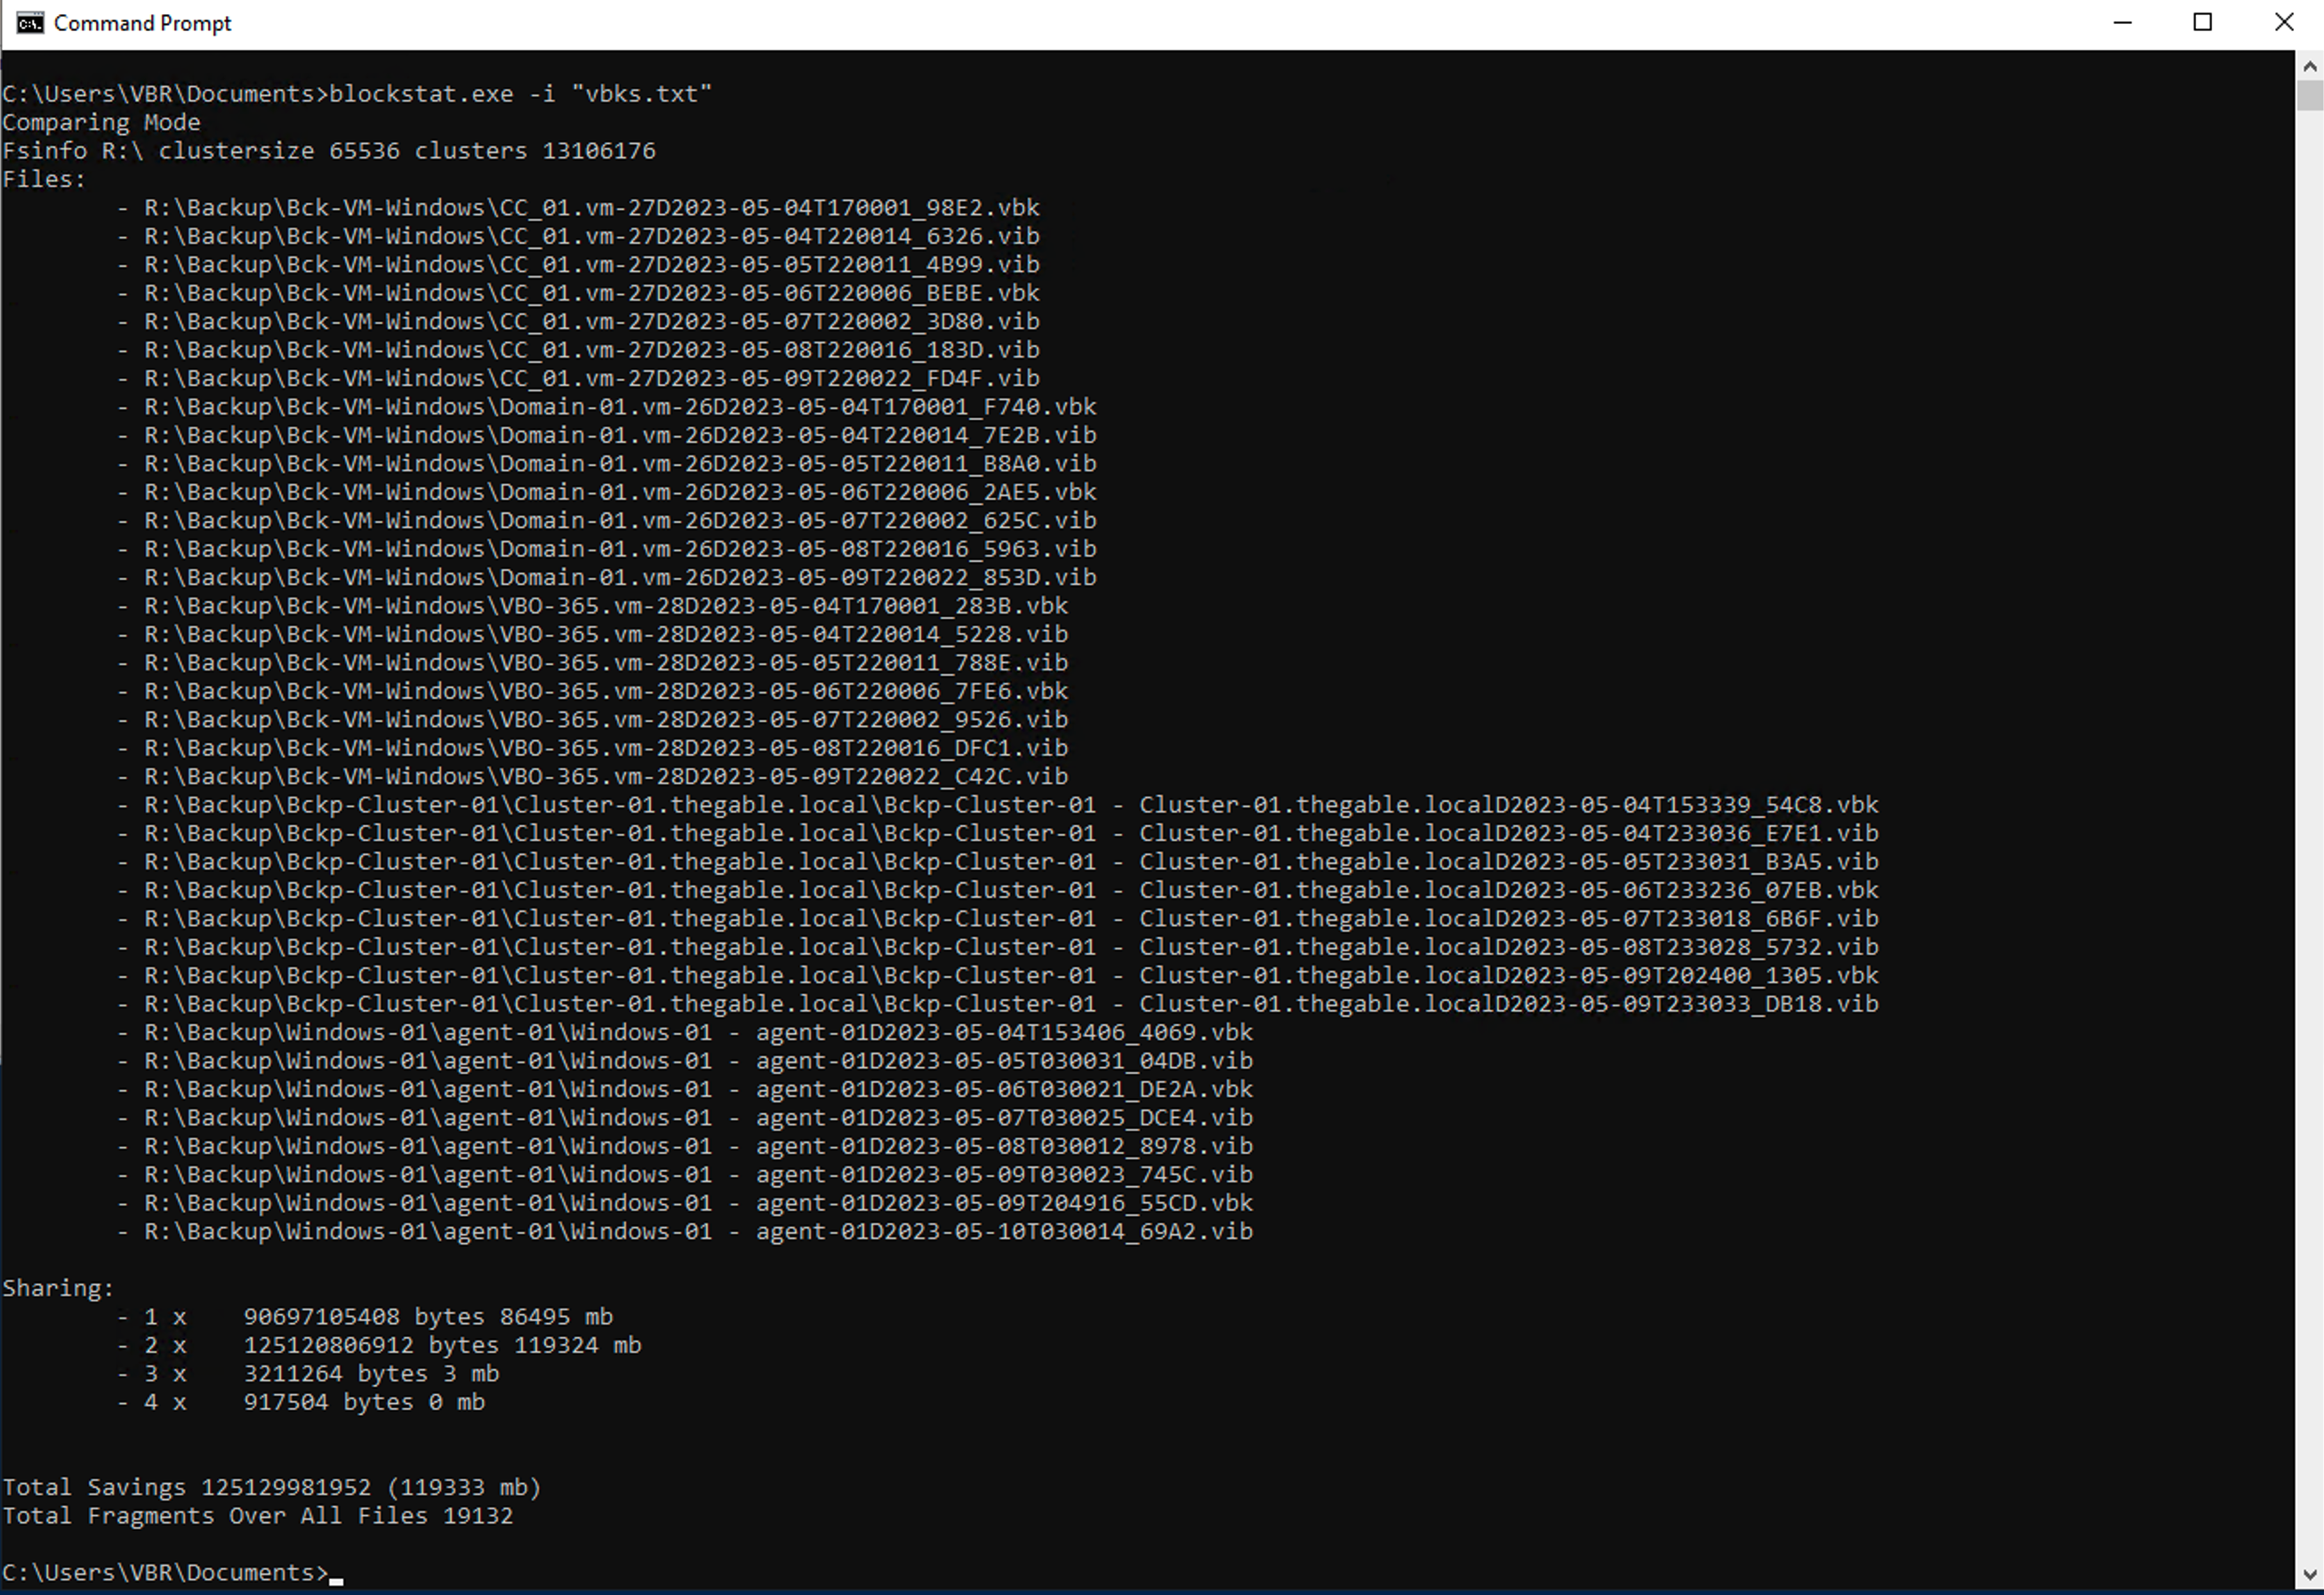 picture 2
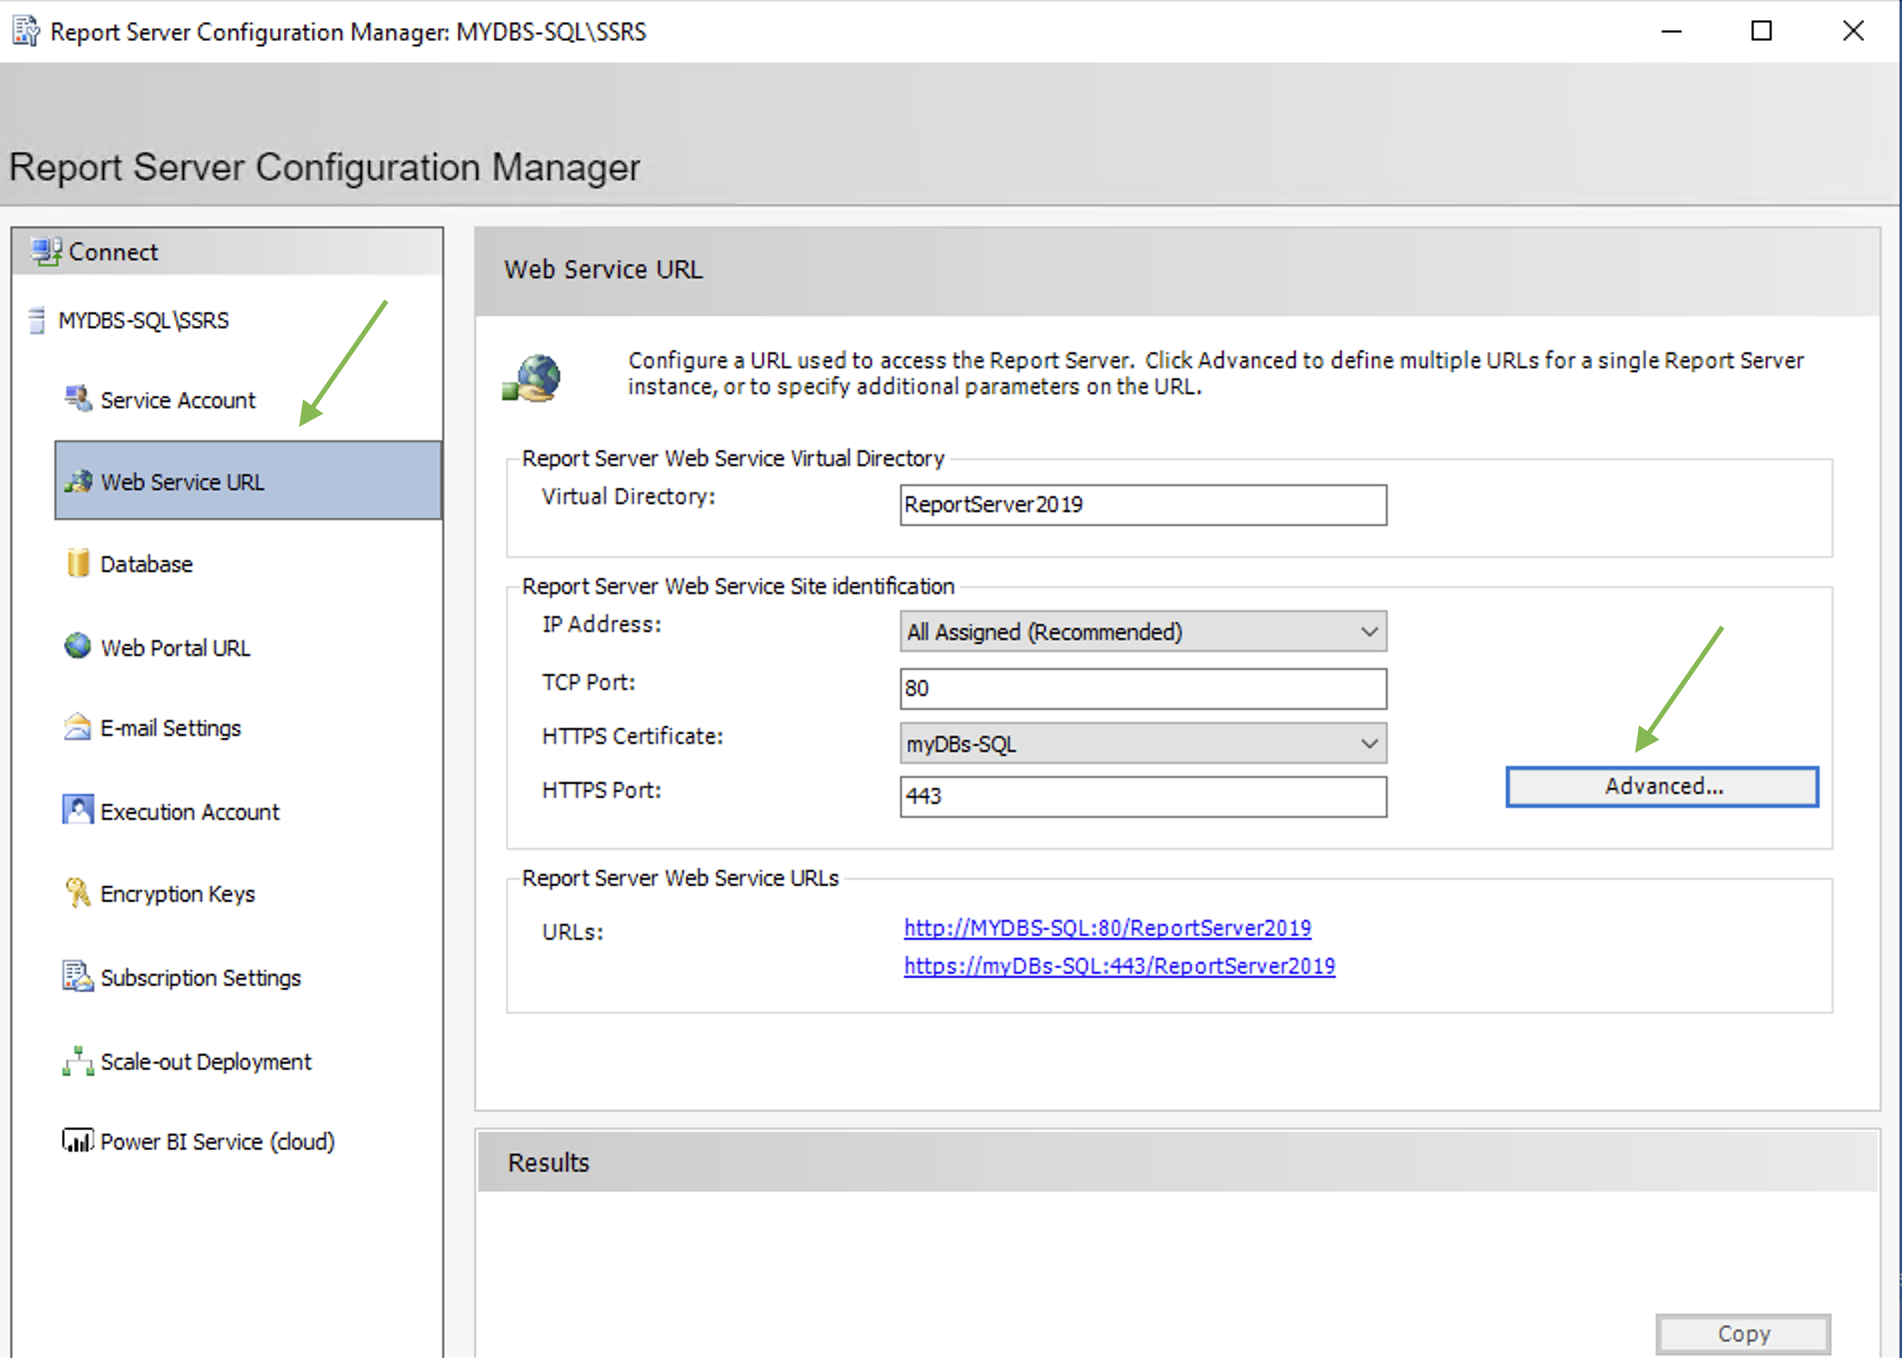 Picture 1
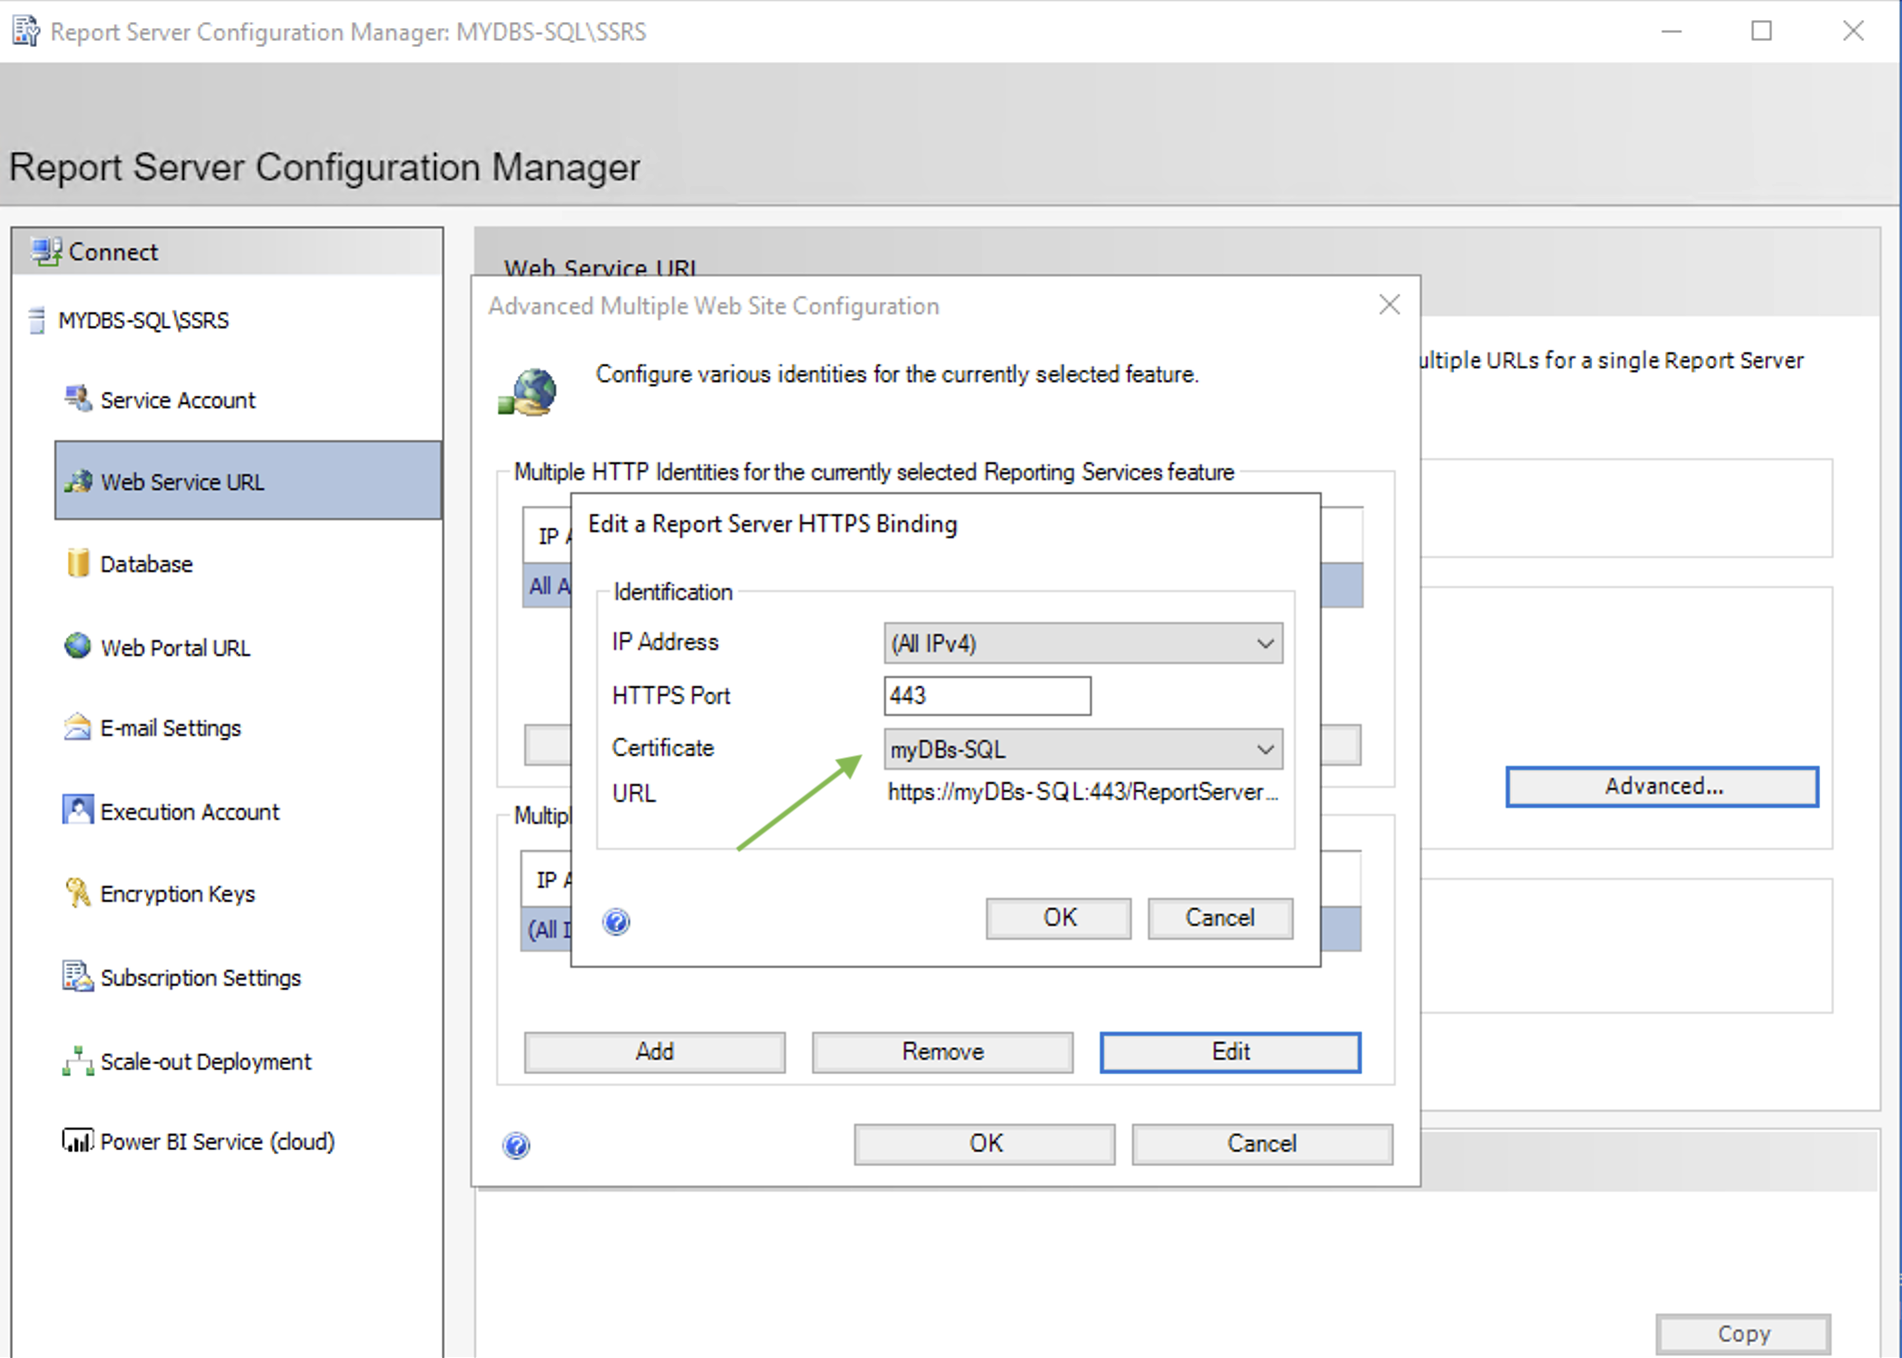 picture 2
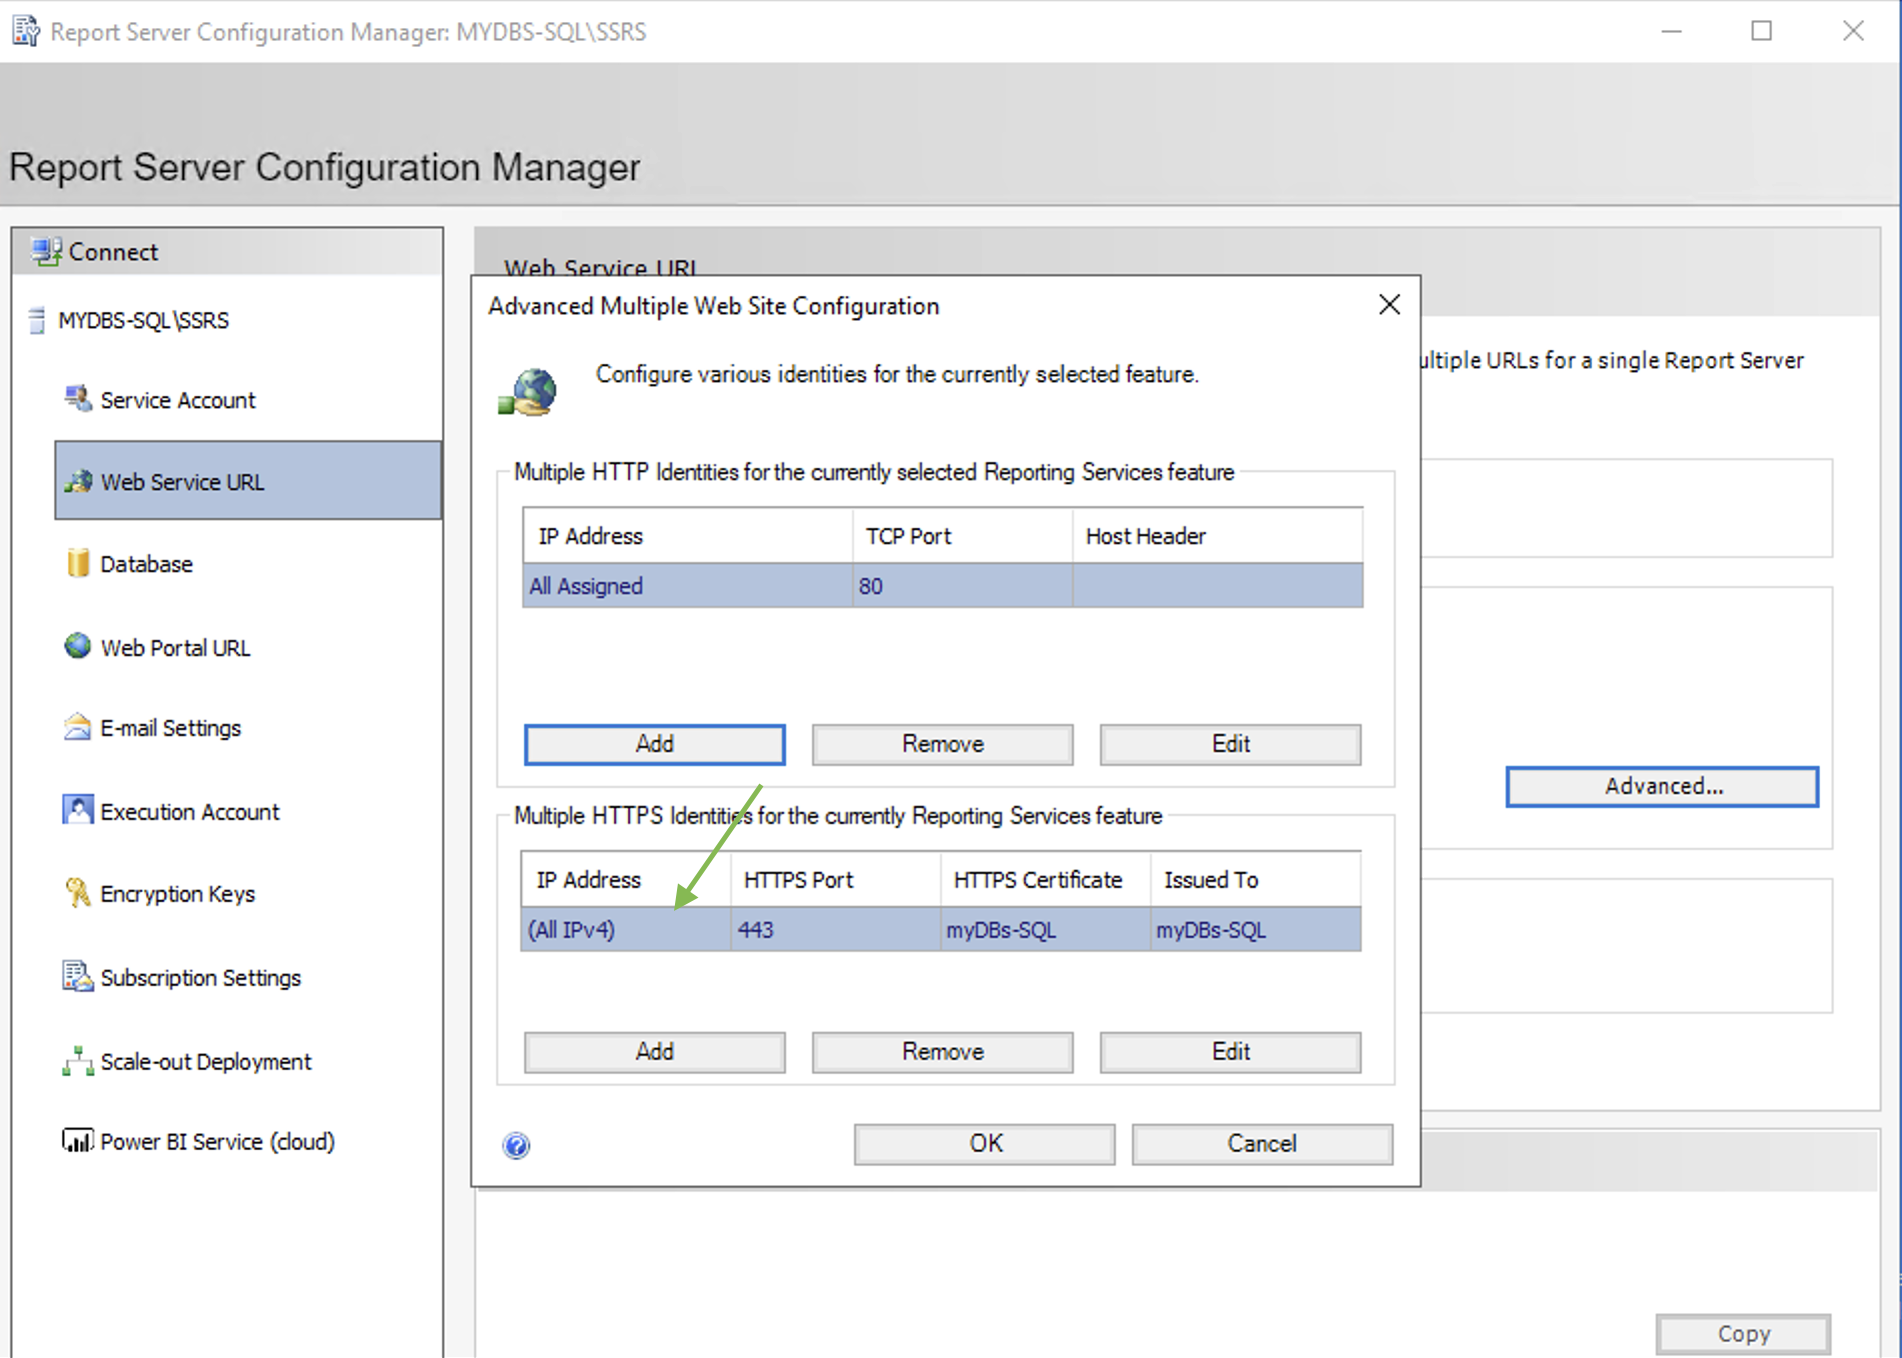 Picture 3
 Picture 4
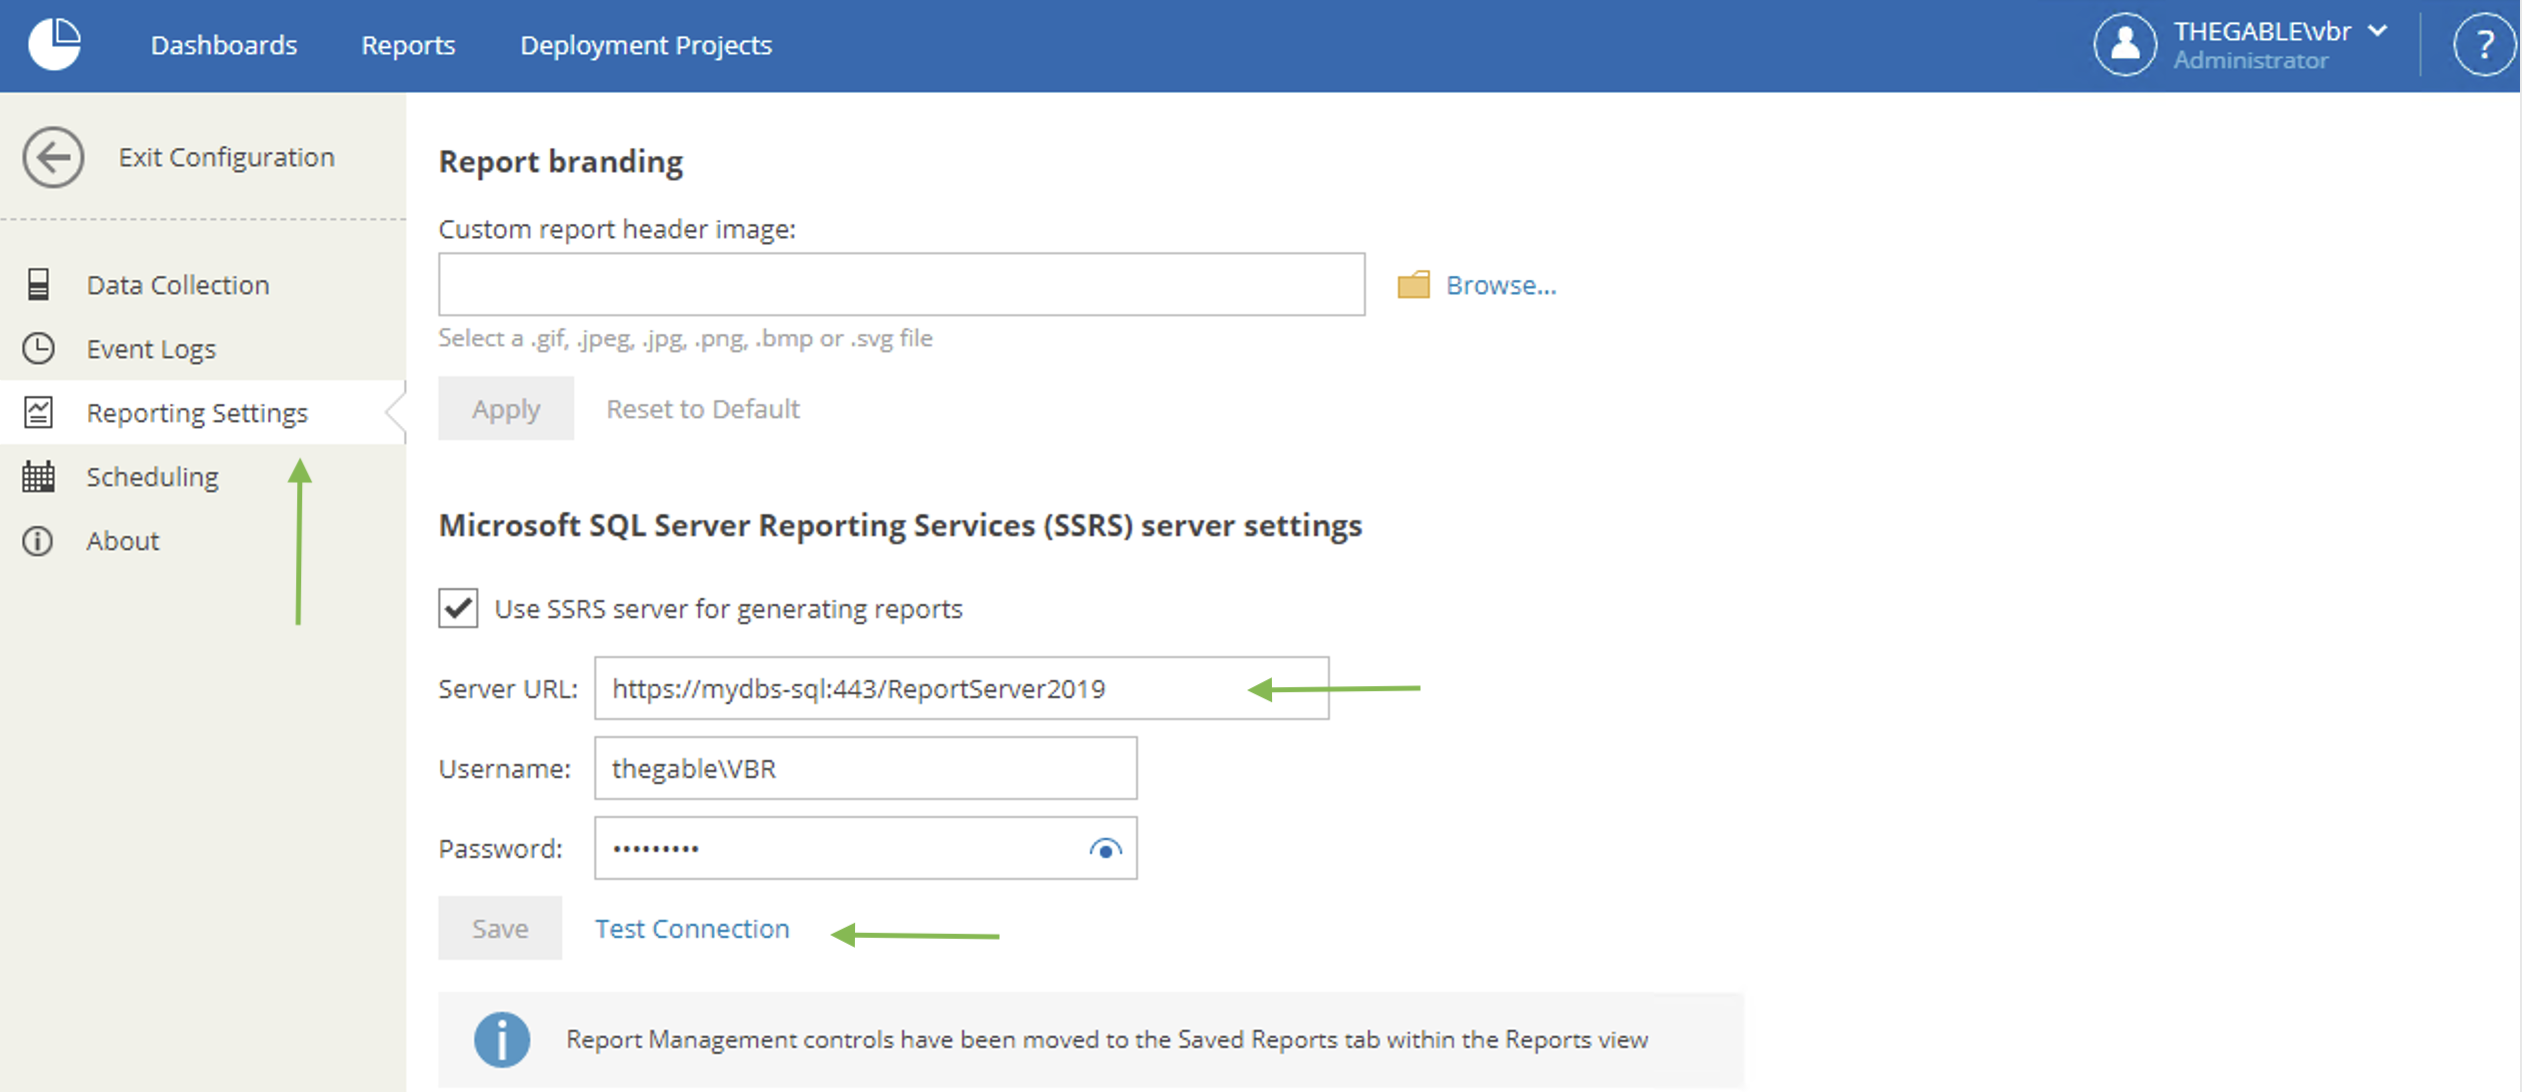 Picture 5