Veeam Backup & Replication: License count

Starting July 1, 2022, the sale of perpetual per-socket licenses of Veeam Backup & Replication ™, Veeam Availability Suite ™, Veeam Backup Essentials ™, and Veeam ONE ™ will cease to both new and existing customers.

The products currently in operation will continue to work but it will not be possible to purchase new Socket licenses to upgrade.

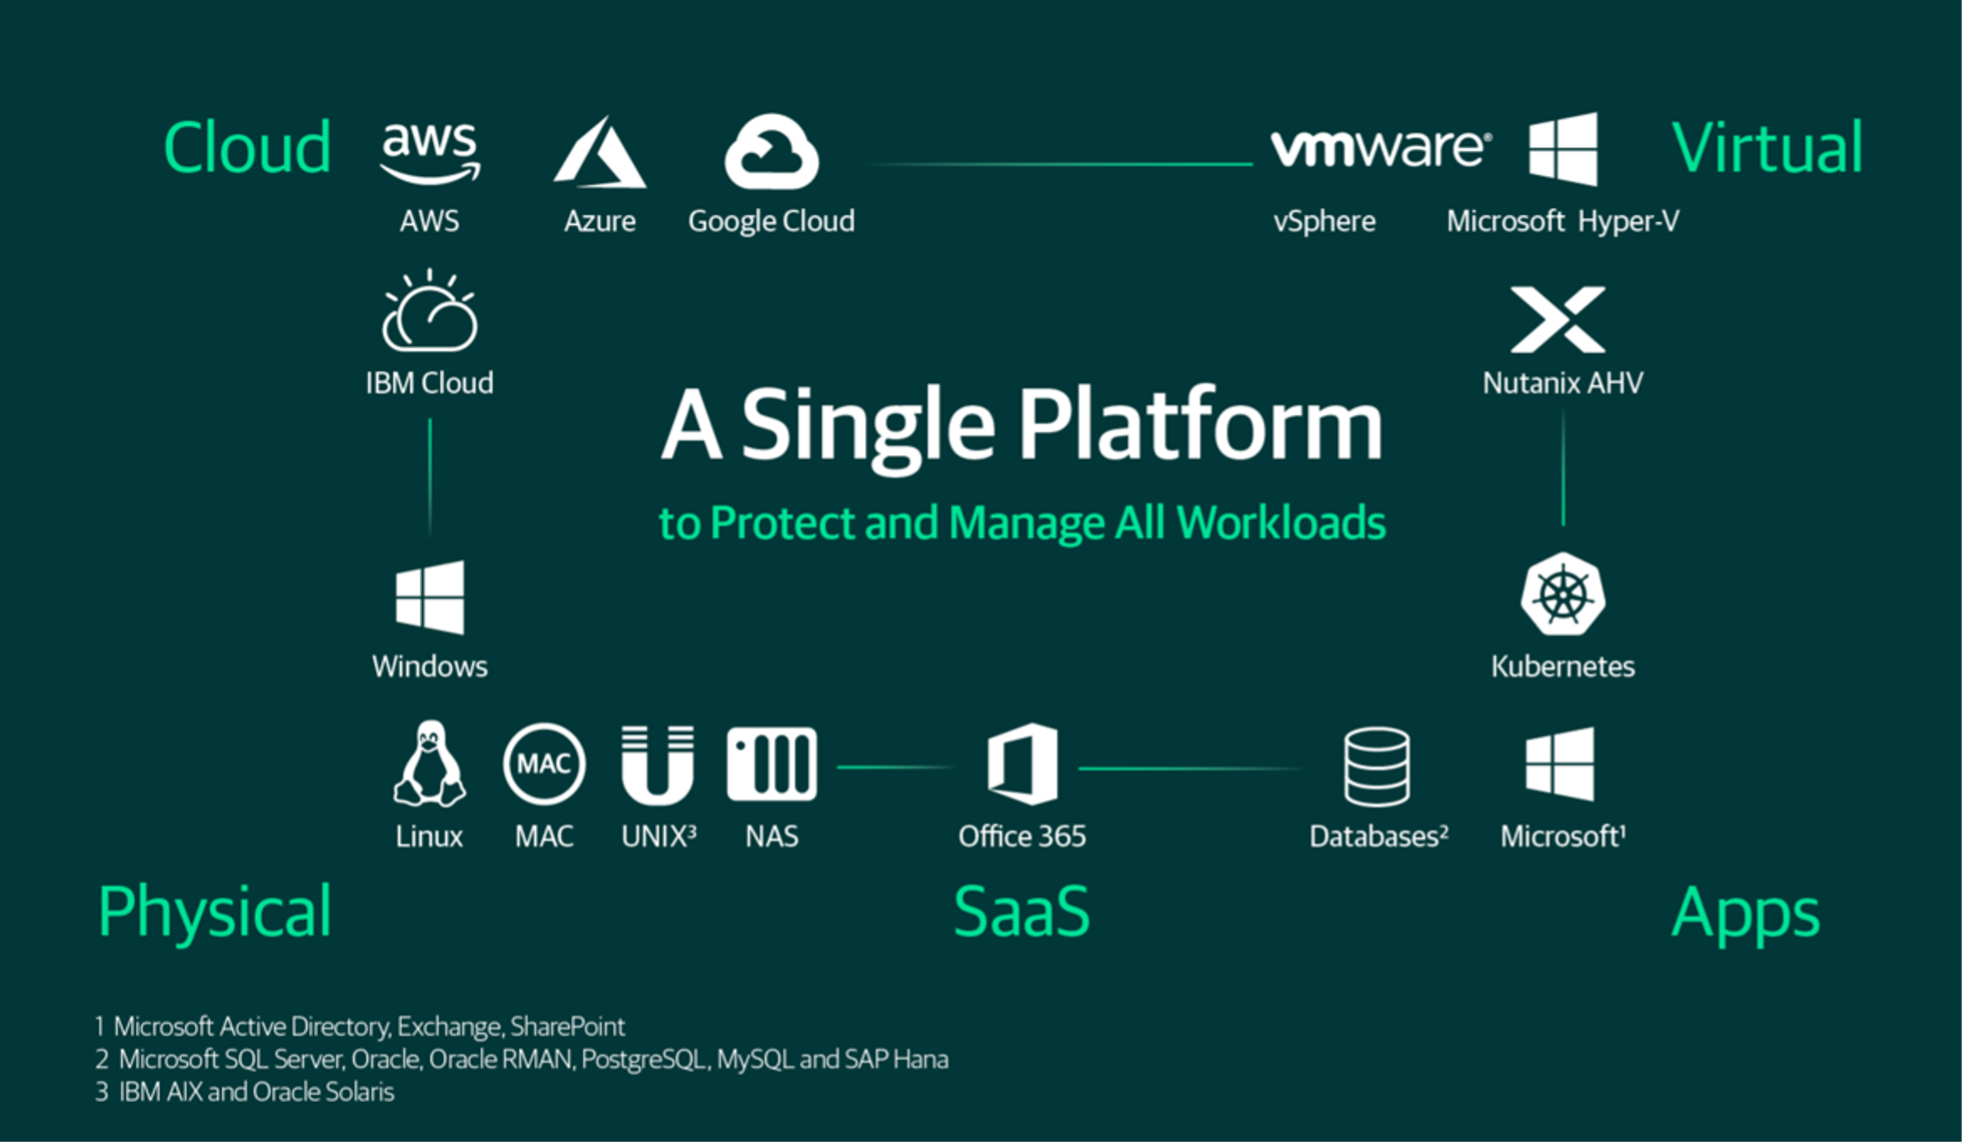
The licenses that can be purchased and available are the Veeam Universal Licenses (VUL) which use the single workload as the unit of measure.

The most important advantages of the VUL model can be summarized in:

  1. Ability to protect any supported workload (such as instances in AWS, Azure, and GCP) and not just VMware and Hyper-V virtual machines.
  2. Freedom to move licenses as needed between all supported workloads.

Note 1 : Each instance can be used to protect 500 GB source data of a NAS

Note 2: Let’s take an example to simplify the count: let’s assume we need to protect an environment made of 50 Hyper-V VMs, 30 instances in Azure (or in Aws or in GCP), 10 physical servers, and 5 TB of data.

The total number of instances is the algebraic sum of:

a. 50 (VM-HV) + 30 (Azure) + 10 (Server) + 10 (NAS) = 100 instances = 10 VUL

If 20 Hyper-V VMs will be migrated to Azure, the count changes to

b. 30 + 50 + 10 + 10 = 100 instances = 10 VUL

As you can see, the total number of instances does not change.

The good news is that Veeam has a plan available to help customers migrate their licenses.

Your Veeam Sales Representative will be able to advise you on the best options available.

Note 3 : In this scenario it is essential to provide the Veeam contact with the log files.

The one that describes the licenses used is called VMC.log

See you soon

Veeam Disaster Recovery Orchestrator – Creazione del piano

Siamo arrivati all’ultimo articolo sul Veeam Disaster Recovery Orchestrator versione 5.

In questa ultima parte concentreremo gli sforzi fatti in precedenza e consultabili nel presente sito, per realizzare il piano di Orchestrazione del Disaster Recovery.

Dopo aver effettuato il login, la dashboard illustra lo stato dei piani realizzati (immagine 1).

Immagine 1

Notate che a differenza della versione VDrO precedente, è possibile filtrare i piani in base agli “scopes” (immagine 2).

Immagine 2

Una seconda e utilissima novità della versione 5 è la presenza della voce inventory (immagine 3), dove vengono riportati i VM Groups.

Tale opzione verifica immediatamente che nello “scope” scelto vi siano il gruppo di VM che realizzeranno il piano di DR.

Immagine 3

L’immagine 4 riporta i dettagli dei piani di Orchestrazione già creati.

Immagine 4

Vediamo ora come creare un piano:

Dal menù manage selezioniamo la voce New (immagine 5).

Immagine 5

E proseguendo con il wizard, inseriamo un nome (immagine 6), lo scope (immagine 7) e la tipologia di piano (immagine 8).

Immagine 6

Immagine 7

Immagine 8

Dopo aver aggiunto il gruppo di VM da porre sotto orchestrazione (immagine 9, 10 e 11)

Immagine 9

Immagine 10

Immagine 11

E’ possibile personalizzare le opzioni di Recovery, (ad esempio se processare le VM in modalità parallela o  sequenziale) (immagine 12).

Immagine 12

Aggiungo ora gli step necessari alla realizzazione del piano (nell’esempio come prima attività del piano è stato aggiunto lo spegnimento della VM di produzione ) (vedi immagini 13, 14, 15 e 16).

Immagine 13

Immagine 14

Immagine 15

Immagine 16

Il wizard si conclude con:

  • L’opzione di  porre sotto Backup le VM che sono state avviate durante il piano di DR (immagine 17)
  • I valori di RTPO che dovranno essere rispettati affinchè il piano possa essere eseguito (immagine 18)
  • La scelta della lingua del template da utilizzare (immagine 19)
  • L’ora alla quale i report saranno automaticamente generati (immagine 20)
  • Se creare immediatamente il report readiness (che verifica tutti i componenti del piano) (immagine 21)

immagine 17

immagine 18

immagine 19

immagine 20

immagine 21

Ora è possibile testare e successivamente avviare i piani di orchestrazione

Veeam Disaster Recovery Orchestrator – Creating the plan

We have arrived at the latest article on Veeam Disaster Recovery Orchestrator version 5.

In this last part, we will concentrate on the efforts made previously and available on this site, to implement the Disaster Recovery Orchestration plan.

After logging in, the dashboard illustrates the status of the completed plans (image 1).

Picture 1

Note that, unlike the previous VDrO version, it is possible to filter planes based on “scopes” (image 2).

picture 2

A second and very useful novelty of version 5 is the presence of the inventory items (image 3), where the VM Groups are reported.

This option immediately verifies that in the chosen “scope” there is the group of VMs that will implement the DR plan.

Picture 3

Image 4 shows the details of the Orchestration plans already created.

Picture 4

Let’s see now how to create a plan:

From the manage, menu selects the New item (image 5).

Picture 5

And continuing with the wizard, we enter a name (image 6), the scope (image 7), and the type of floor (image 8).

Picture 6

Picture 7

Image 8

After adding the VM group to be orchestrated (image 9, 10 and 11)

Image 9

Image 10

Image 11

It is possible to customize the Recovery options, (for example whether to process the VMs in parallel or sequential mode) (image 12).

Image 12

Now I add the steps necessary for the realization of the plan (in the example the shutdown of the production VM was added as the first activity of the plan) (see images 13, 14, 15, and 16).

Image 13

Image 14

Image 15

Image 16

The wizard ends with:

  • The option to backup the VMs that were started during the DR plan (image 17)
  • The RTPO values that must be respected for the plan to be executed (image 18)
  • The choice of the language of the template to be used (image 19)
  • The time at which the reports will be automatically generated (image 20)
  • Whether to immediately create the readiness report (which verifies all components of the plan) (image 21)

image 17

image 18

image 19

image 20

image 21

Now you can test and start your orchestration plans later

Veeam Disaster Recovery Orchestrator v.5: Verifica dei componenti

Il presente articolo illustra come configurare il menù di amministrazione del Veeam Disaster Recovery Orchestrator (VDrO).

Prima di procedere alla fase di amministrazione, è indispensabile aver già etichettato le risorse che dovranno far parte dei piani di Disaster Recovery.

La classificazione è stata illustrata nel precedente articolo, disponibile cliccando sul seguente link: VDrO – VOne – Tagging.

Nota 1: Per accedere al menù di amministrazione, selezionate la voce denominata “Administration” (vedi immagine 1)

Immagine 1

La configurazione del menù di amministrazione si divide in tre principali aree:

Nella prima sono impostate:

  • Il nome del VDrO Server e il contact name (immagine 2).
  • le connessioni verso i Veeam Backup & Replication Server (VBR) (immagine 3)
  • le connessioni verso i vCenter (immagine 4)
  • la connessione opzionale verso gli storage (immagine 5) (fate riferimento al presente articolo per scoprire i dettagli)

Immagine 2

Immagine 3

Immagine 4

Immagine 5

La seconda area identifica attraverso il tagging le risorse da aggiungere ai piani di DR:

  • La recovery location (immagine 6)
  • Nella recovery location i datastore ove i filesystem delle VM resiederanno (immagine 7)
  • Il mapping delle reti (immagine 8)
  • Il remapping degli indirizzi IP (immagine 9)

Nota 2: Le operazioni sopra descritte sono possibili se e solo se tutte le risorse necessarie sono state etichettate.

Nota 3: Il remapping automatico degli indirizzi IP in caso di avvio di un piano di DR è disponibile solo per le VM Windows.

Immagine 6

Immagine 7

Immagine 8

Immagine 9

Nella terza area sono identificate:

  • La profilazione degli utenti. In parole semplici il VDrO permette di creare utenti in grado di amministrare solo degli specifici workload che sono chiamati “scopes” (immagine 10).
  • L’assegnazione dei DataLab agli  “scopes”. Ricordo che i DataLab permettono di  verificare che il piano di DR sia utilizzabile (immagine 11).

Immagine 10

Immagine 11

L’ultima configurazione permette di legare il gruppo di VM replicate o salvate tramite backup (dette VM Groups) agli scopes degli utenti.

Ad esempio, l’immagine 12 riporta che il VM Group “B&R Job – Replication VAO Win 10” è assegnato (included) ad entrambi gli scopes Admin e Linux.

Immagine 10

Nel prossimo ed ultimo articolo scopriremo come creare e verificare un piano di DR.

A presto

Veeam Disaster Recovery Orchestrator v.5: Components verification

This article explains how to configure the Veeam Disaster Recovery Orchestrator (VDrO) administration menu.

Before proceeding to the administration phase, it is essential to have already labeled the resources that will have to be part of the Disaster Recovery plans.

The classification was illustrated in the previous article, available by clicking on the following link: VDrO – VOne – Tagging .

Note 1 : To access the administration menu, select the item called “Administration” (see image 1)

Picture 1

The configuration of the administration menu is divided into three main areas:

In the first, the following are set:

  • The name of the VDrO Server and the contact name (image 2).
  • connections to Veeam Backup & Replication Servers (VBR) (image 3)
  • connections to vCenters (image 4)
  • the optional connection to the storage (image 5) (refer to this article to find out the details)

picture 2

Picture 3

Picture 4

Picture 5

The second area identifies the resources to be added to the DR plans through tagging:

  • The recovery location (image 6)
  • In the recovery location the datastores where the VM filesystems will reside (image 7)
  • Network mapping (image 8)
  • IP address remapping (image 9)

Note 2: The operations described above are possible if and only if all necessary resources have been tagged.

Note 3: Automatic remapping of IP addresses when starting a DR plan is only available for Windows VMs.

Picture 6

Picture 7

Image 8

Image 9

In the third area are identified:

  • User profiling. In simple terms, the VDrO allows you to create users capable of administering only specific workloads which are called “scopes” (image 10).
  • The assignment of the DataLabs to the “scopes”. Remember that the DataLabs allow you to verify that the DR plan is usable (image 11).

Image 10

Image 11

The last configuration allows you to link the group of VMs replicated or saved via backup (called VM Groups) to the users’ scopes.

For example, image 12 shows that the VM Group “B&R Job – Replication VAO Win 10” is assigned (included) to both the Admin and Linux scopes.

Image 10

In the next and last article, we will find out how to create and verify a DR plan.

See you soon

Veeam Dr Orchestrator v.5: VONE – Tagging

Oggi illustreremo come indicare al Veeam Disaster Recovery Orchestrator quali risorse utilizzare per avviare un piano di Disaster Recovery.

Prima di leggere il presente articolo, vi suggeriamo di leggere l’articolo precedente (cliccando qui) che vi permette di verificare lo stato del Server VDrO.

Lo strumento principe dell’etichettatura delle risorse è Veeam One che ricordiamo viene di default installato contestualmente con il Veeam Disaster Recovery Orchestrator v.5.

La procedura è molto semplice:

Dopo essersi collegati via RDP al VDrO Server selezionate sul desktop la voce Veeam One Client (Vedi figura 1)

Figura 1

Dopo aver selezionato la voce Business View (in basso a sinistra), le risorse da etichettare sono:

  1. I Cluster: attraverso tale voce sono identificate le risorse vCenter di Disaster Recovery e di produzione (Figura 2)
  2. I DataStores: attraverso tale voce sono identificate le aree disco ove risiederanno le VM una volta accese (Figura 3)
  3. Le Virtual Machines: attraverso tale voce sono identificate le VM che garantiscono la continuità di servizio in caso di Disastro (Figura 4 e 5).

Figura 2

Figura 3

Figura 4

Figura 5

Nota 1: I job di replica sono stati configurati sul VBR embedded del server VDrO (vedi figura 6)

Figura 6

Nota 2: L’operazione di etichettatura (tagging) è trattata in un precedente post disponibile al seguente link:

https://lnx.gable.it/home-page/veeam-availability-orchestrator-v-3-0-dr-from-replicas/

Per oggi è tutto, a presto!