NAS Backup – GFS to TAPE – Part II

In the previous article, we saw how to operate on backup jobs to obtain Fulls that can be used to create a GFS retention policy when the destination of the jobs is a tape.

In this second article, we find out how a similar result can be achieved by copying tapes.

Note1: A second tape library must be present in the DataCenter to pursue this protection process.

Note2: The most common use case for Copy-Tape is to migrate data contained on tapes from an old technology (LT06) to a new one (LTO9), since the new technology would not be able to natively read the data contained on the old tapes.

There are two steps that will enable us to achieve our goal:

  • Step 1: Creation of a tape pool afferent to the second library.
  • Step 2: Tape copy job.

Stage 1

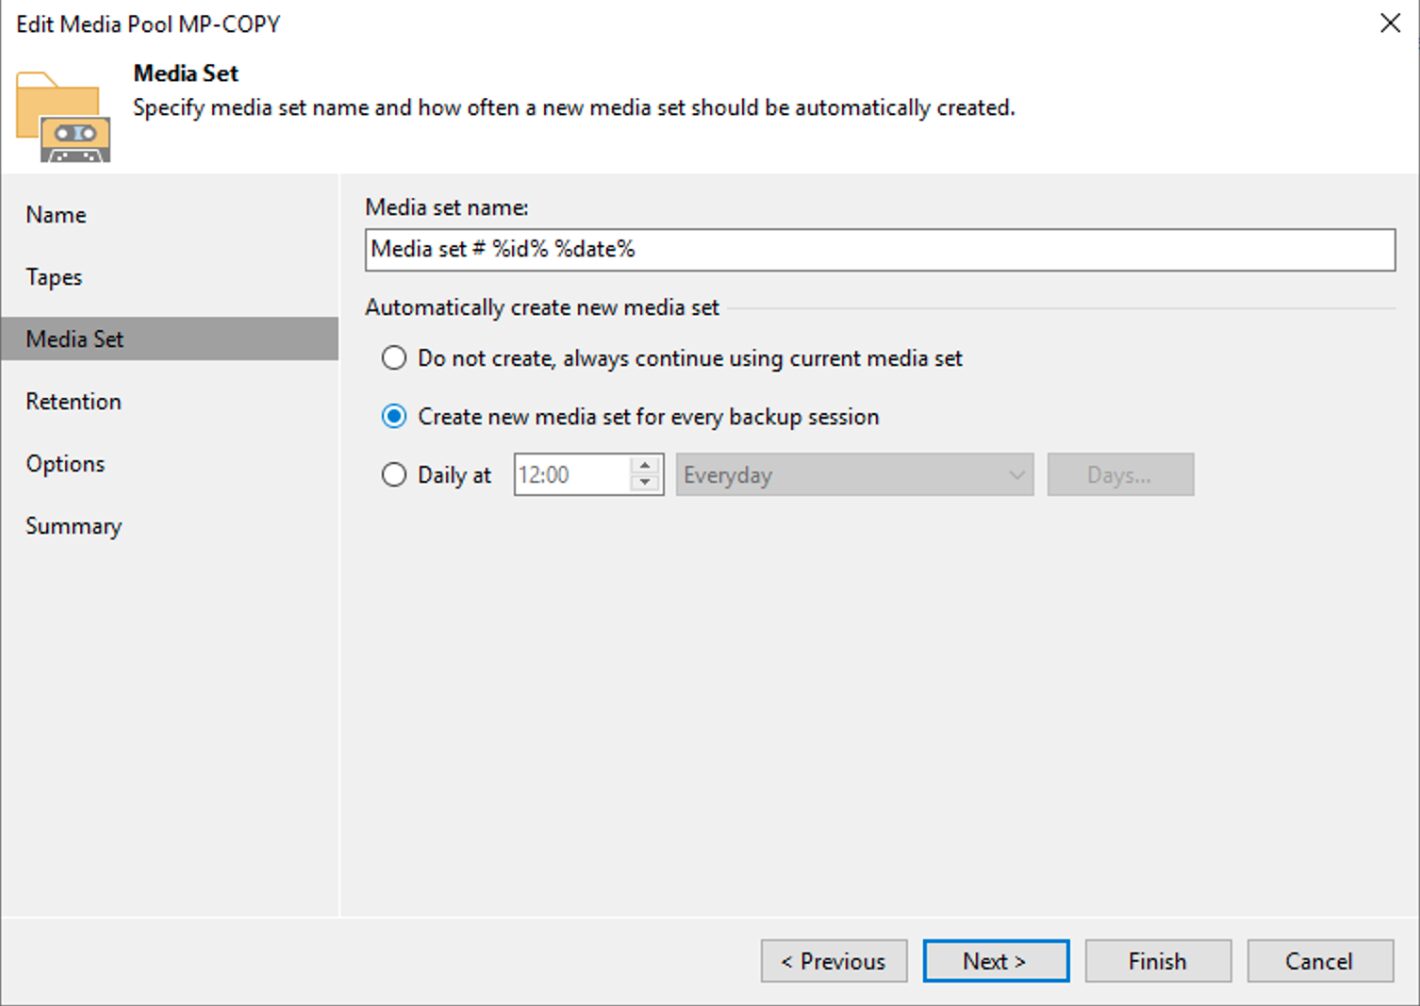
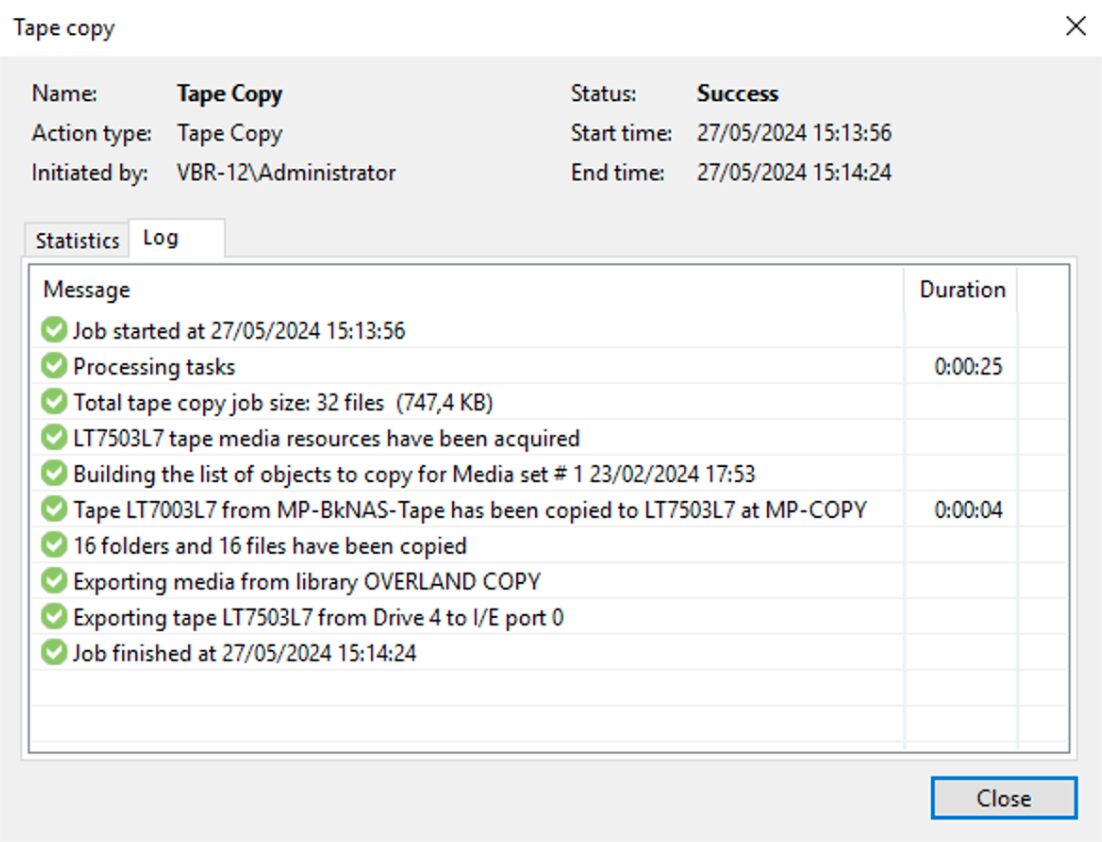
The creation of the Media Pool (image 1), will need to be customized by setting:

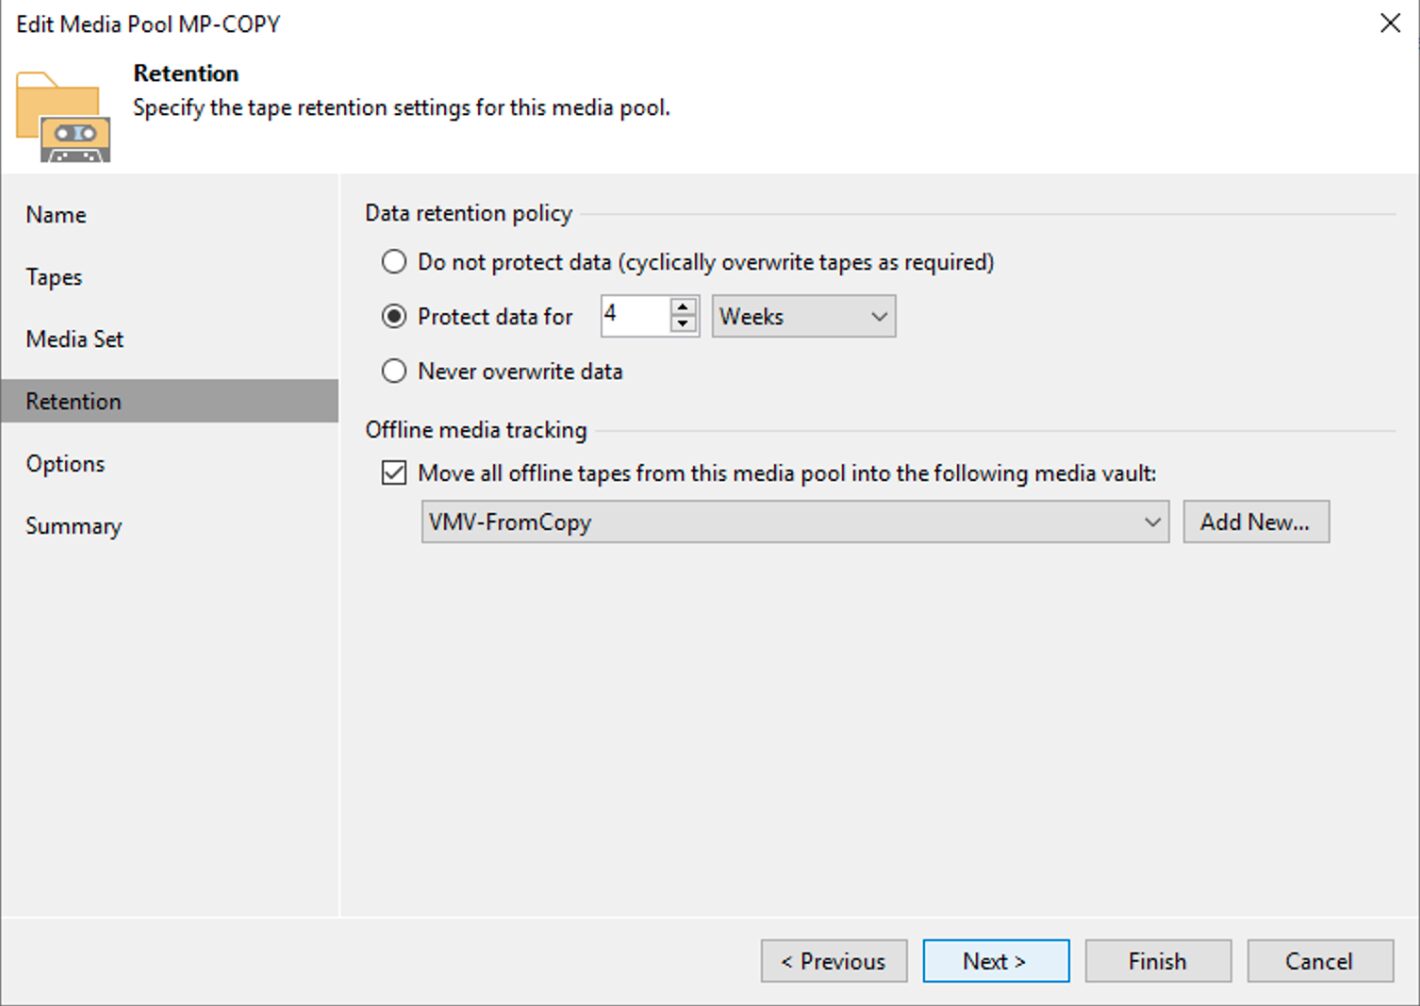
    • The use of a new tape for each copy session (image 2).
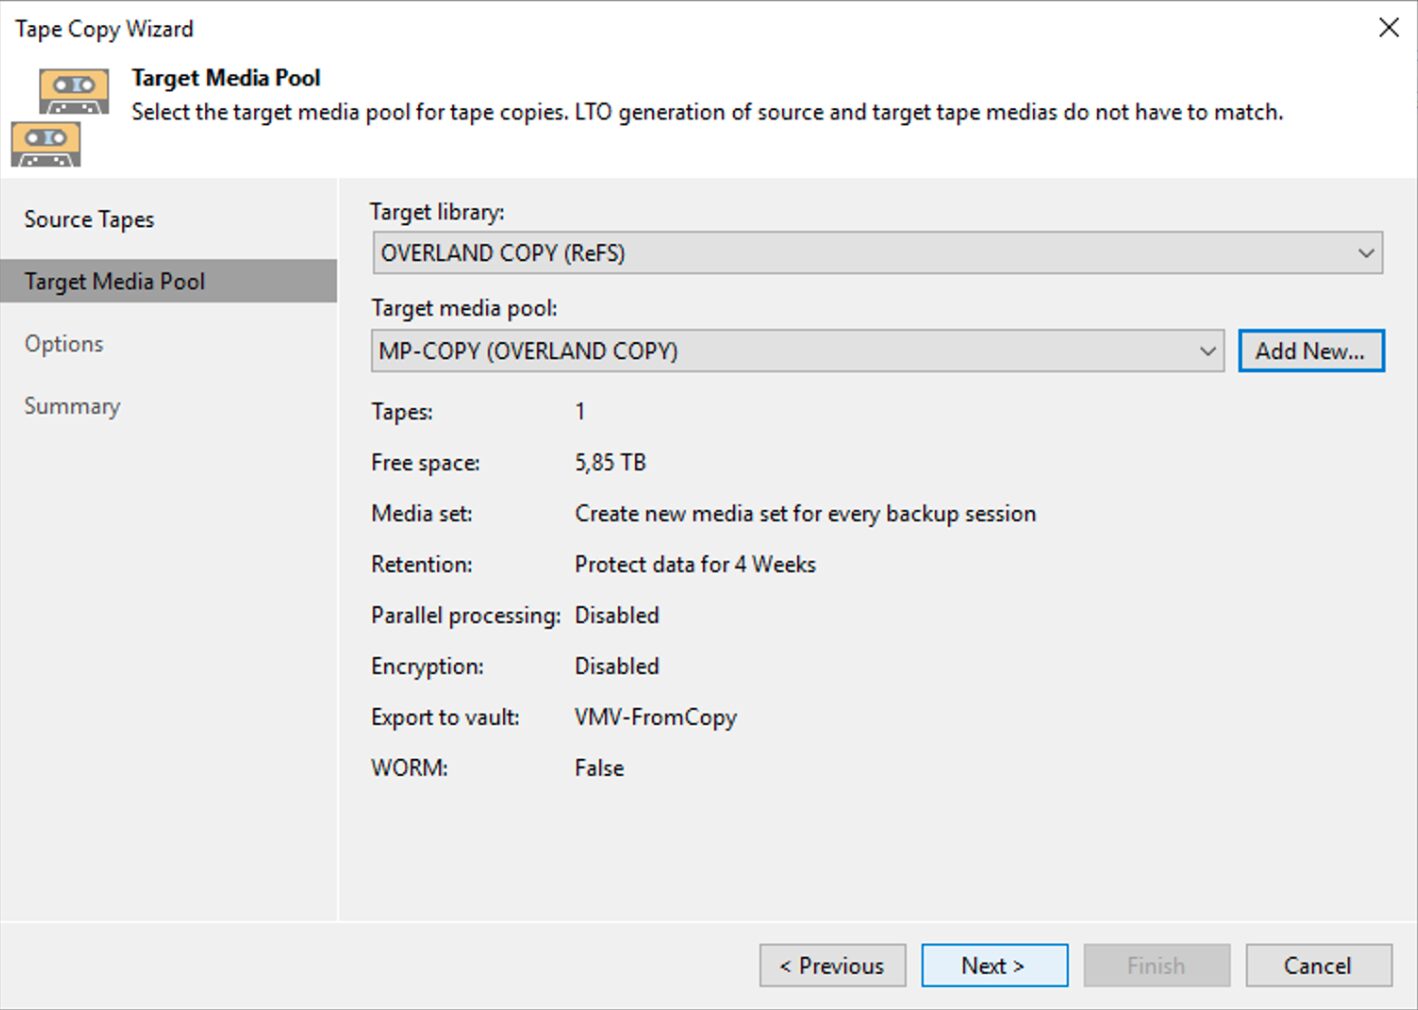
    • Setting a retention that for that tape group coincides with that required by the GFS policy (image 3).
Picture 1

picture 2

Picture 3

Note3: A 4-week retention was set in Image 3, which addresses the need to keep the full weekly for 1 month.

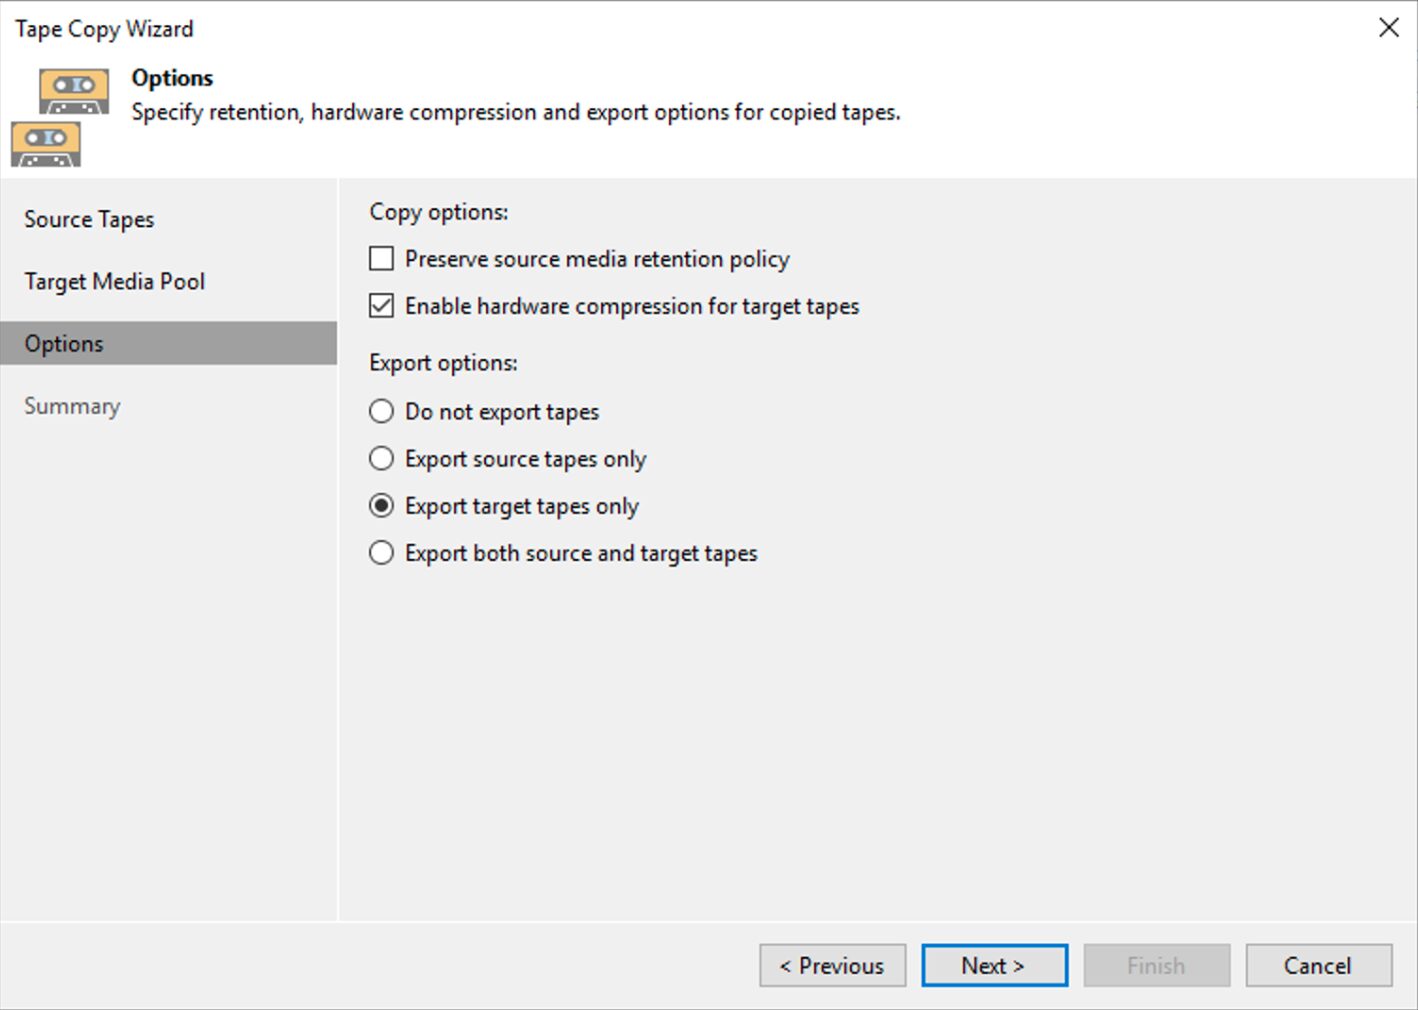
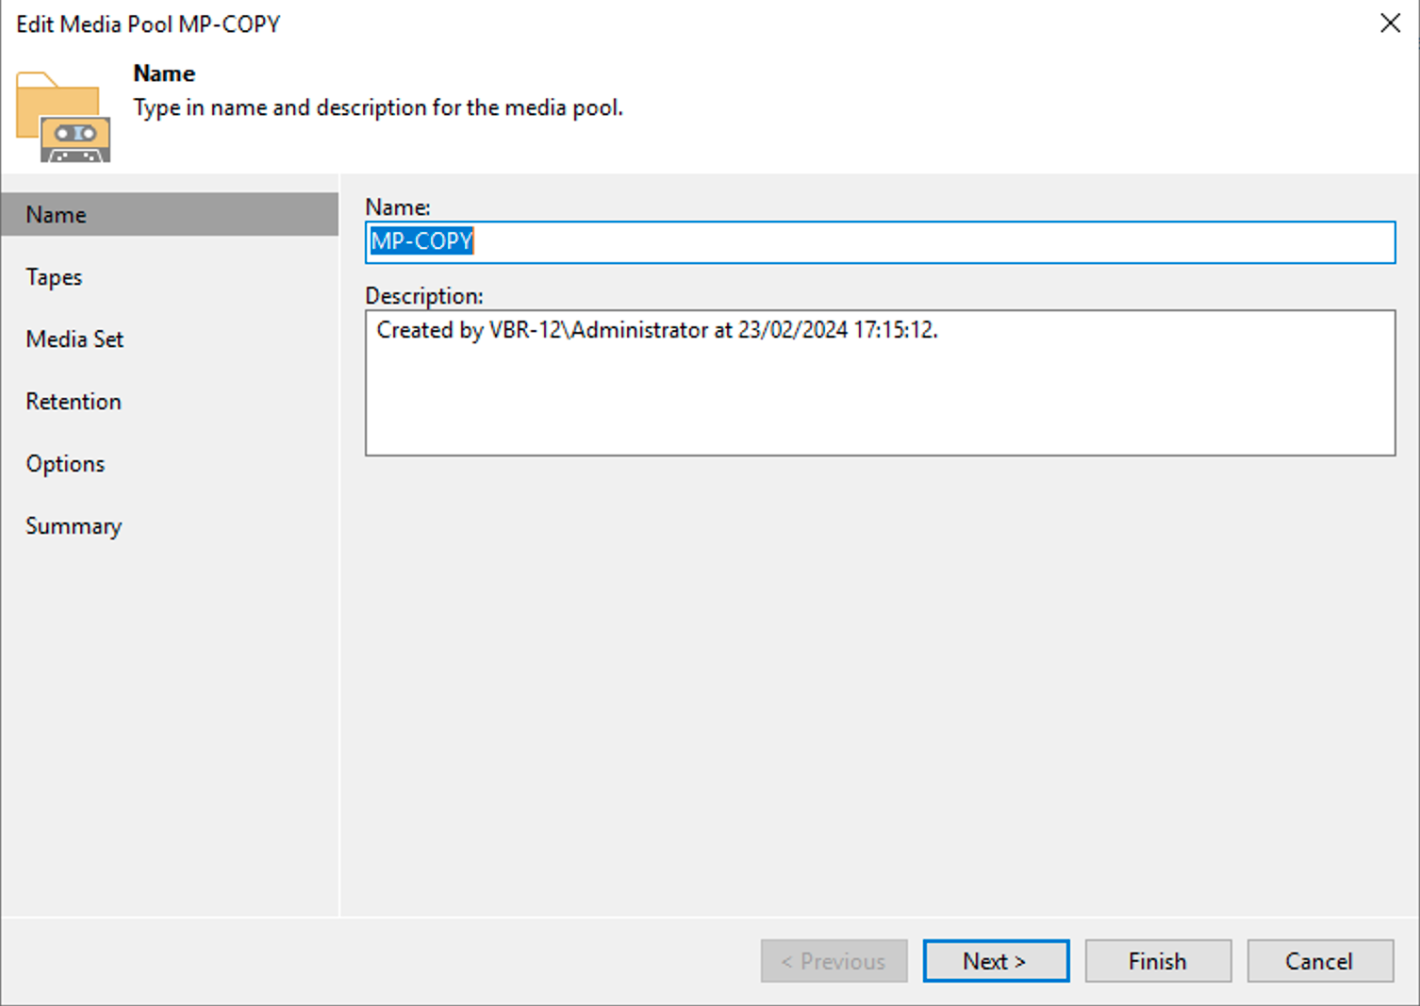
Note4: Image 4 highlights the possibility of implementing a Vault policy for tape storage.
Picture 4

PHASE 2

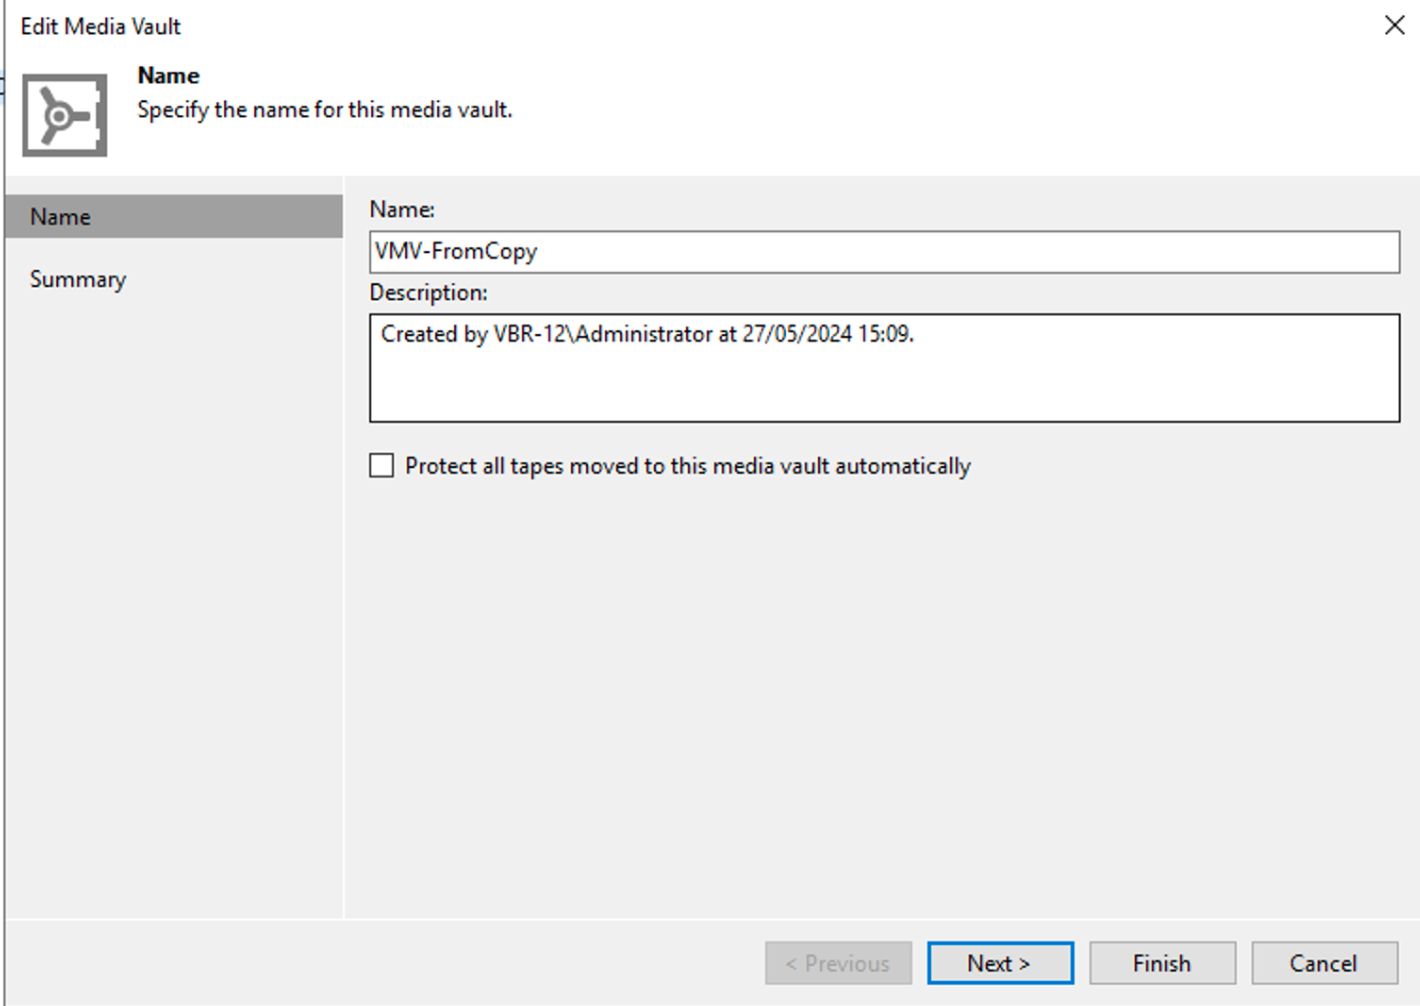
From the VBR GUI by selecting the tape to be copied with the right mouse button (image 5), the copy command can be initiated.
Picture 5

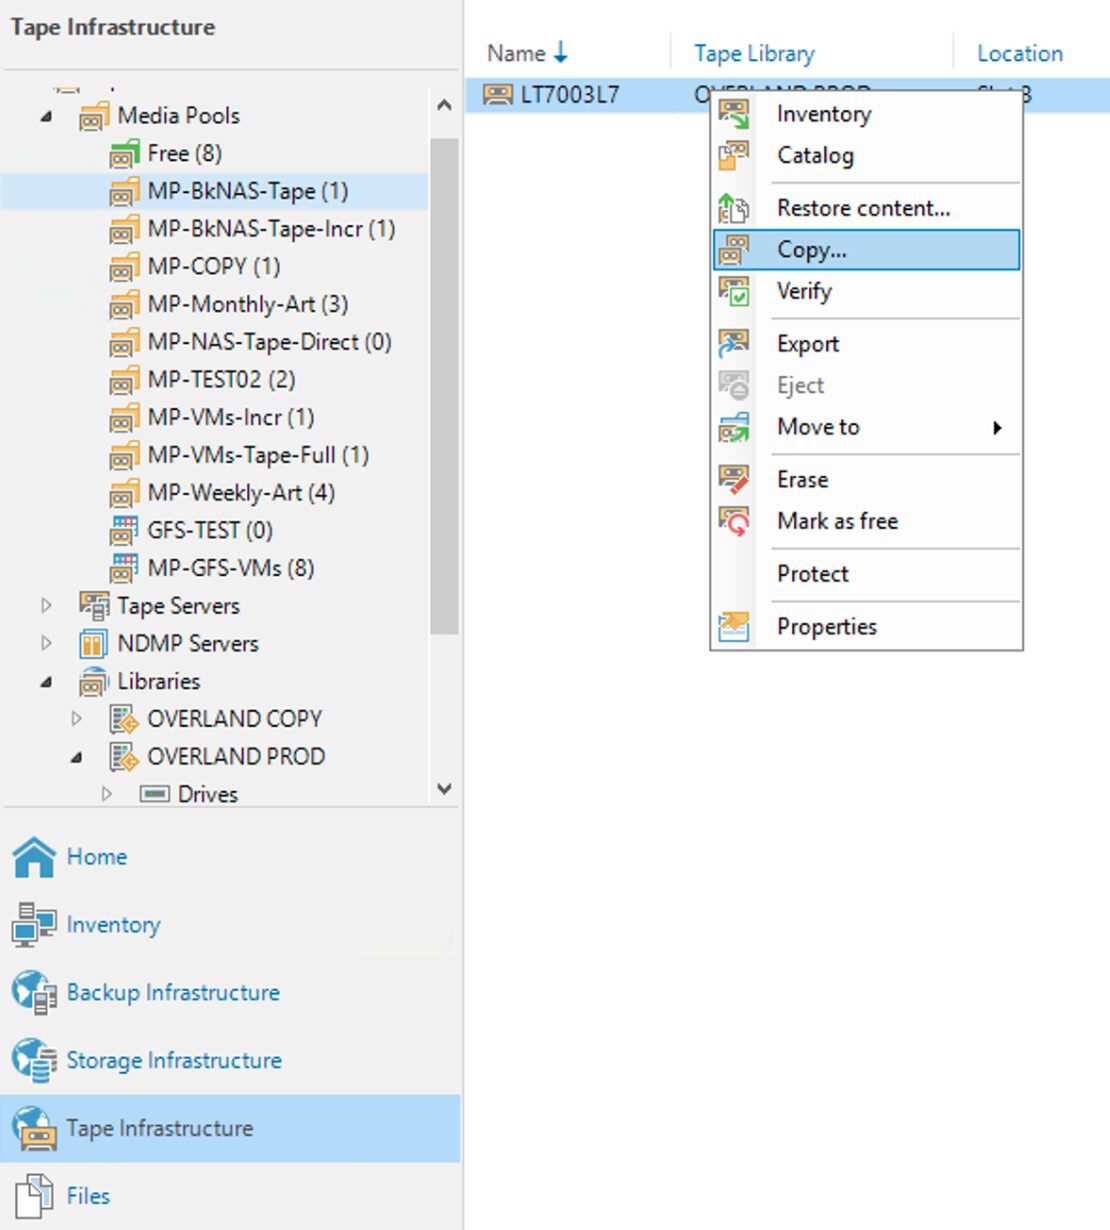
The simple next steps shown by images 6,7,8 and 9 show how to complete the copying operation.
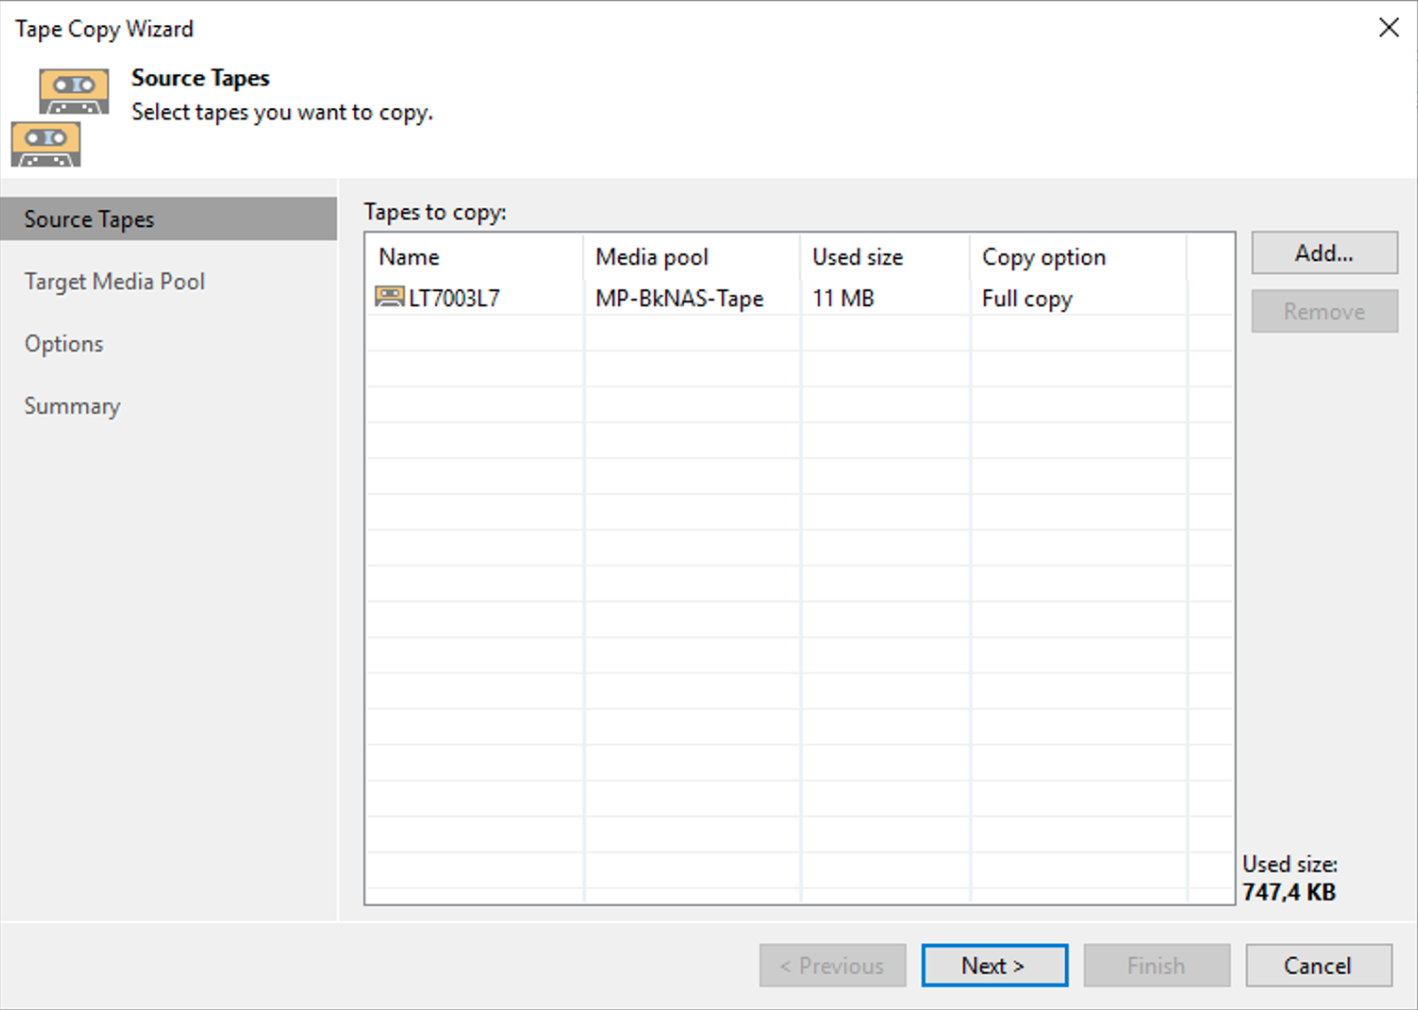
Picture 6

Picture 7

Image 8

Image 9

Latest notes:

  • Documentation to refer to in order to know how many resources it is essential to allocate to the various components is available at the following link.
  • Automation of copying can be done through scripts in powershell.
  • Copy to Tape does not consume capacitive licensing but refer to the following link, Capacity Licensing item to know all the details.

VBR & Cloud Business Model – Part 3

This article will cover the topic of license in VCSP scenarios.

Please refer to the official documentation to get more details on it.

The easiest way to explain the license model is by thinking of a basket.

a. What is present in the basket?
It is the container of the licenses. The licenses belong to the Service Provider.

b. What the Service Provider can do with licenses?
It can assign them to his customers (you can call them end-users or tenants).

c. Does the services consume different amounts of licenses?
The cost depends on the supplied service.

The example below will clarify the licensing method; the units I will use to explain the model are apples 🙂
(numbers written here are not real, contact the local Veeam sales representative to have a correct quote).

A Service Provider supplies three types of services to his customers;
DraaS, BaaS, RbcS(Remote Backup Copy Service)

Every single month the Service Provider buys 100 “apples” and put them into the basket.

Let’s suppose that:

1) DraaS consumes 10 apples for VM a month (VM/m)
2) BaaS 4 apples  VM/m
3) RbcS 6 apples VM/m
4) Every tenant has 5 VMs
5) Service Provider customers are: Green – White – Red
6) Green bought DraaS
7) White bought BaaS
8) Red bought RbcS

How can I measure the apple-eating?
With an easy math operation 🙂

Green = 5VM*DraaS = 50 apples
White = 5 VM*BaaS = 20 apples
Red=5VM*BbcS=30 apples

Total = 100 Apples

Note 1: If the Service Provider adds new customers or the present tenants more VMs the Service Provider license can be enlarged on-fly easily contacting the Veeam team.

But, if the license count it’s quite simple with few customers it can be more difficult with hundreds of them.

In aid of of the Service Provider Veeam released a  very useful and powerful software named  Veeam Service Provider Console (VSPC)

What are the common VSPC use cases?

1) Remote monitoring and management
2) Licensing engine and usage reporting
3) Billing
4) Integration and automation (RestFul API)
5) Multi-tenant serviceability

(To have more details please click here)

Picture 1 shows which services can be managed via VSPC.

Picture 1

Please remember that cloud connect is mandatory work with VCSP.

The official guide shows the requirements to work with it:

Note 2: The software provided by Veeam enables any partner to create his own cloud services. To example performing a backup service for workstations and laptops  of employees that working from home (a common scenario in these unlucky last months)

Note 3: To create a price list every single Service provider will have to add all costs of Infrastructure, Managing etc

That’s all for Cloud Modelling.

VEEAM AGENT FOR WINDOWS – REMOTE COPYING DATA – 1

In the last weeks, I’ve been requested to understand how to set up a strategy of remoting Backup Data when the source is a Veeam Agent.

The answer is not just the “Use the backup copy job” option because it can be used in one of three scenarios I’m going to cover in the next three articles.

So, let’s move fast forward

My Lab Environment is composed of VBR + 2 Windows 10 Physical Laptops

I do not cover the first part regarding how to create a protection group. There is more than one online guide that explains how to add a protection group to VBR.

My two suggestions are:

  1. Check if the Firewall ports are correctly open (click here)
  2. Check on Laptop if Admin share (c$) is available.

If the second point failed just follow this simple procedure. Launch a cmd as administrator and write the following command:

REG ADD HKLM\SOFTWARE\Microsoft\Windows\CurrentVersion\Policies\system /v LocalAccountTokenFilterPolicy /t REG_DWORD /d 1 /f

Scenario 1: VBR as central Manager – VAW configurated as Server

Let’s see how to configure a primary VAW  backup Job

From the wizard select Windows Computer as shown in picture 1

Picture 1

from the Job Mode Select Server (Picture 2)

Picture 2

Now add the Backup Job name and follow the simple wizard (Pictures 3 to 9)

Picture 3

Picture 4

Picture 5

Picture 6

Picture 7

Picture 8

Picture 9

Now you can check if the backup up has been completed correctly (Picture 10)

Picture 10

Now it’s time to configure a Backup Copy job and run it (Pictures 11 to 16)

Picture 11

Picture 12

Picture 13

Picture 14

Picture 15

Picture 16

Now you can see different restore points on disks (Pictures 17 to 19)

Picture 17

Picture 18

The last step is watching how many licenses have been used

Picture 19

In the next article, we are going to see what will change if we work on the “select mode” option.