NAS backup – GFS to Tape – Part I

Many customers and partners ask whether it is possible to implement a GFS (Grandfather – Father – Son) type of protection policy when the data to be protected pertains to a NAS (Network network-attached storage) and the destination is a tape library.

Such automation with the current version of Veeam Backup & Replication(VBR) 12.1 is not yet available, something that is already possible when the data source is a backup of VMs and Physical Servers.

In this first article, I will help you achieve that goal by taking advantage of VBR ‘s great flexibility in creating backup jobs.

Note1: In the next one I will illustrate how to make GFS copies by exploiting a little-known feature of
VBR
, the Tape Copy.

Flexibility of Backup Jobs:

a. VBR manages tapes using an architecture that is based on:

  • Media Pool(MP) are the logical containers of the tapes and can pertain to one or more Backup jobs (in our scenario we will create one MP per Job).
  • Media Set(MS) identifies the restore points present on the tape (in our scenario we will create one MS per Backup job per single tape).

b. The proposed solution is to create weekly, monthly, and annual backup jobs in full mode. These backups should be created on a specific date and the backups should reside on tape pools created for the purpose.

Let’s see step by step how to proceed:

c. Creation of weekly and monthly Media Pools(MP).
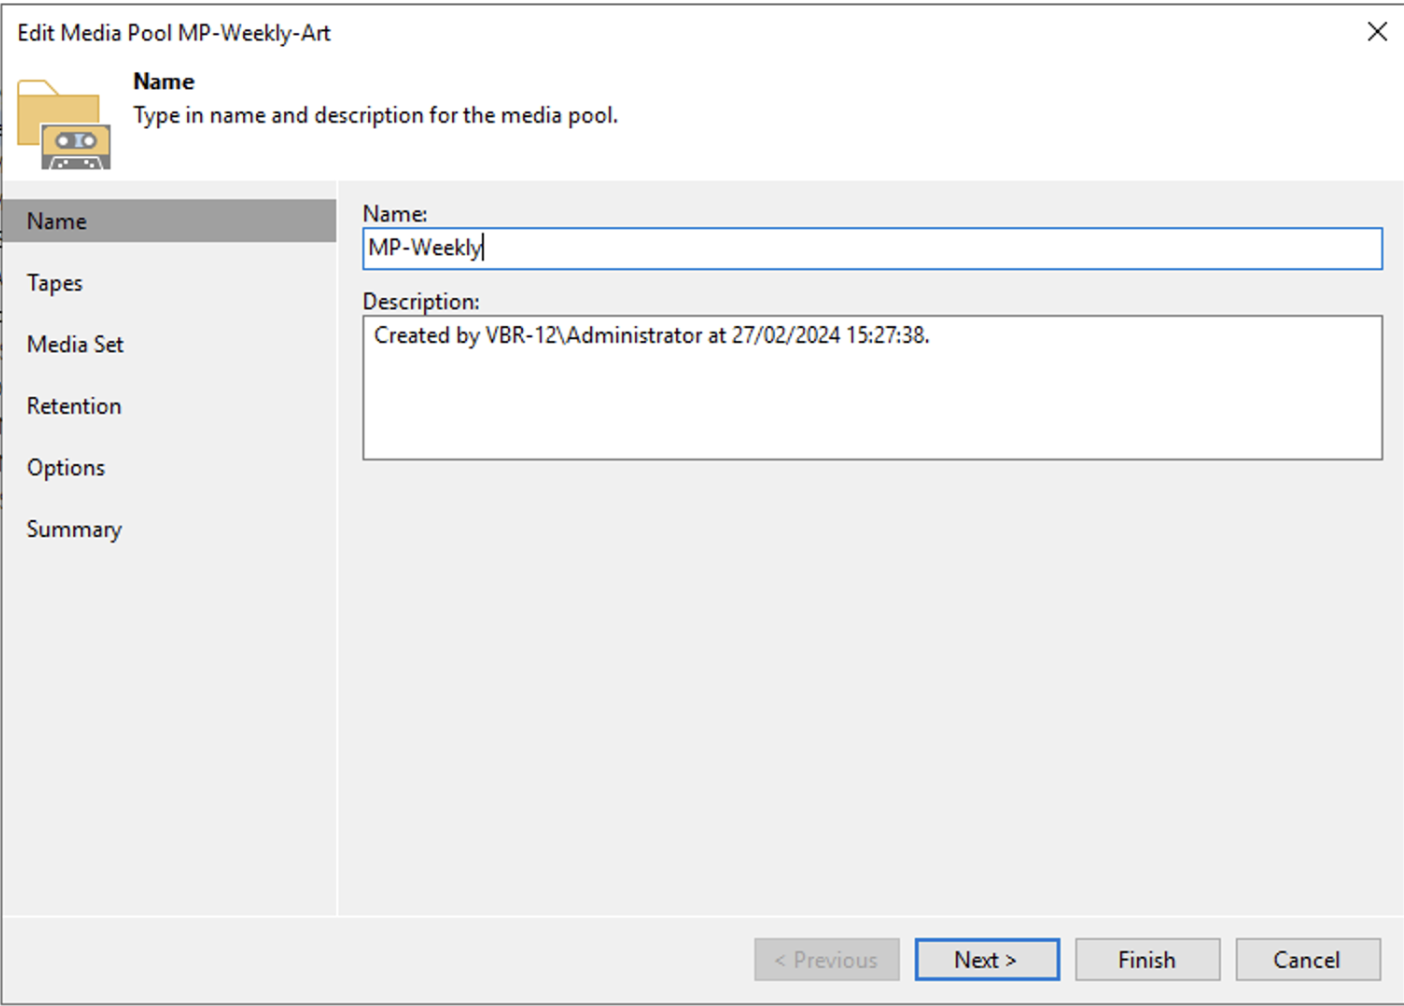
Picture 1

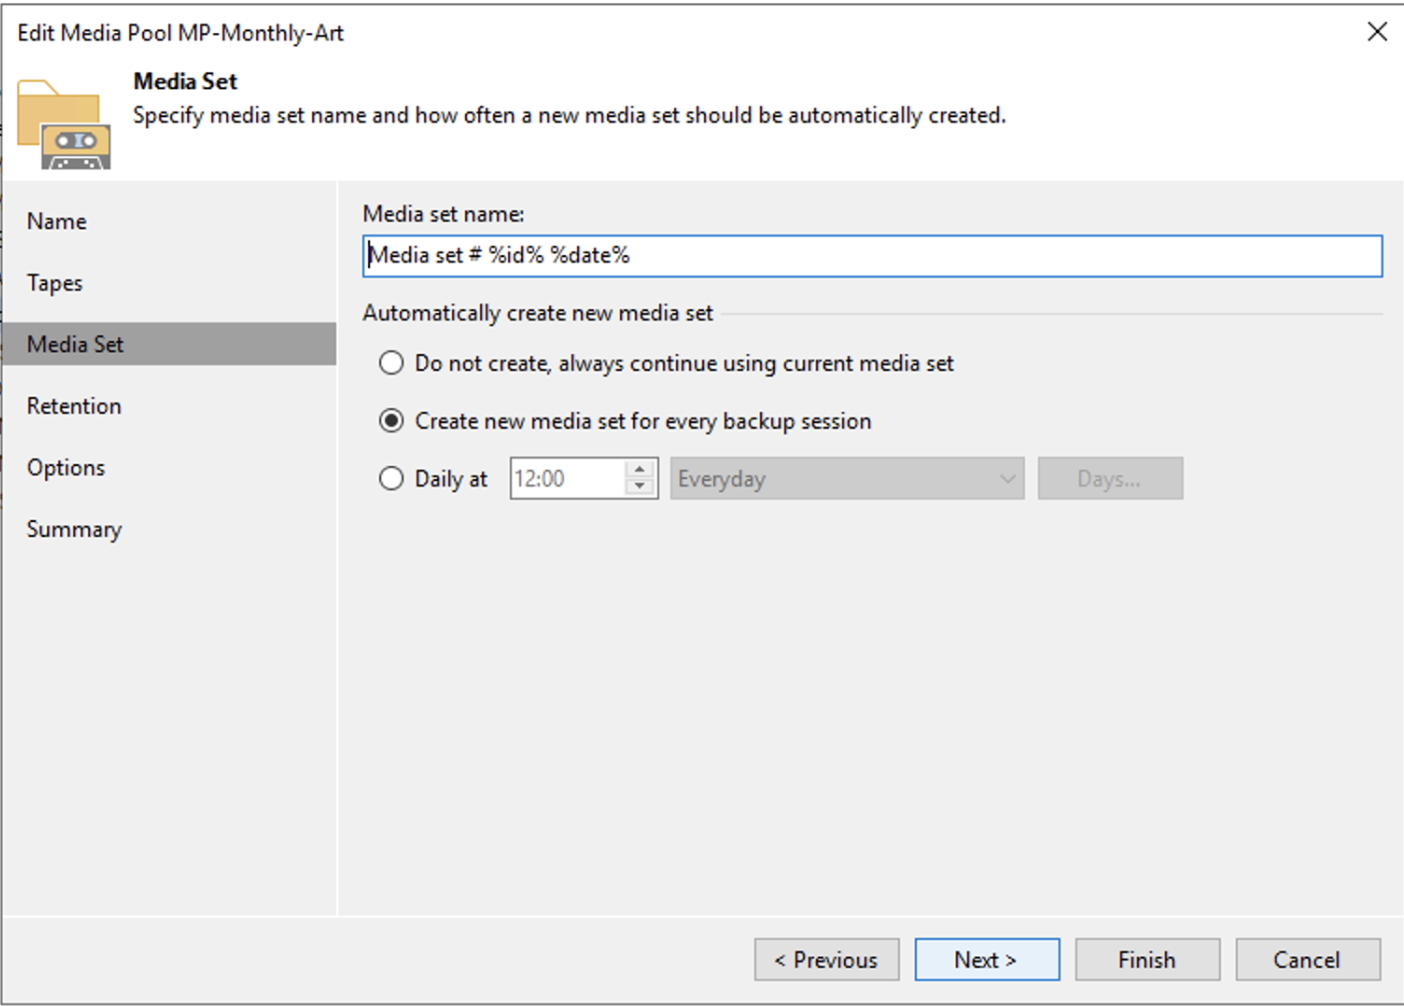
From image 2 it is important to note that a new tape will be used for each backup session.
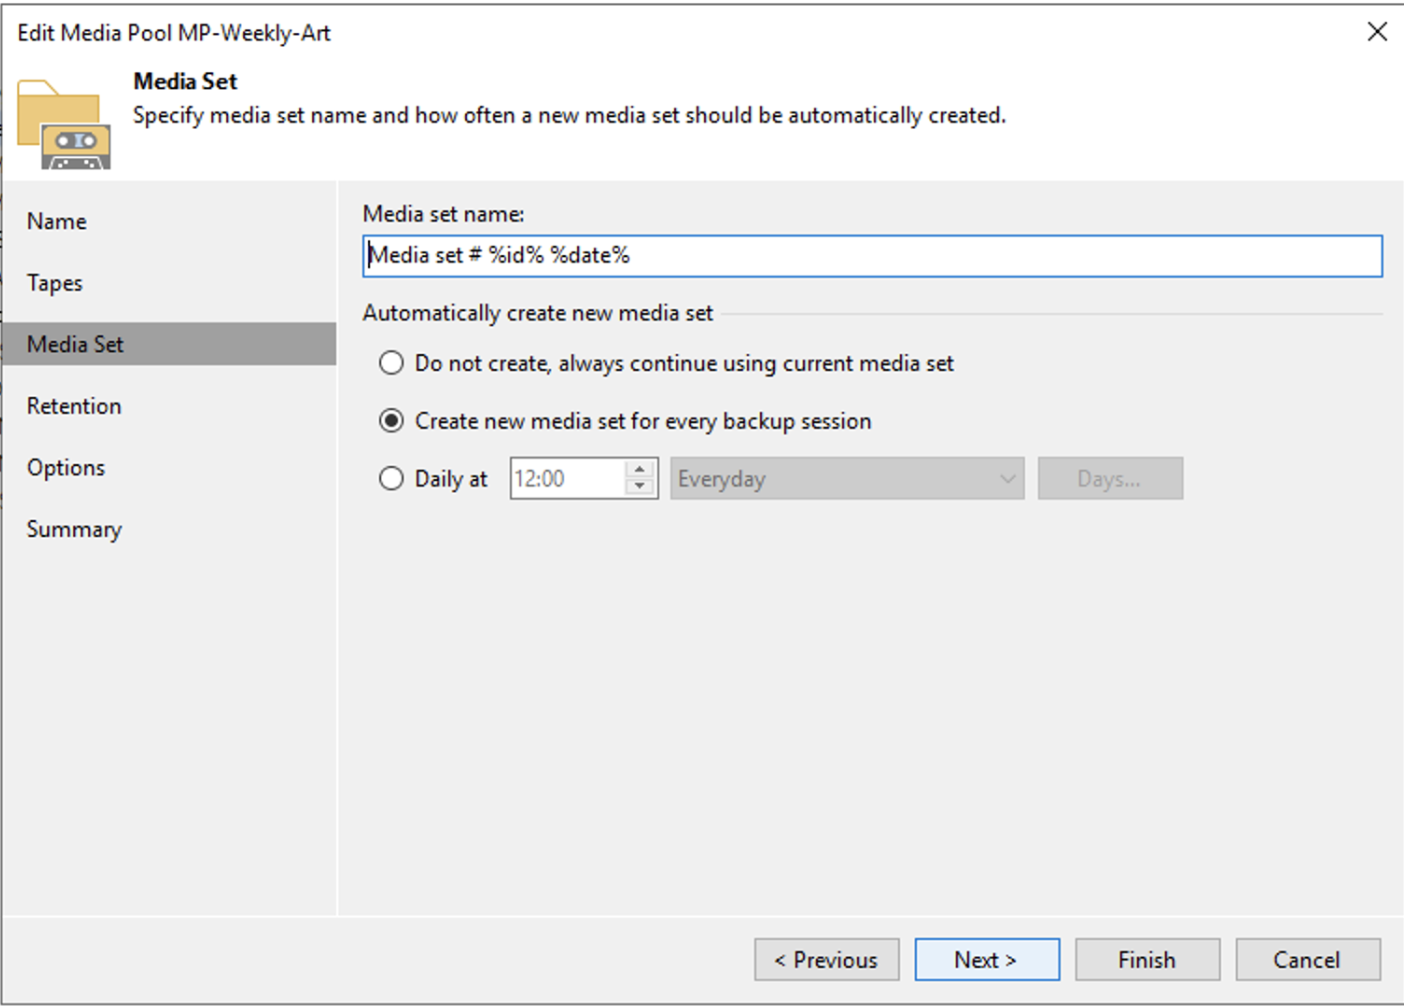
picture 2

Image 3 shows how to set the retention, which in this scenario is 4 weeks.
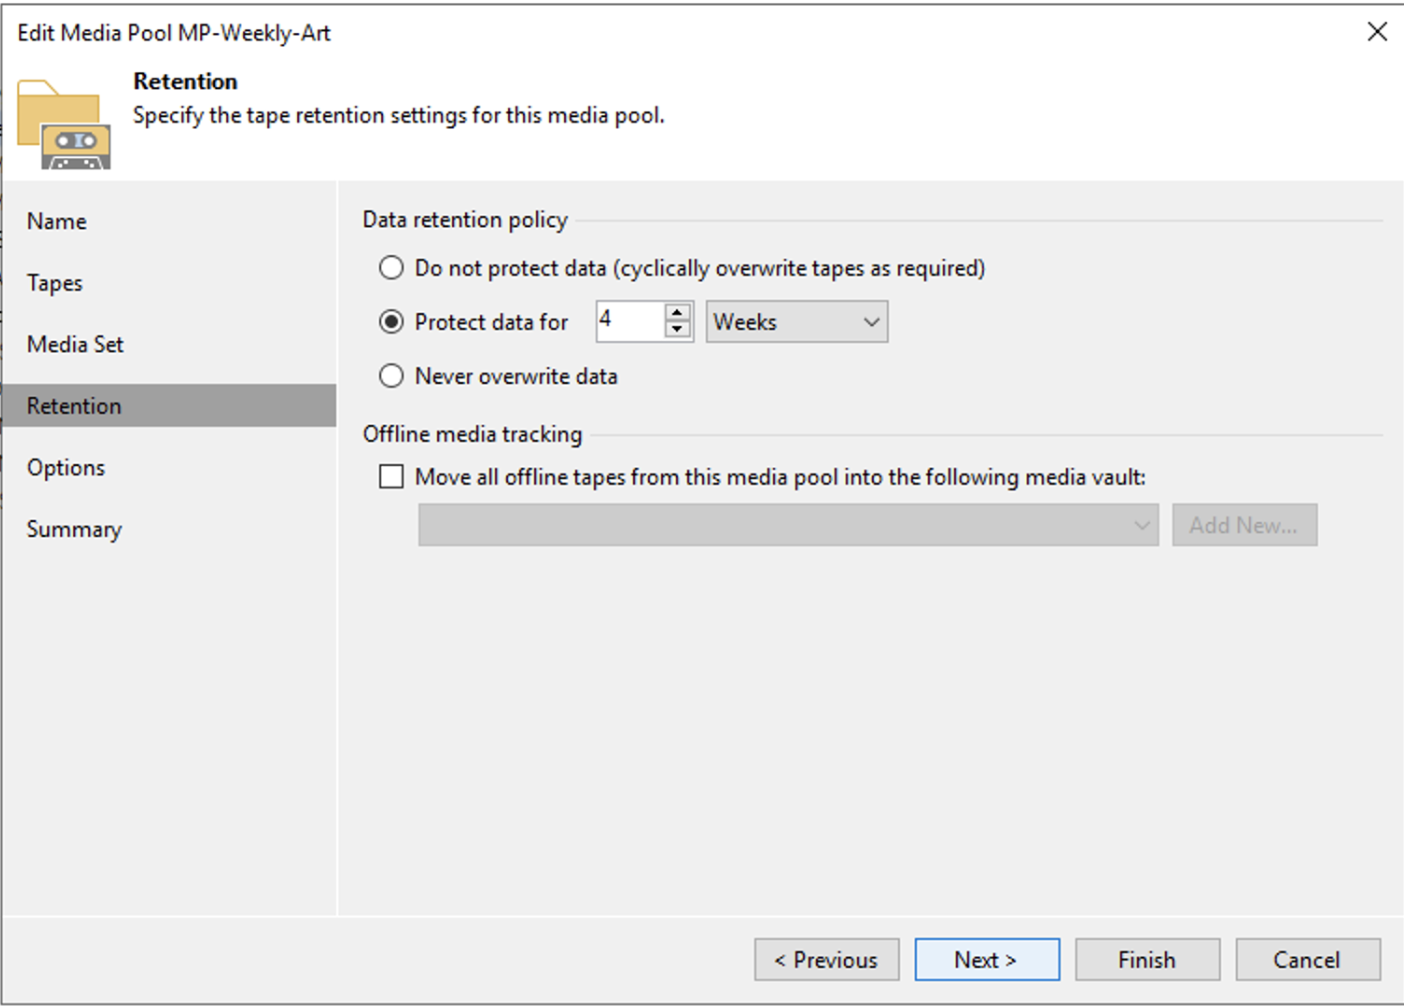
Picture 3

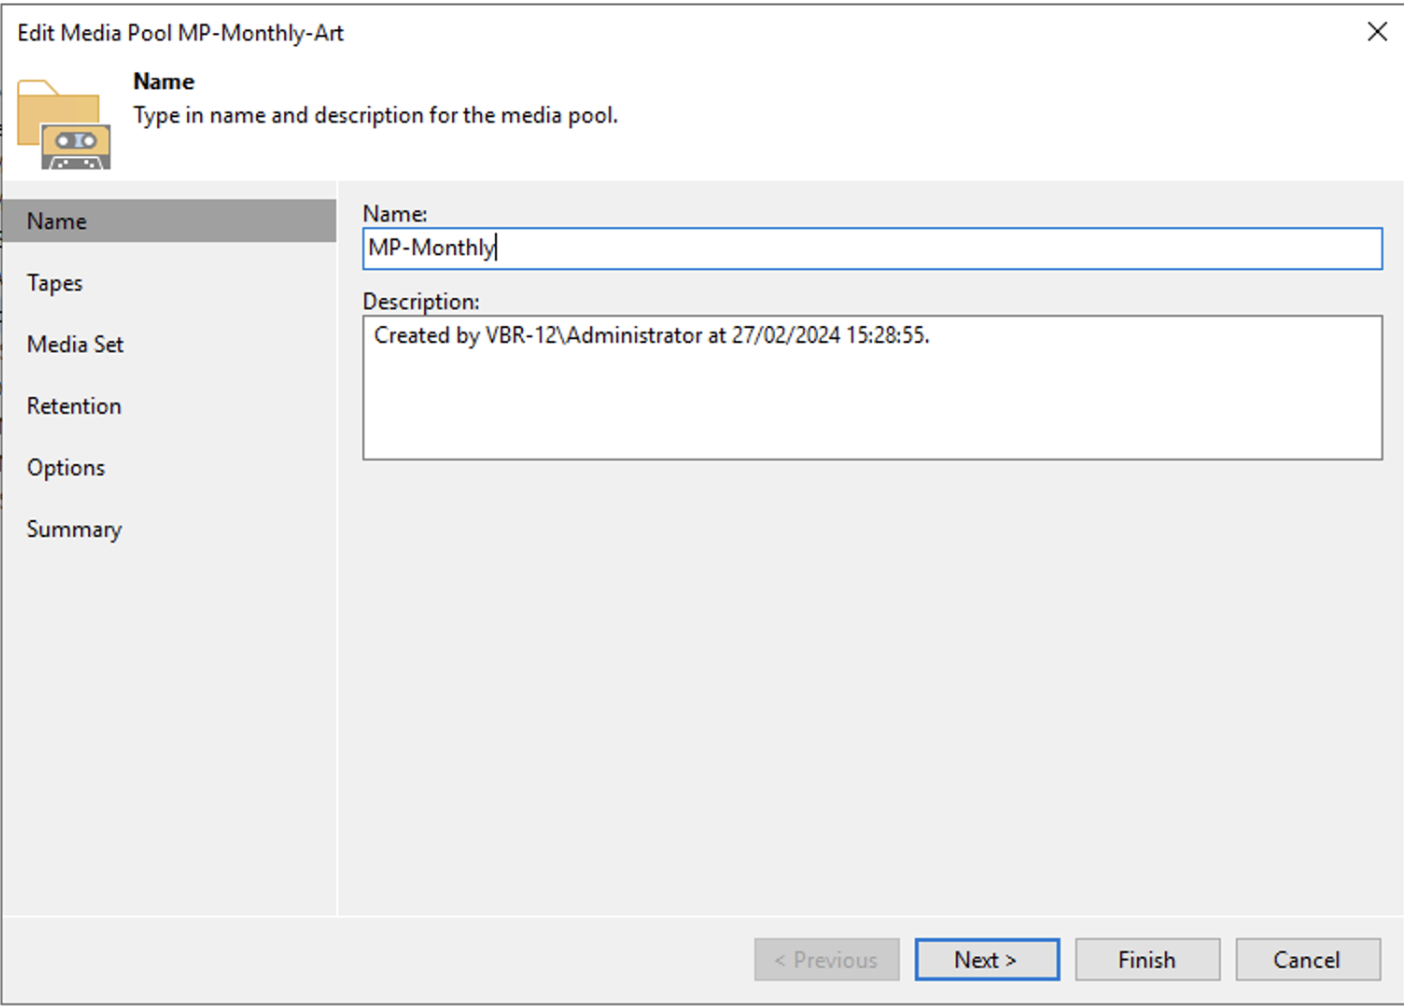
For the Monthly MP, the same procedure is used, changing the retention to 12 months (see images 4,5,6).
Picture 4

Picture 5

Image 6 shows that the retention for Full Months is 12 months.

Picture 6

d. Creating Backup Jobs

Picture 7

image 8

Image 9 highlights the scheduling of the Backup job.

The assumption is to make n full backup jobs for each GFS policy.

Our example scenario shows the first week’s job (blue arrow) with weekly retention (green arrow). For the second, third, and subsequent week, we will proceed in a completely similar way, replacing the value first with second, third, etc. under “Run the full backup automatically.”
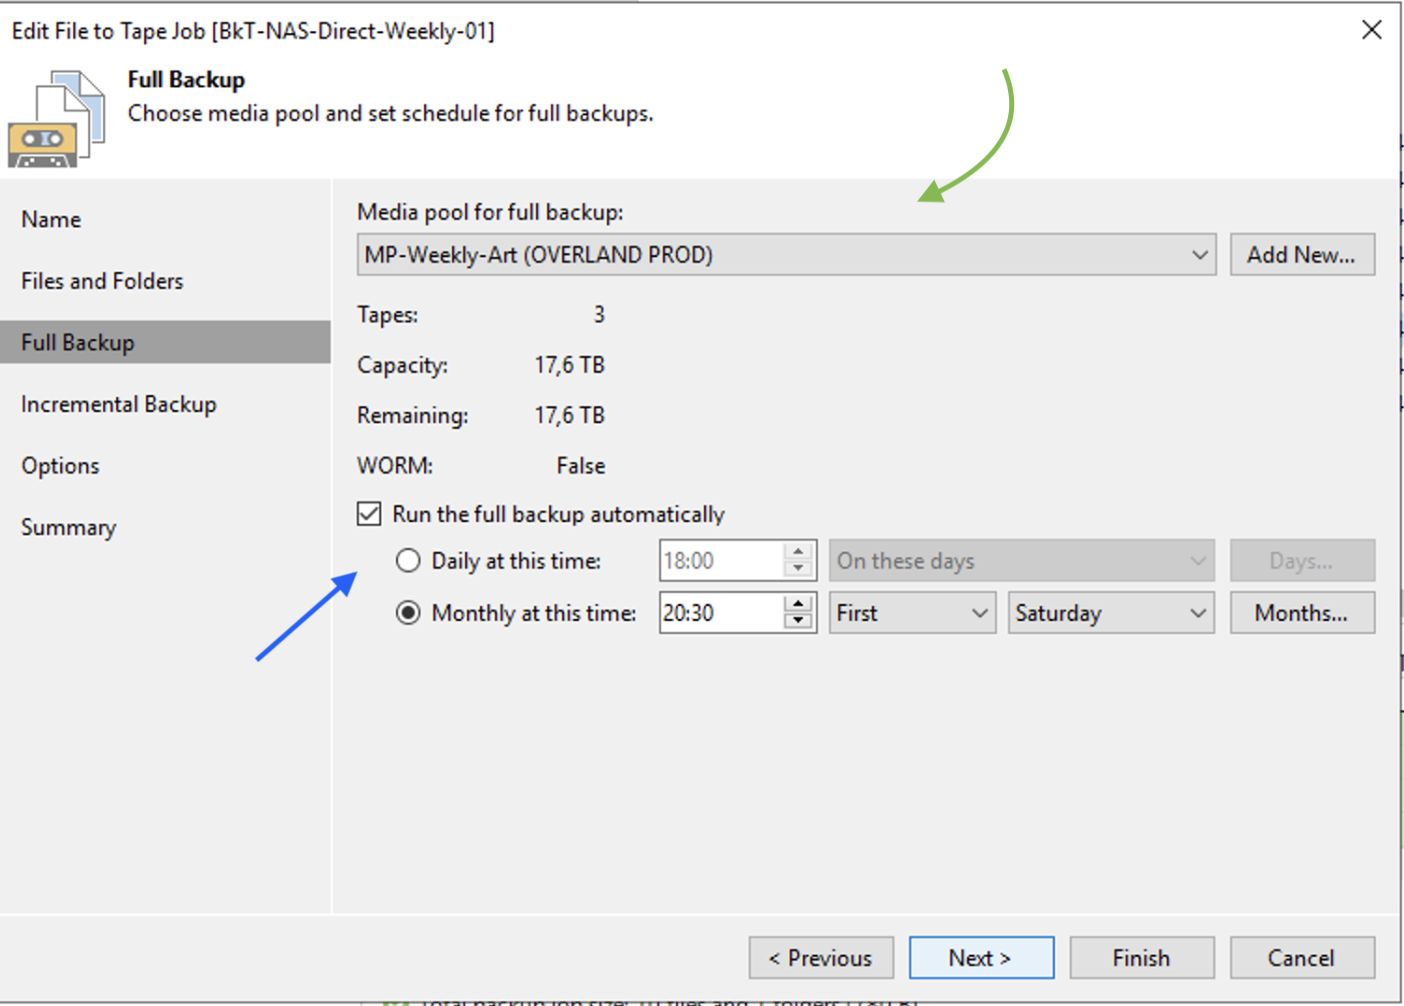
Image 9

Image 10 highlights (orange arrow) that no incremental backups will be initiated.
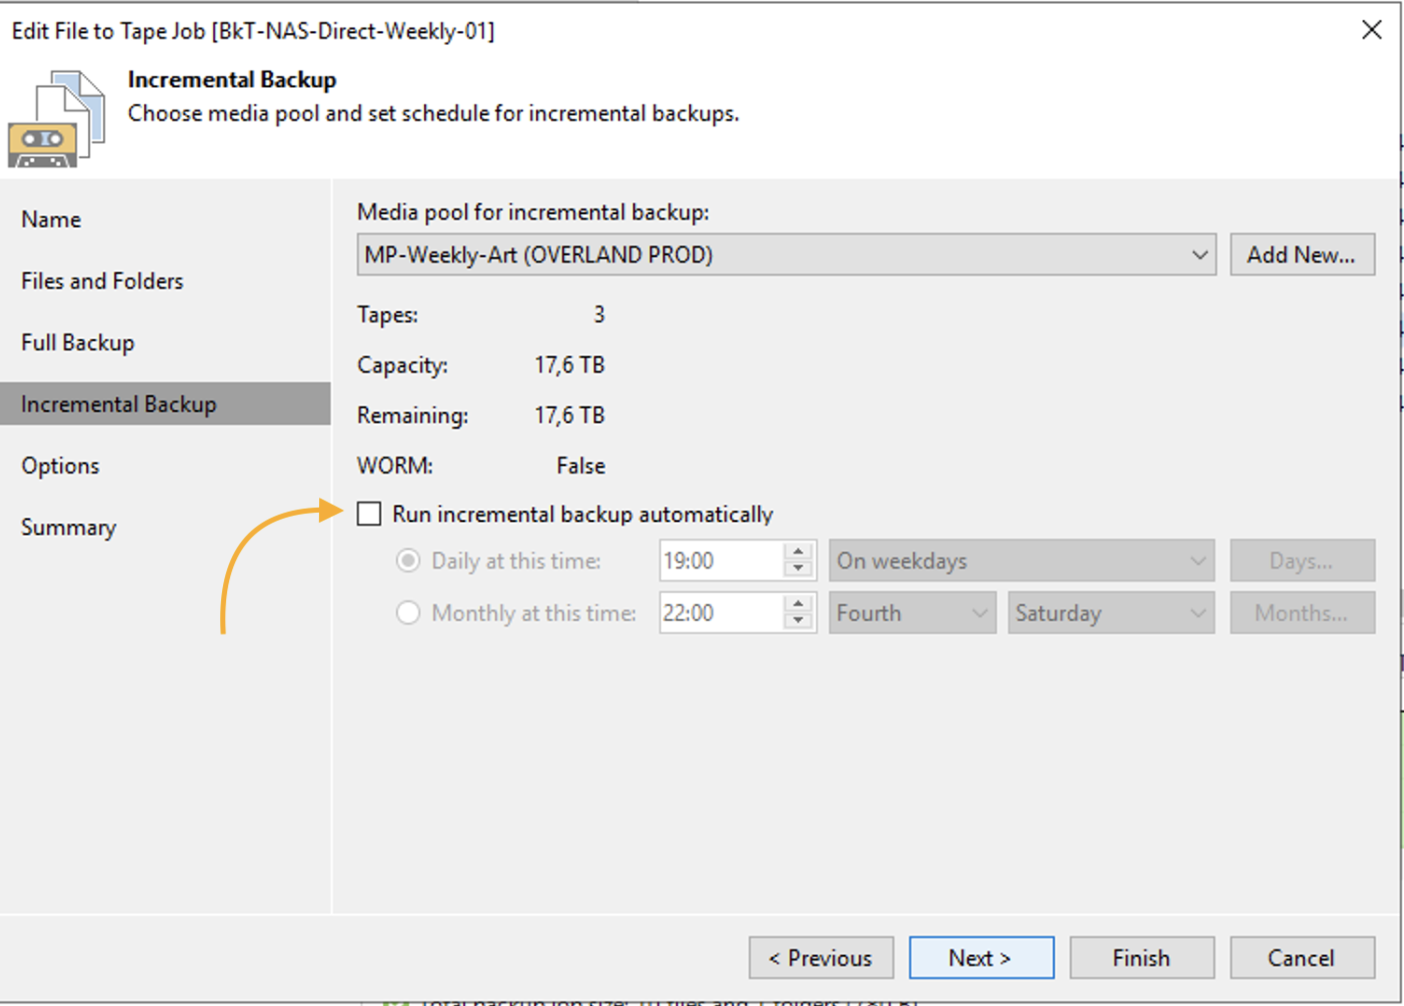
image 10

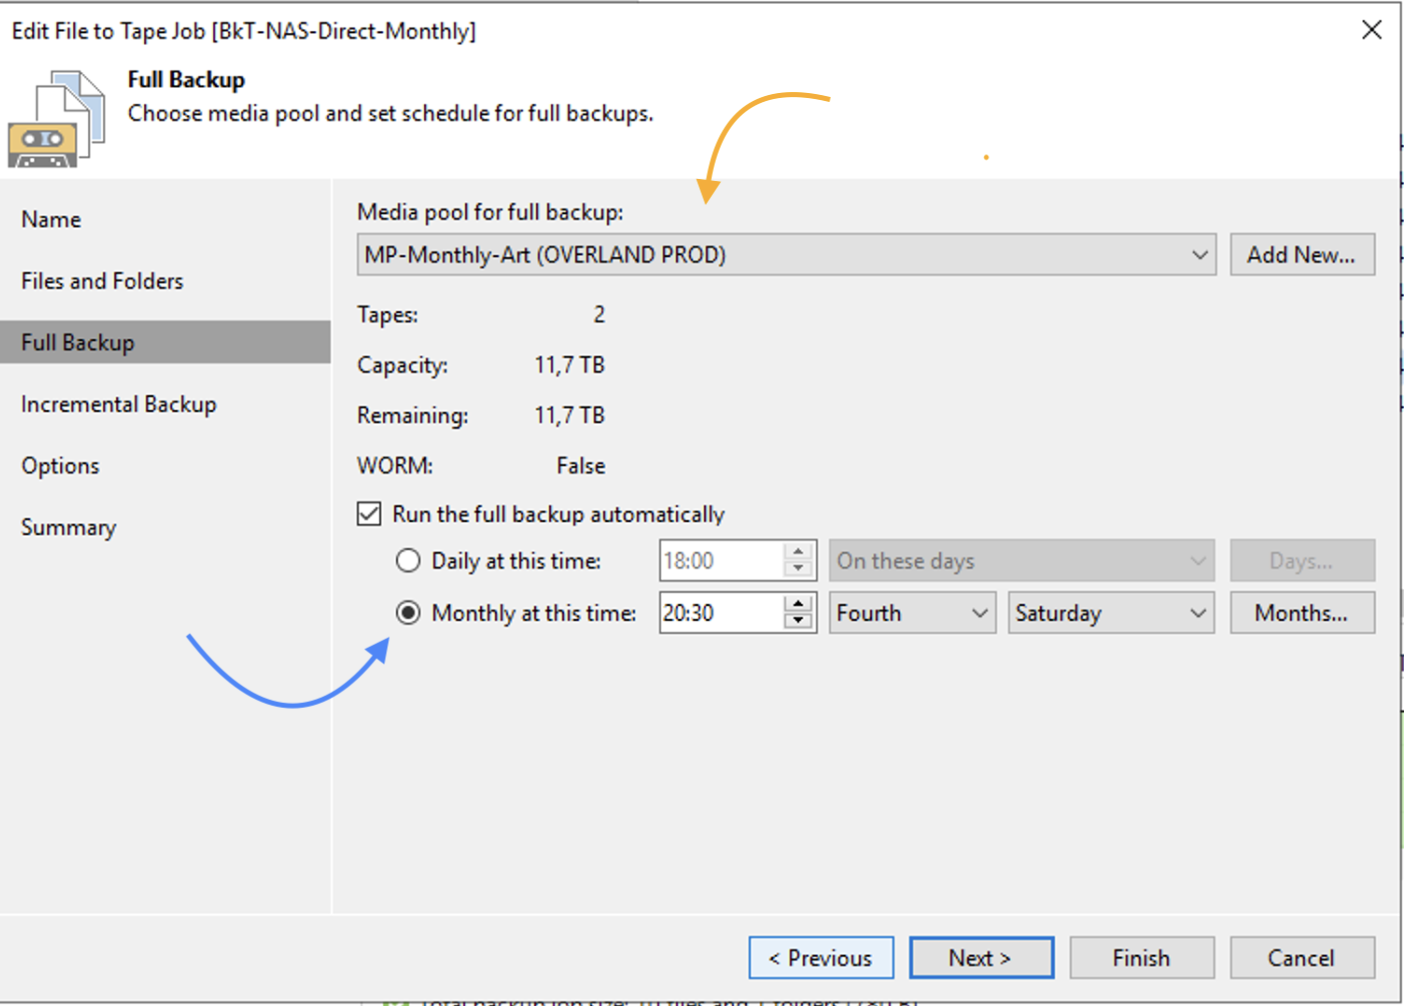
The same steps must be implemented to create monthly type GFS backups, in the example I set the backup job start on the 4th Saturday of the month (image 12 – blue arrow).
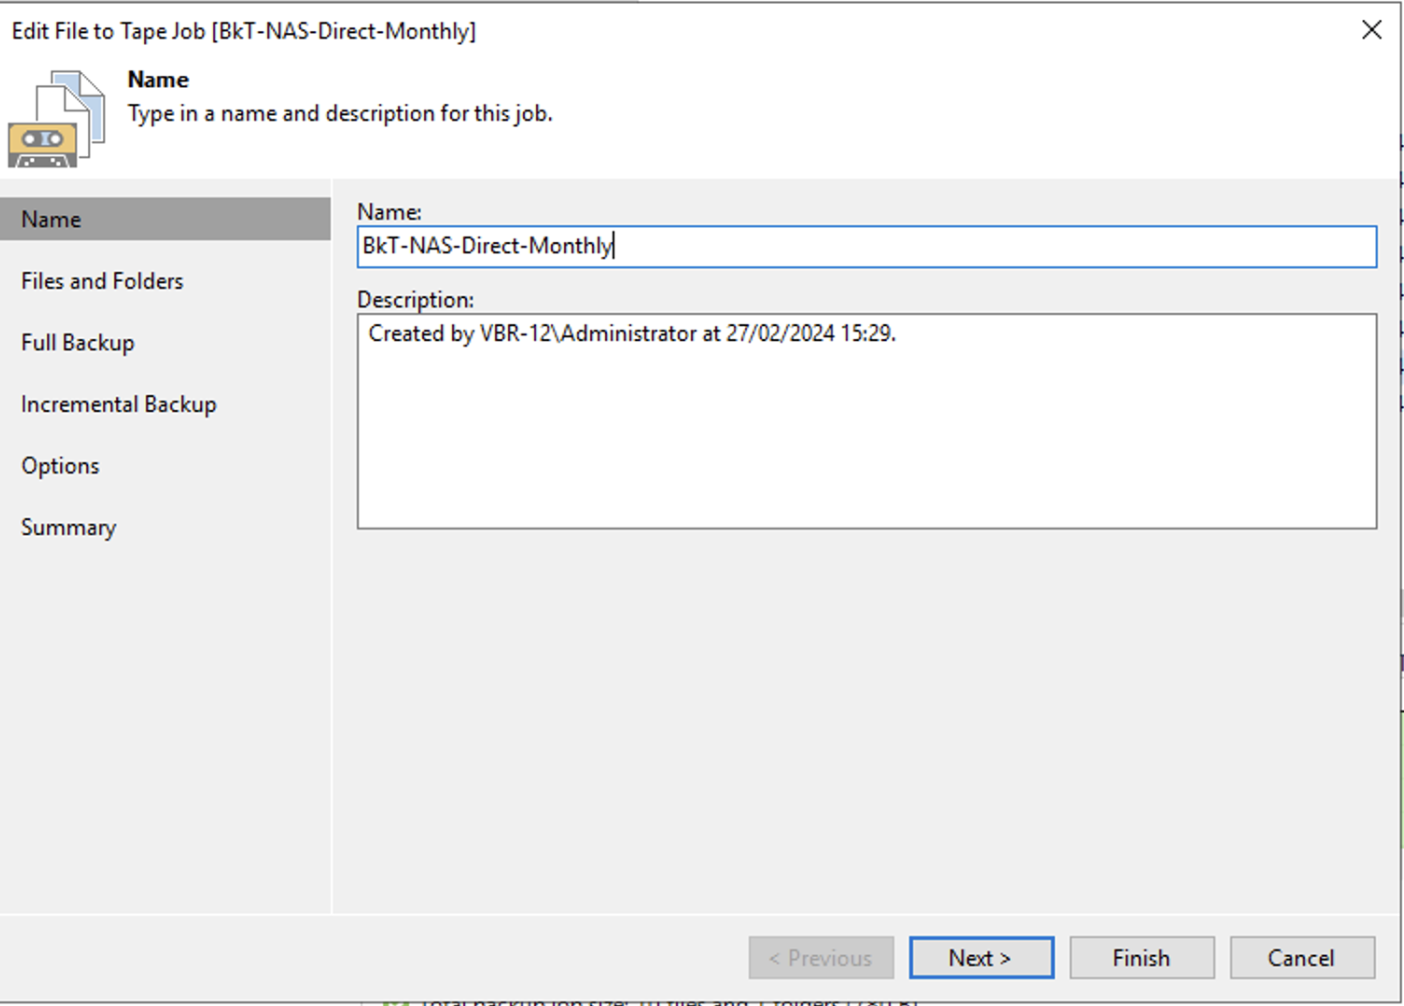
Image 11

Image 12

Image 13

Note 2:

  • Licensing counts licenses per individual Backup job (verision 12.1).
  • Conduct tests to make sure the scenario matches your needs. Get help from Veeam support.

In the next article, we will see how to use the Tape Copy feature.

MySQL Backup and Veeam Backup & Replication – Part 1

This article will show you how to implement a data protection strategy in MySQL environments.

Let’s start with a consideration.

To create consistent backups from an application point of view, it is necessary that before the copy process is started, the application has written all the data in memory to disk ( flush ).

For example, Microsoft® applications use a technology called Shadow Copy which, through the coordination of VSS drivers , achieves application consistency.

A similar technology is not available on Linux and in addition MySQL does not support it in the Microsoft® environment.

How to remedy?

Through the creation of scripts that automate application consistency before starting the creation of the Snapshot .

Having understood this aspect, let’s return to the scope of the article, introducing the options available for MySQL .

Note 1 : Application consistency occurs before snapshot creation.

  • 1. Logical Backup : The script creates a file with the .sql extension which in case of restore allows the re-creation of the database and its data.

The file . sql is created through the native MySQL command ” mysqldump “ .

The advantages of logical backup can be summarized in:

  • There are no dependencies on third-party software.
  • Backups can be restored to other servers.
  • 2. Physical / Cold Backup : Cold copies of the DB files are created (for example: ibdata, .ibd, .frm, ib_logfile, my.cnf).

To be sure that the backups are made in ” application consistency ” mode, before taking the snapshot, it is essential to stop the MySQL services.

It is a backup strategy typically implemented in environments that do not require 24×7 operations.

Note 2 : The service is stopped only for the time necessary to create the snapshot and not for the entire duration of the backup.

  • 3. Physical / Hot Backup : If the InnoDB engine is running, the script allows the creation of consistent copies without stopping the services (using for example the command mysqlbackup component of the MySQL Enterprise suite ( MySQL Product) ).

Now that we know the scripting options available, let’s see how Veeam solutions can natively integrate with MySQL environments.

The first available option is the Veeam Agent for Linux ( VAL ) which automates the following four steps:

  1. Flush data from memory to disk (application consistency).
  2. Creation of the snasphot.
  3. Release of tables.
  4. Start the Backup process.

Note 3 : As indicated in the first part of the article, if the DB is of the MyISAM type, it is possible to backup with the blocking of all the tables.

The pre-requisites of the VAL are:

  • MySQL version is greater than or equal to 5.8.
  • The operating system is Linux.

Question: Is it possible to backup in Windows environments where the MySQL version is lower than version 5.8?

The answer is yes and the available scenarios are:

Logical Backup -> Hot-Backup Database Online Dump -> Mysqldump command.

Physical / Cold Backup –> Cold-Backup Database Shutdown -> Temporary stop of the Services.

Physical / Hot Backup –> Hot-Backup Database Freeze -> Native mysql commands.

Note4 : There is also the possibility of making Partial Backups . In this scenario, specific tables and databases are backed up. It is useful when different protection strategies have to be implemented on the same Server.

In the next article, we will find out how to create scripts and how to integrate them into Veeam Backup & Replication.

Veeam Disaster Recovery Orchestrator v.5: Components verification

This article explains how to configure the Veeam Disaster Recovery Orchestrator (VDrO) administration menu.

Before proceeding to the administration phase, it is essential to have already labeled the resources that will have to be part of the Disaster Recovery plans.

The classification was illustrated in the previous article, available by clicking on the following link: VDrO – VOne – Tagging .

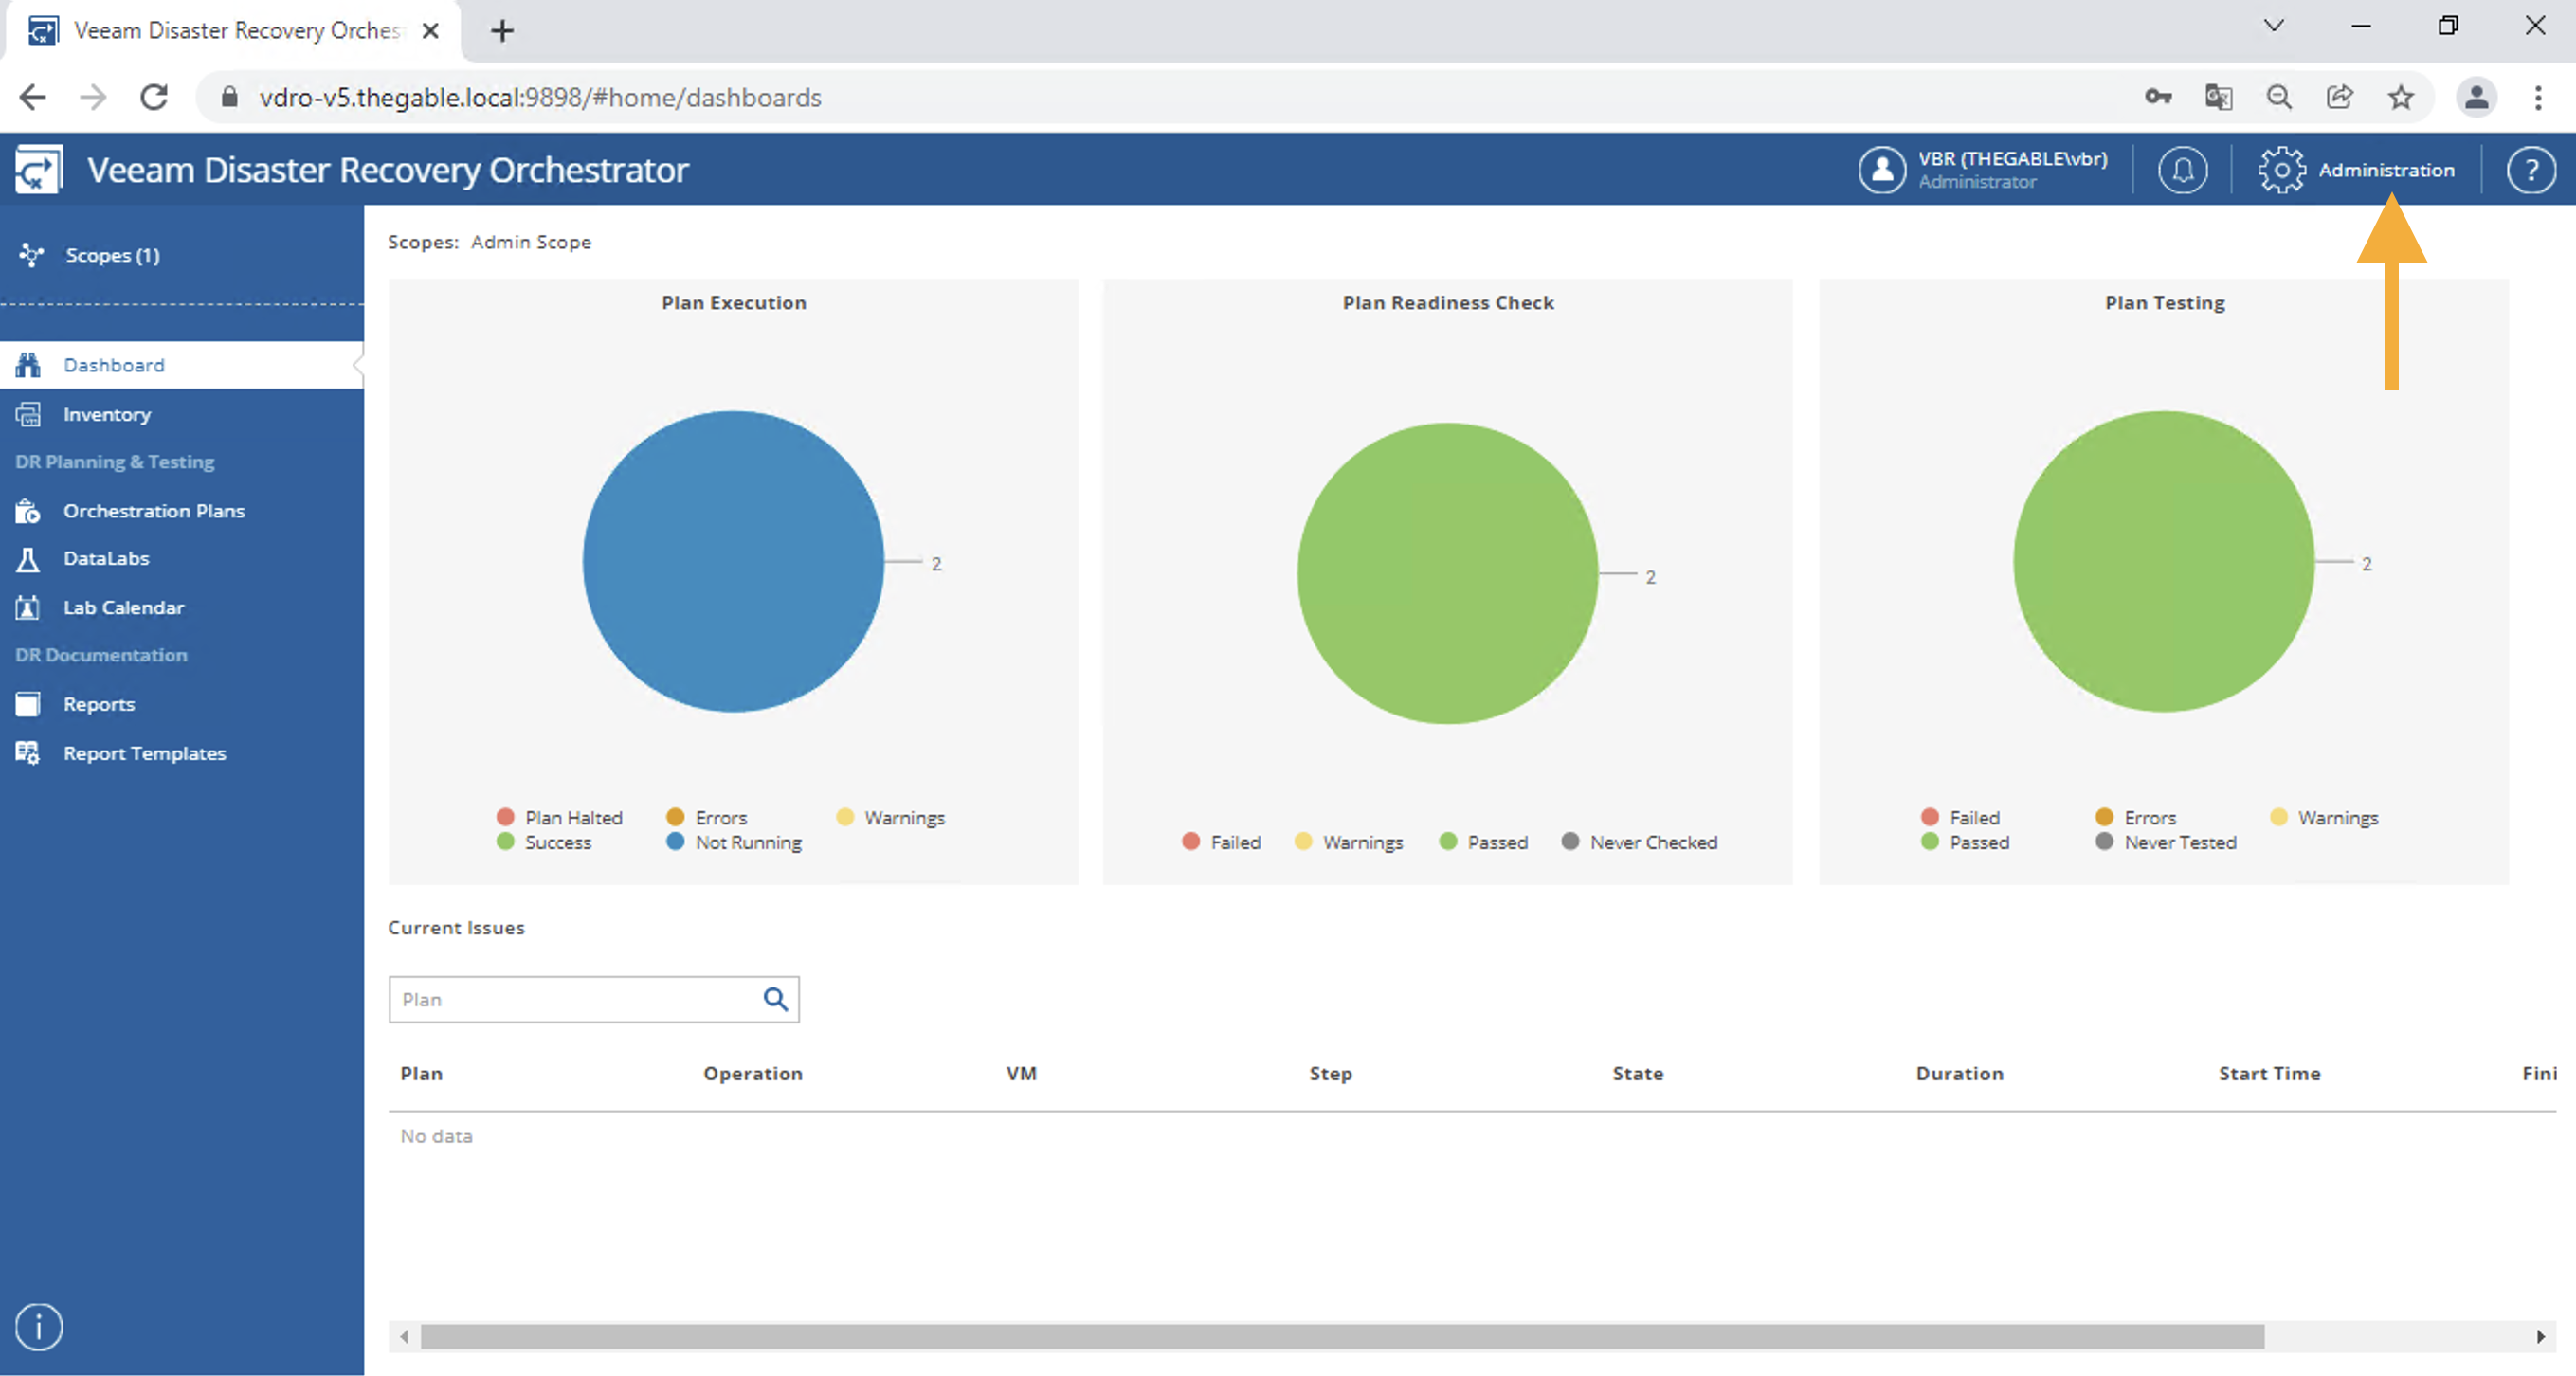
Note 1 : To access the administration menu, select the item called “Administration” (see image 1)

Picture 1

The configuration of the administration menu is divided into three main areas:

In the first, the following are set:

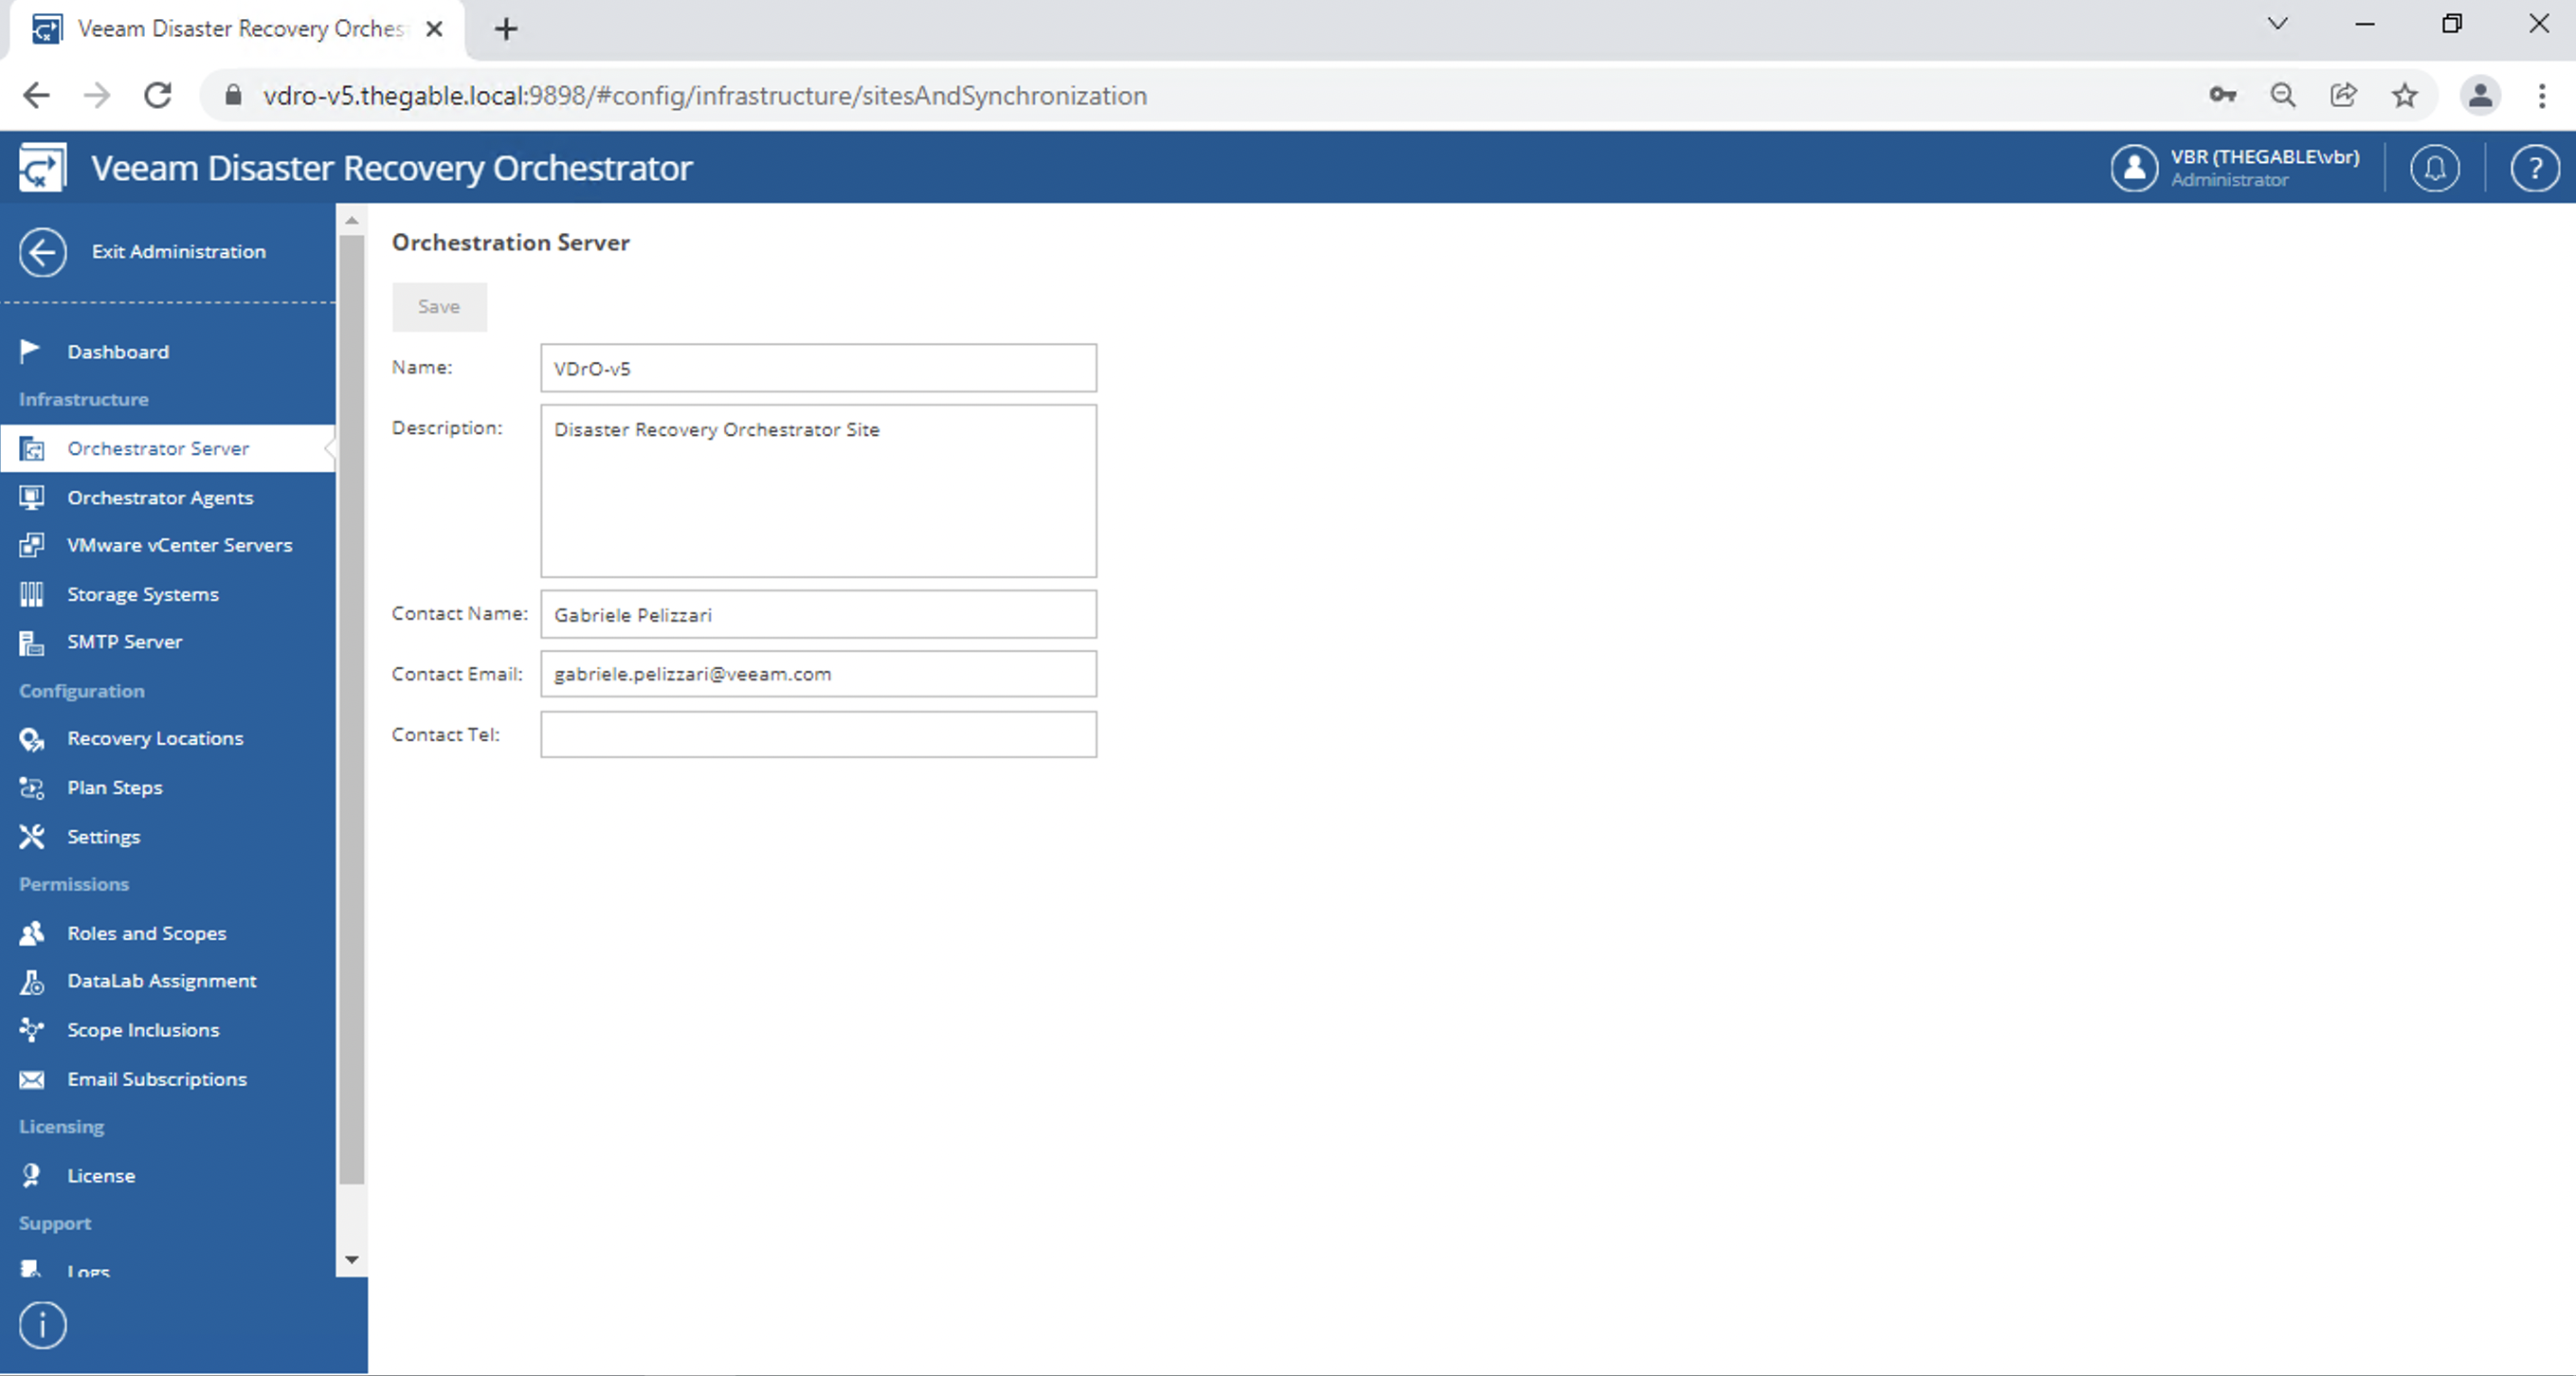
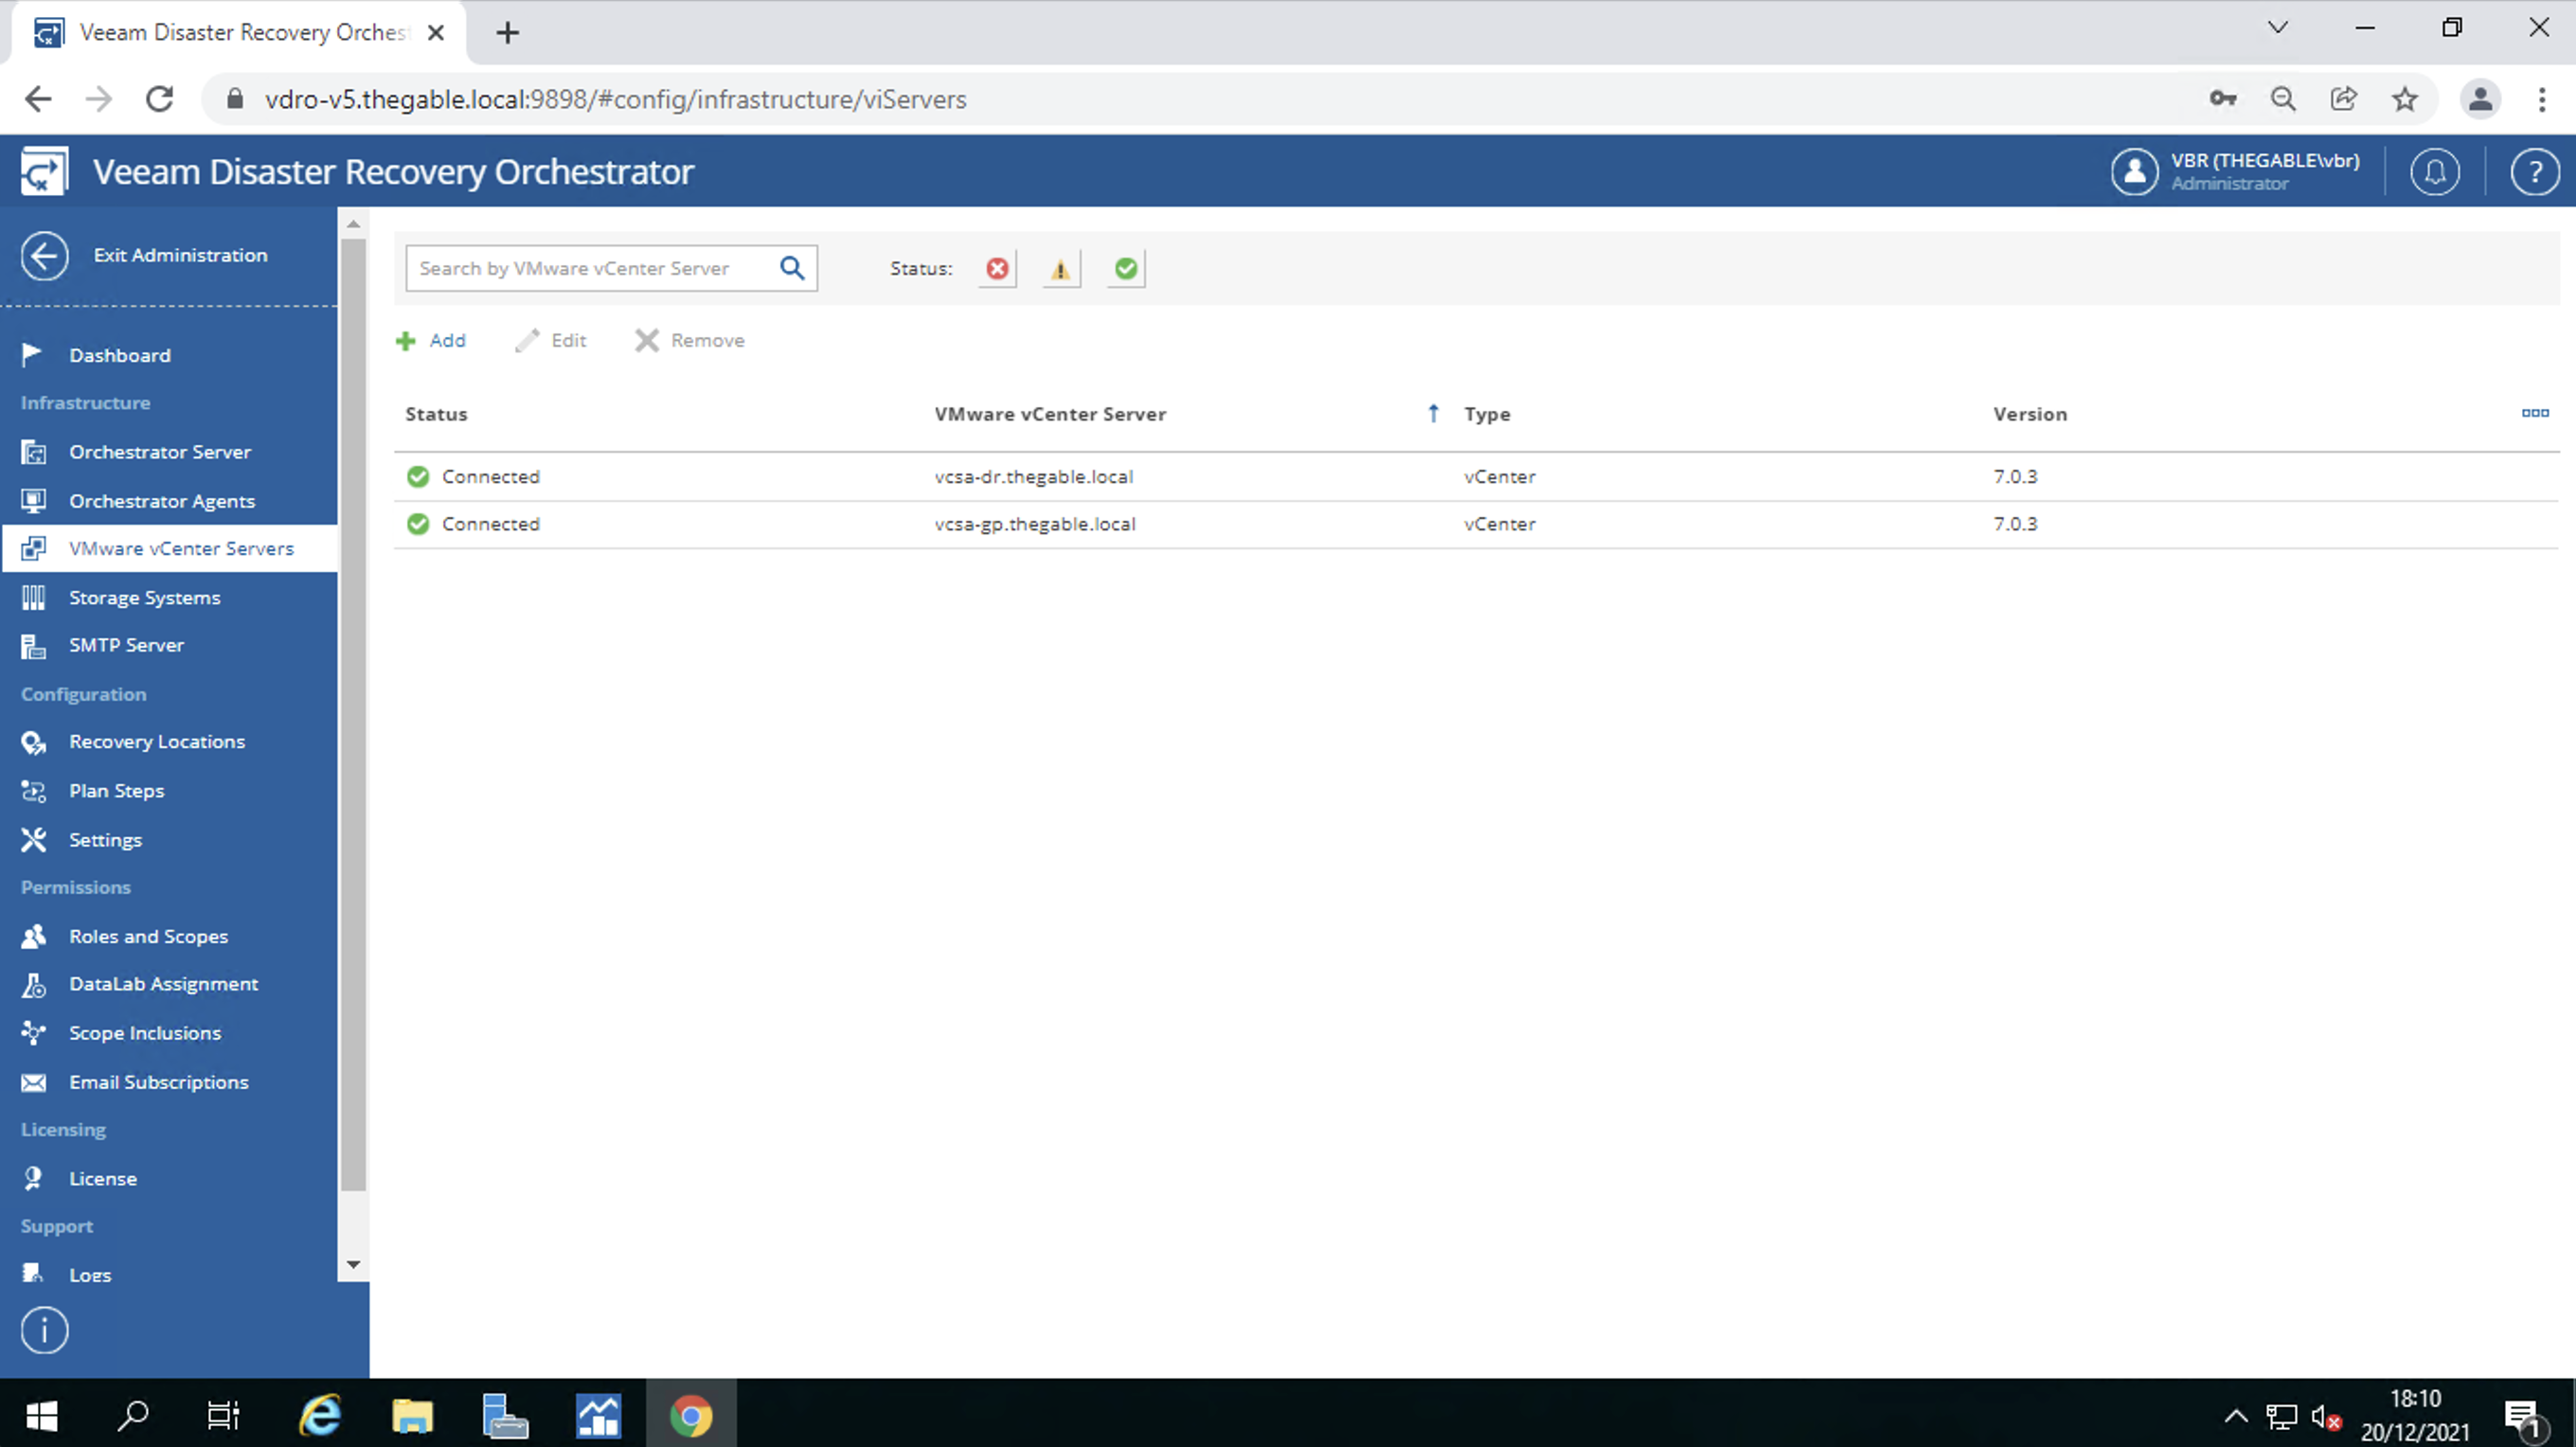
  • The name of the VDrO Server and the contact name (image 2).
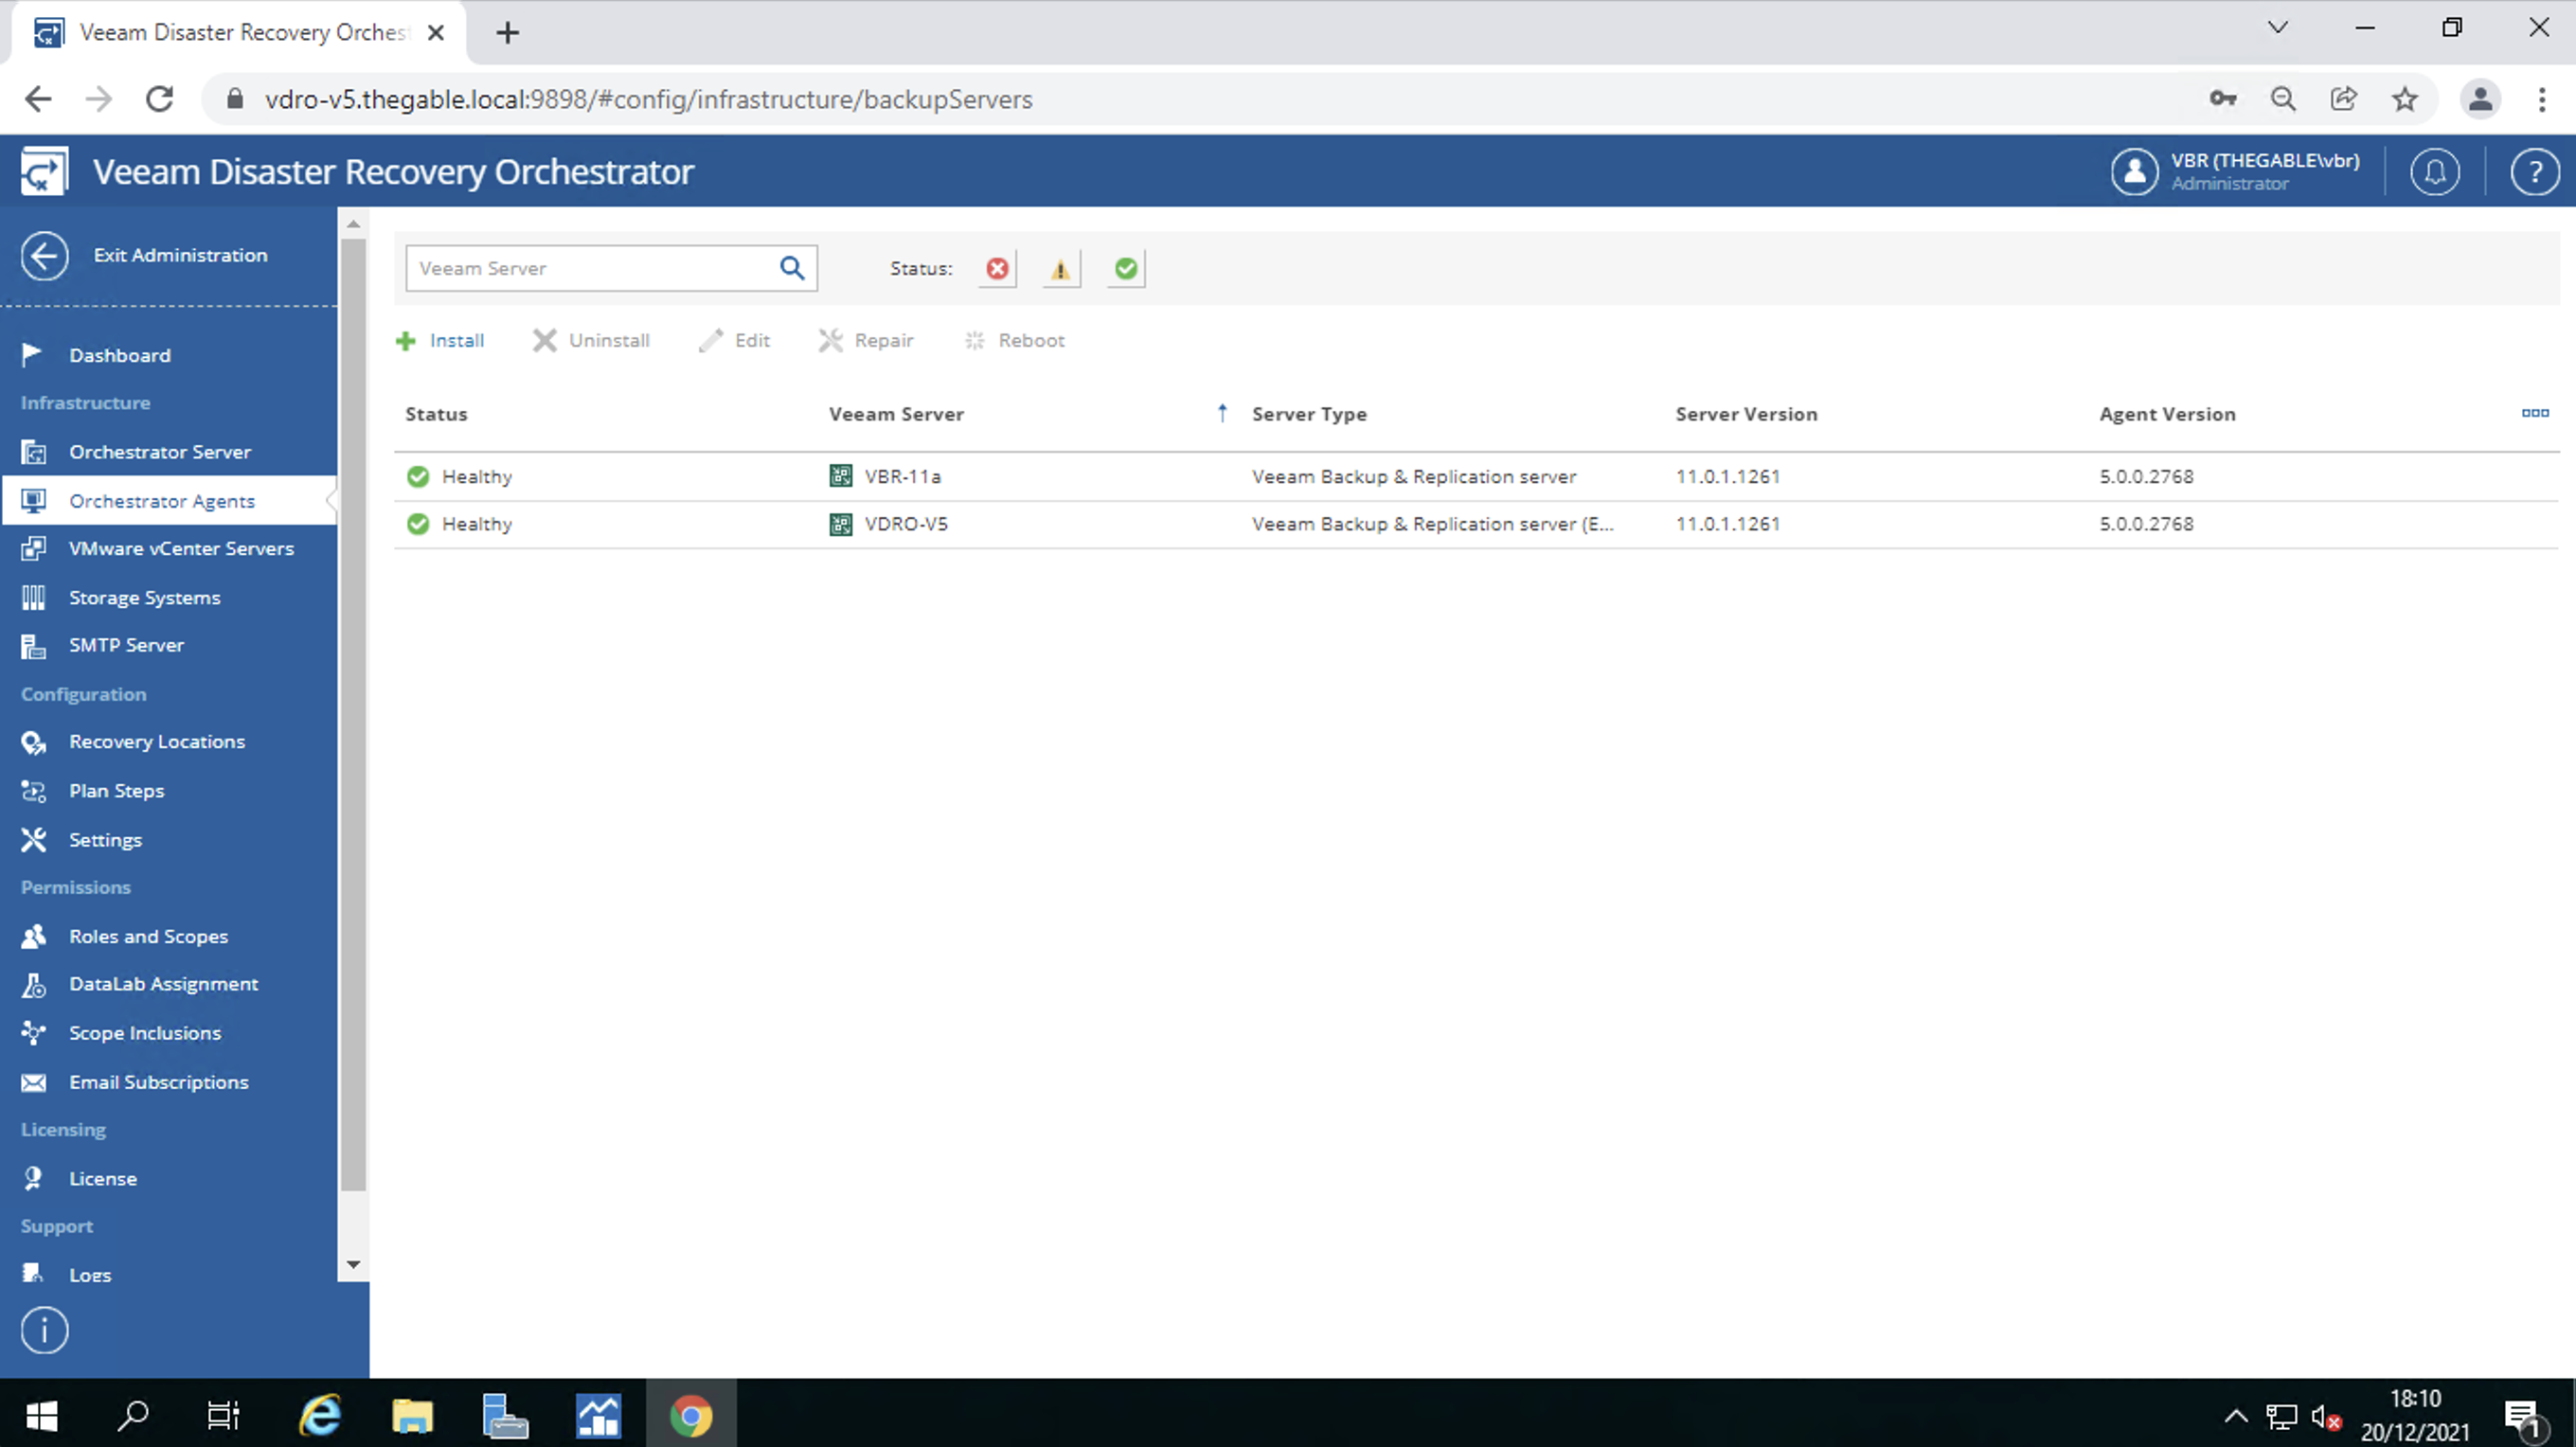
  • connections to Veeam Backup & Replication Servers (VBR) (image 3)
  • connections to vCenters (image 4)
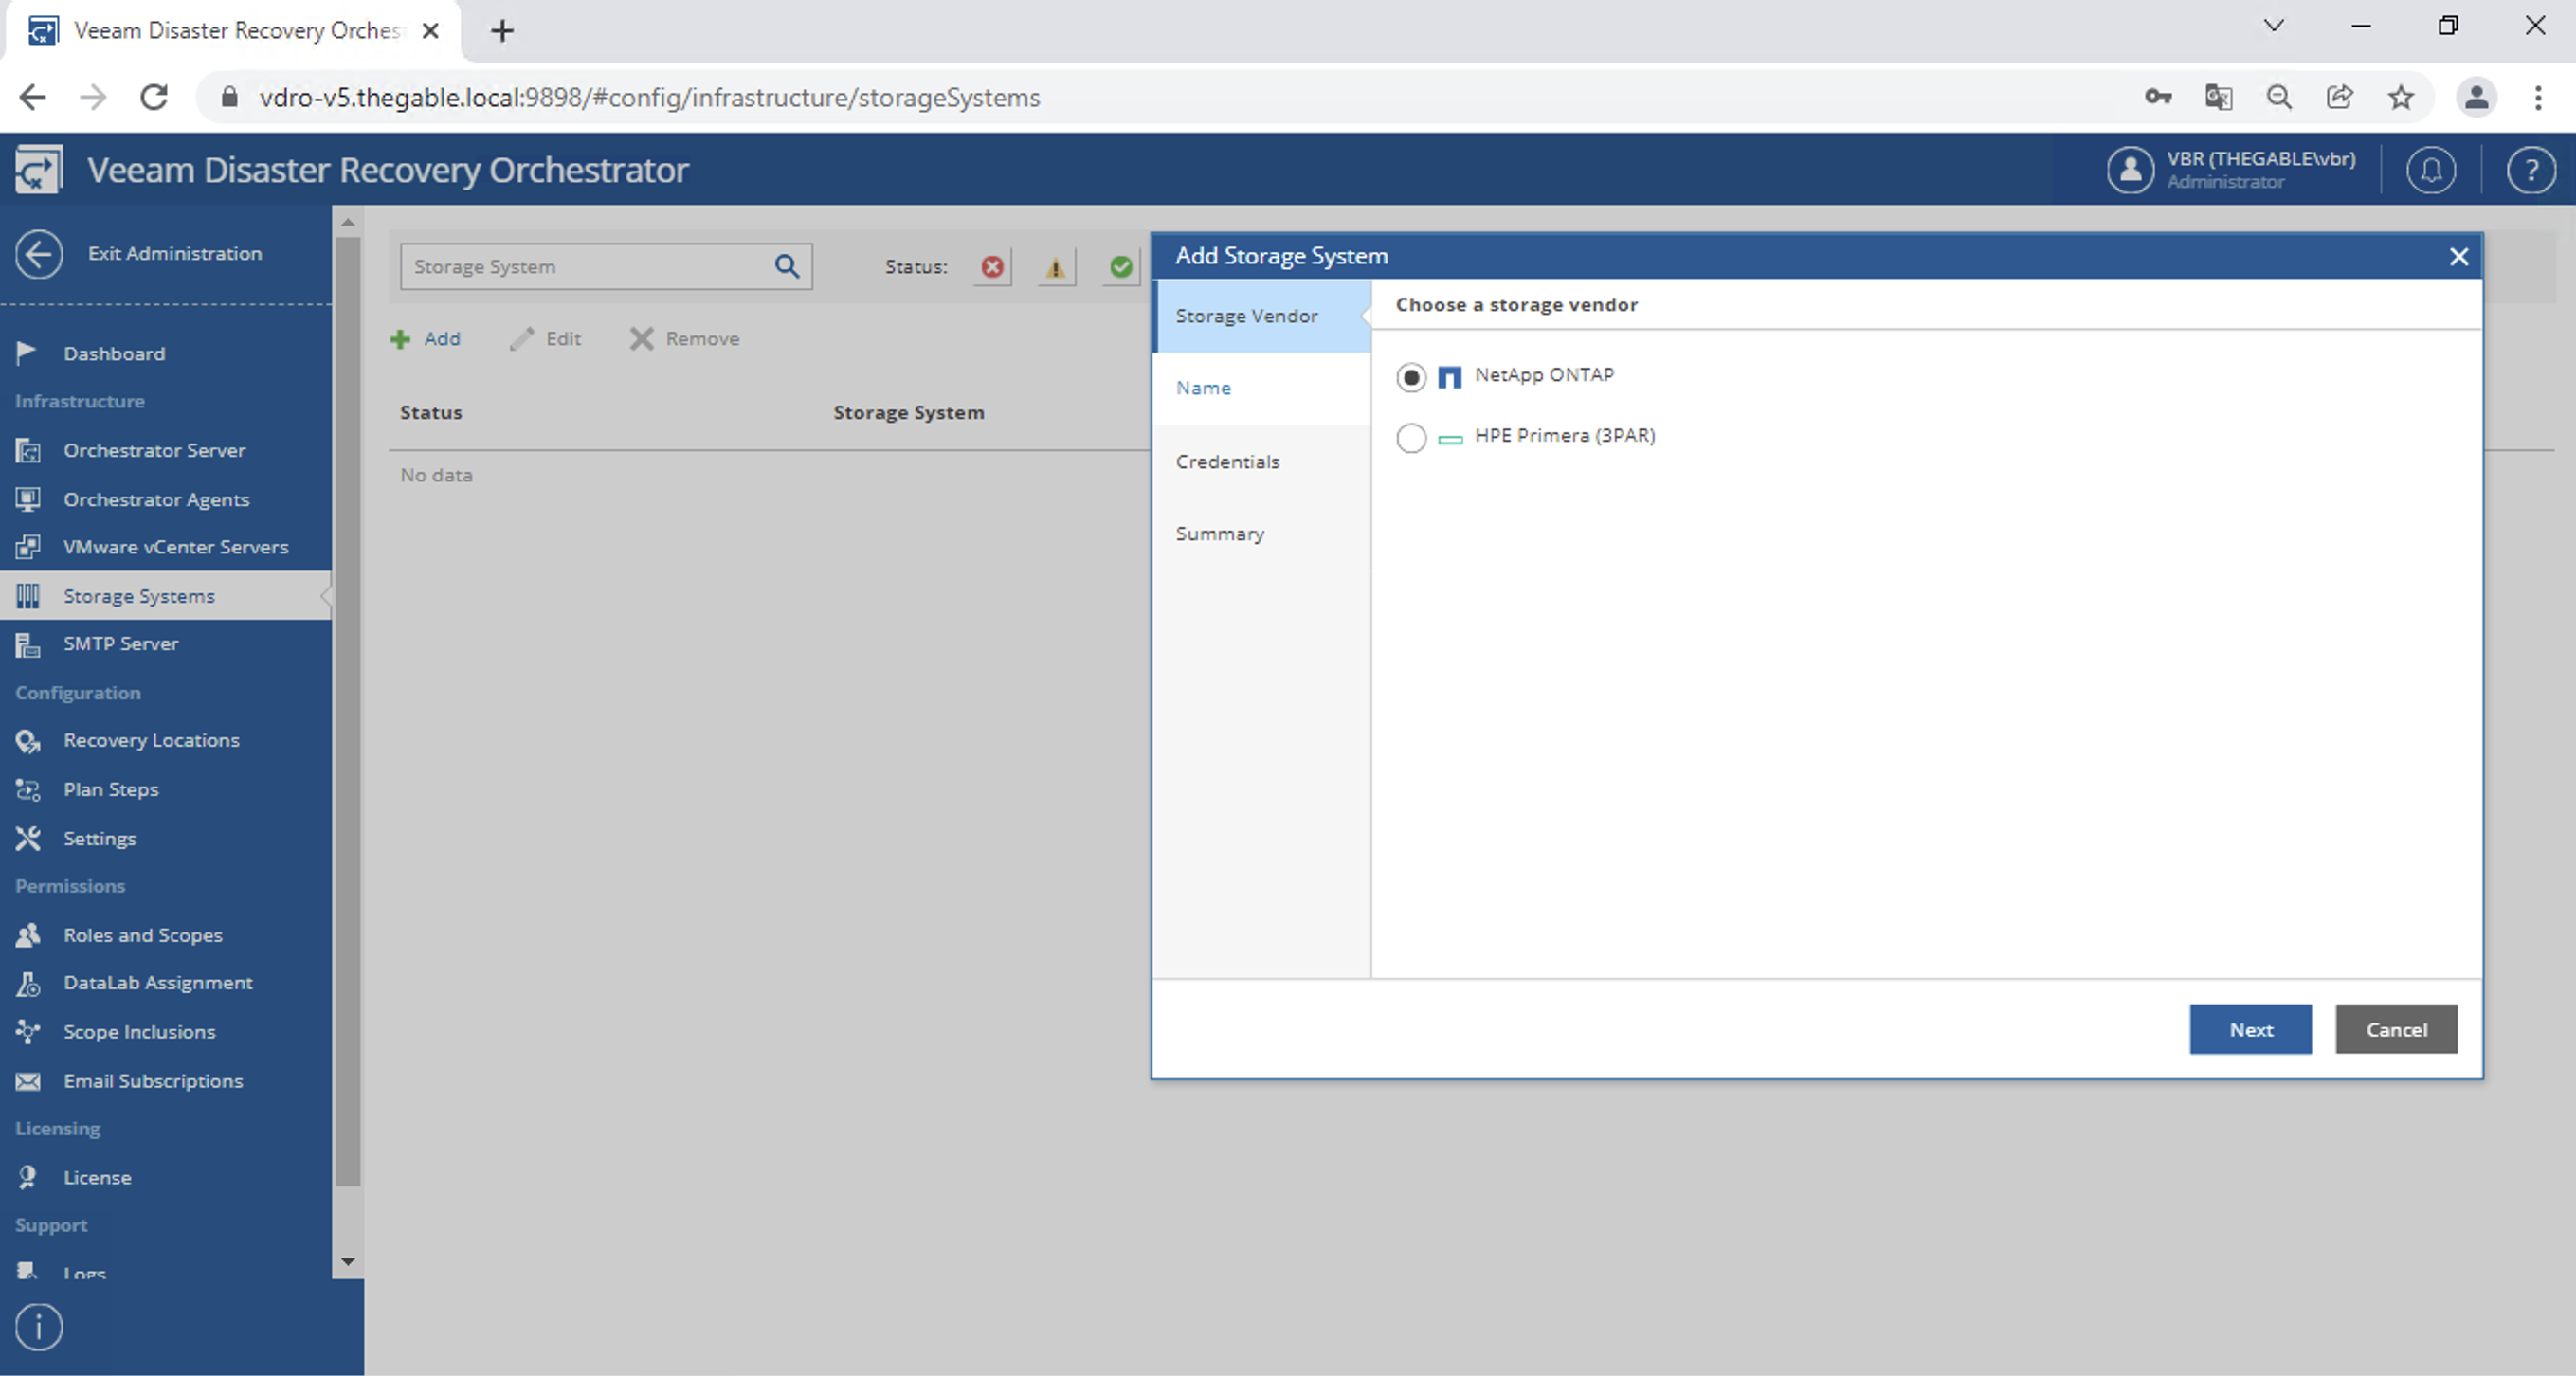
  • the optional connection to the storage (image 5) (refer to this article to find out the details)

picture 2

Picture 3

Picture 4

Picture 5

The second area identifies the resources to be added to the DR plans through tagging:

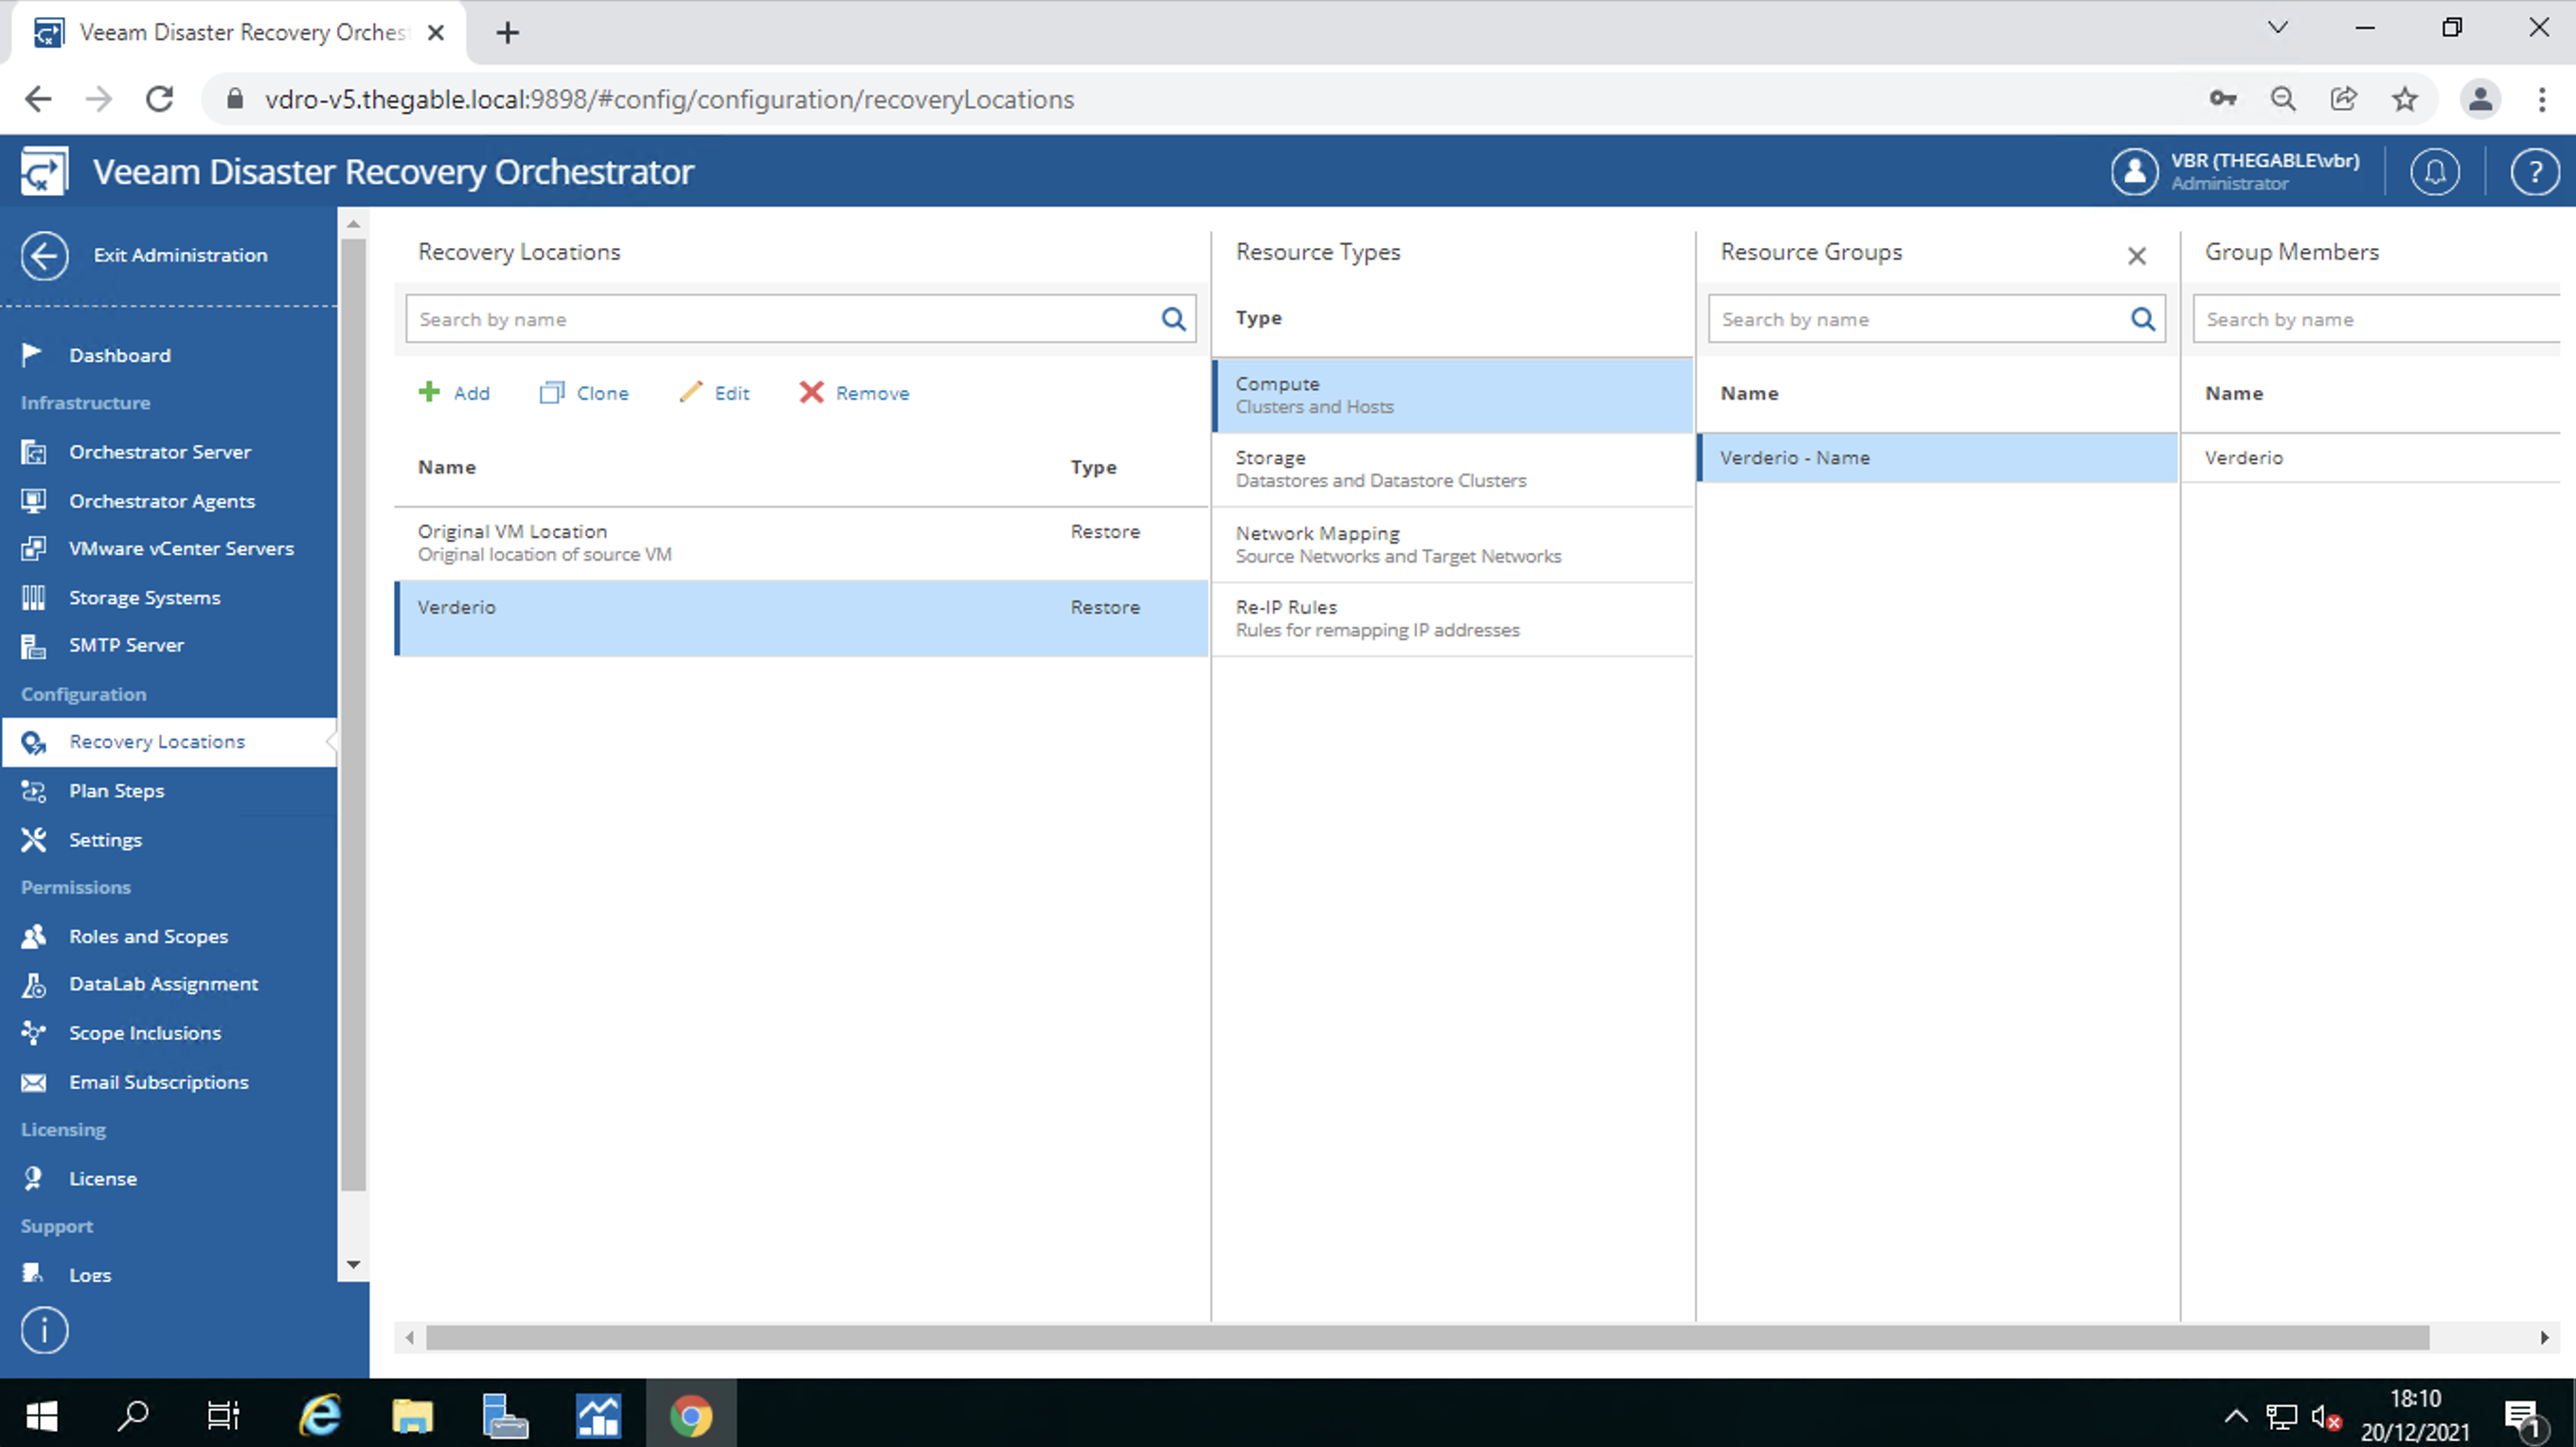
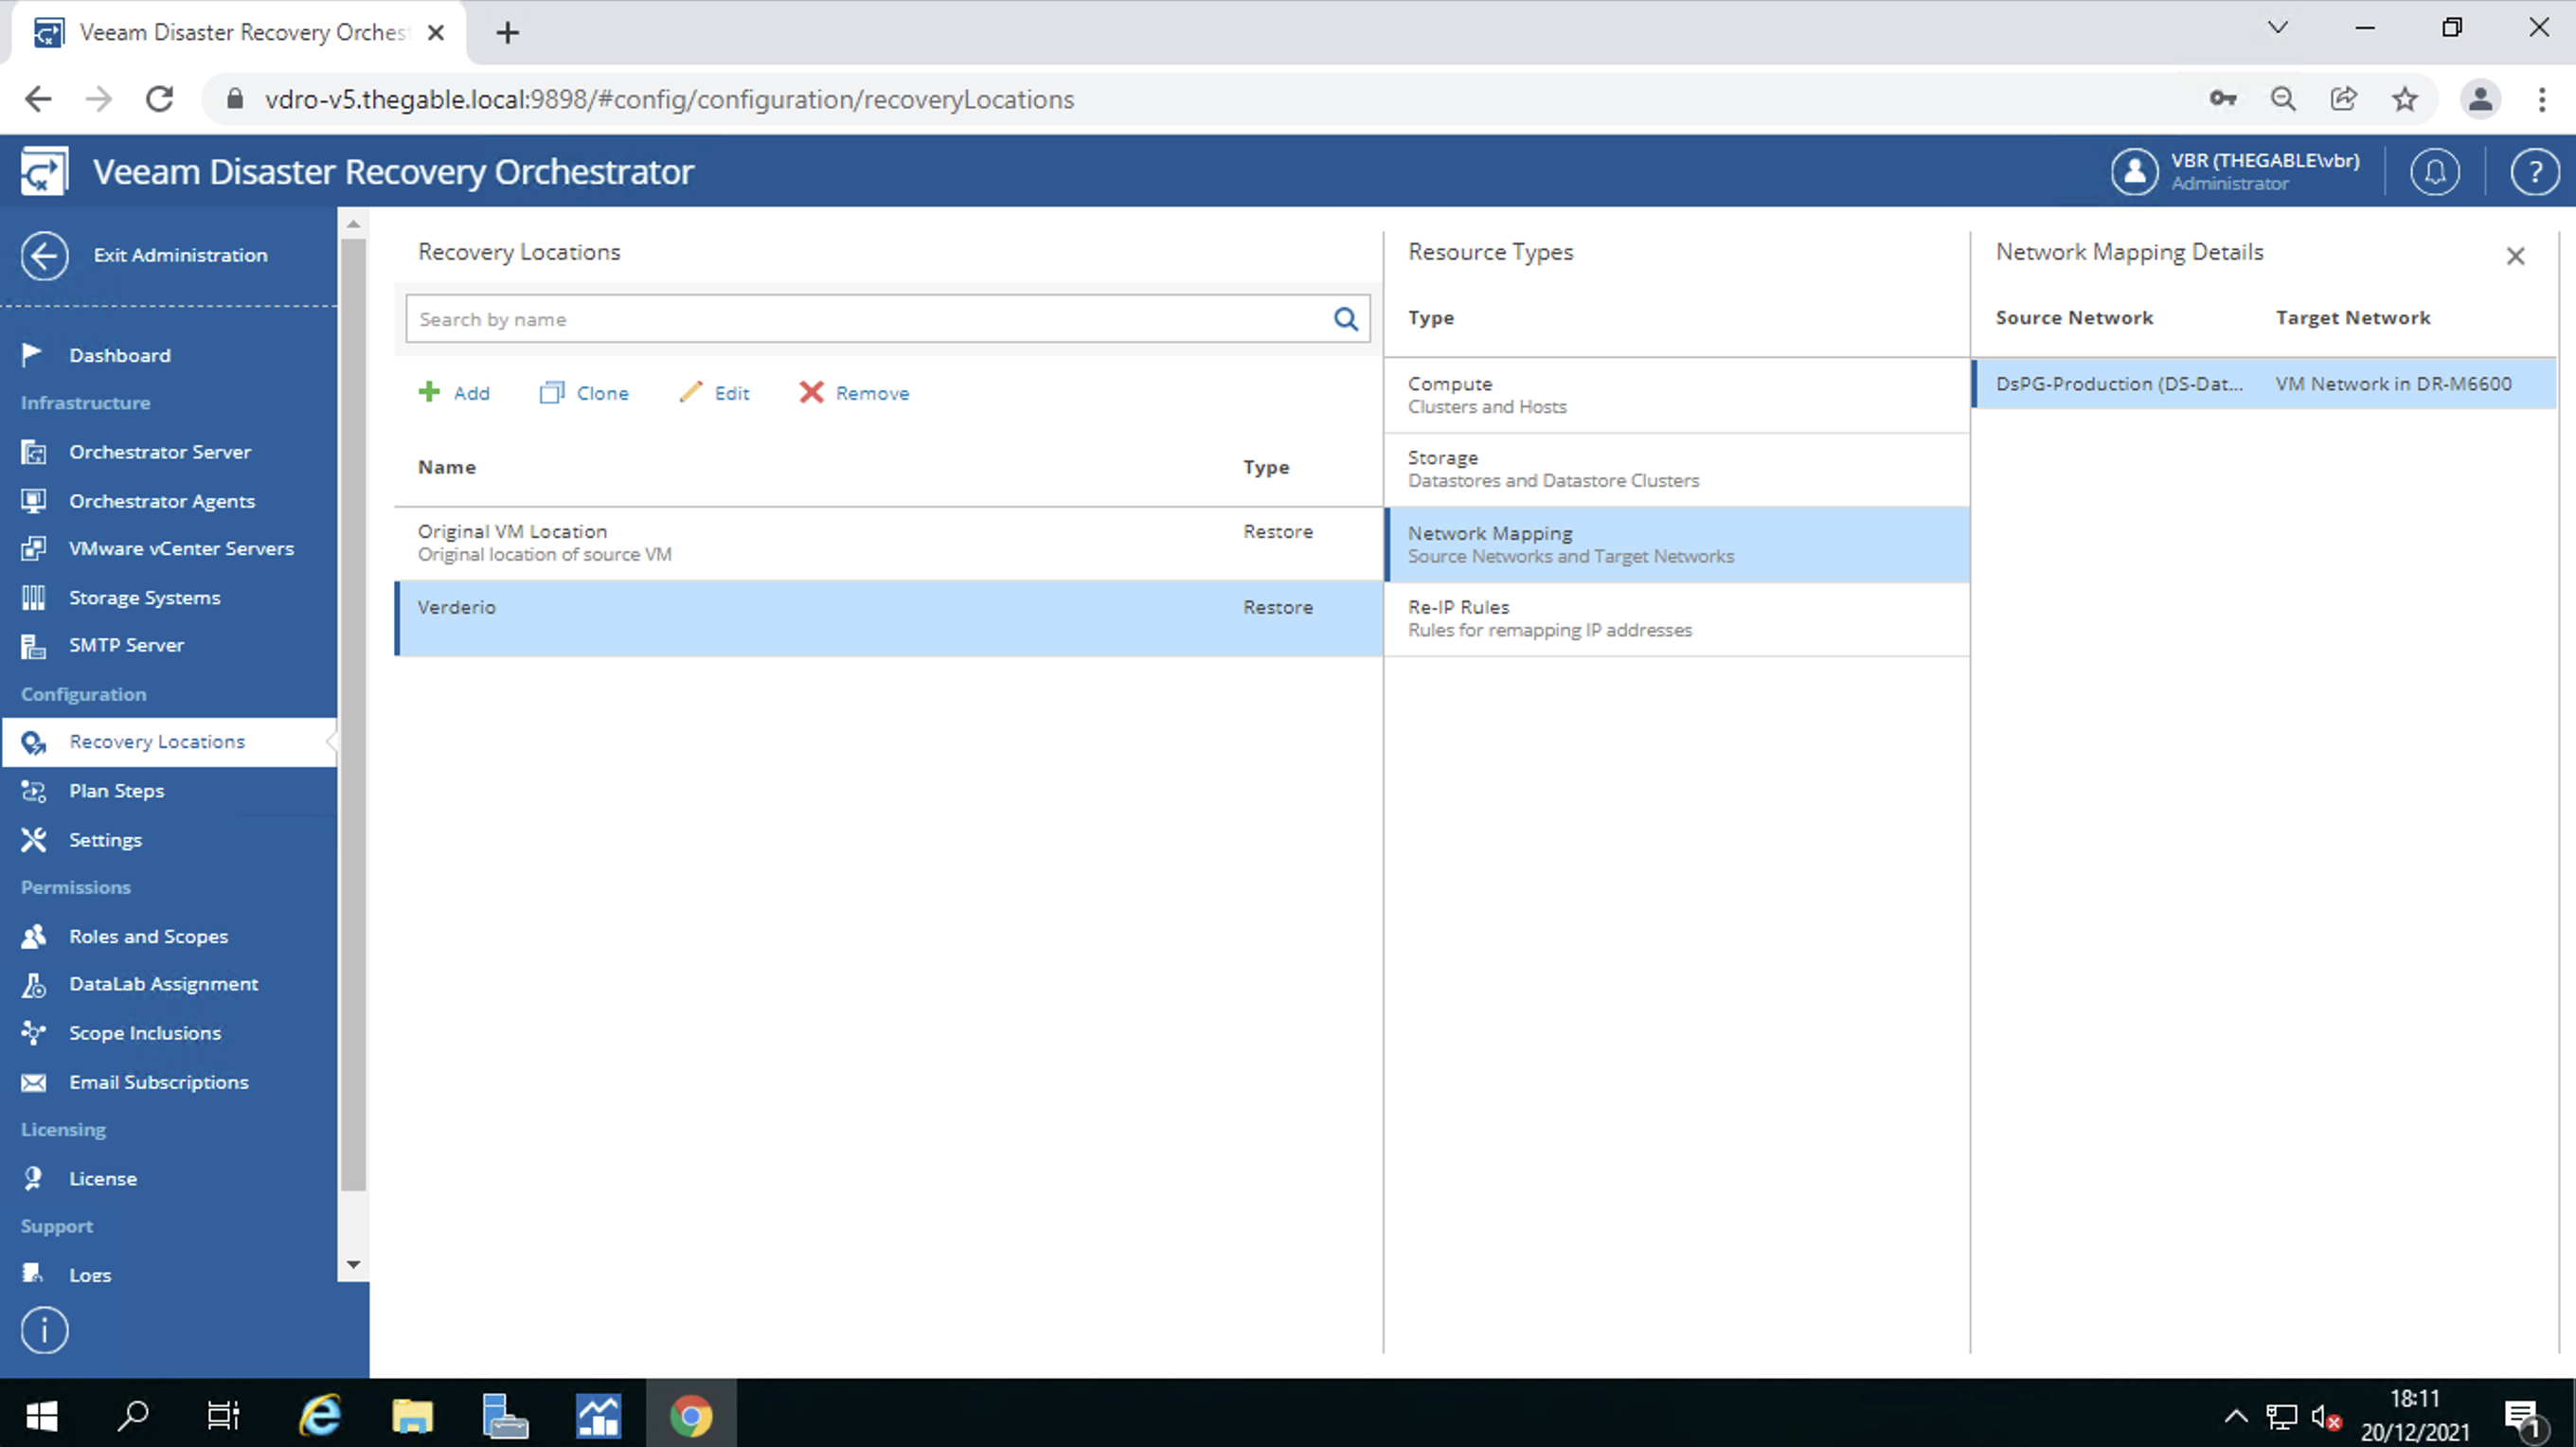
  • The recovery location (image 6)
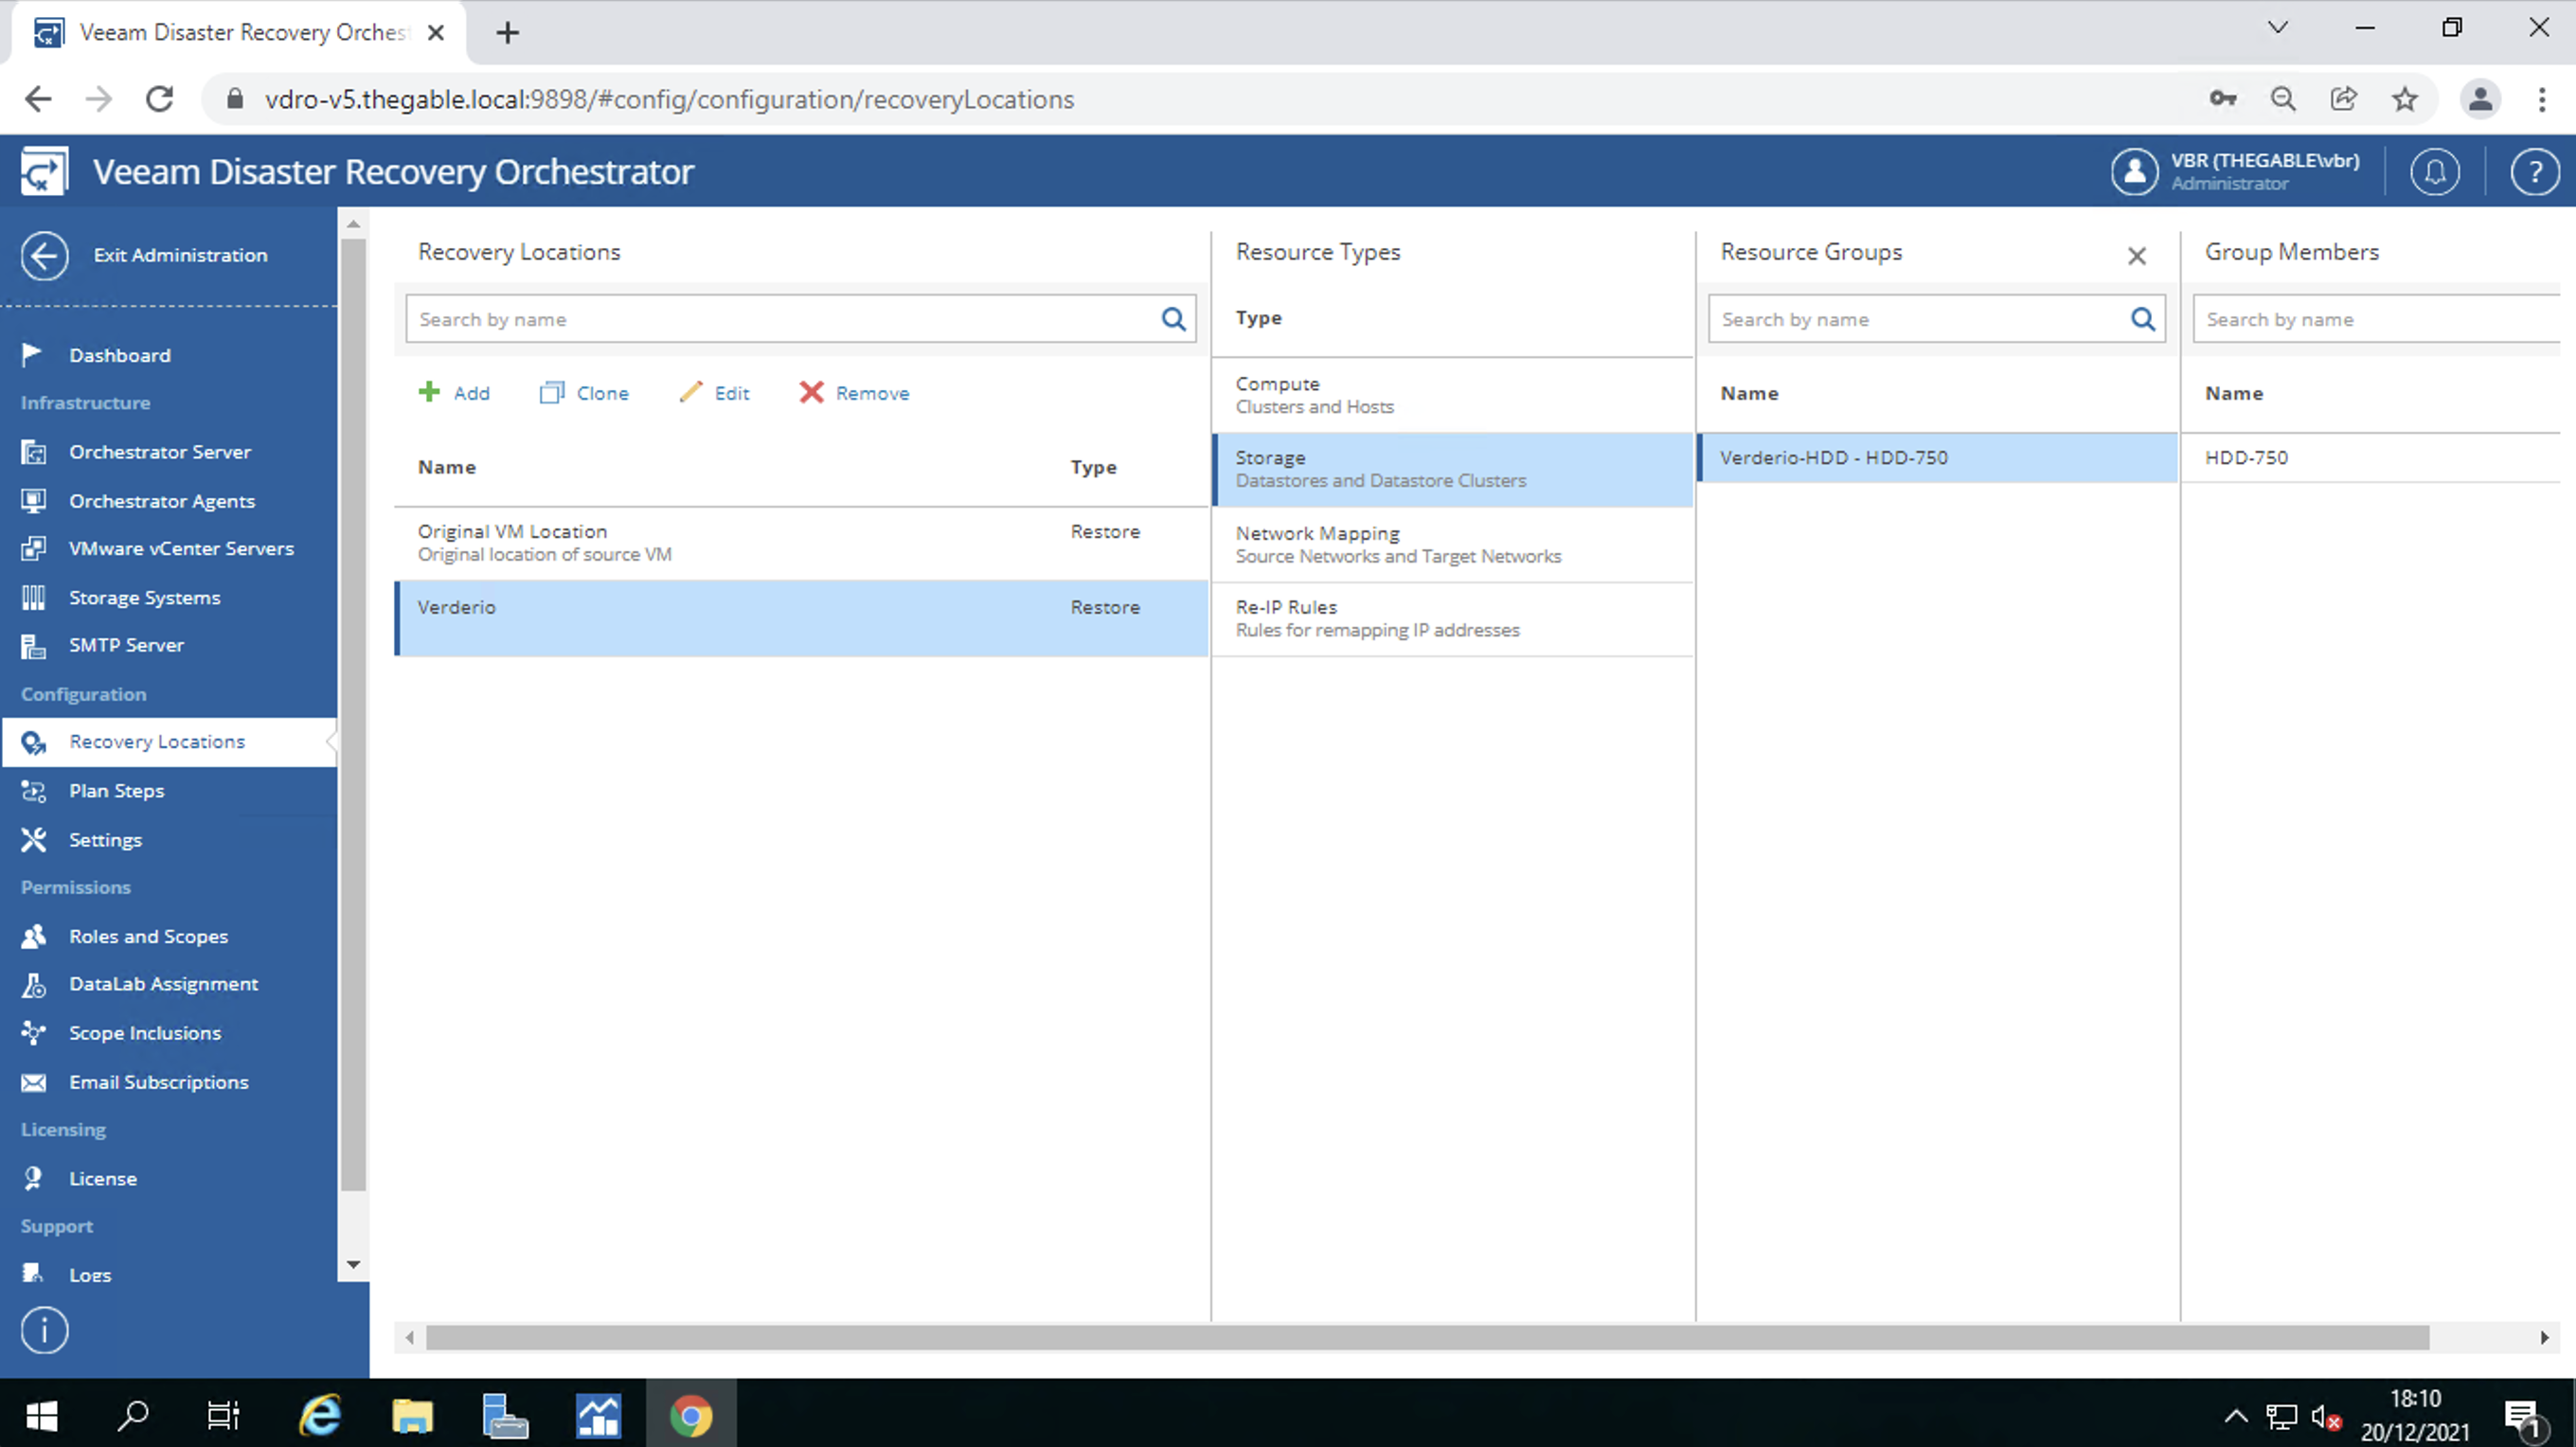
  • In the recovery location the datastores where the VM filesystems will reside (image 7)
  • Network mapping (image 8)
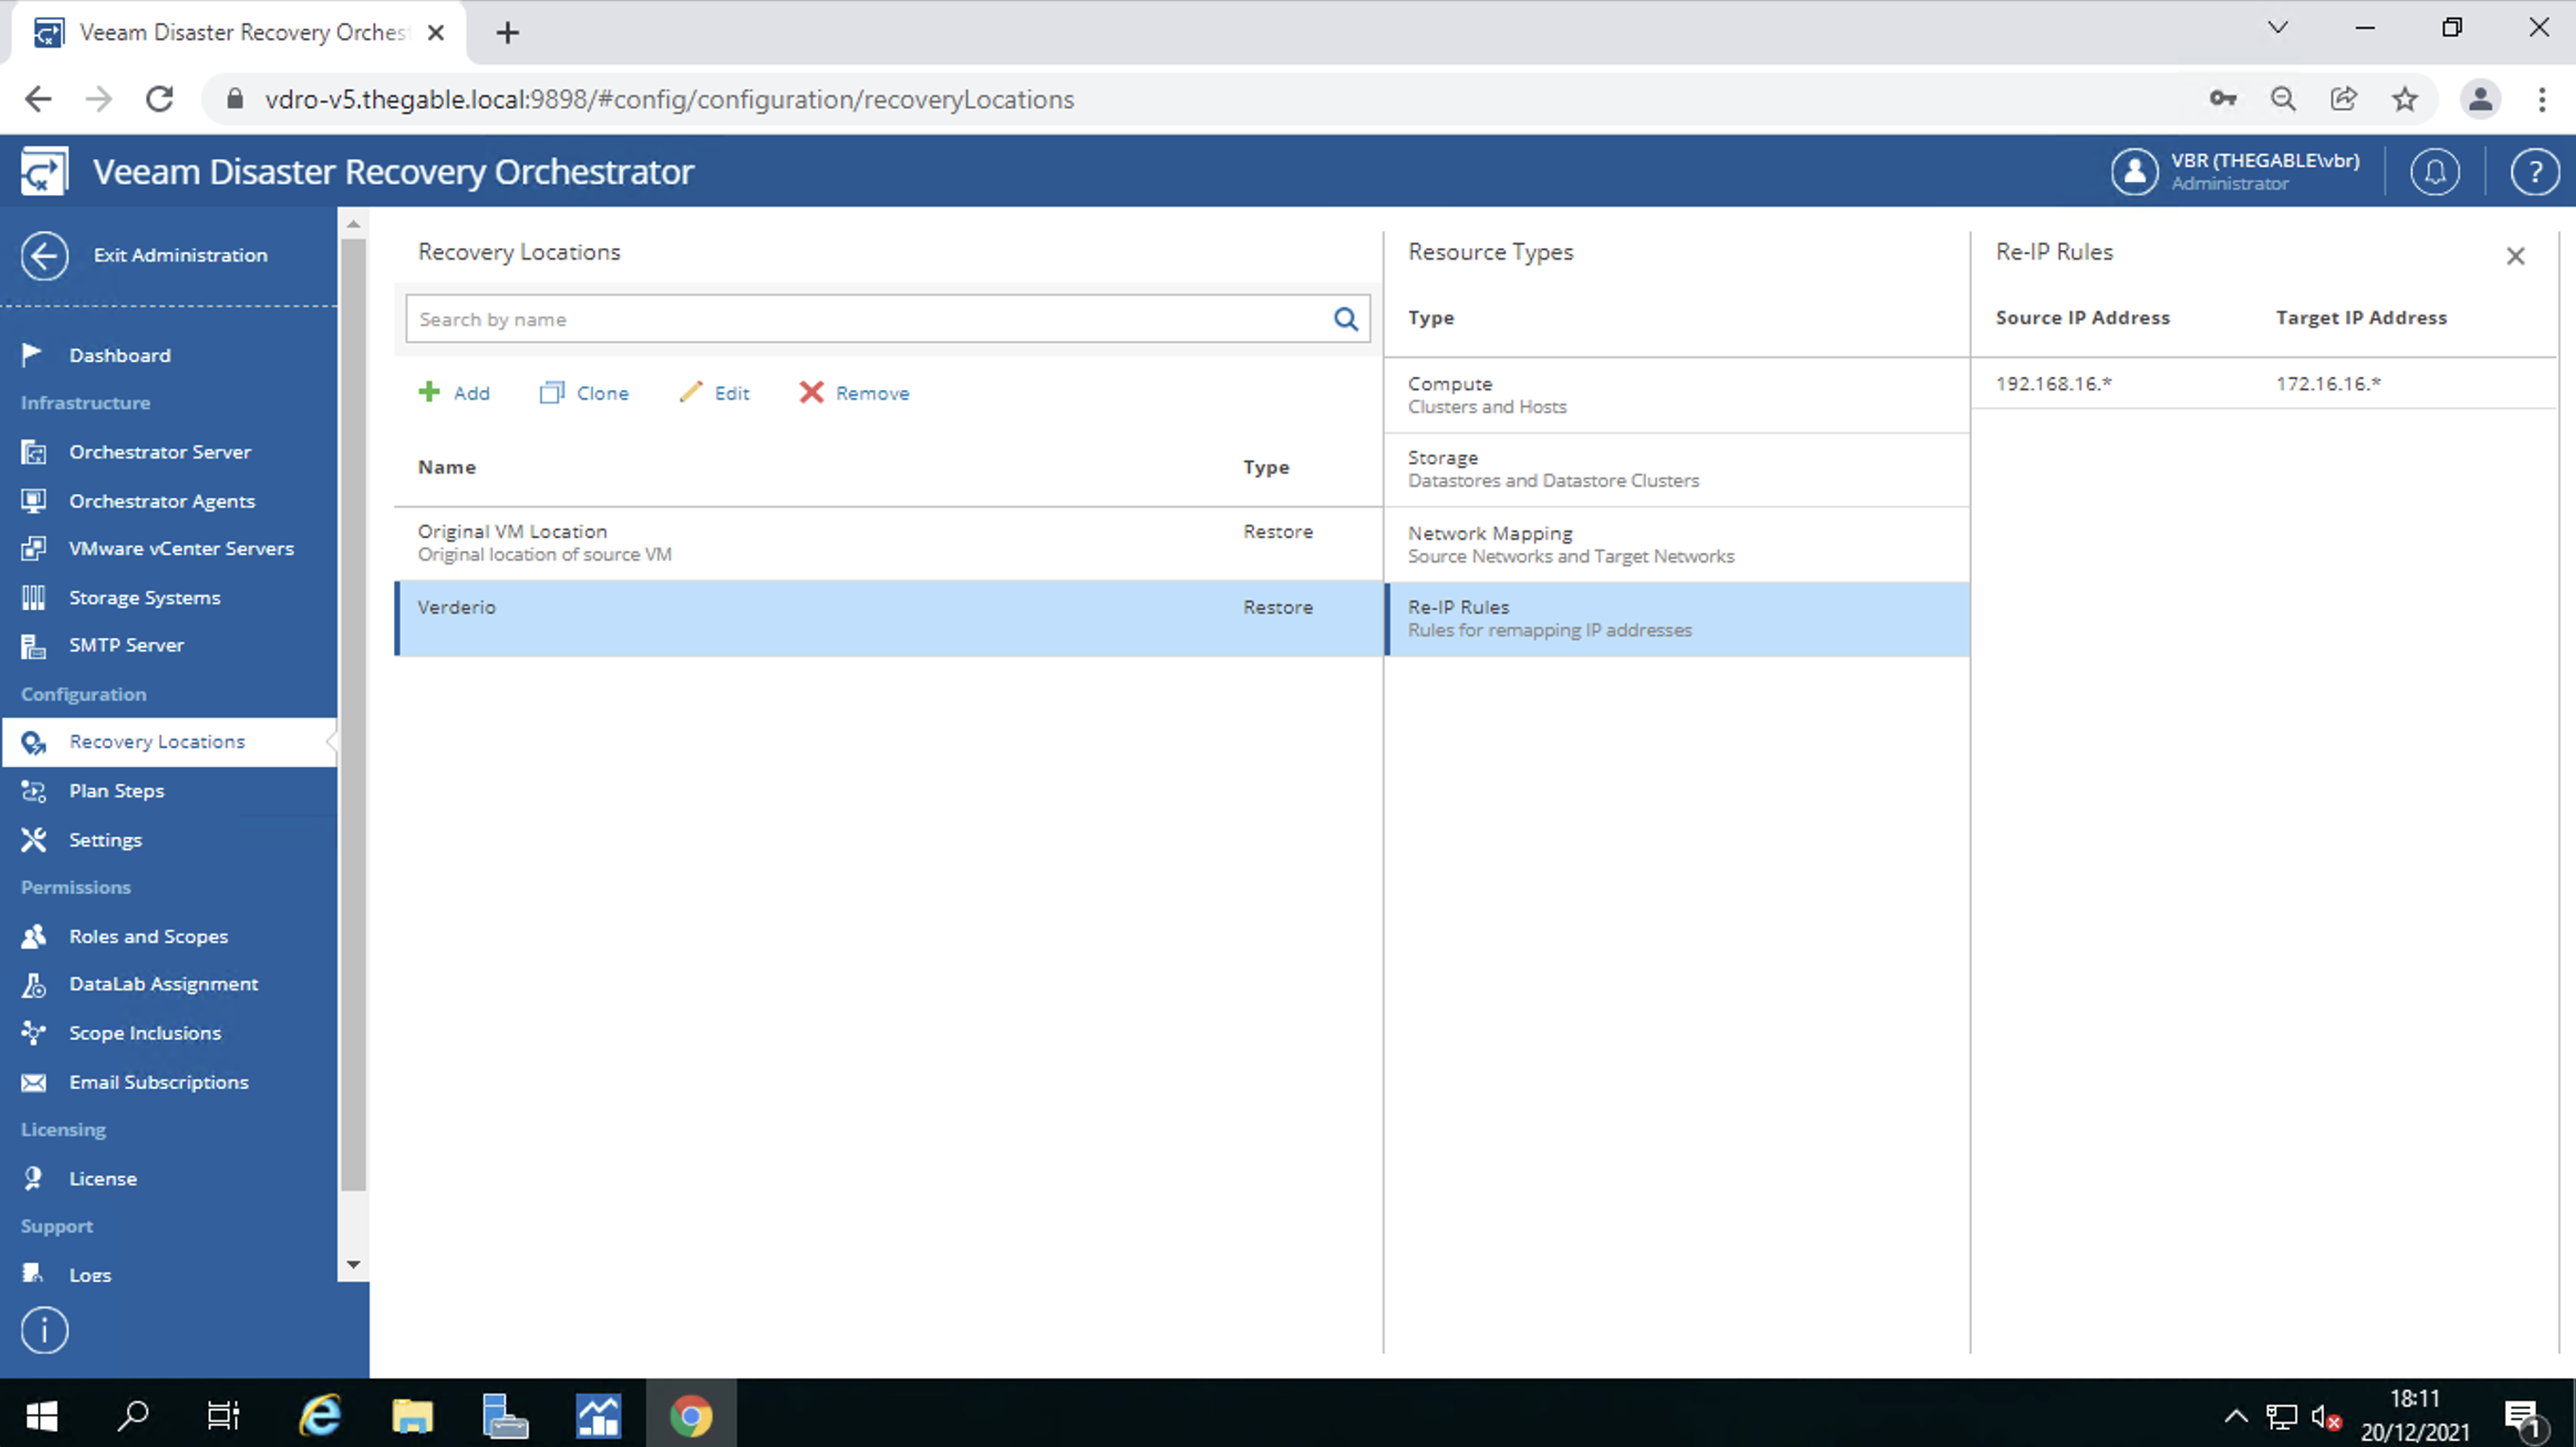
  • IP address remapping (image 9)

Note 2: The operations described above are possible if and only if all necessary resources have been tagged.

Note 3: Automatic remapping of IP addresses when starting a DR plan is only available for Windows VMs.

Picture 6

Picture 7

Image 8

Image 9

In the third area are identified:

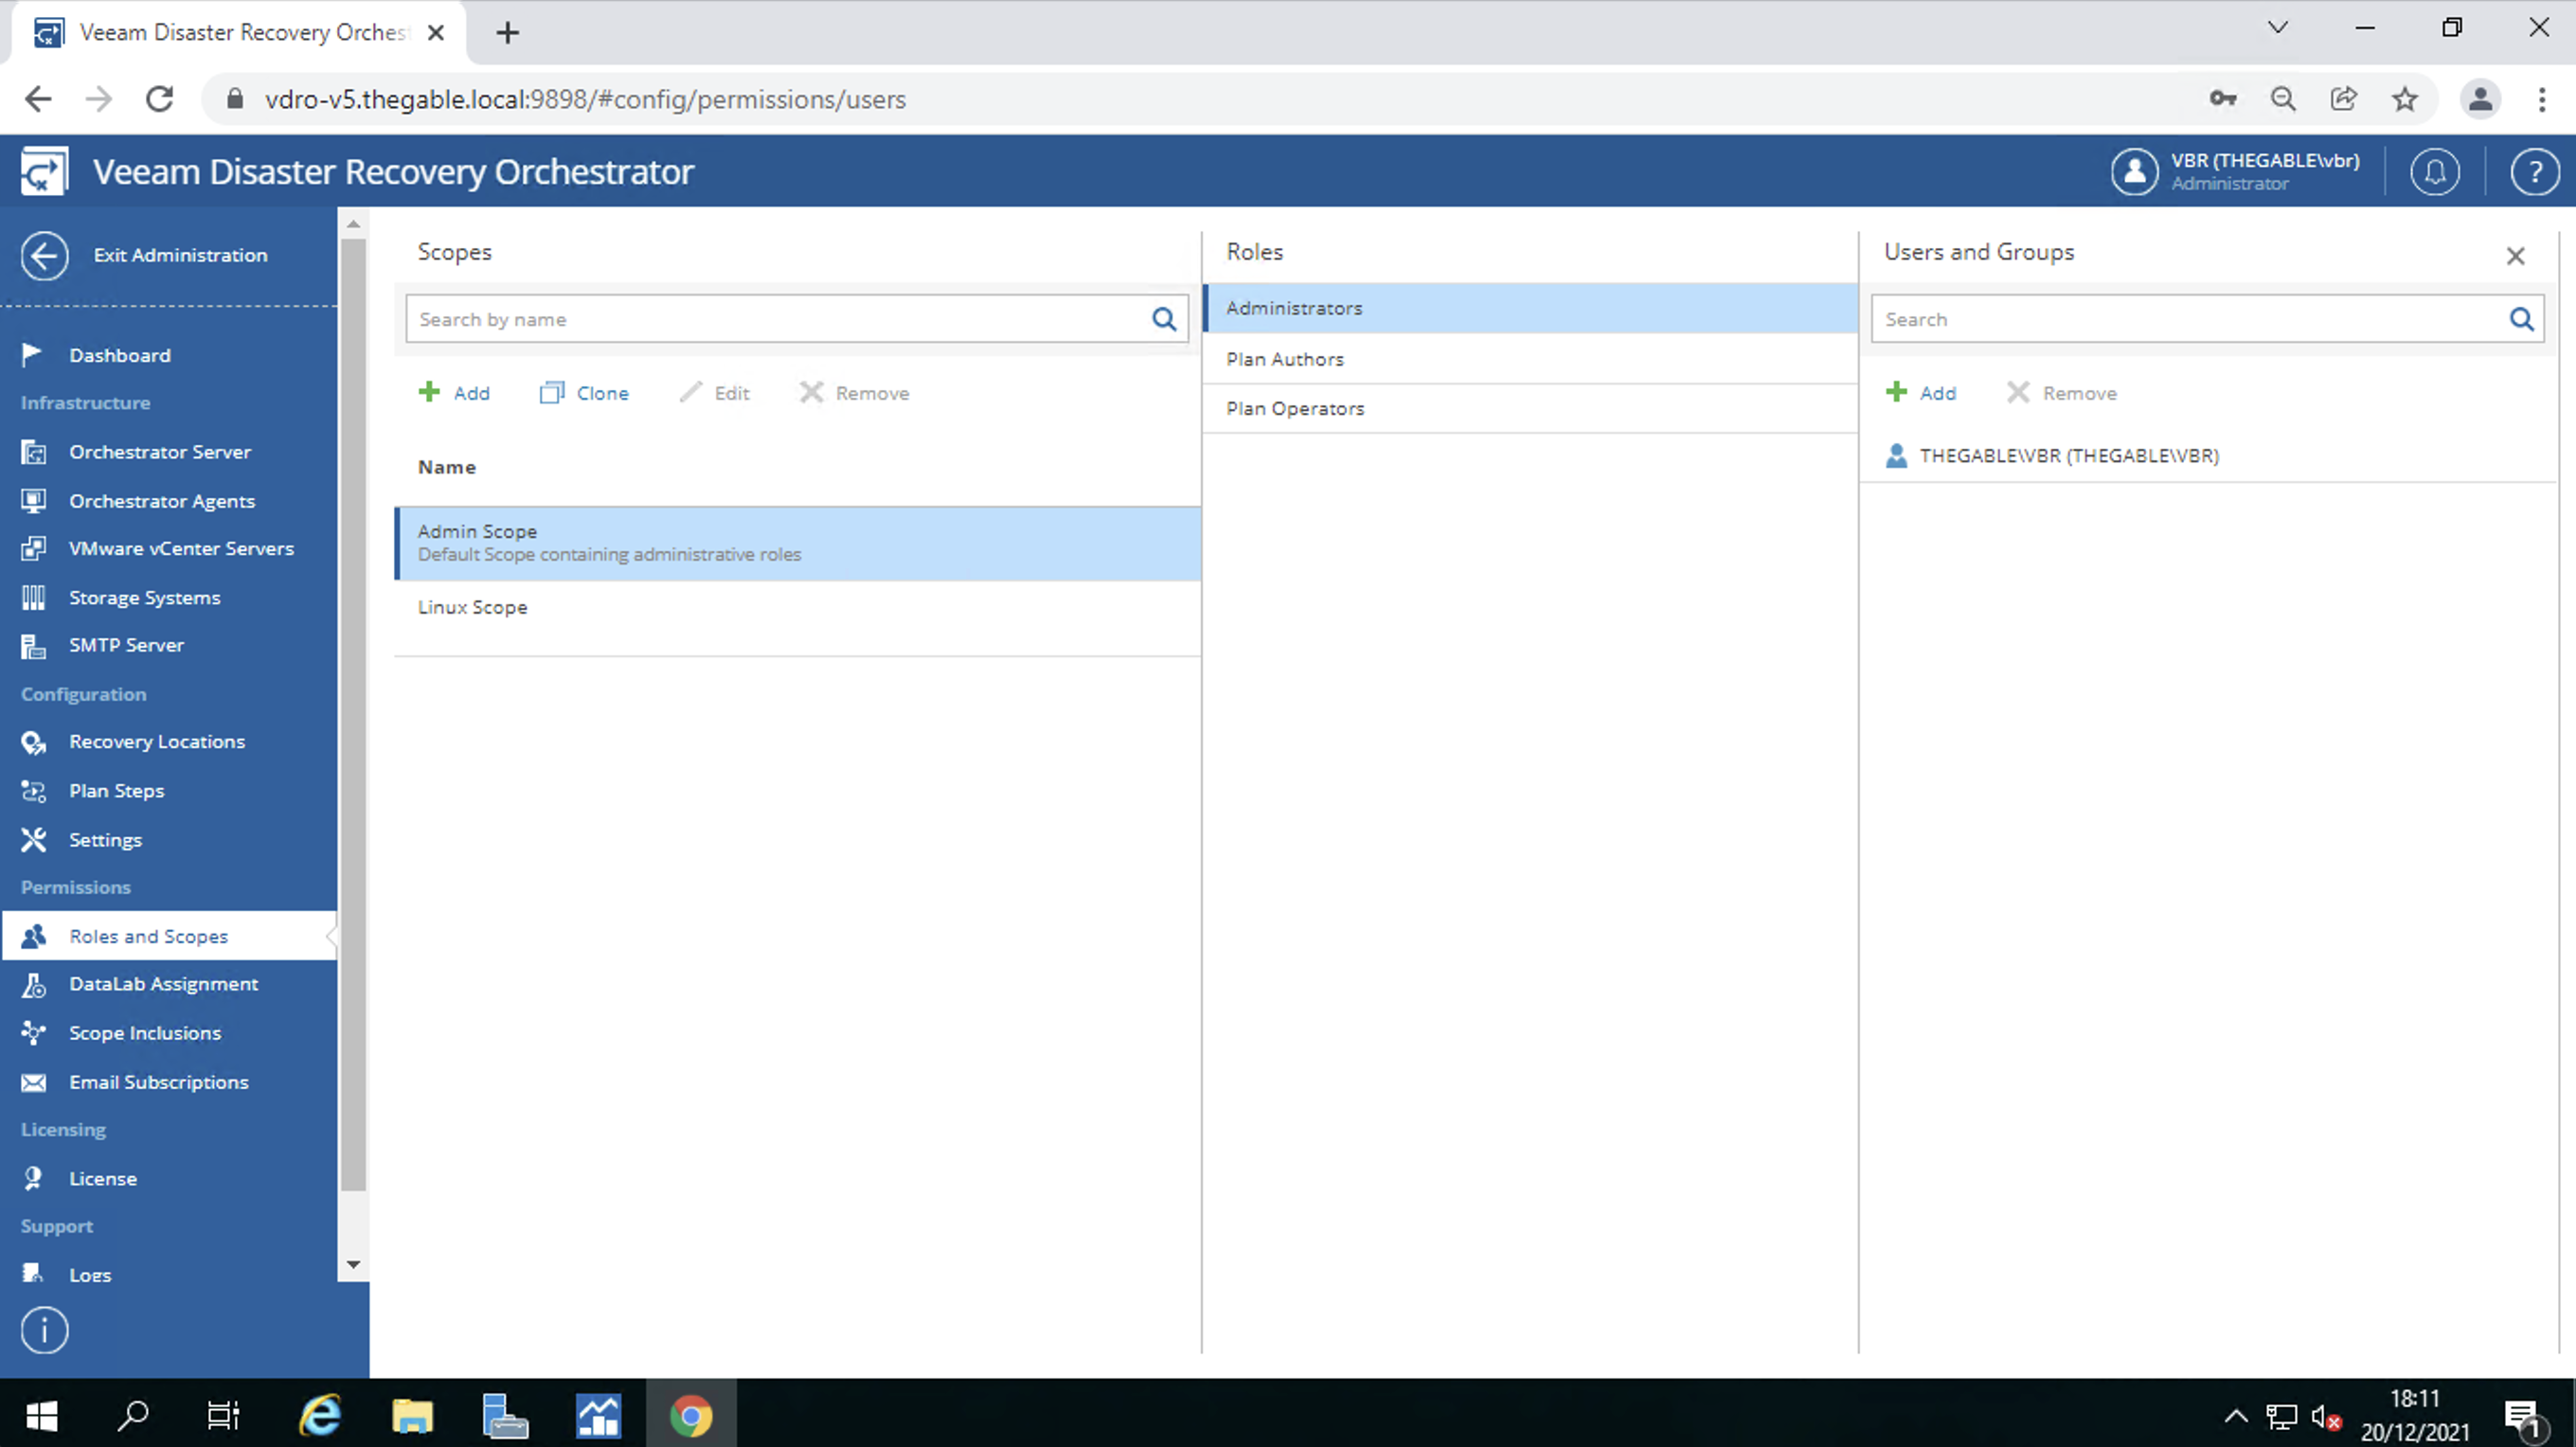
  • User profiling. In simple terms, the VDrO allows you to create users capable of administering only specific workloads which are called “scopes” (image 10).
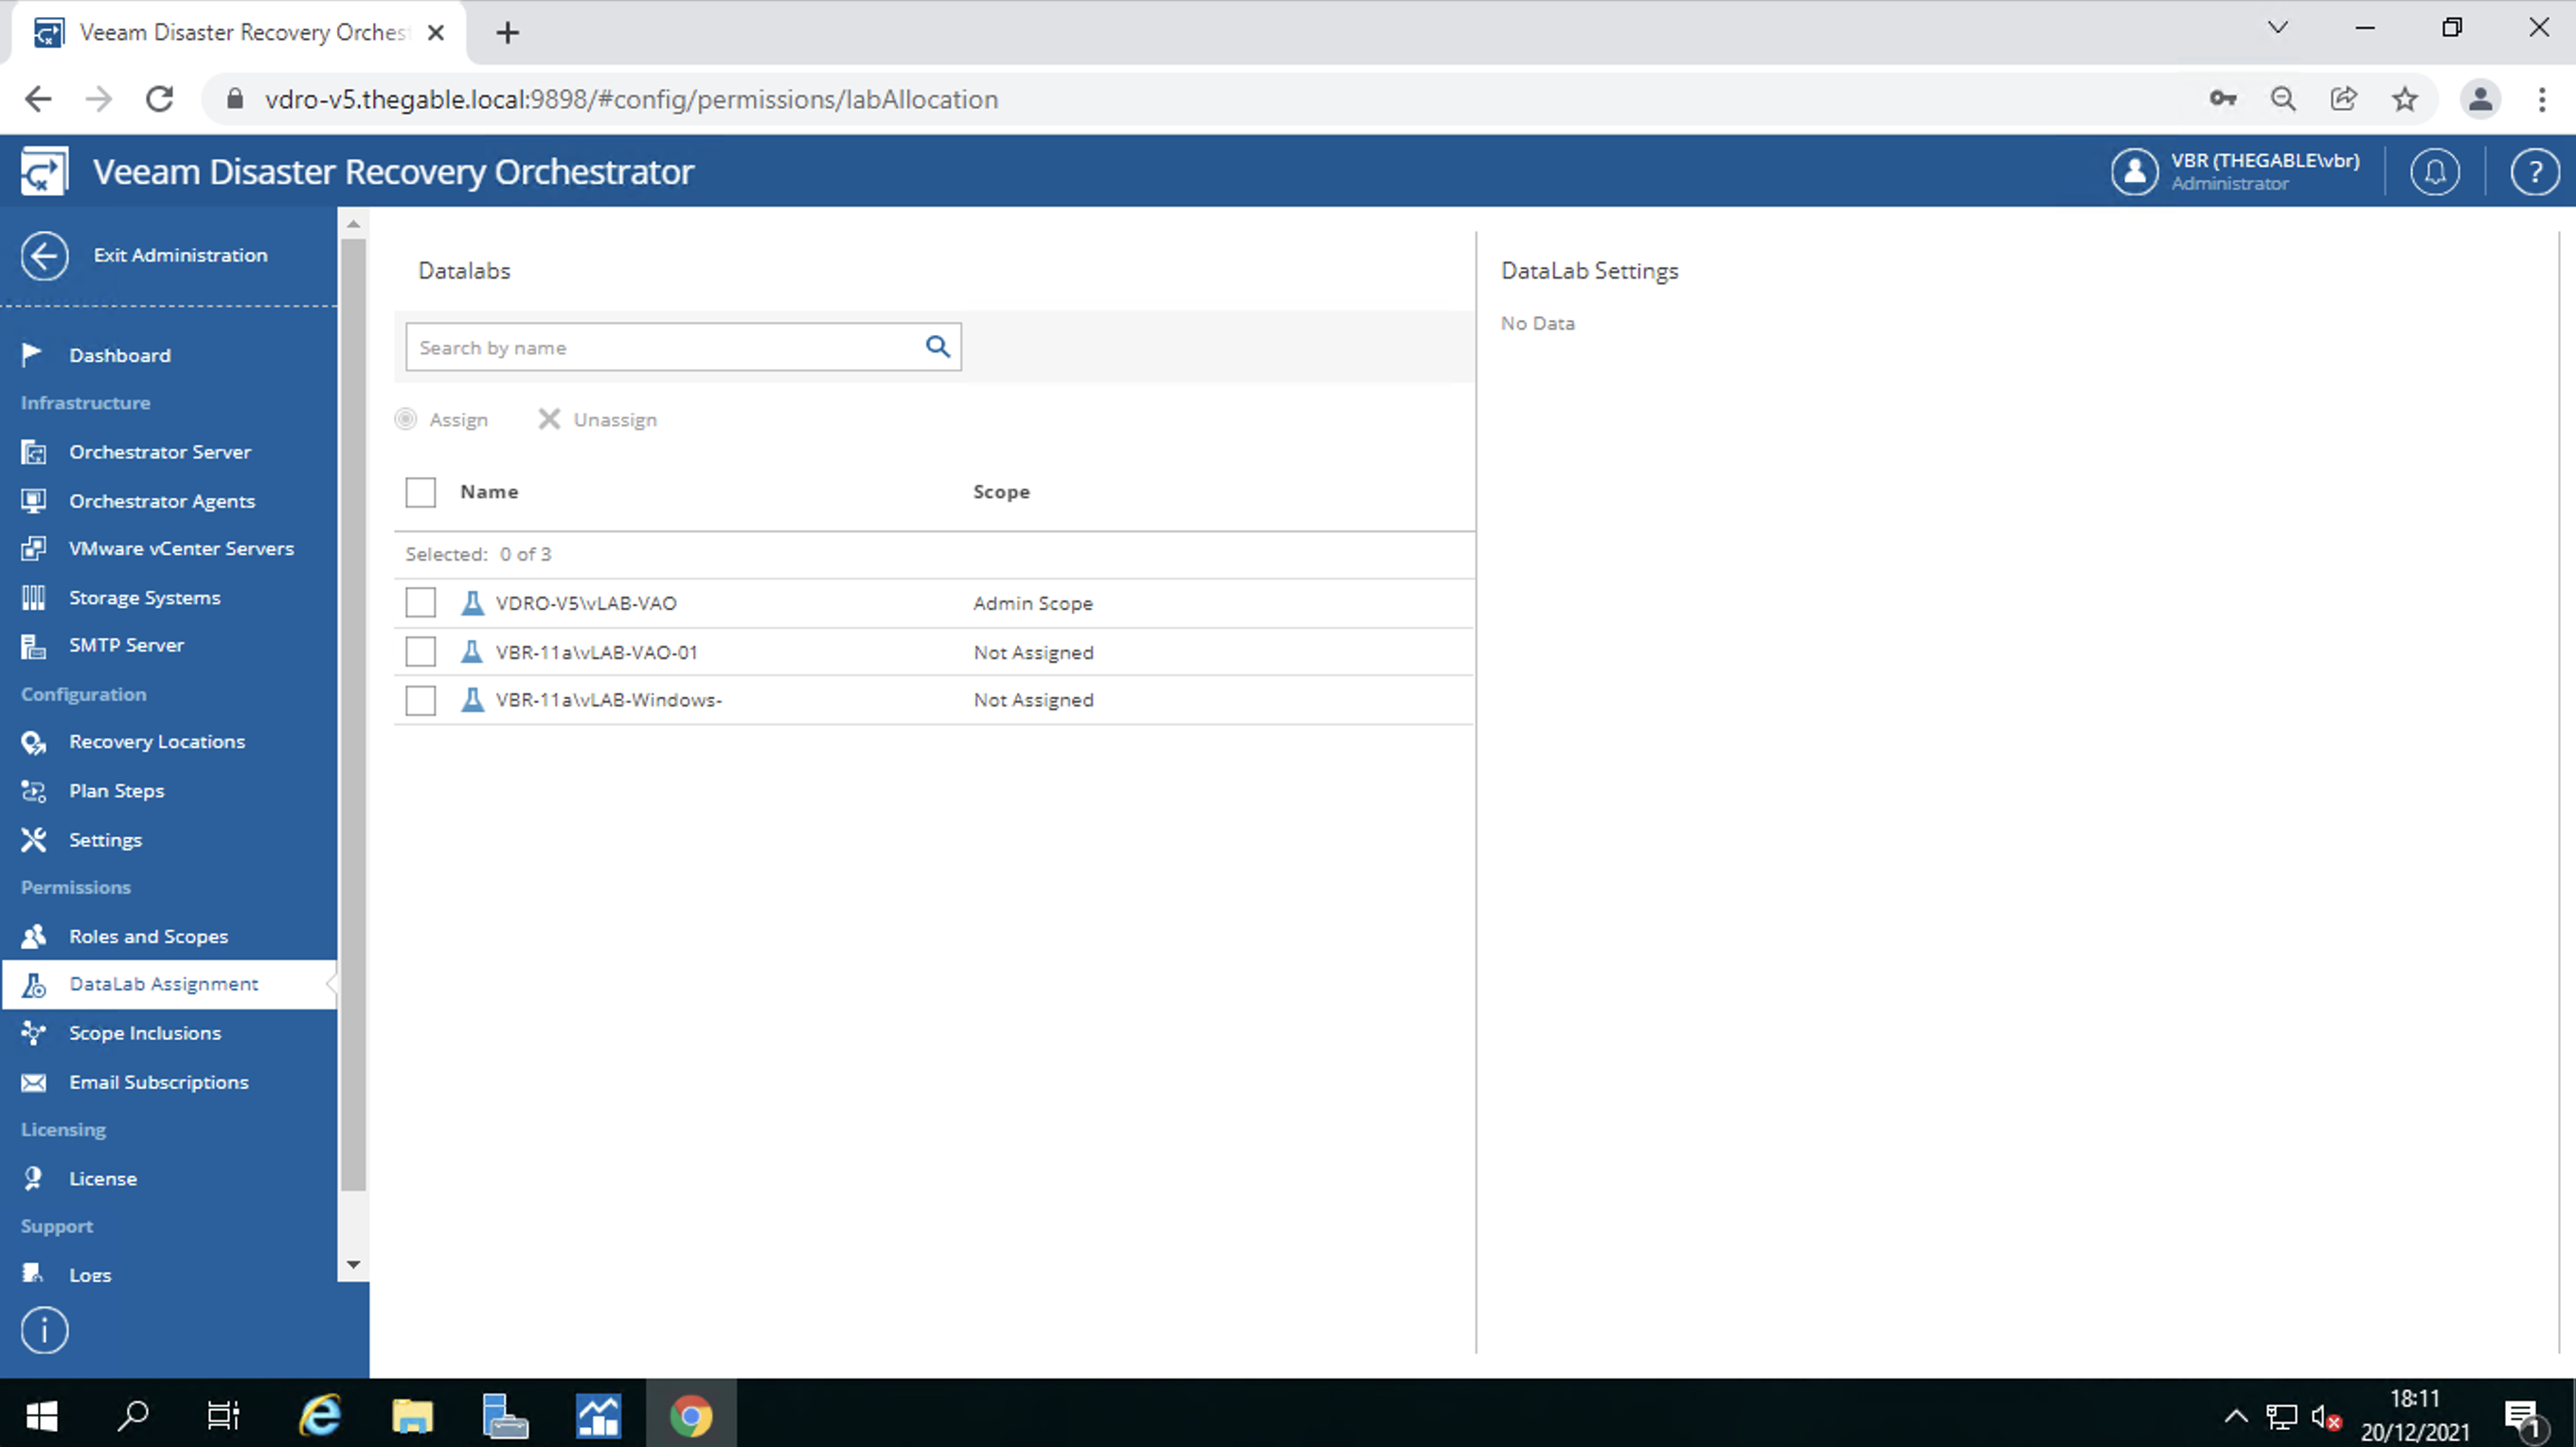
  • The assignment of the DataLabs to the “scopes”. Remember that the DataLabs allow you to verify that the DR plan is usable (image 11).

Image 10

Image 11

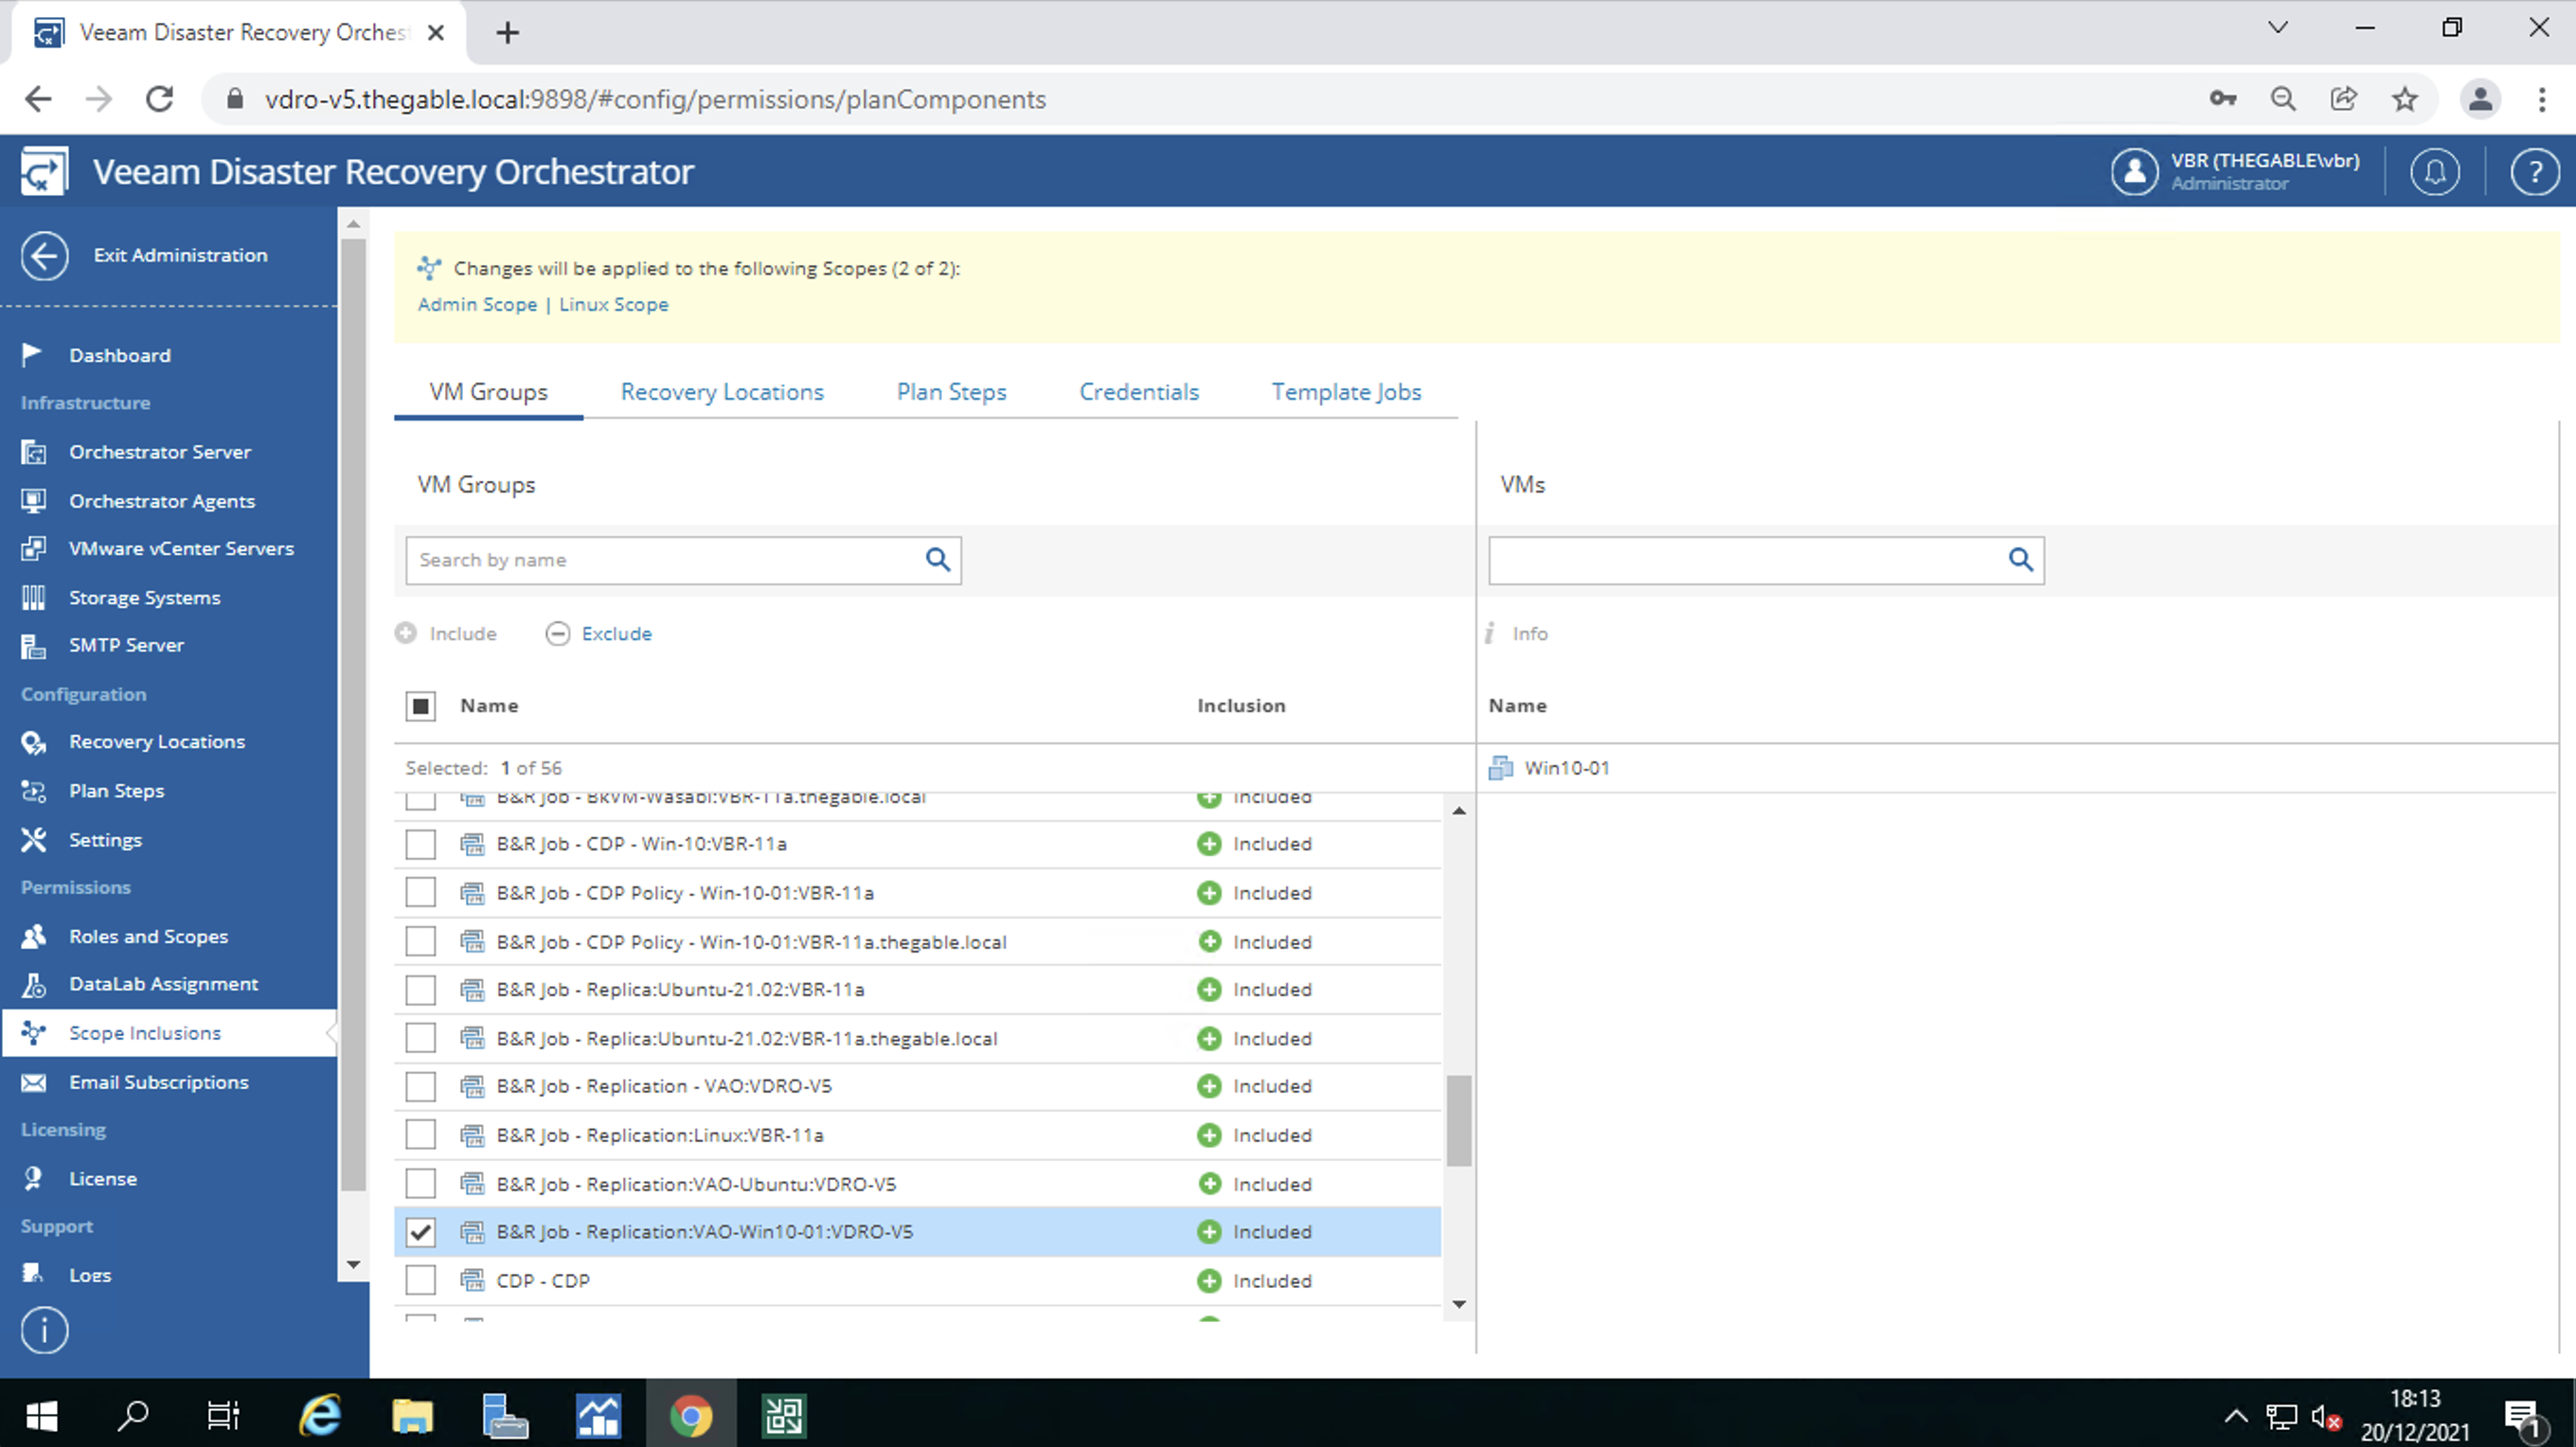
The last configuration allows you to link the group of VMs replicated or saved via backup (called VM Groups) to the users’ scopes.

For example, image 12 shows that the VM Group “B&R Job – Replication VAO Win 10” is assigned (included) to both the Admin and Linux scopes.

Image 10

In the next and last article, we will find out how to create and verify a DR plan.

See you soon