The first article of 2022 is dedicated to how to secure Google instances ( GCPs ).
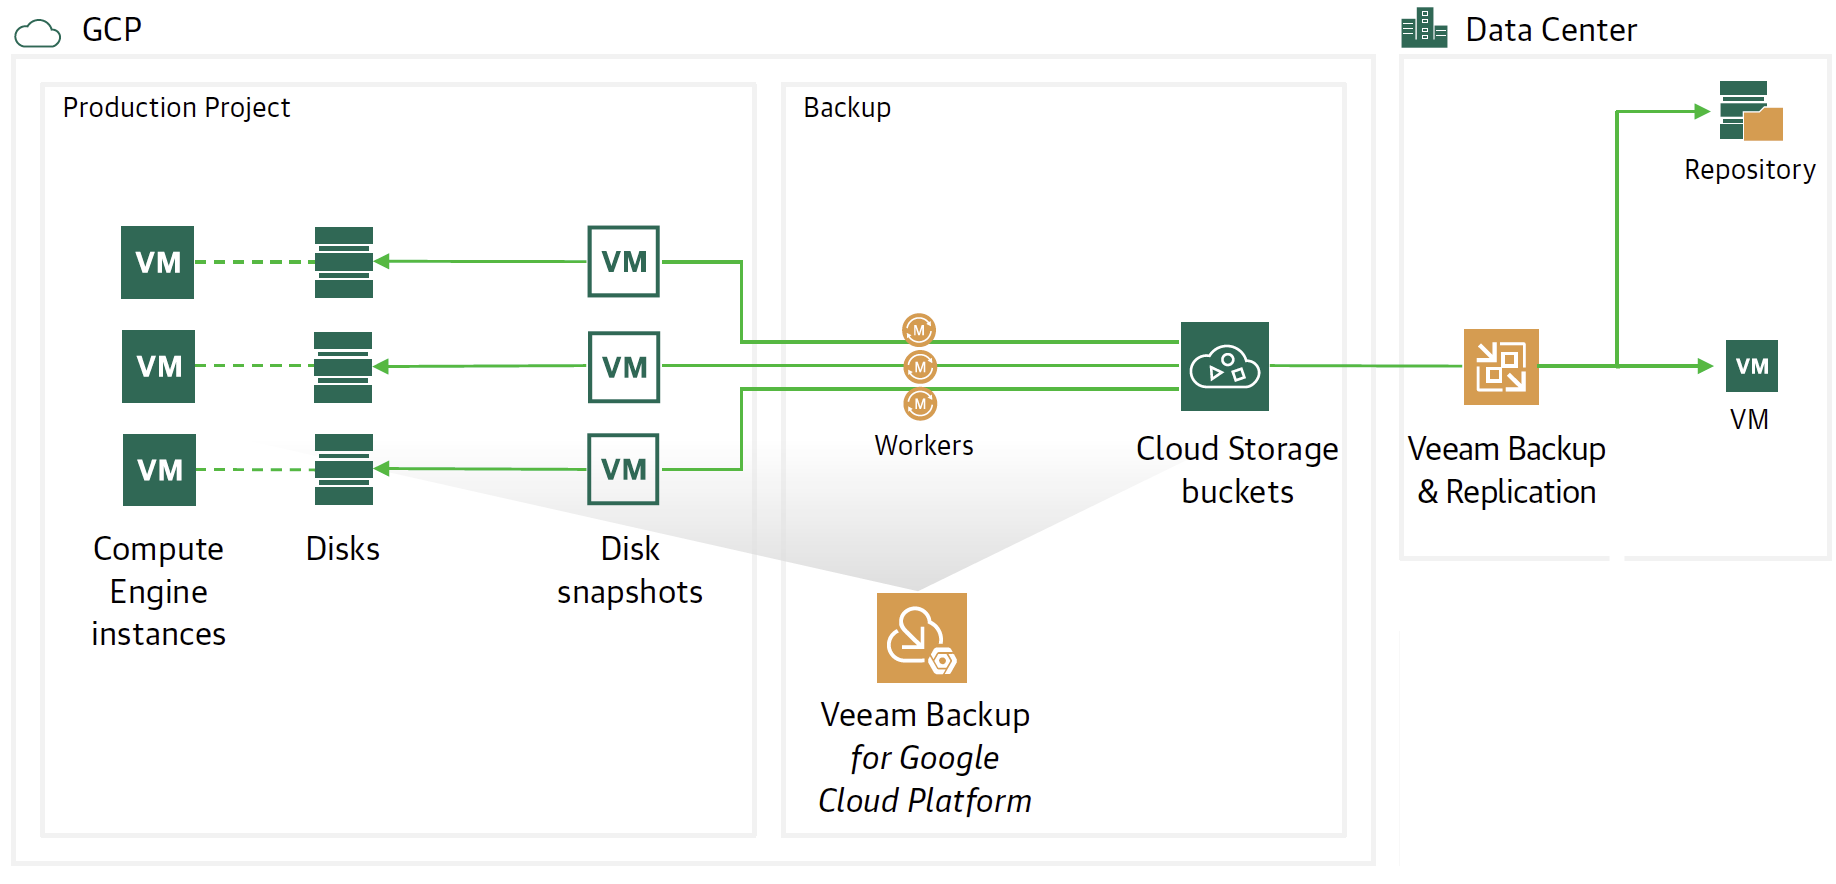
The flow and protection architecture is shown in image 1 where there are two Veeam components.
The Veeam Backup for Google Platform ( VBGP ) instance is responsible for making backups and restores of GCP instances.
Veeam Backup & Replication ( VBR ) has the responsibility to centrally manage the movement of Backup data to and from the cloud (Data Mobility).
Picture 1
Note 1 : VBGP can be installed in stand-alone mode or using the VBR wizard.
Note 2: This article will show how to hook a VBGP instance already present in GCP from VBR.
Let’s see the steps in detail:
From the VBR console, we choose the Backup Infrastructure item.
By clicking with the right mouse button, select add server and then Google Cloud Platform (see image 2)
picture 2
The next step is to enter the login credentials to the Google Service Account (image 3)
Picture 3
The wizard continues asking you to enter the name of the VBGP server already created (image 4)
Picture 4
After selecting the type of network present (image 5), the next step is to enter the credentials to access the Repository (image 6).
Remember that the best protection practice is to back up the instance as a snapshot, then pour the snapshot into Google’s Cloud Object Storage.
Thus the 3-2-1 rule is respected, i.e. having 3 copies of data (Production + Snapshot + Object Storage) on two different media (Primary Storage + Object Storage) with an offsite copy (Object storage should belong to another region).
Picture 5
Picture 6
Once the wizard is finished, still from the VBR console we can connect to the console to the VBGP server (image 7) to start creating protection policies.
Picture 7
After entering the login credentials (image 8)
Image 8
it is possible to monitor the environment through an overview of the present instances, of the protected ones (image 9 & 10)
Image 9
Image 10
Manage protection policies through:
The creation of the Backup policies, indicating the name (image 12), selecting the project (image 13), the region (image 14), the resources (image 15), the Backup target (image 16), the schedule, and the type backup (images 17 to 19)
Image 11
Image 12
Image 13
Image 14
Image 15
Image 16
Picture 17
Image 18
Image 19
The last two items indicate the estimated monthly costs to implement the backup policy (image 20) and the setting of retries and notifications (image 21)
Image 20
Image 21
Once the configuration is complete and the monitoring has verified that the policy has been completed successfully, it is possible to proceed with the recovery (image 22).
Image 22
The available options are:
Entire Instance
Files and Folders
The next images (23-24-25) show the key steps to restore the entire instance.
Image 23
Image 24
Image 25
In the next article we will see how to protect and restore a SQL DB present in a GCP instance
In previous articles we have seen some details of how the Kubernetes architecture is built.
Today the working mechanisms of the Kubernetes engine will be described indicating the name of each component; to remain faithful to the comparison of the car engine, we will speak of the camshafts,valves,bearings, … that belong to the Cloud Native
Note 1: The installation of k8s in Datacenter, Cloud, and Laboratory will not be discussed, the network has already made comprehensive tutorials available.
To familiarize yourself with k8s I recommend using Minikube (Linux platform) Docker Desktop (Windows & Mac platform).
Let’s begin!
Kubernetes Master:It is the main node of the cluster on which three processes that are vital for the existence of the cluster run.
kube-apiserver
kube-controller-manager
Kube-scheduler
In the master node, there is also the DataBase etcd, which stores all configurations created in the cluster.
The nodes that take care of running the applications and therefore the services are said worker node. The processes present on the worker node I’m:
Kubelet
kube-proxy
kubectl : AND’ The official Kubernetes client ( CLI ) through which you can manage the cluster ( Kube-apiserver ) using the API.
Some simple examples of kubectl commands are:
kubectl version (indicates the version of k8s installed)
kubectl get nodes (find out the number of nodes in the cluster)
kubectl describe nodes nodes-1 (shows the health status of the node, the platform on which k8s is running (Google, AWS, ….) and the allocated resources (CPU, RAM)).
Kube-Proxy : He is responsible for managing networking, from Routing to Load Balancing rules.
Note 2 : K8s will try to use them all libraries available at the level of operating system .
Container Runtime : It is the foundation on which the k8s technology rests.
kubernetes supports several runtimes among which we remember, container-d , cri-o , rktlet .
Note 3 : The runtime Docker it has been deprecated in favor of those that use interfaces CRI ; Docker images will still continue to work in the cluster.
The objects Kubernetes base are:
Pod
Services
Volumes
Namespace
THE controller provide additional functionality and are:
ReplicaSet
Deployment
StatefulSet
DaemonSet
Job
Between Deployment it is imperative to mention Kube-DNSwhich provides name resolution services. Since kubernetes version 1.2 the name has changed to Core-dns.
Add-On : they are used to configure further cluster functions and are placed inside the name space kube-system (such as Kube-Proxy, Kube-DNS, kube-Dashboard)
Add-ons are categorized according to their use:
Add-on of Netwok policy . (For example the NSX-T add-on takes care of the communication between the K8s environment and VMware)
Add-on Infrastructural (For example KubeVirt which allows connection with virtual architectures)
Add-on of Visualization and Control (For example Dashboard a web interface for K8s).
For commissioning, Add-ons use controllers DaemonSet And Deployment .
The image in figure 1 summarizes what has just been explained.
A good way to describe cloud-native environments is to refer to the image of your car.
The container is the engine, k8s is the electronic control unit that manages the proper functioning of the vehicle, the drivers, indicating the route and the destination, select the type of service to be provided.
Today’s article will reveal some architectural details to understand how “the car” manages to reach its destination in an efficient way.
Containers are of two types:
The first is called System Container. It is the bodywork of the car (I mean from the plates to seats, steering wheel, gear lever and accessories).
Often for simplicity of creation, it is a Virtual Machine (VM) with Linux operating system (it can also be Windows).
The most common services present in the VM are ssh , cron and syslog , the File System is of type ext3, ext4, etc.
The second type is called ApplicationContainer and is the place where the image will carry out the activities.
Note1: The image is not a single large file. They are usually multiple files which, through an internal cross-pointing system, allow the application to operate correctly.
The Container application (from now on container only), has an operating mode based on a rigid logic, where all levels (layers) have the peculiarity of communicating with each other and are interdependent.
Figure 1
This approach is very useful as it is able to manage the changes that may occur over time in an effective and hierarchical way.
Let’s take an example: When a service configuration change occurs, for which Layer C is updated, Layer A and B are not affected, which means that they must NOT be modified in turn.
Since Developers like to refine their own images (program files) rather than dependencies, it makes sense to set the service logic in the mode indicated in figure 2 where the dependencies are not affected by a new image.
Figure 2
Note2 : The File system on which the images are placed (in the example of the car engine we are talking about pistons, connecting rods, shafts …) is mainly of three different types:
Overlay
Overlay 2
AUFS
Note3 : A good advice on the security side is not to build the architecture so that the passwords are contained in the images ( Baked in – Cooked)
One of the splendid innovations introduced in the container world is the management of images:
In a classic high-reliability environment, the application is installed on every single node of the cluster.
In containers, the application is downloaded and deployed only when the workload requires more resources than a new cluster node with a new image.
For this reason, the images are saved in “virtual” warehouses, which can be local or distributed on the internet. They are called “Register Server”.
The most famous are Docker Hub, Google Container Registry, Amazon Elastic Container Registry, Azure Container Registry.
We conclude this article by talking about the management of resources associated with a service.
The container platform uses two features called Cgroup and NameSpace to allocate resources that work at the kernel level.
The purpose of the Cgroup is to assign the correct resources ( CPU & RAM ).
Name spaces have the purpose of grouping the different processes and making sure that they are isolated from each other ( Multitenancy ).
The type of NameSpace can affect all the components of the service as indicated in the list below.
Cgroup
PID
Users
Mount
Network
IPC (Interprocess communication)
UTS (allows a single system to appear with different host and domain names and with different processes, useful in case of migration)
An example of limiting the resources of an application is shown in Figure 3 where thegable image, downloaded from the Register Server grcgp, has a limit of RAM and CPU resources allocated.
If Cloud has been the most used word in the last five years, the words that have been buzzing the IT world in the last five months are Digital Transformation
From Wikipedia:
“Digital Transformation (DT or DX) is the adoption of digital technology to transform services and businesses, through replacingnon-digital or manual processes with digital processes or replacing older digital technology with newer digital technology”.
Or: Digital Transformation must help companies to be more competitive through the fast deployment of new services always aligned with business needs.
Note 1: Digital transformation is the basket, technologies to be used are the apples, services are the means of transport, shops are clients/customers.
1. Can all the already existing architectures work for Digital Transformation?
I prefer to answer rebuilding the question with more appropriate words:
2. Does Digital transformation require that data, applications, and services move from and to different architectures?
Yes, this is a must and It is called Data Mobility
Note 2: Data mobility regards the innovative technologies able to move data and services among different architectures, wherever they are located.
3. Does Data-Mobility mean that the services can be independent of the below Infrastructure?
Actually, it is not completely true; it means that, despite nowadays there is not a standard language allowing different architecture/infrastructure to talk to each other, the Data-mobility is able to get over this limitation.
4. Is it independent from any vendors?
When a standard is released all vendors want to implement it asap because they are sure that these features will improve their revenue. Currently, this standard doesn’t still exist.
Note 3: I think the reason is that there are so many objects to count, analyze, and develop that the economical effort to do it is at the moment not justified
5. Is already there a Ready technology “Data-Mobility”?
The answer could be quite long but, to do short a long story, I wrote the following article that is composed of two main parts:
Application Layer (Container – Kubernetes)
Data Layer (Backup, Replica)
Application Layer – Container – Kubernetes
In the modern world, services are running in a virtual environment (VMware, Hyper-V, KVM, etc).
There are still old services that run on legacy architecture (Mainframe, AS400 ….), (old doesn’t mean that they are not updated but just they have a very long story)
In the next years, the services will be run in a special “area” called “container“.
The container runs on Operating System and can be hosted in a virtual/physical/Cloud architecture.
Why containers and skills on them are so required?
There are many reasons and I’m listing them in the next rows.
The need of IT Managers is to move data among architectures in order to improve resilience and lower costs.
The Container technology simplifies the developer code writing because it has a standard widely usedlanguage.
The services ran on the container are fast to develop, update and change.
The container is de facto a new standard that has a great advantage. It gets over the obstacle of missing standards among architectures (private, hybrid, and public Cloud).
A deep dive about point d.
Any company has its own core business and in the majority of cases, it needs IT technology.
Any size of the company?
Yes, just think about your personal use of the mobile phone, maybe to book a table at the restaurant or buying a ticket for a movie. I’m also quite sure it will help us get over the Covid threat.
This is the reason why I’m still thinking that IT is not a “cost” but a way to get more business and money improving efficiency in any company.
Are there specif features to allow data mobility in the Kubernetes environment?
Yes, an example is Kasten K10 because it has many and advanced workload migration features (the topic will be well covered in the next articles).
Data-Layer
What about services that can’t be containerized yet?
Is there a simple way to move data among different architectures?
Yes, that’s possible using copies of the data of VMs, Physical Servers.
In this business scenario, it’s important that the software can create Backup/Replicas wherever the workloads are located.
Is it enough? No, the software must be able to restore data within architectures.
For example, a customer can need to restore some on-premises workloads of his VMware architecture in a public cloud, or restore a backup of a VM located in a public cloud to a Hyper-V on-premises environment.
In other words, working with Backup/Replica and restore in a multi-cloud environment.
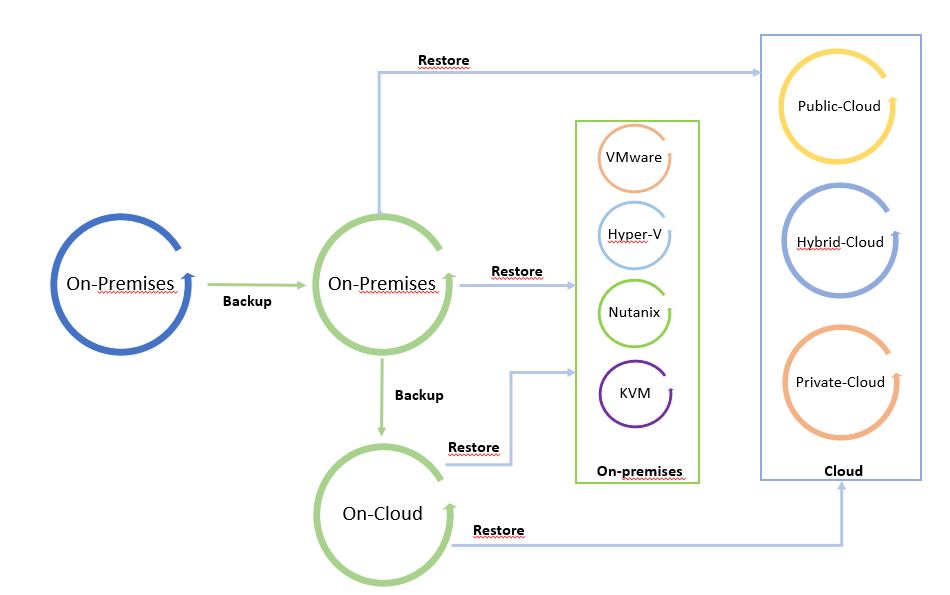
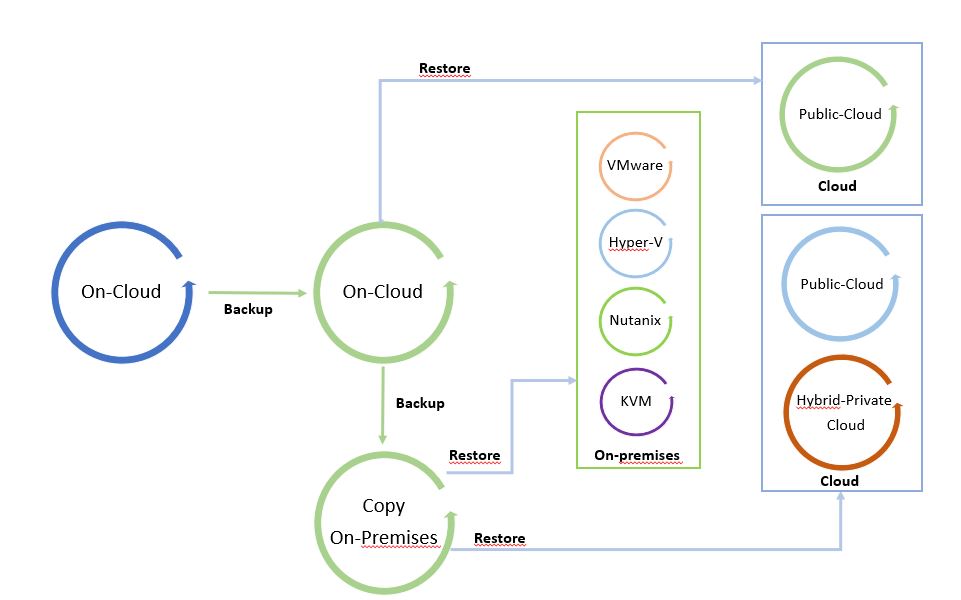
The next pictures show the Data Process.
I called it “The cycle of Data” because leveraging from a copy it is possible to freely move data from and to any Infrastructure (Public, hybrid, private Cloud).
Pictures 1 and 2 are just examples of the data-mobility concept. They can be modified by adding more platforms.
The starting point of Picture 1 is a backup on-premises that can be restored on-premises and on-cloud. Picture 2 shows backup of a public cloud workload restored on cloud or on-premises.
It’s a circle where data can be moved around the platforms.
Note 4: A good suggestion is to use data-mobility architecture to set up a cold disaster recovery site (cold because data used to restore site are backup).
Picture 1
Picture 2
There is one last point to complete this article and that is the Replication features.
Note 5: For Replica I intend the way to create a mirror of the production workload. Comparing to backup, in this scenario the workload can be switched on without any restore operation because it is already written in the language of the host hypervisor.
The main scope of replica technology is to create a hot Disaster Recovery site.
More details about how to orchestrate DR are available on this site at the voice Veeam Availability Orchestrator (Now Veeam Disaster Recovery Orchestrator)
The replica can be developed with three different technologies:
Lun/Storage replication
I/O split
Snapshot based
I’m going to cover those scenarios and Kasten k10 business cases in future articles.

 Picture 1
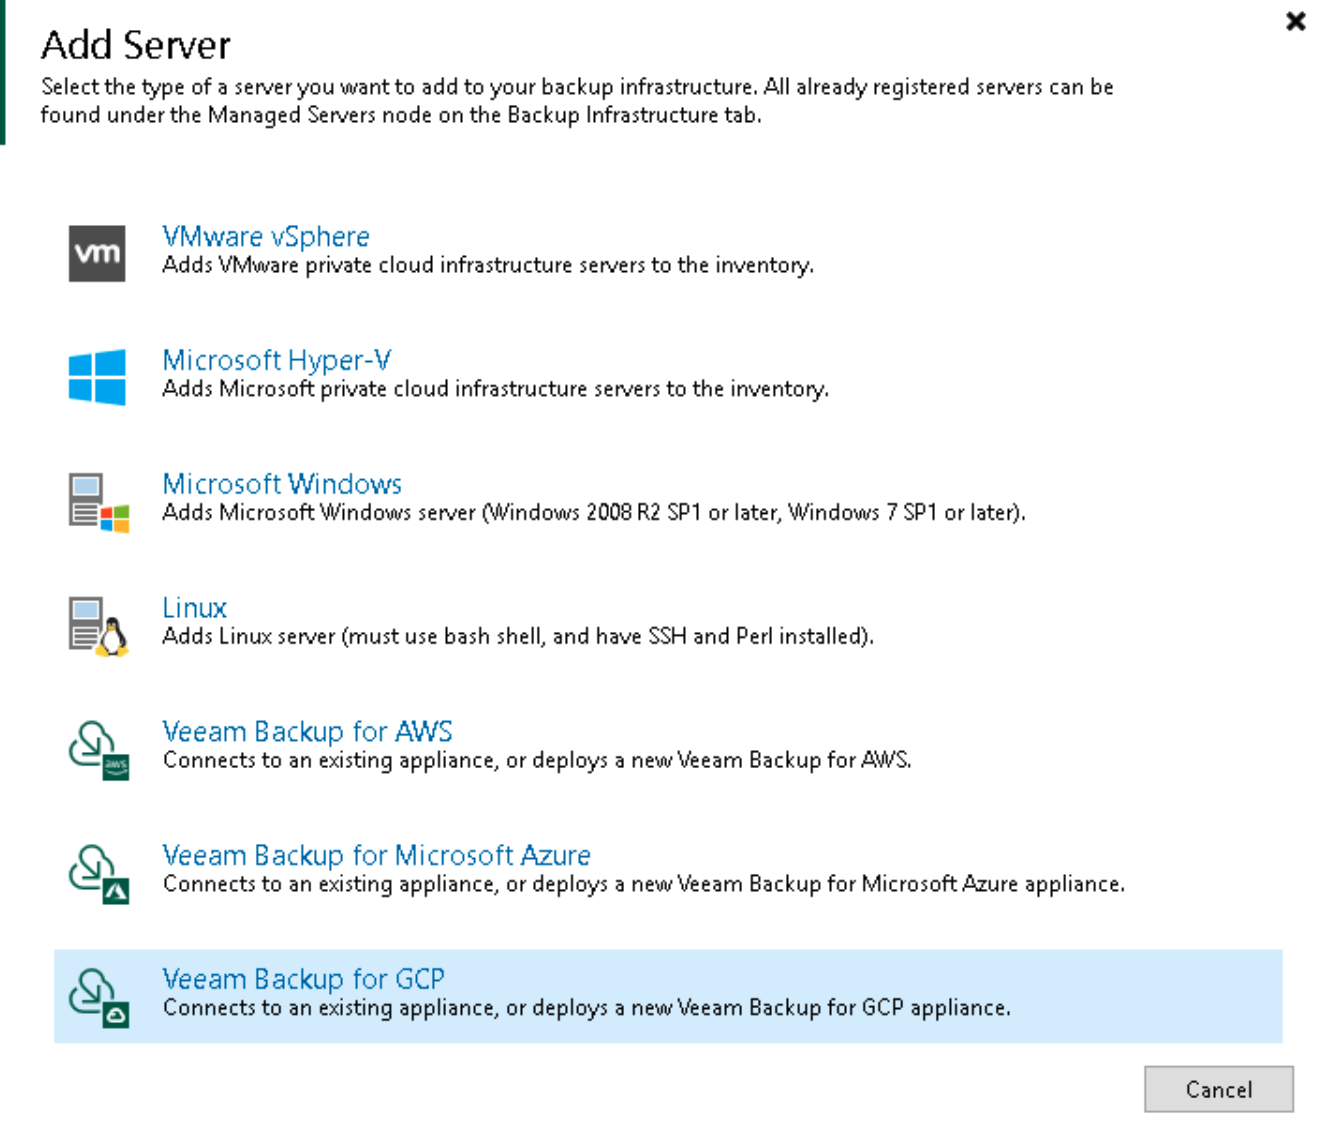 picture 2
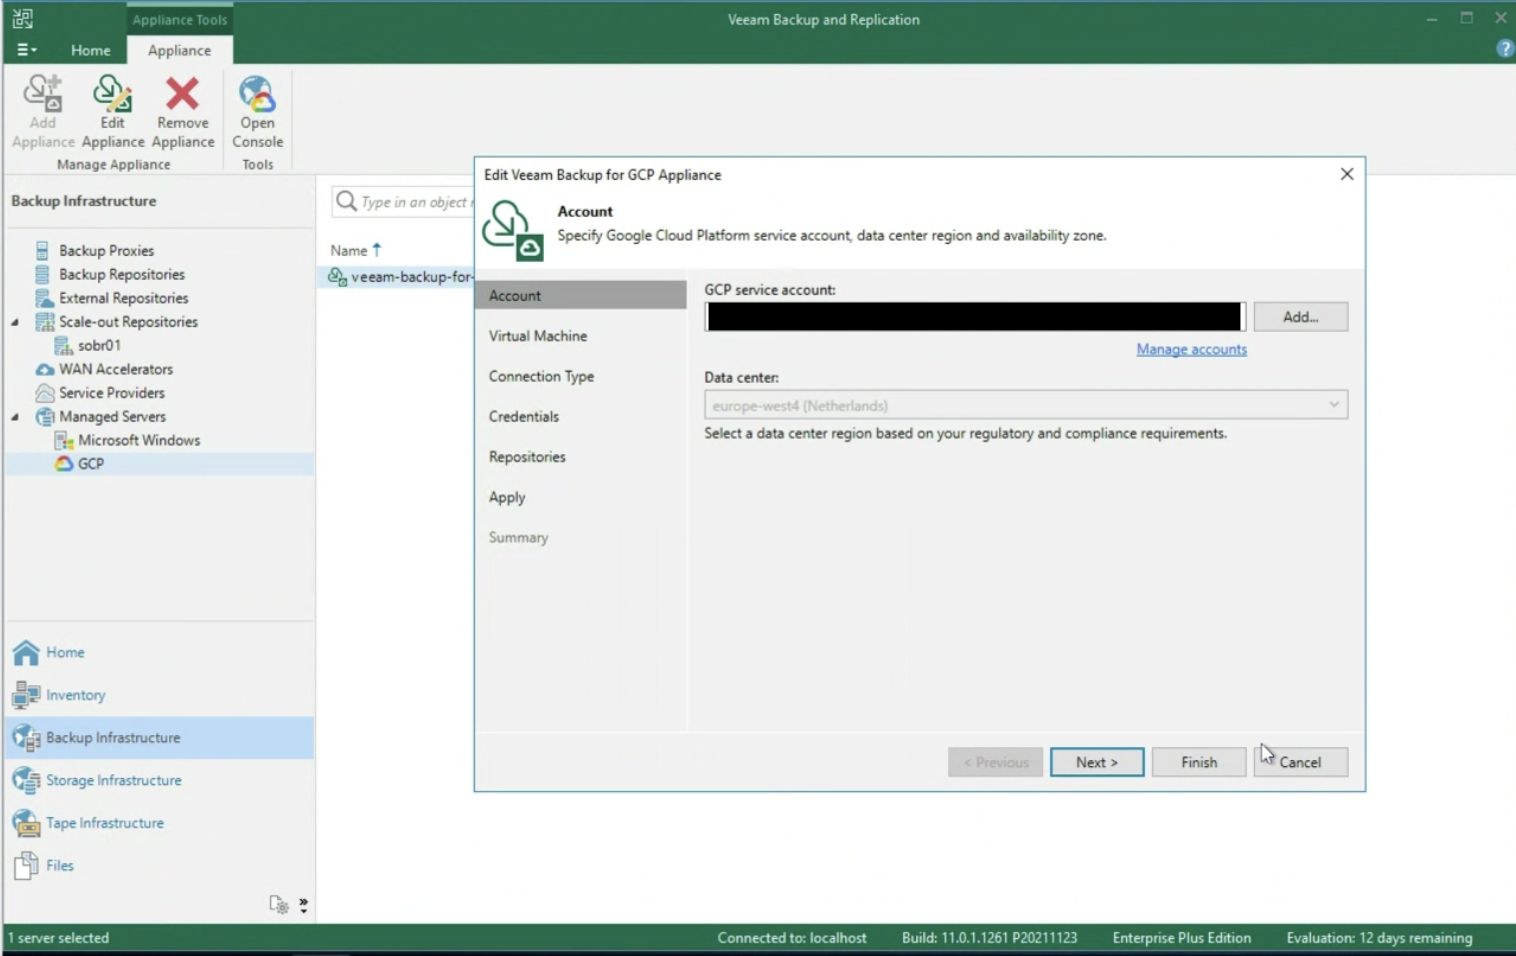 Picture 3
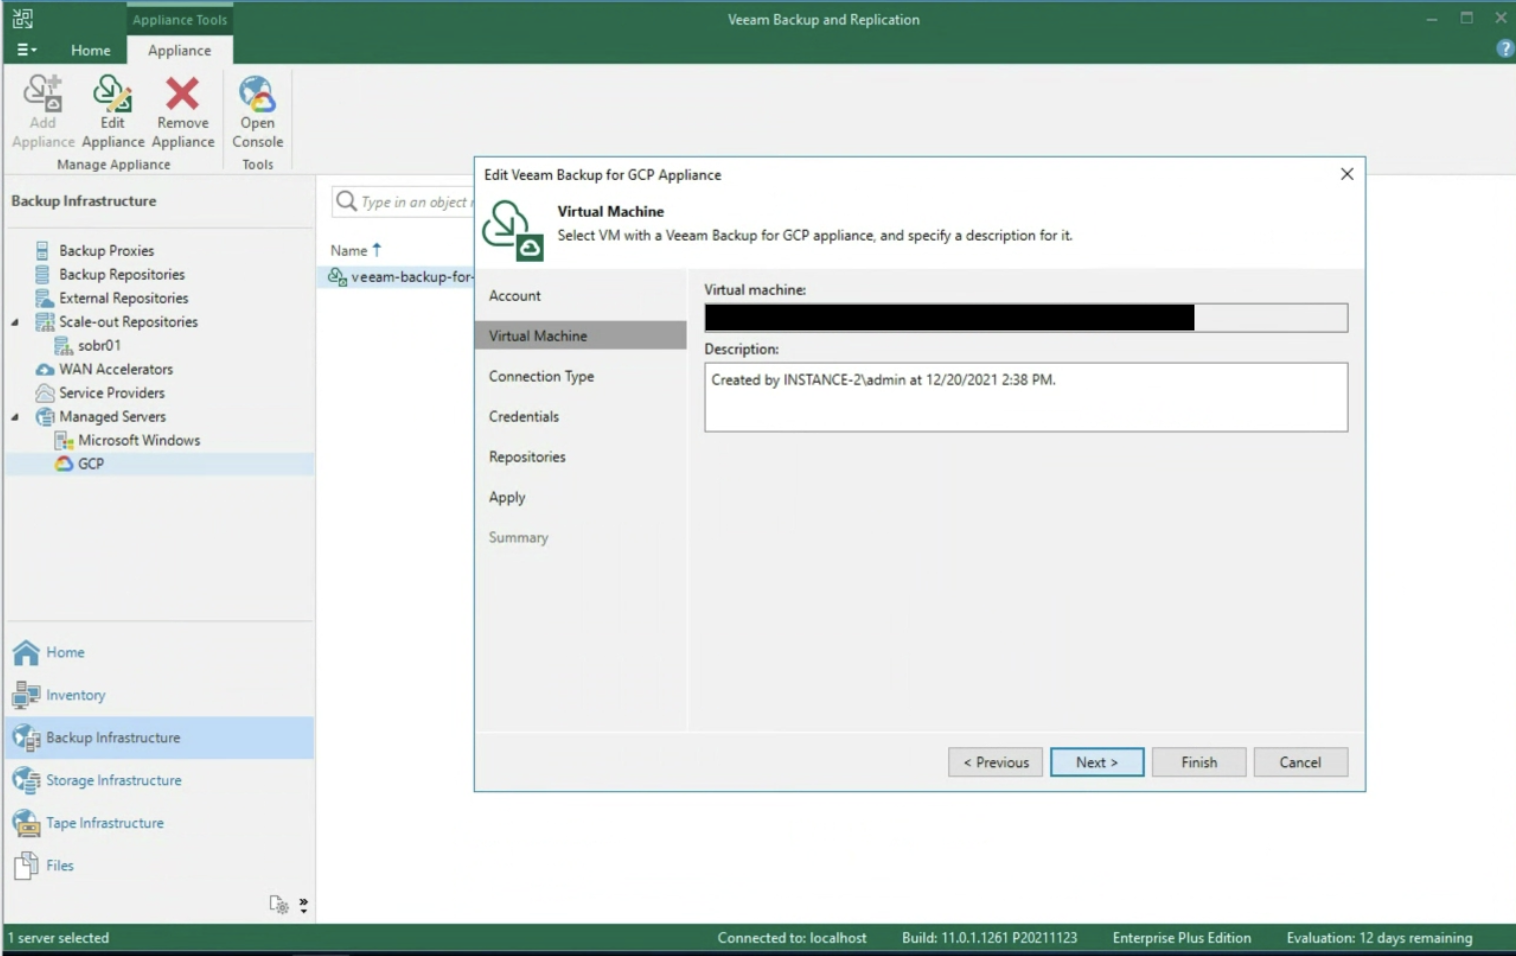 Picture 4
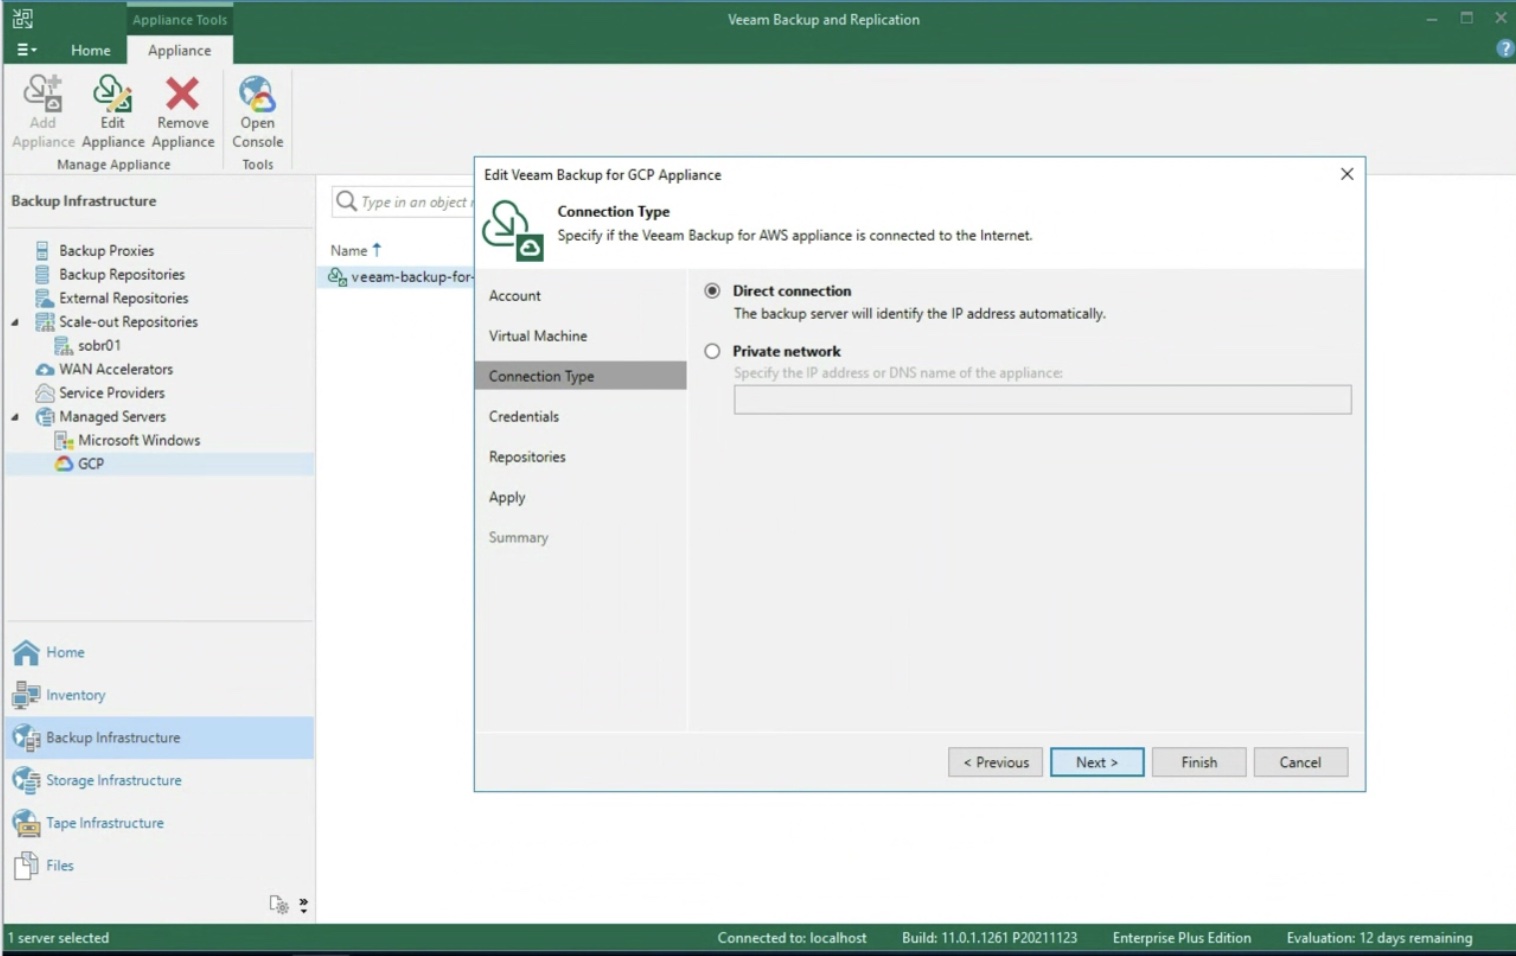 Picture 5
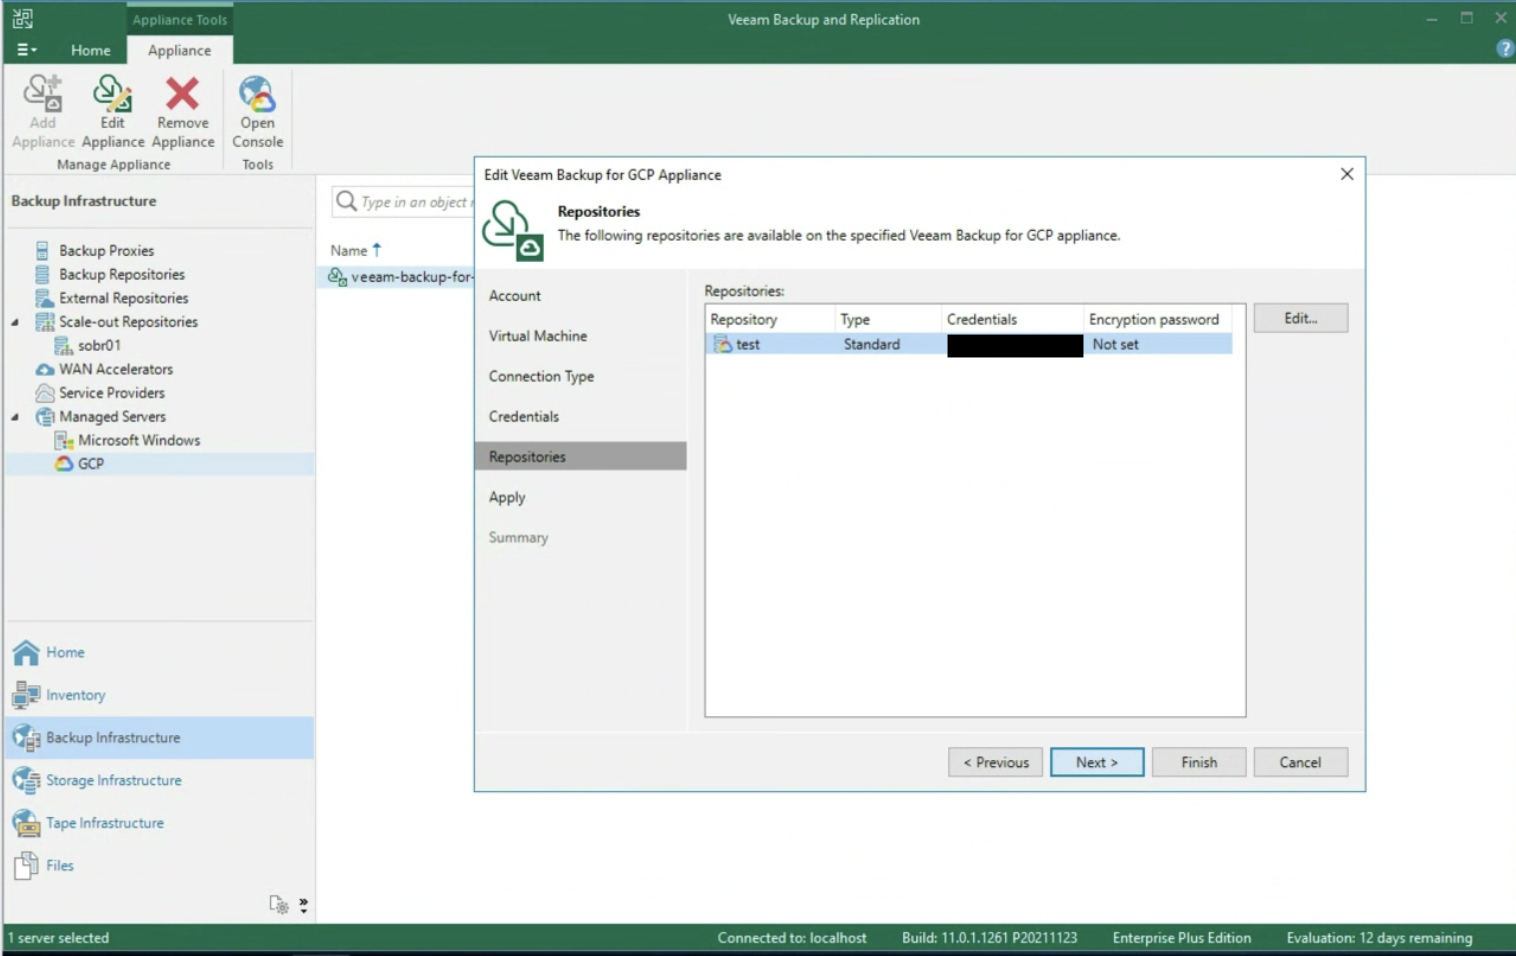 Picture 6
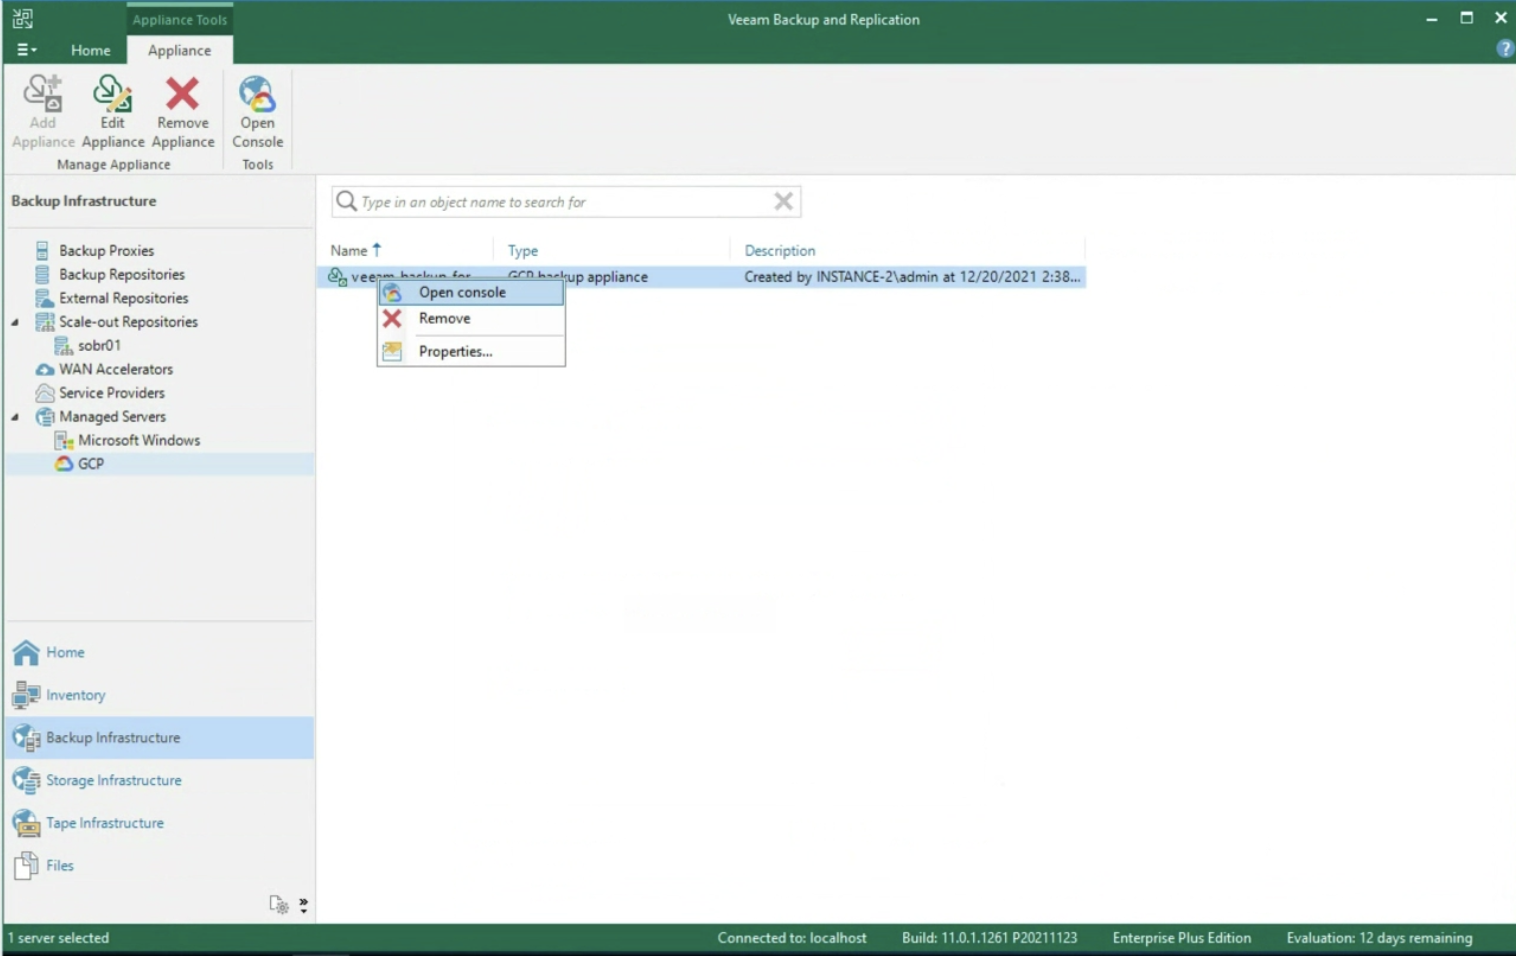 Picture 7
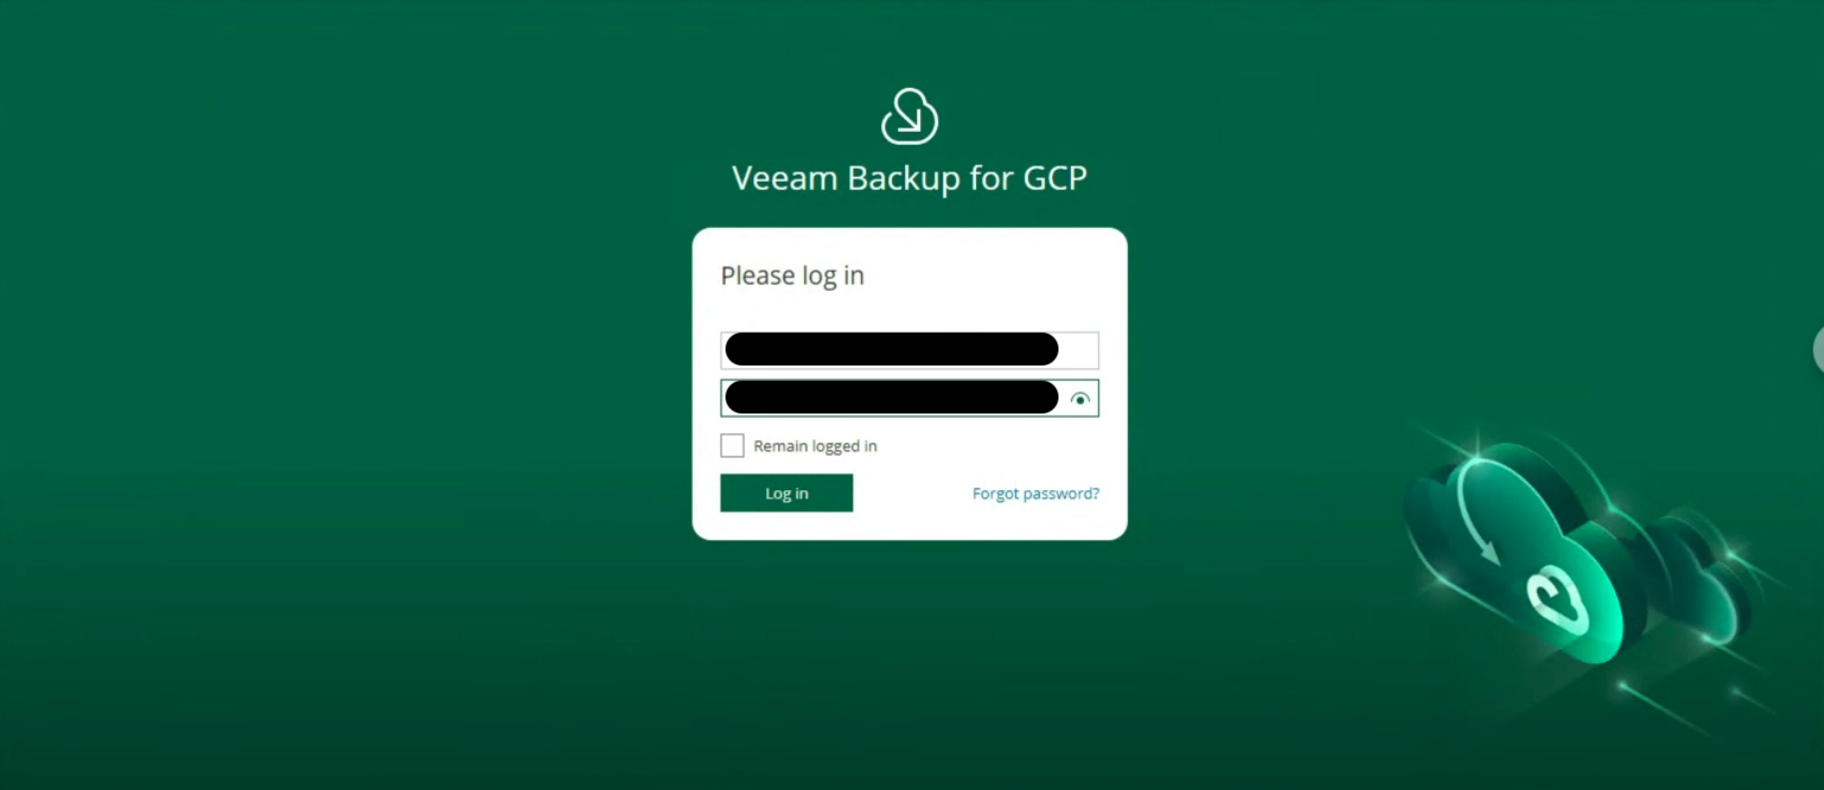 Image 8
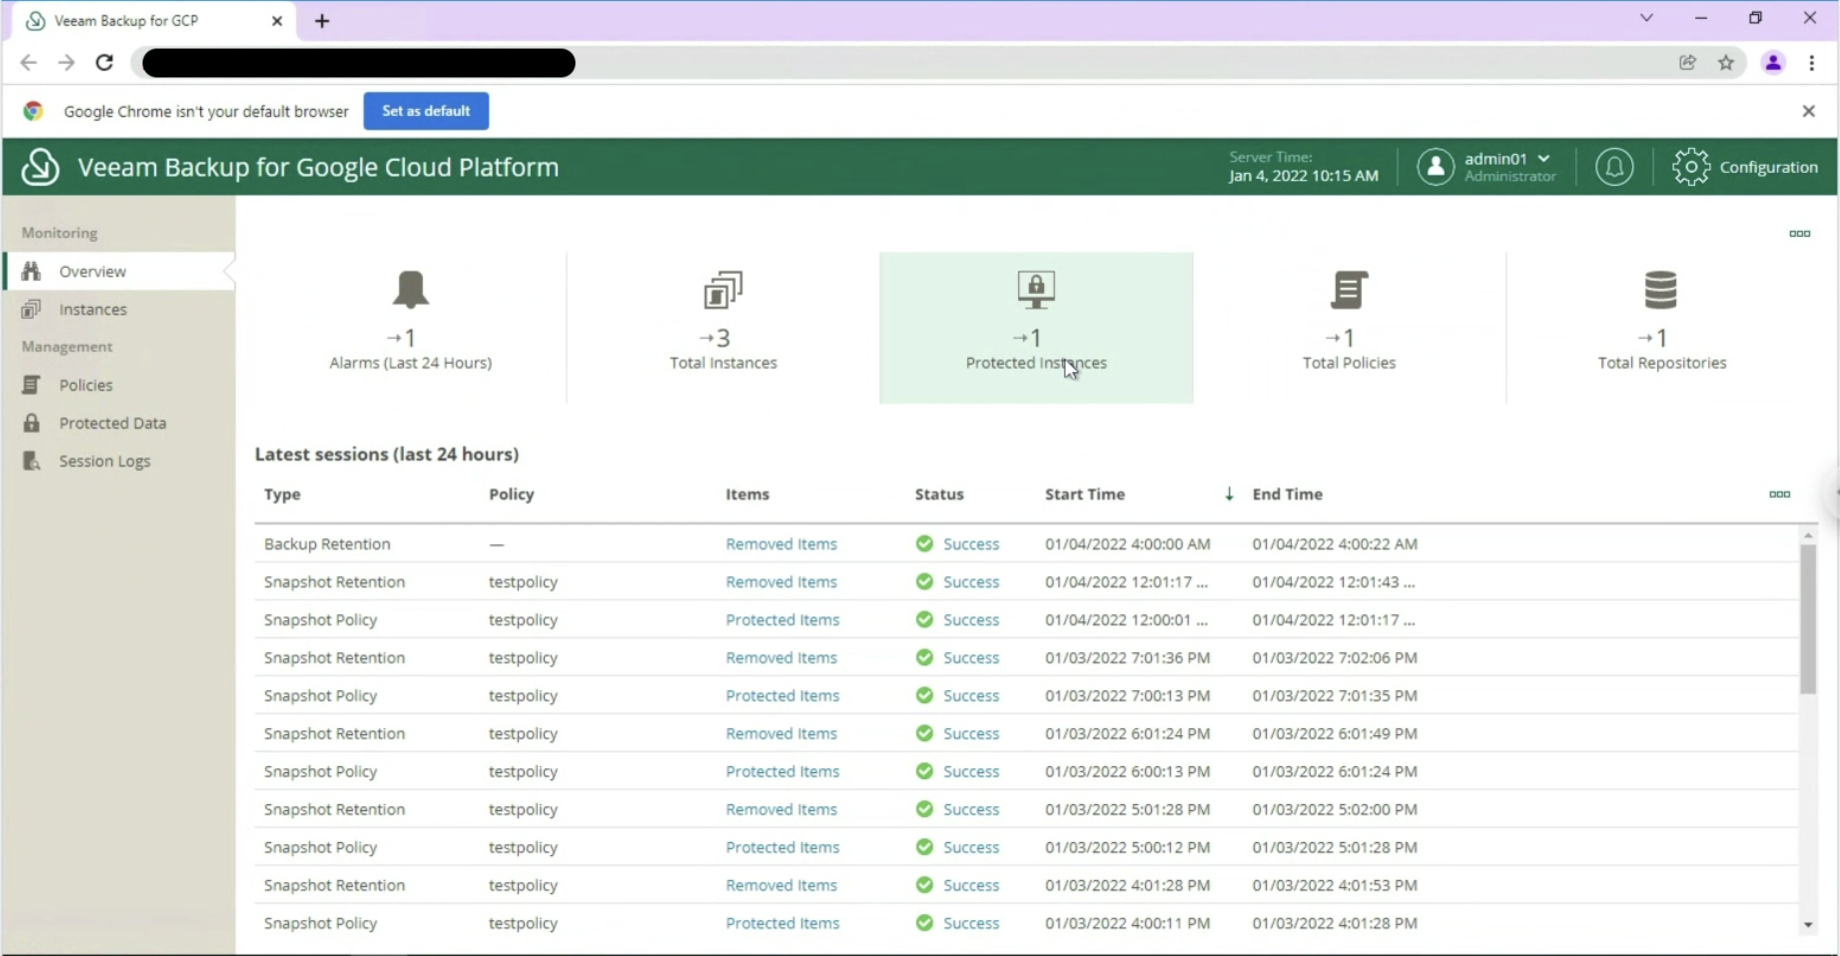 Image 9
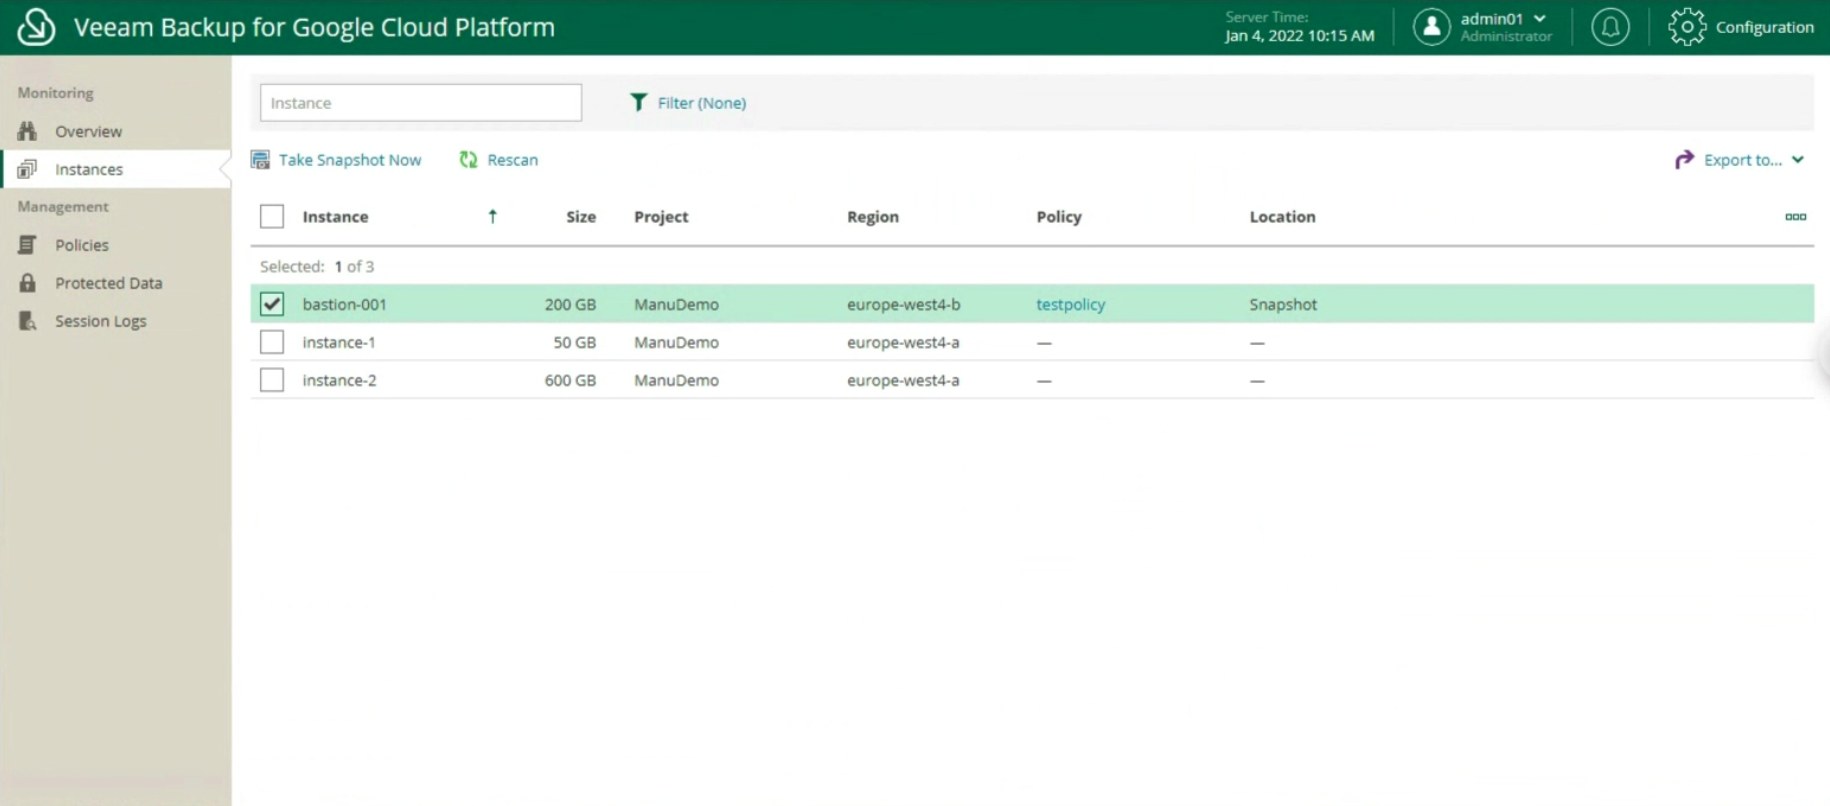
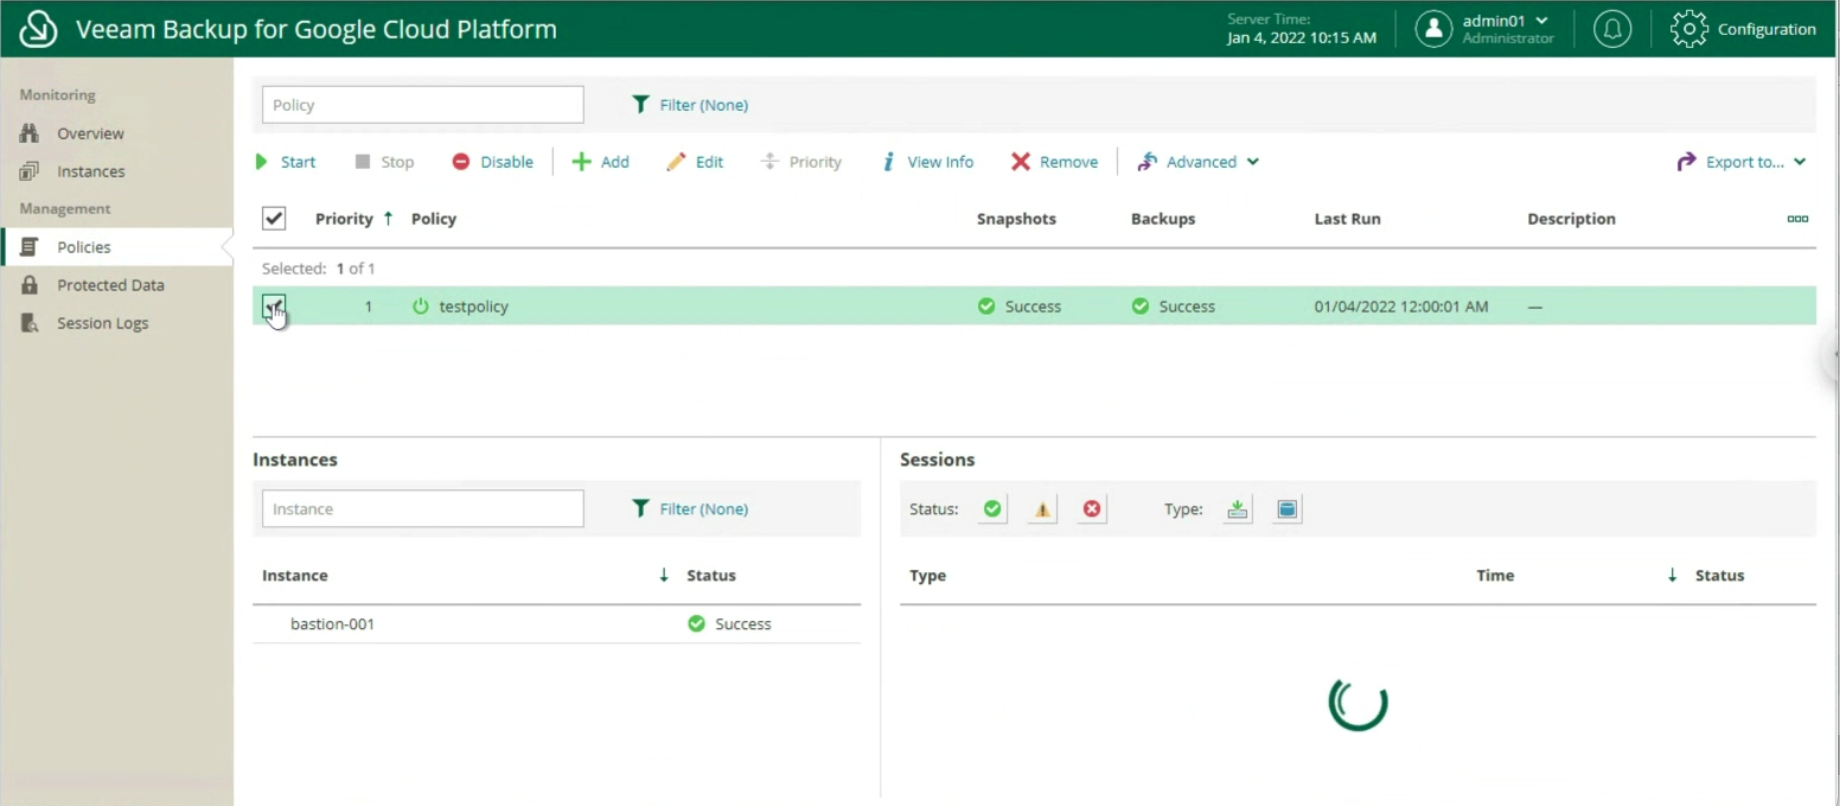 Image 11
 Image 12
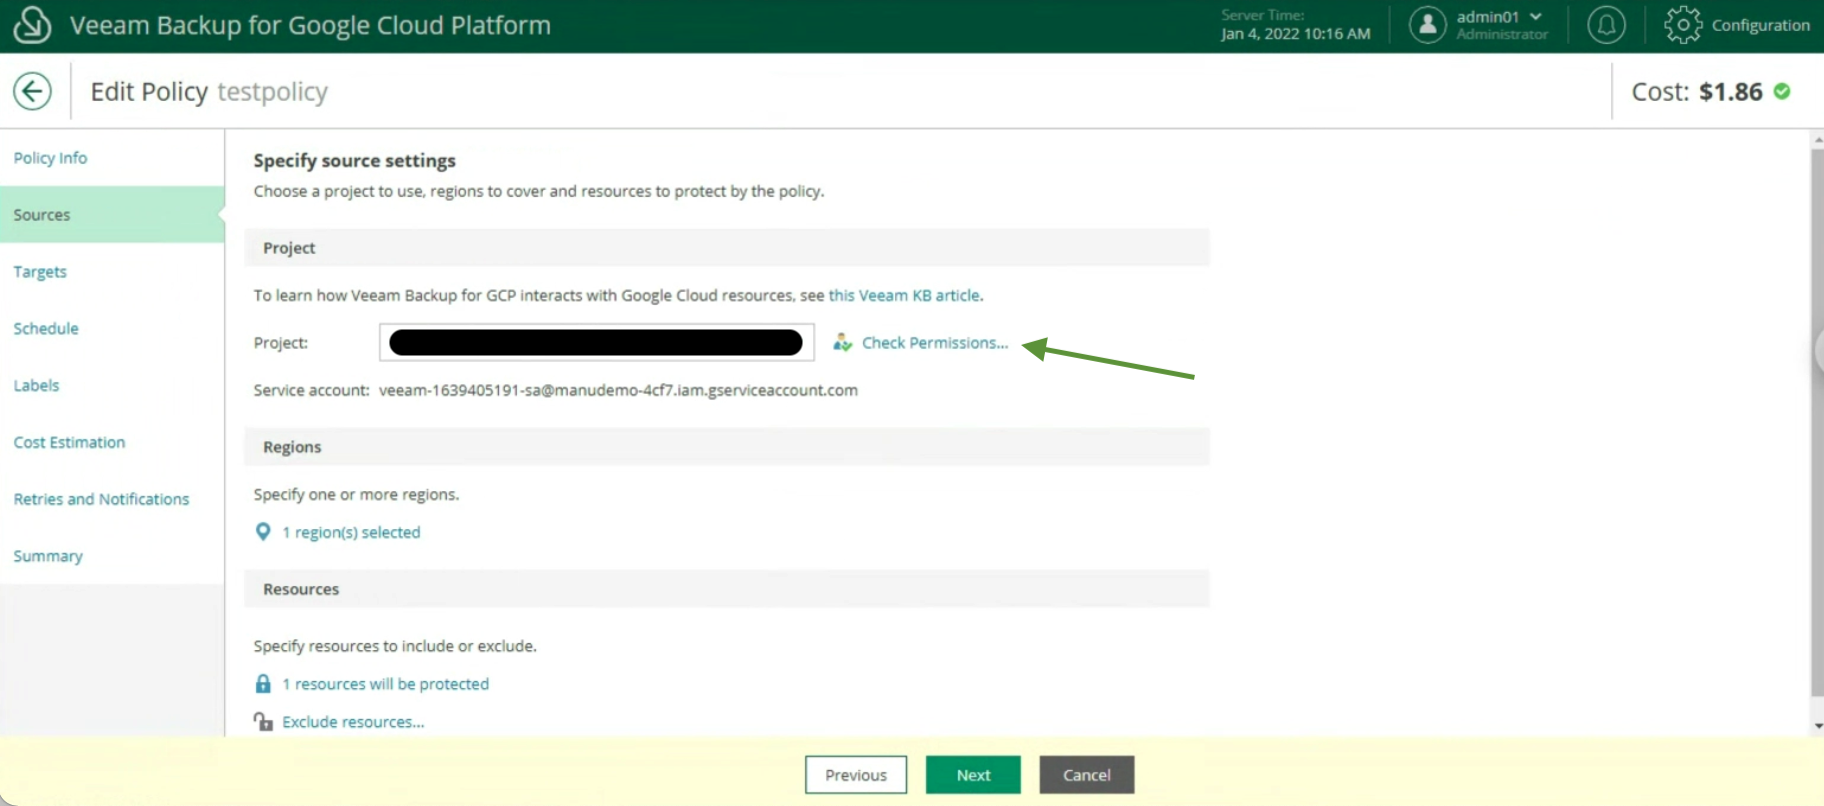 Image 13
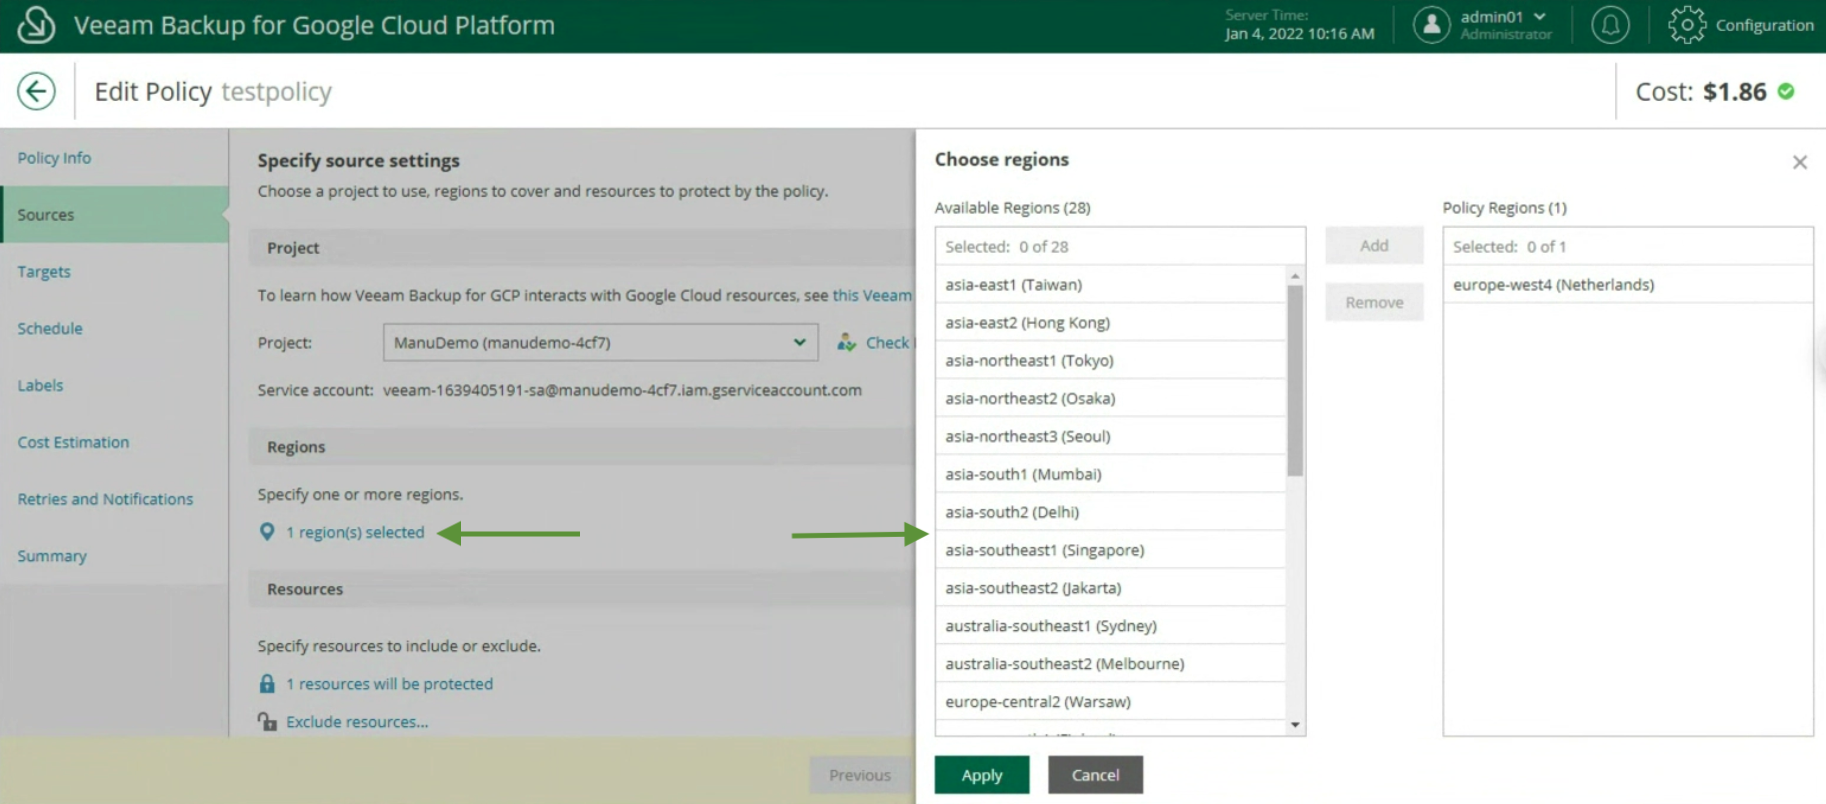 Image 14
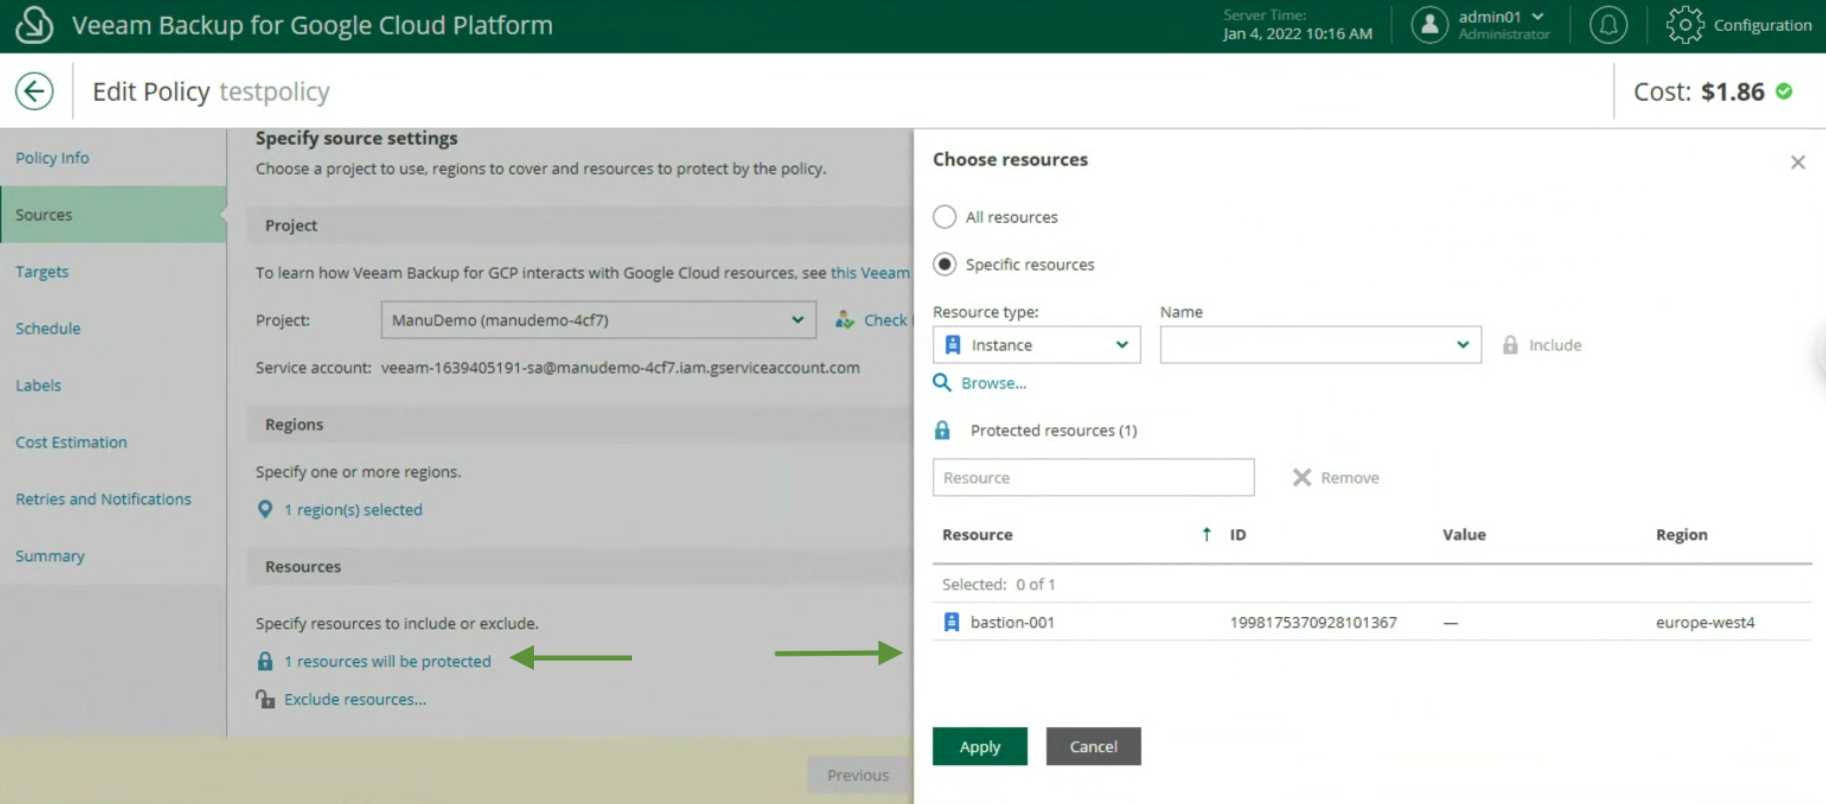 Image 15
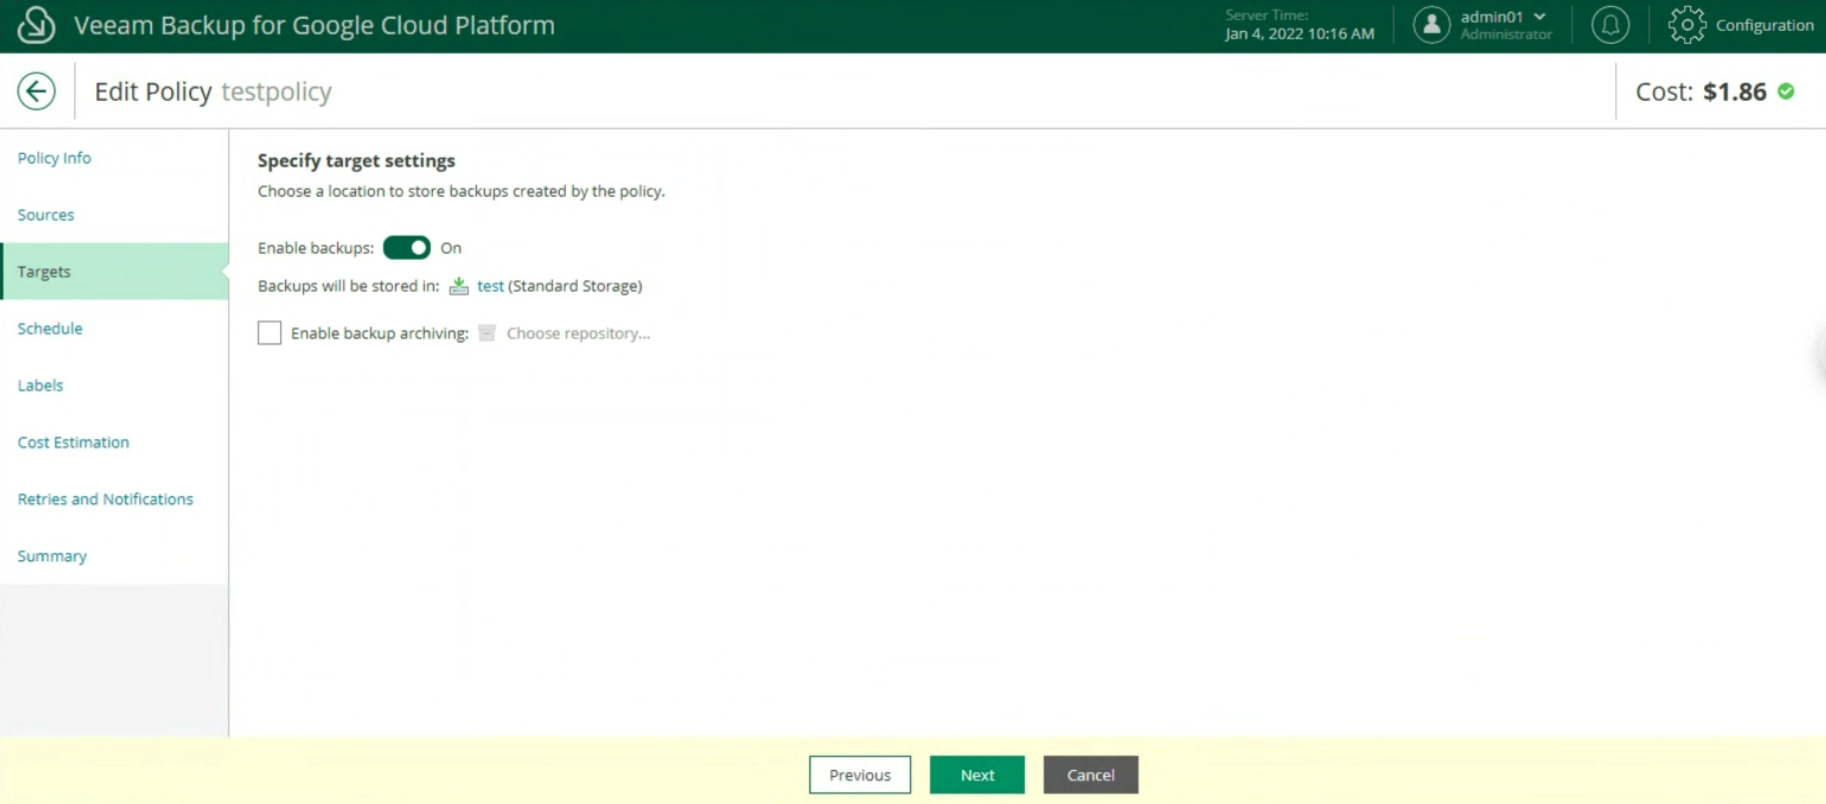 Image 16
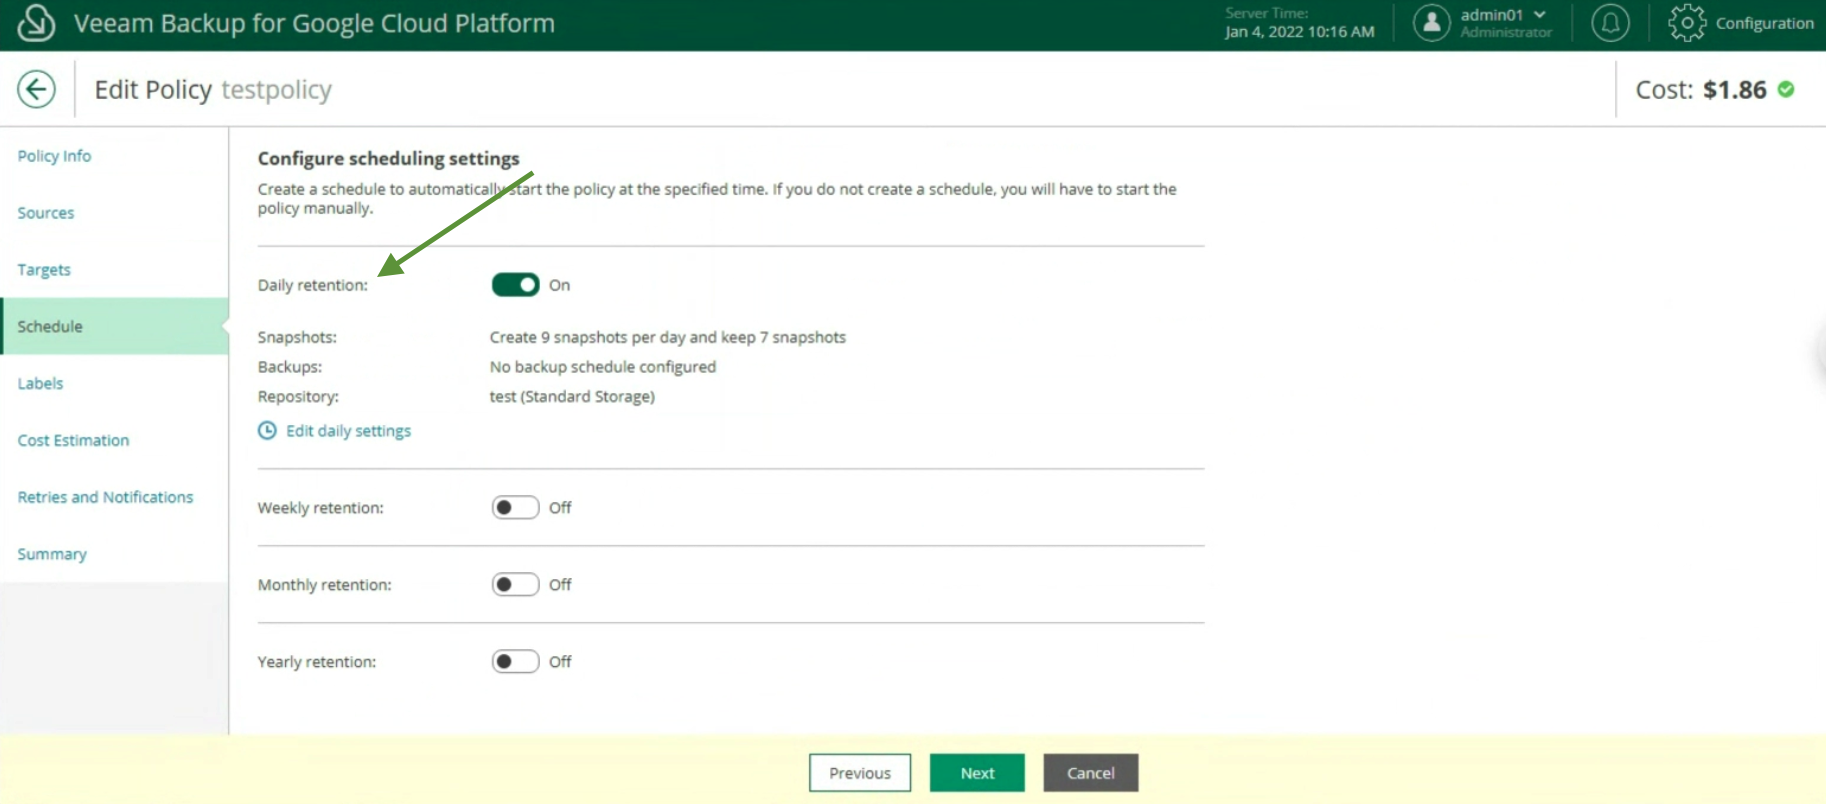 Picture 17
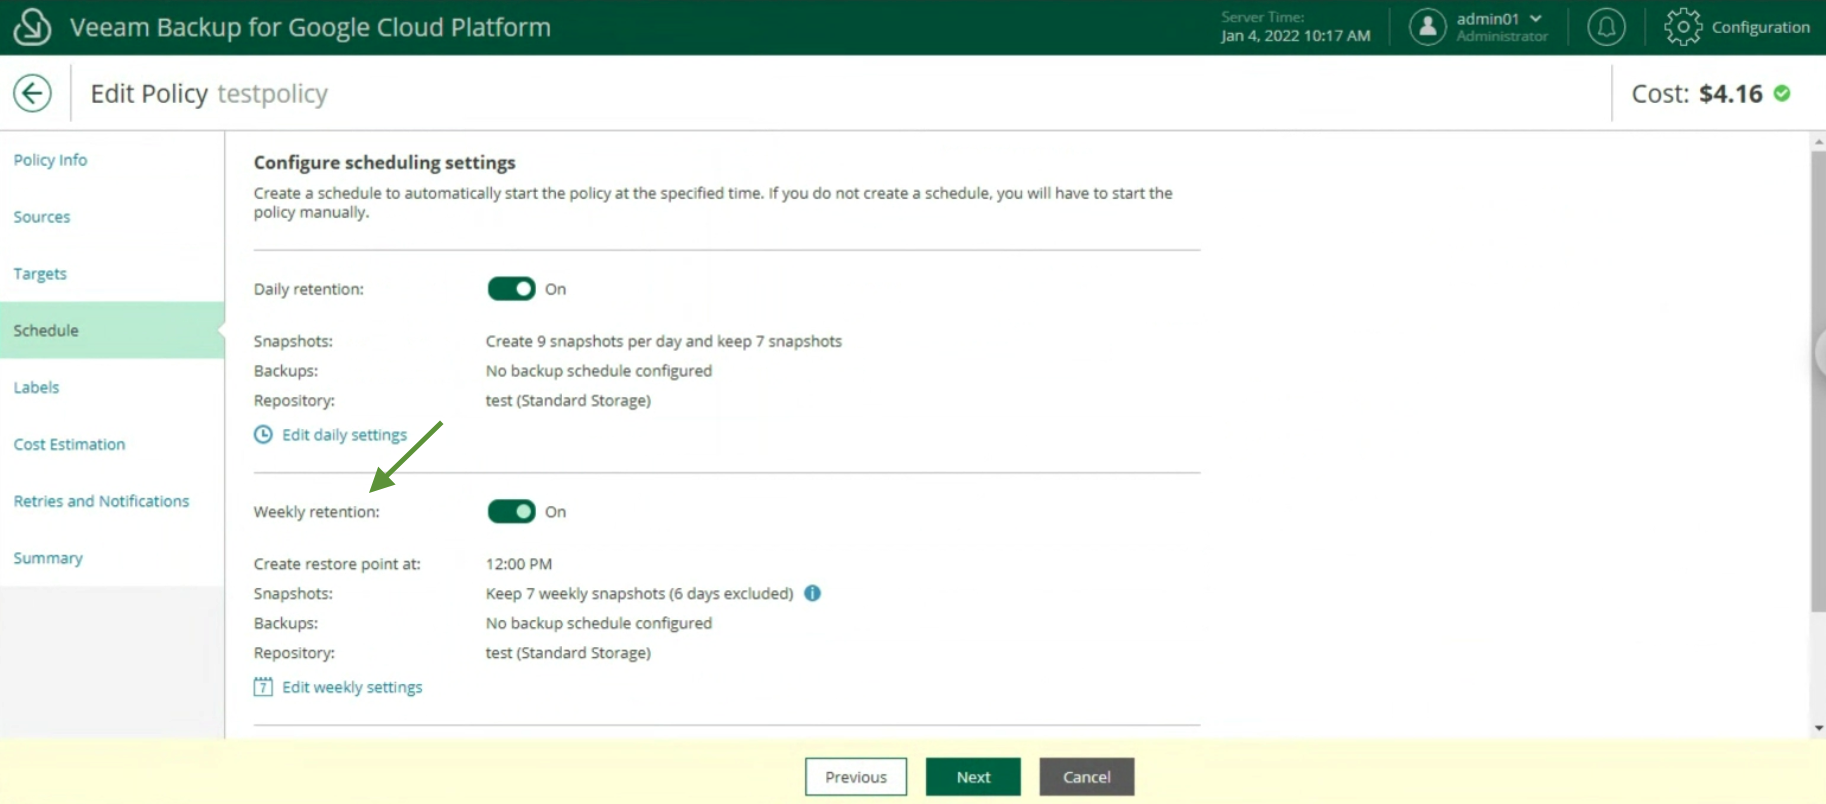 Image 18
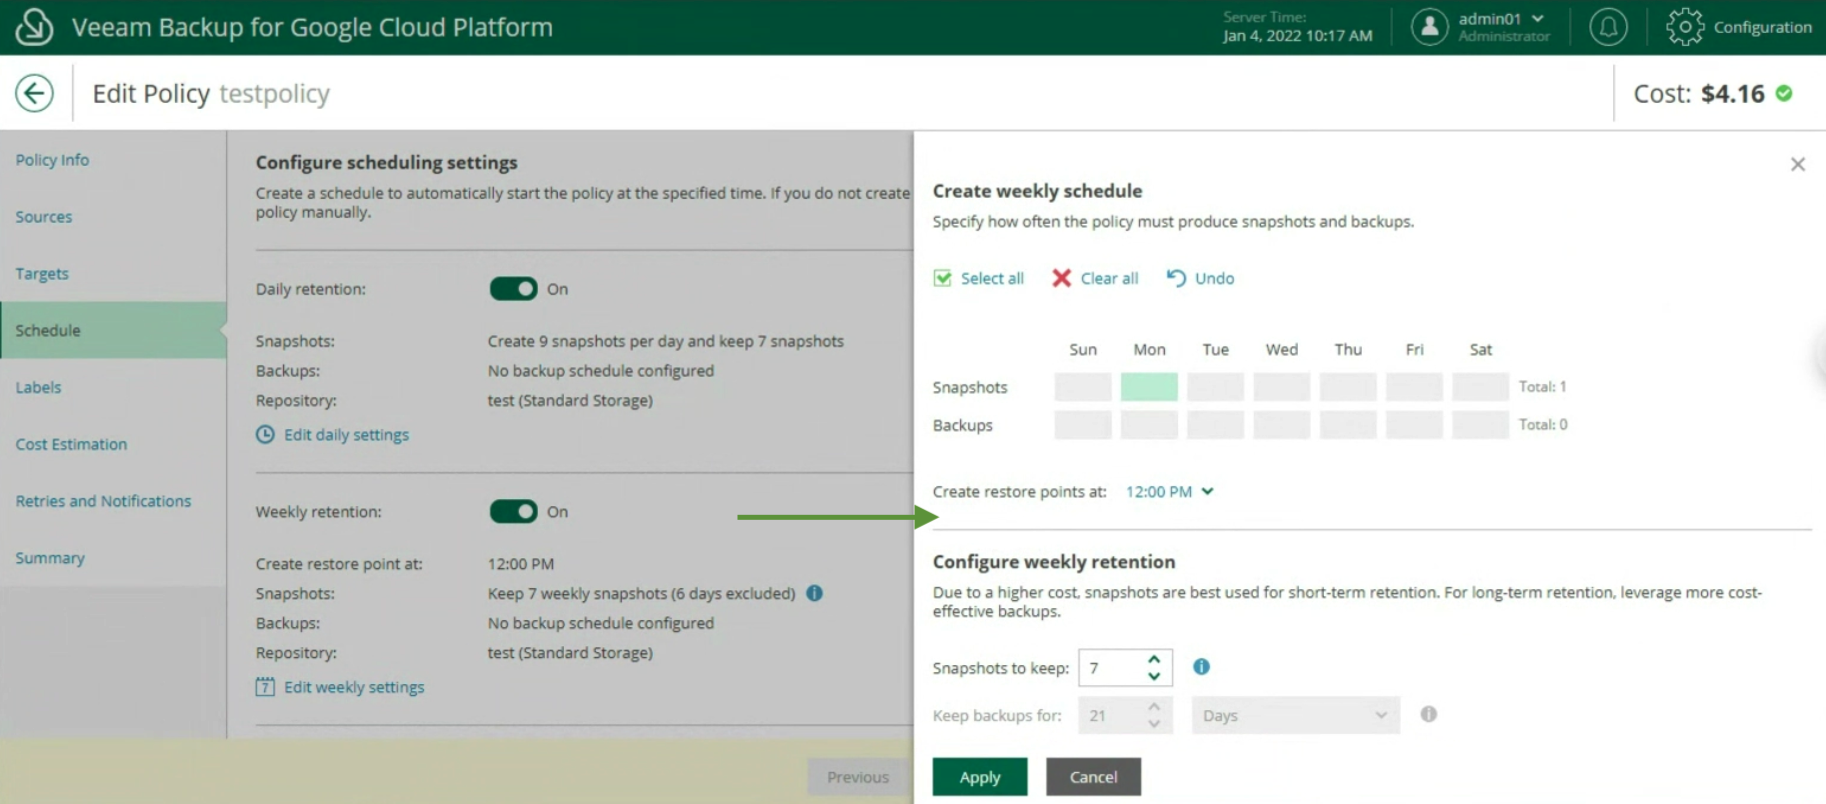 Image 19
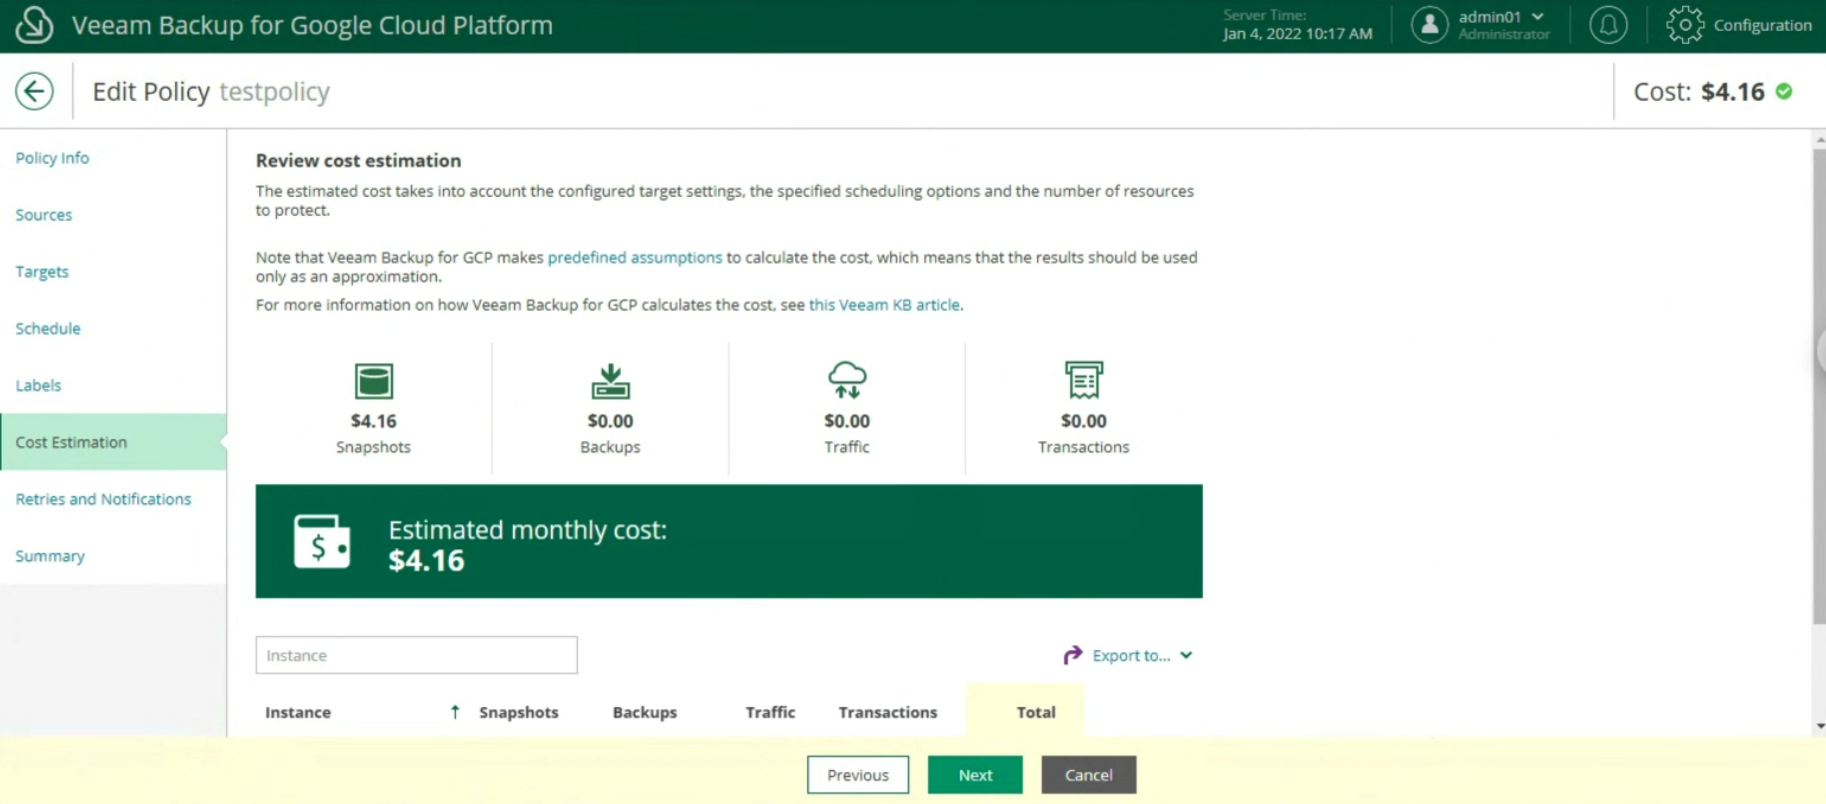 Image 20
 Image 21
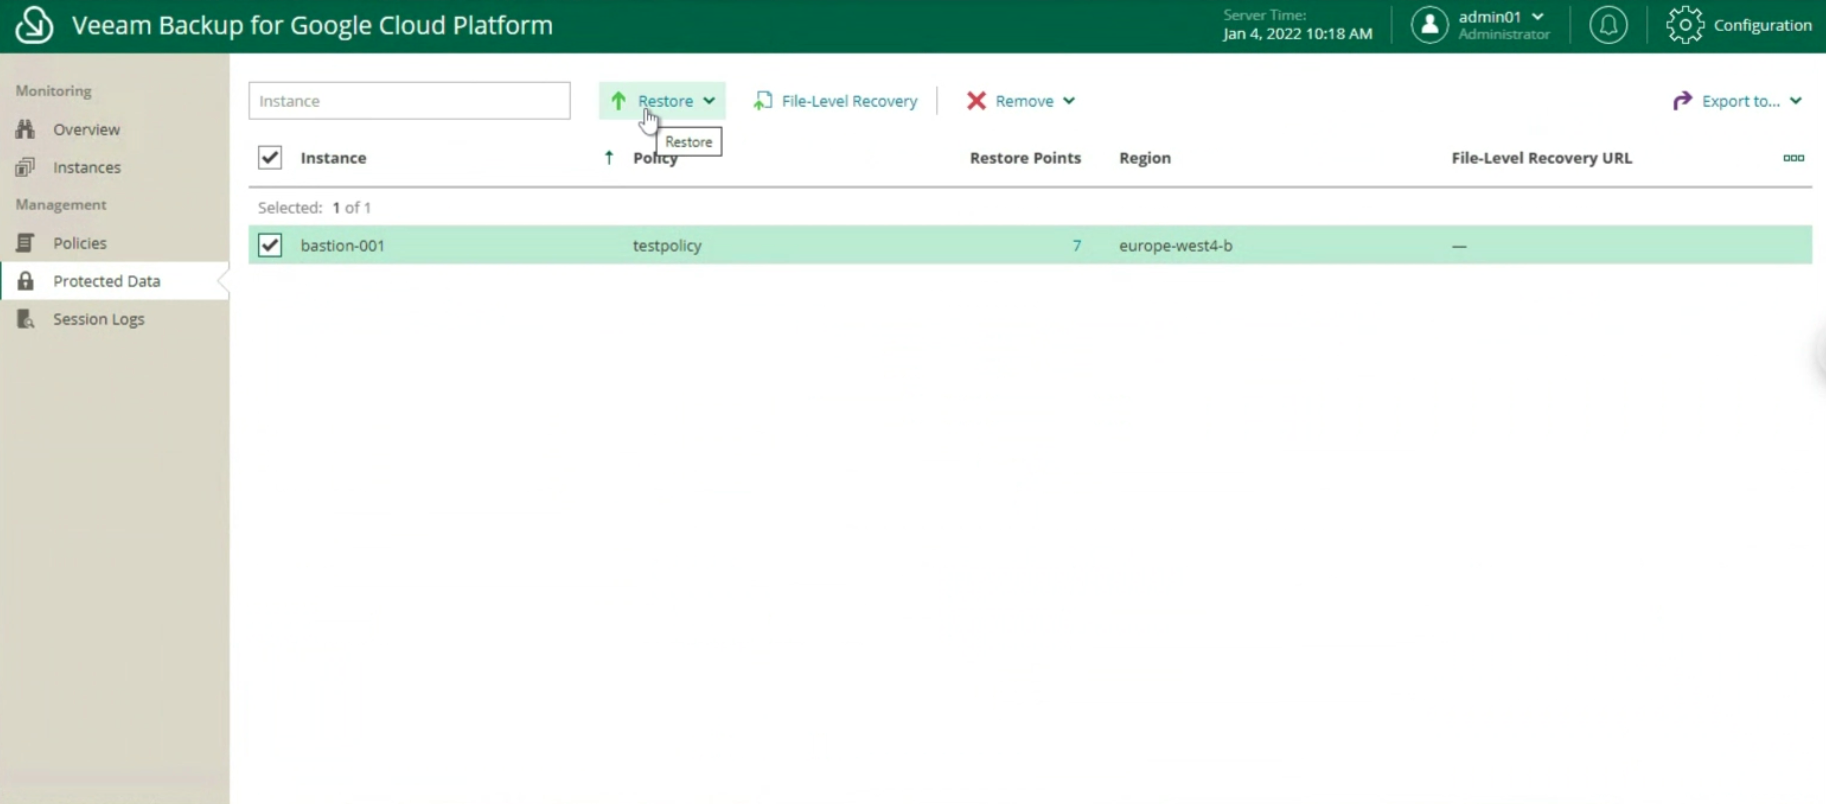 Image 22
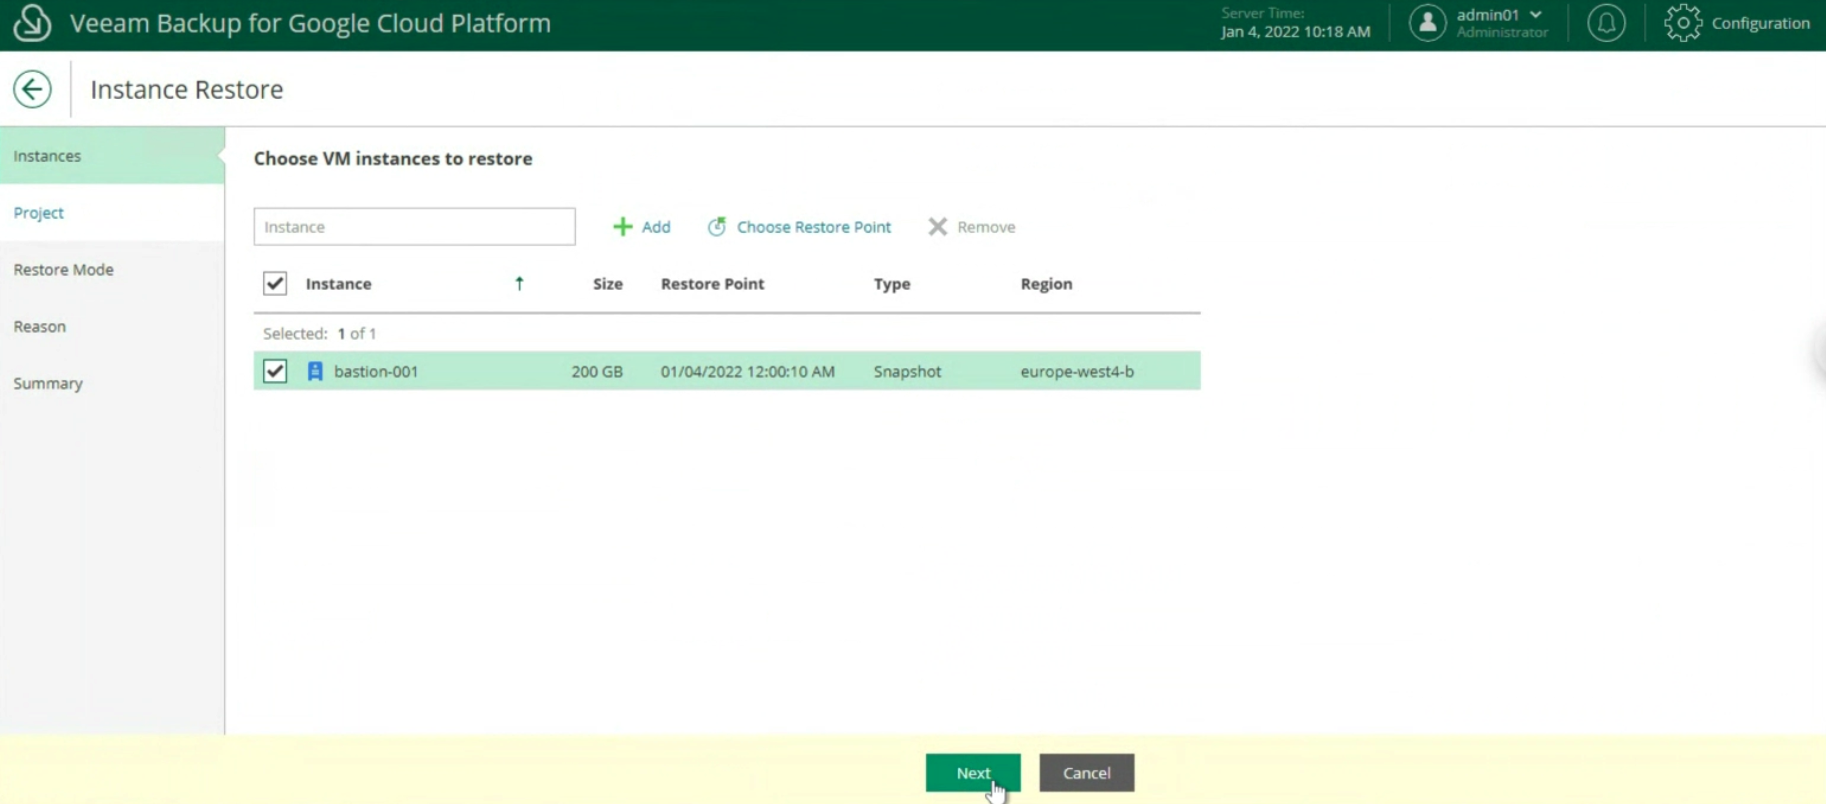 Image 23
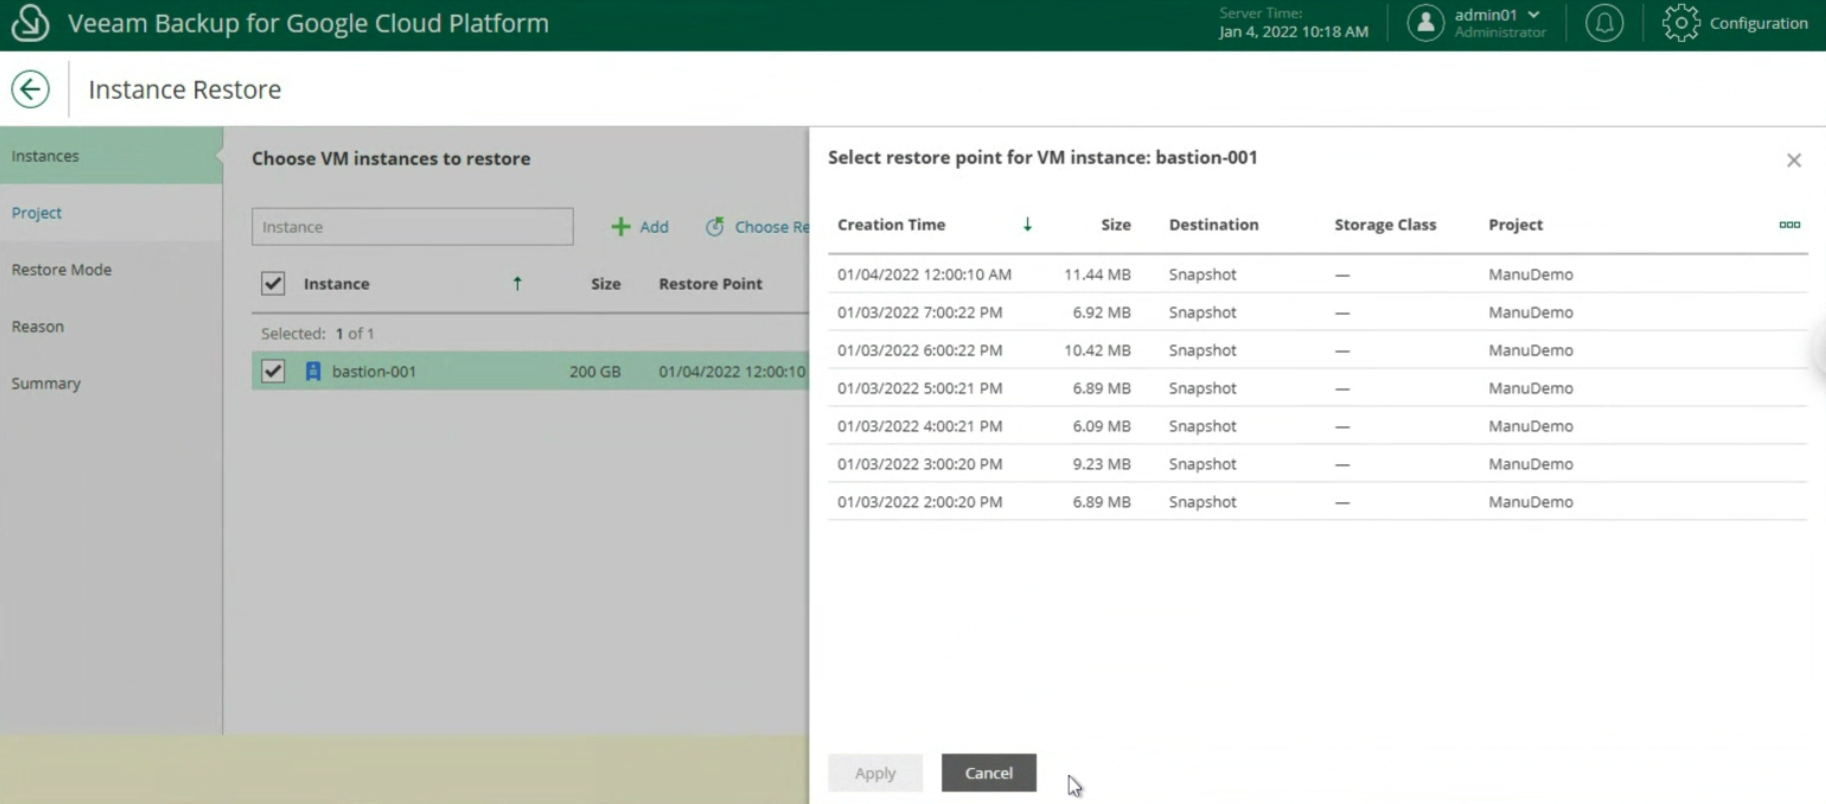 Image 24
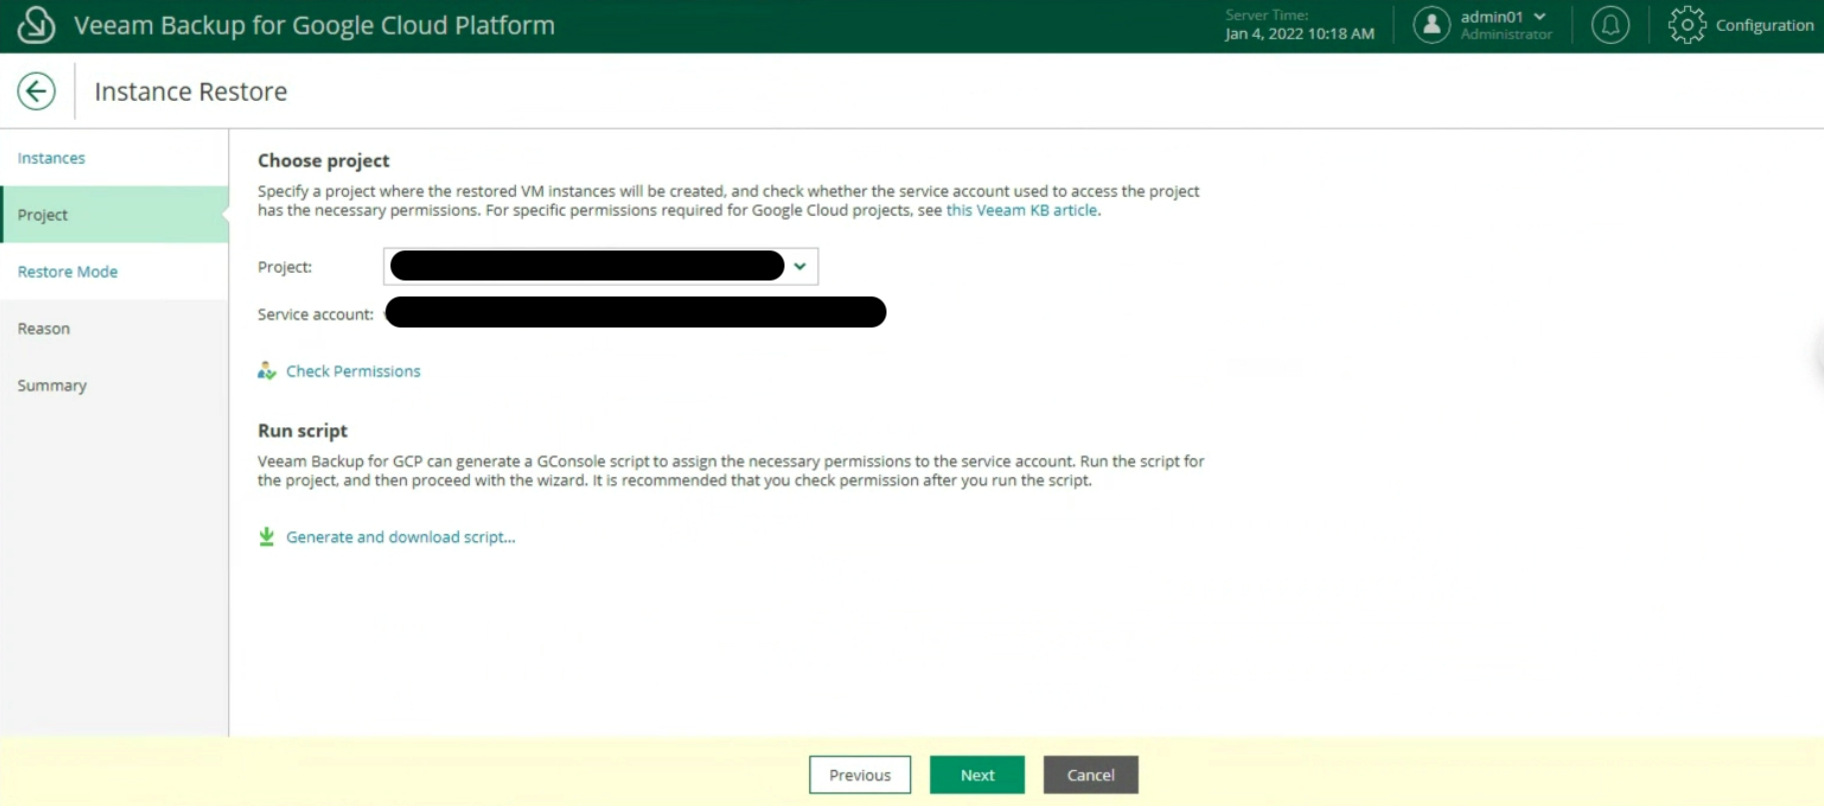 Image 25
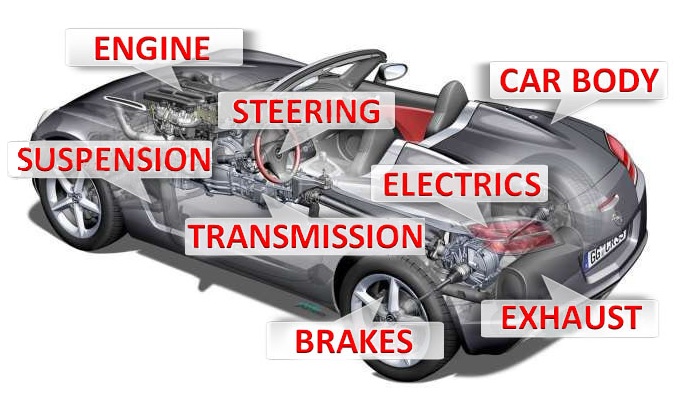
 Figure 1
 Figure 1
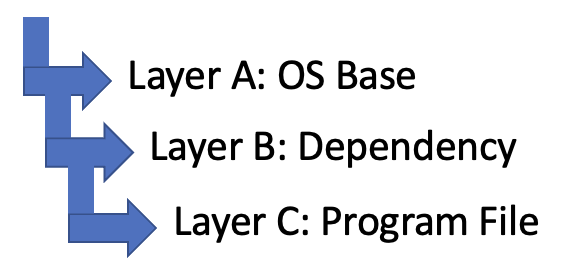 Figure 2
 Figure 3