The topic of this article is understanding how to automatize the delivery of a micro-service.
In the previous one, I showed the flow process of a service. This flow requires typing a lot of commands to launch any single container.
Is there a way to automatize the entire process making it easier?
Yes, Docker-compose is a tool for defining and running an environment multi-container.
Docker-compose works with a describing file that includes all the configurations. The file has the extension YAML (human-readable data-serialization language).
After writing the YAML file (in this example it is named mypersonalfile.yaml), the syntax of the command is:
docker-compose -f mypersonalfile.yaml
Let’s see an easy example using the article I wrote in the last episode as a source.
I had to type all these commands to implement the service:
a. Mongo DB commands
b. Mongo Express commands
In their place, it’s possible to use the following yaml file.
mypersonalfile.yaml
We will find yaml files again when writing about Kubernetes architecture and its protection.
The first two articles explained what a container is (article 1) and how they can talk to each other (article 2).
In this third article, I’m going to show how to deploy a service through this new and amazing container technology.
Note 1: I won’t cover the image flow deployment part (Git – Jenkins, Docker repository, and so on) because my goal is to explain how to implement a service, not how to write lines code.
Main Point:
As many of you already know, a service is a logical group of applications that talk to each other
Every single application can run as an image
Any image can run to a container
Conclusion: Deploying container technology is possible to build up any service
An example could clarify the concept.
Example: Web application
A classical web application is composed of a Front-End, a Back-End, and a DB.
In the traditional world, every single application runs on a single server (virtual or physical it doesn’t matter).
This old scenario required to work with every single brick of the wall. It means that to design correctly the service the deployers and engineers have to pay attention to all the objects of the stack, starting from OS, drivers, networks, firewall, and so on.
Why?
Because they are a separate group of objects that need a compatibility and feasibility study to work properly together and they require great security competencies also.
Furthermore, when the service is deployed and every single application is going to be installed, it often happens that remote support from the developer team is required. The reason is that some deployment steps are not clear enough just because they are not well documented (developers are not as good at writing documentation as they are at writing codes). The result is that opening a ticket to customer service is quite normal.
Someone could object and ask to deploy a service just using one server. Unfortunately, it doesn’t solve the issue, actually, it amplifies it up just because in that scenario, it’s common to meet scalability problems.
Let’s continue our example by talking about the architecture design and the components needed (Picture 1)
Front End: HTML and JavaScript
Back End: Node.js: It is a framework, which is used to write server-side Javascript applications (https://nodejs.org/it/)
Note 2: In the next rows, I will skip how to deploy the front and backend architecture as well as the docker technology because:
Writing HTML and Javascript files for creating a website is quite easy. On Internet, you can find a lot of examples that will meet your needs.
Node.js is a very powerful open-source product downloadable from the following website where it’s possible to get all the documentation needed to work with it.
Docker is open-source software; it can also be downloaded from the official open-source website. The installation is a piece of cake.
My focus here is explaining how to deploy and work with docker images. Today’s example is the Mongo DB and Mongo Express applications.
I wrapped up the steps in 4 main stages:
a. First point: Creating a Network
It allows communication from and to the images.
In our example, the network will be named “thegable-network”.
From the console (terminal, putty….) just run the following commands:
b. Download from docker hub the images needed
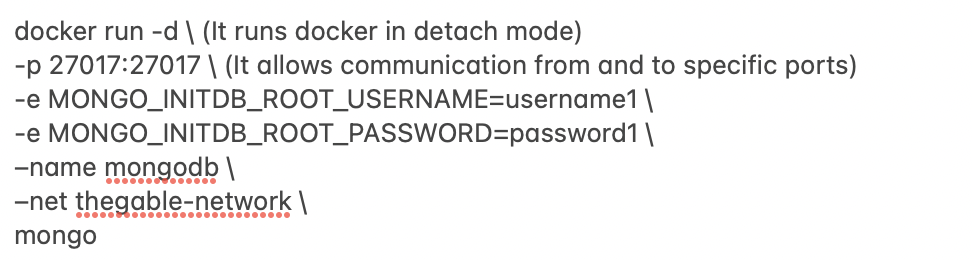
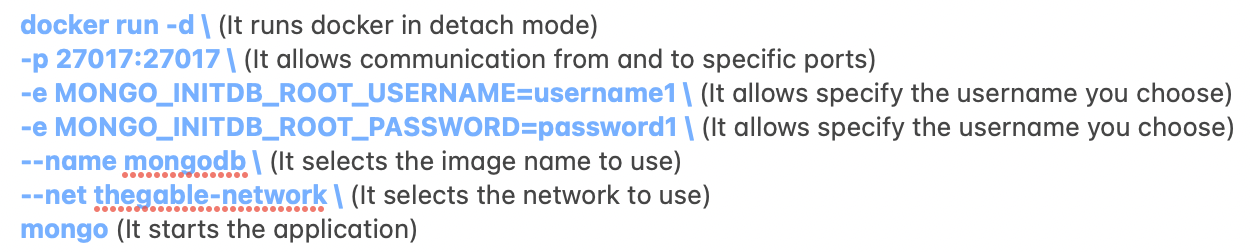
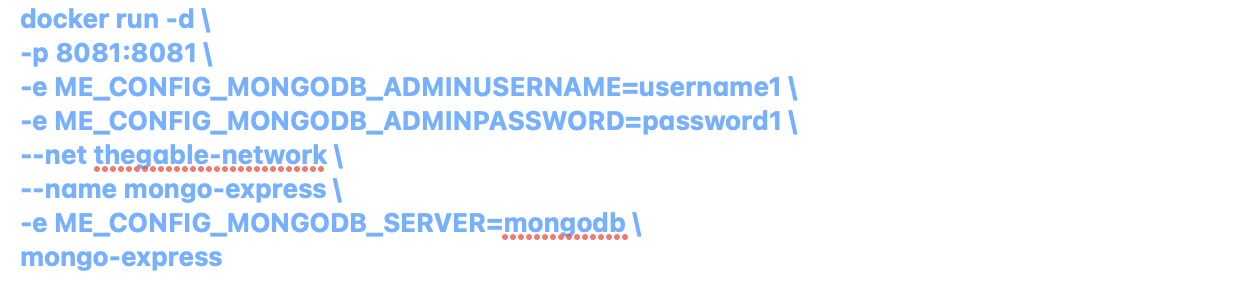
c) Running the mongo DB image with the correct settings:
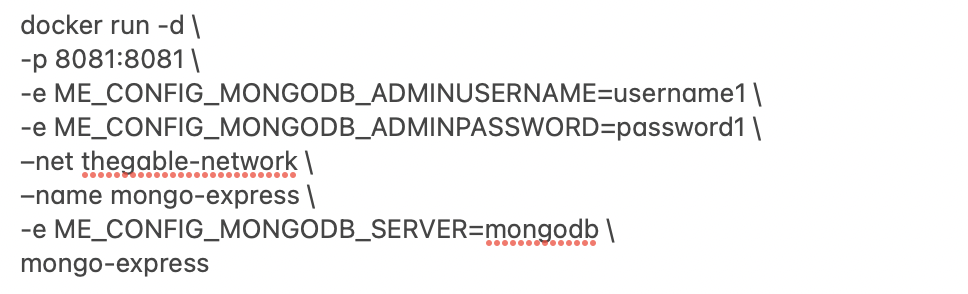
d) Run the mongo-Express image with the correct settings:
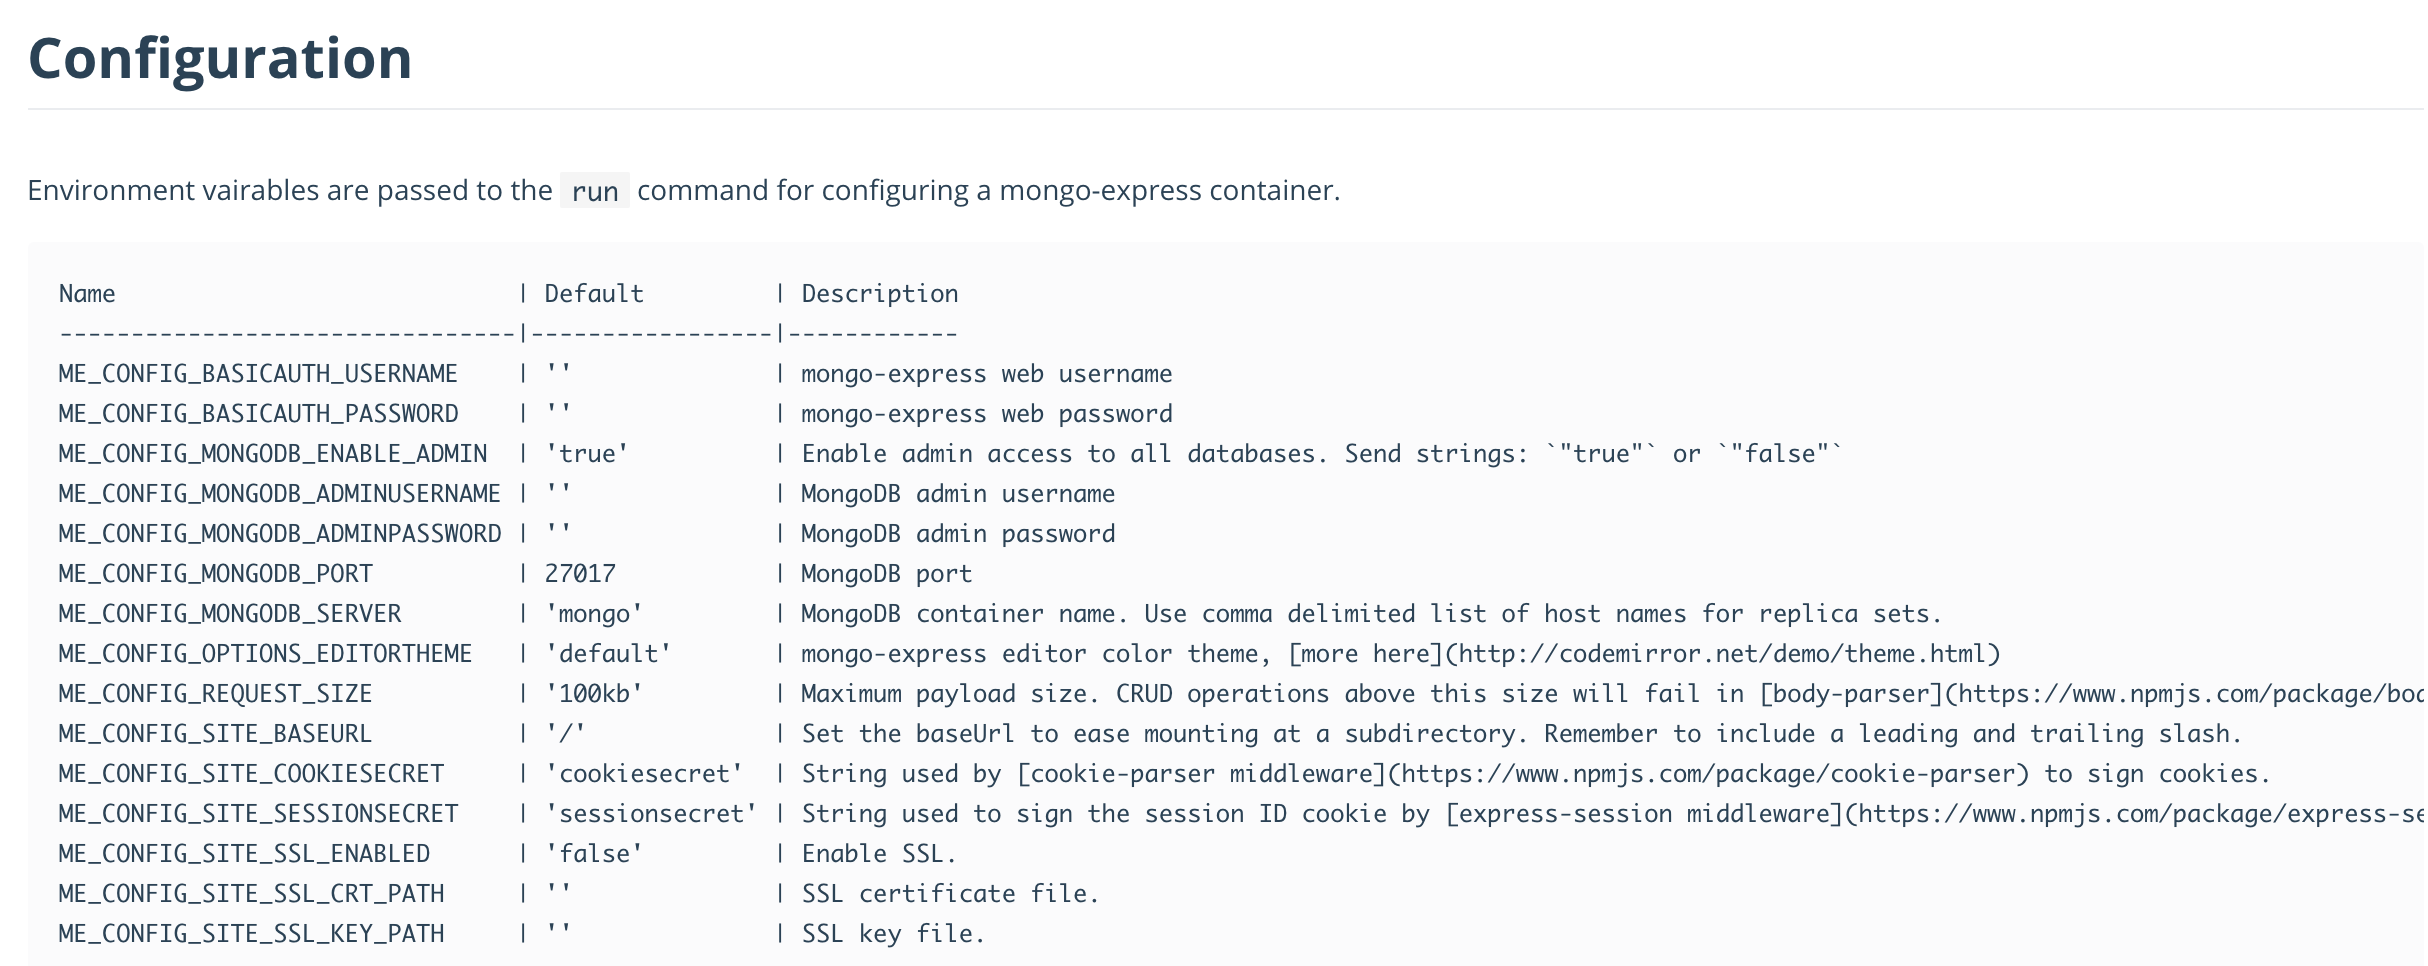
Note 3: The configurable settings are available directly from the docker images.
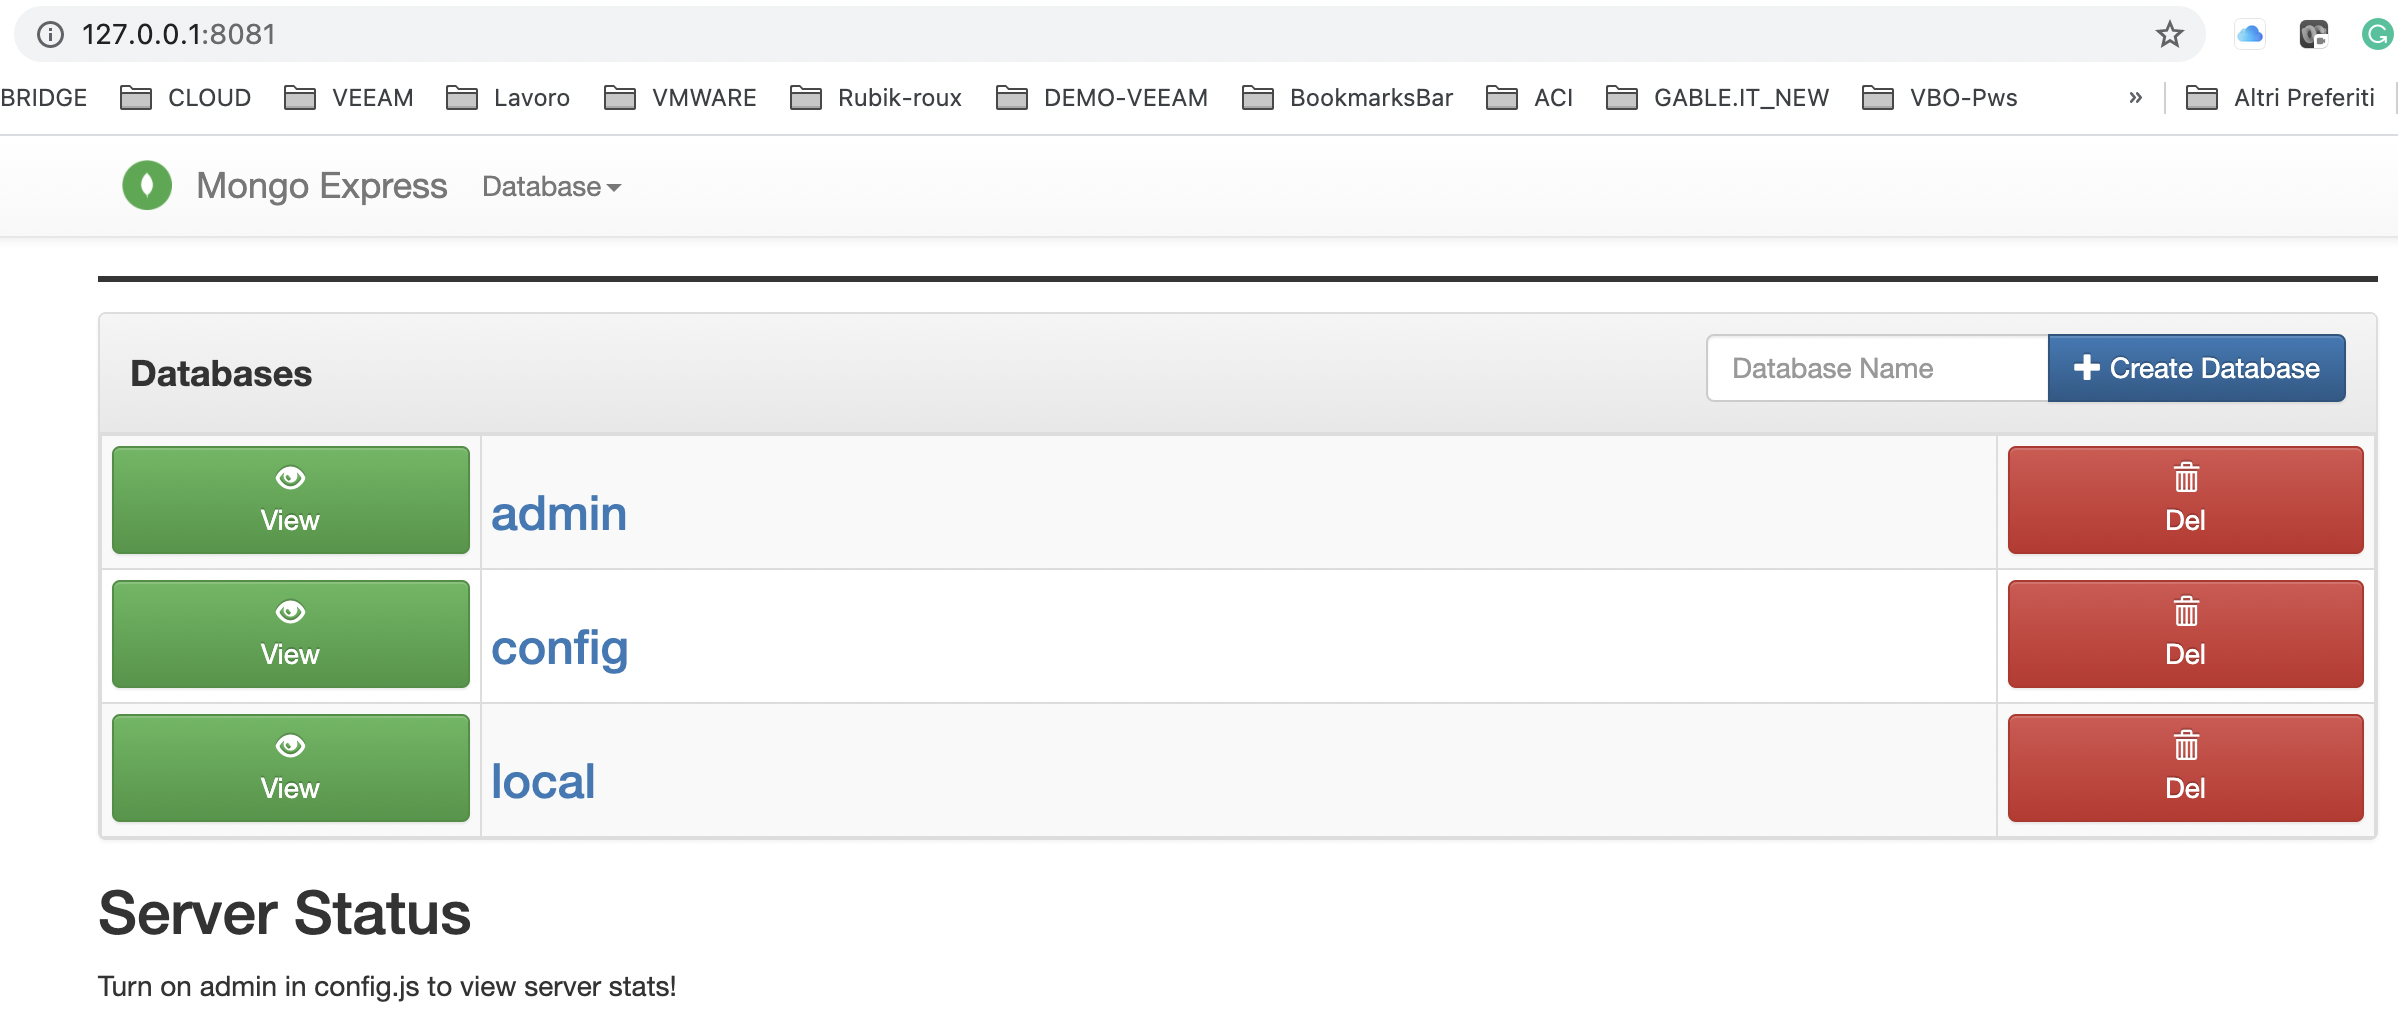
Connecting to the main web page of mongo-express (localhost: port), have to appear the mongo default Databases as shown in picture 3
Picture 2
Now creating new Mongo DBs (through the Mongo-Express web interface just for example create the DB named “my-GPDB“) and managing your javascript file, it’s possible to build up your own web application.
In the javascript file (normally is named server.js) the main points to connect to the DB are:
(Please refer to a javascript specialist to get all details needed)
Is it easy? Yes, and this approach allows having a fast and secure deployment.
In just a word, it is amazing!
That’s all folks for now.
The last article of this first series on modern applications is Docker Compose
As written in the last article a container can manage more images.
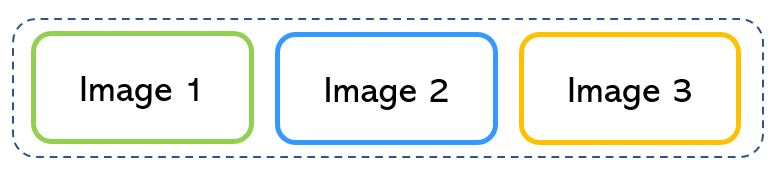
Picture 1 shows an example of three different workloads running in a single container.
Picture 1
It’s possible to work with different versions of the same image also.
For example, MySQL has several images that can be installed and run to the same container.
Note 1: Nowadays MySQL available images are:
8.0.25, 8.0, 8, latest
5.7.34, 5.7, 5
5.6.51, 5.6
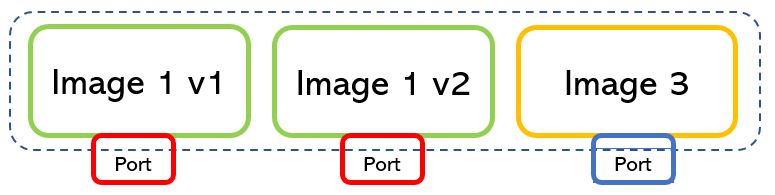
Picture 2 shows a container where three different images run with two kinds of version applications.
Picture 2
Let’s digress slightly talking about how a service is built.
Most of the time it is made by grouping applications that means grouping several types of images.
The question is: How do images talk to each other?
The answer is quite easy. They talk through the networks, where IP addresses and ports are in charge of the communication to and from the applications (picture 3).
Picture 3
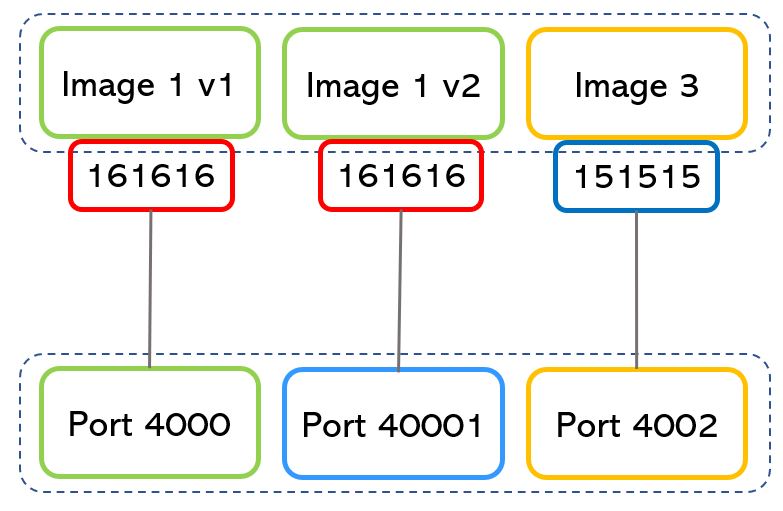
There is just a simple rule to remember when a container network architecture is deployed.
As shown in picture 4, if the ports used by a running image can be the same for different applications (in example 161616), the port assigned to the back-end server must be always different (4000,40001,4002).
Note 2: The port numbers are just an example also because the port with the higher number is 216 = 65535.
Picture 4
Wrap-up: The binding network architecture is completely allowed but the host back-end port can’t expose the same port number to more than one service.
Let’s go deeper into networking in the Container environment:
The network’s topology is defined by the used drivers.
They can be:
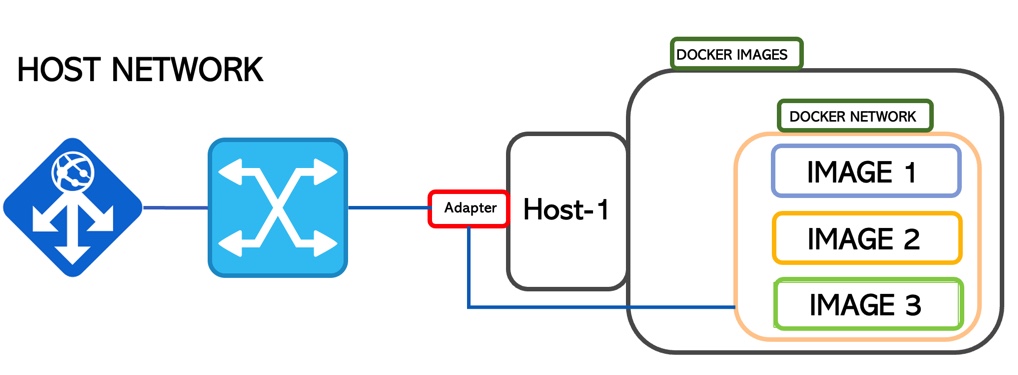
1. Host
When the container comes up it attaches its ports to the host network directly.
In this way, it shares the TCP/IP stack and the Host NameSpace.
The segregation is guaranteed by Docker technology (Picture 5)
Picture 5
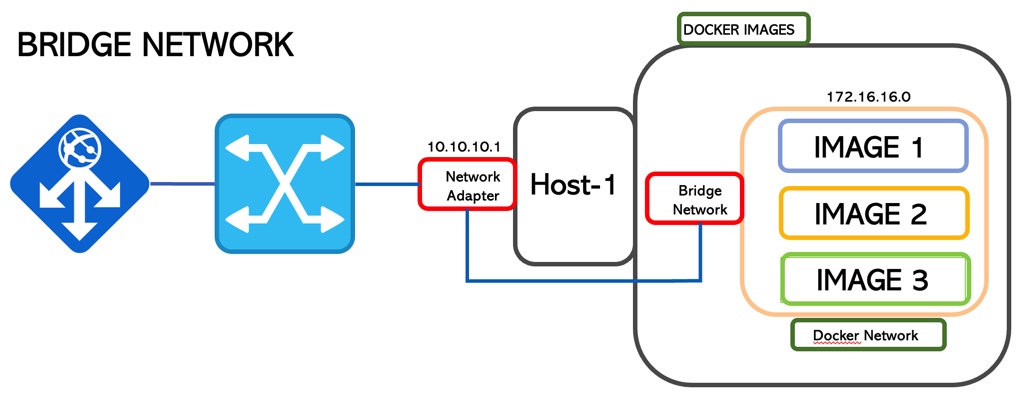
2. Bridge
This is the default network mode.
It creates an isolated bridge network where the containers run inside a range of IP addresses.
In the previous scenario, the containers can talk to each other but no connection is allowed from outside.
To allow communication with external service in Docker, it’s necessary to start docker with the -p option.
docker run -pserverport:containerport nameservice (ie: docker run -p2400:2451 mysql)
port 2400 is now working with 2451
From a security point of view, it is amazing. You can monitor and select which ports are going to be used for a service (Picture 6)
Picture 6
3. Overlay
If the previous technologies are single-host networking topology, the Overlay allows communication among the container hosted in different hosts.
This scenario requires cluster intelligence to manage the traffic and guarantee segregation. It could be Swarm or Kubernetes (picture 7)
The technology core that allows it is vxlan that creates a tunnel on top of the underlay network and it is part of the operating system
The traffic is encrypted (AES) with a rotating password.
When a service is exposed (-p option wrote before), all traffic is automatically routed, nevermind where the service is running
More interesting details: each container has two IP addresses: the first one insists on the overlay network and is used by the containers to talk to each other (internal). The second address is for vxlan and allows the traffic to outside.
Picture 7
4. Null (Black box)
No network connection
5. MacVLan
It’s possible to implement a MacVLan through a driver. The scope is giving to the network container the behaviour of a traditional network. It’s necessary that the network accepts the promiscuous mode.
This is the first of a group of articles about the technologies that can modernize the applications.
The scope is helping the reader to understand the potentiality of this new way to make business allowing the Companies to be more competitive.
These articles follow my personal approach and studies of Kubernetes.
I’m paying attention to how to make services available and protected by exploiting internal and external native technologies
Let’s start !!!
What is a container
It’s a way to package the applications with their pertinent dependencies and configurations in just one block.
There are at least two big advantages of this approach:
The container for his native architecture is portable. It means you can run it in any architecture wherever they are located. (please read the article Digital Transformation and Cloud Mobility to get all detail)
Deploying services prove easier and more efficient than in the traditional world because there are already plenty of software images ready to be used.
Where can I download images to run to the containers?
There are public and private Repositories (please do not mess it with a VBR Repository).
The most famous container technology is Docker that has a public repository called docker hub.
What is a container exactly?
A container allows isolated images to run to an operating system.
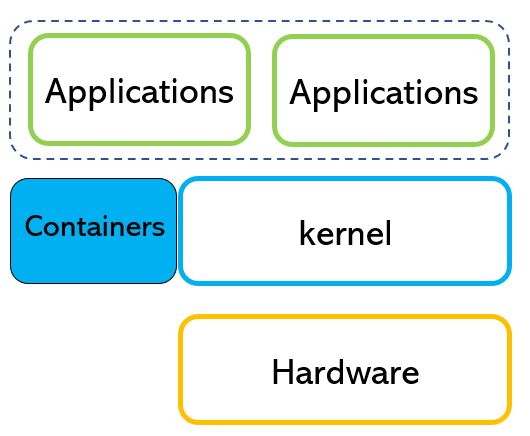
Container vs Virtual Machine
The difference between the two architecture seems to be very tiny but actually, they represent two worlds.
The two technologies are virtualization tools but if Docker focuses on the applications layer (picture 1), VM puts its attention to Kernel and application (picture 2)
Picture 1
Picture 2
Which are the main advantages of this new approach:
The container has a small footprint (few MB compare to GB).
The boot is faster.
Easier compatibility list.
It can run in all common operating systems, such as Windows, Mac-OS, Linux.
Container vs Image
It’s crucial to the next articles to have very clear the difference between a container and an image.
Let’s help ourselves through picture #3 that shows the application composition.
There are four main elements:
Image: It’s the code written by developers. It is downloaded from Repositories.
Configuration: It represents the setup created to allow the application to run.
File System: It’s the place where the application and its data are stored.
Network: It allows all components to talk to each other.
The container is where the application runs.
Picture 3
Note 1: Images are part of the container. Think of the container as a multitasking OS specialized to run applications simultaneously.
Note 2: To get info about Docker, please refer to the official website. I.E.: to run an image just launch the following command: docker run image-name
Note 3: There are more Container technologies; the most common are:

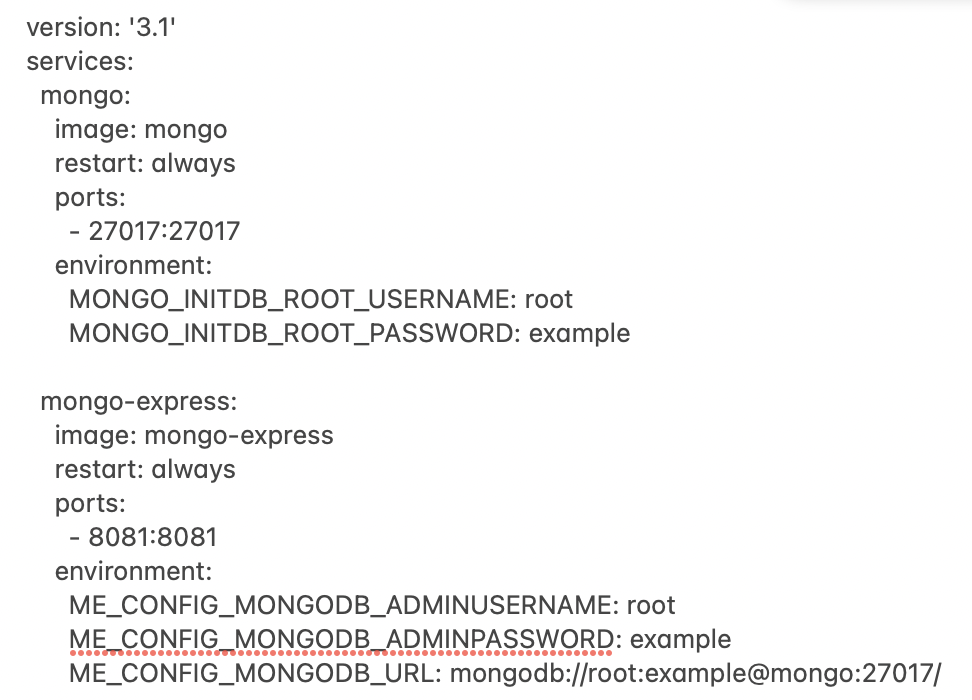 mypersonalfile.yaml
 Picture 1


 Picture 1
 Picture 6
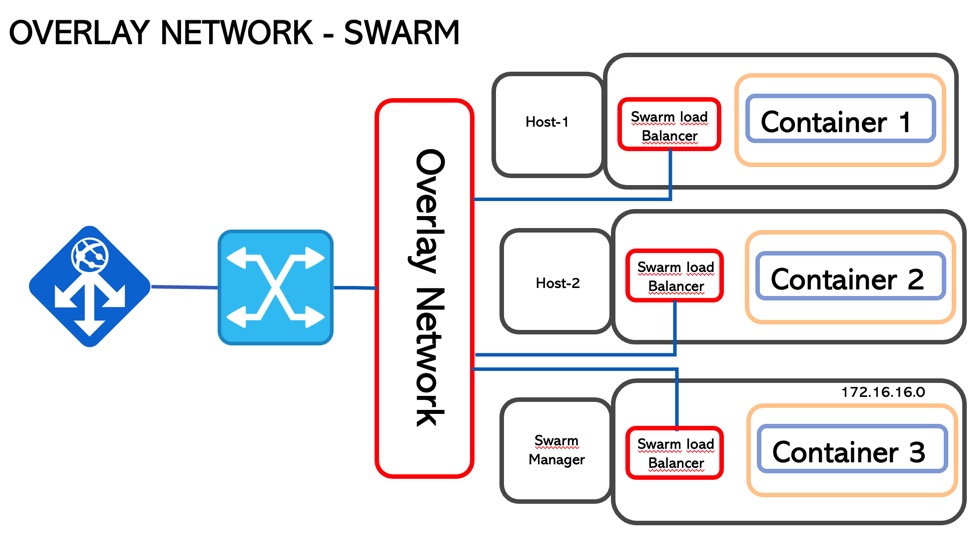
 Picture 1
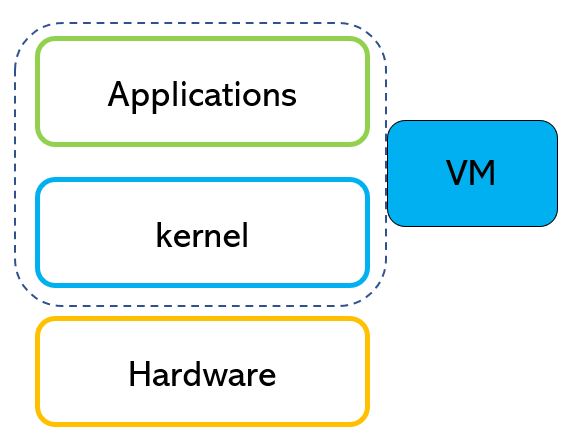 Picture 2
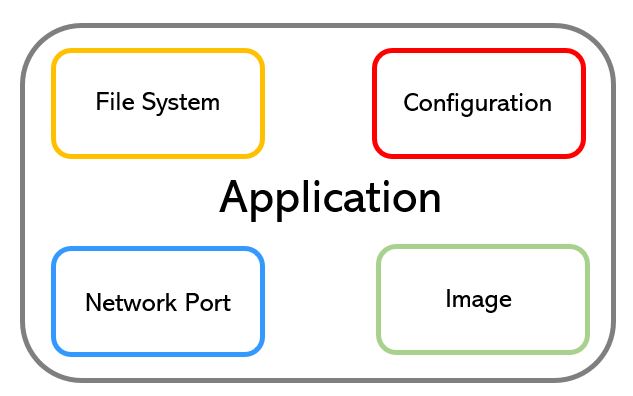 Picture 3