MySQL Backup and Veeam Backup & Replication – Part 1

This article will show you how to implement a data protection strategy in MySQL environments.

Let’s start with a consideration.

To create consistent backups from an application point of view, it is necessary that before the copy process is started, the application has written all the data in memory to disk ( flush ).

For example, Microsoft® applications use a technology called Shadow Copy which, through the coordination of VSS drivers , achieves application consistency.

A similar technology is not available on Linux and in addition MySQL does not support it in the Microsoft® environment.

How to remedy?

Through the creation of scripts that automate application consistency before starting the creation of the Snapshot .

Having understood this aspect, let’s return to the scope of the article, introducing the options available for MySQL .

Note 1 : Application consistency occurs before snapshot creation.

  • 1. Logical Backup : The script creates a file with the .sql extension which in case of restore allows the re-creation of the database and its data.

The file . sql is created through the native MySQL command ” mysqldump “ .

The advantages of logical backup can be summarized in:

  • There are no dependencies on third-party software.
  • Backups can be restored to other servers.
  • 2. Physical / Cold Backup : Cold copies of the DB files are created (for example: ibdata, .ibd, .frm, ib_logfile, my.cnf).

To be sure that the backups are made in ” application consistency ” mode, before taking the snapshot, it is essential to stop the MySQL services.

It is a backup strategy typically implemented in environments that do not require 24×7 operations.

Note 2 : The service is stopped only for the time necessary to create the snapshot and not for the entire duration of the backup.

  • 3. Physical / Hot Backup : If the InnoDB engine is running, the script allows the creation of consistent copies without stopping the services (using for example the command mysqlbackup component of the MySQL Enterprise suite ( MySQL Product) ).

Now that we know the scripting options available, let’s see how Veeam solutions can natively integrate with MySQL environments.

The first available option is the Veeam Agent for Linux ( VAL ) which automates the following four steps:

  1. Flush data from memory to disk (application consistency).
  2. Creation of the snasphot.
  3. Release of tables.
  4. Start the Backup process.

Note 3 : As indicated in the first part of the article, if the DB is of the MyISAM type, it is possible to backup with the blocking of all the tables.

The pre-requisites of the VAL are:

  • MySQL version is greater than or equal to 5.8.
  • The operating system is Linux.

Question: Is it possible to backup in Windows environments where the MySQL version is lower than version 5.8?

The answer is yes and the available scenarios are:

Logical Backup -> Hot-Backup Database Online Dump -> Mysqldump command.

Physical / Cold Backup –> Cold-Backup Database Shutdown -> Temporary stop of the Services.

Physical / Hot Backup –> Hot-Backup Database Freeze -> Native mysql commands.

Note4 : There is also the possibility of making Partial Backups . In this scenario, specific tables and databases are backed up. It is useful when different protection strategies have to be implemented on the same Server.

In the next article, we will find out how to create scripts and how to integrate them into Veeam Backup & Replication.

Veeam & Google Cloud Platform – Part 2

In the previous article, it was shown how to use VBR (Veeam Backup & Replication) as a framework to protect the instances (VMs) present in the Google Cloud Platform ( GCP ).

The integrated component of VBR that automates backup and restore processes is VBGP (Veeam Backup for Google Platform), now in its second version (January 2022).

VBGP allows you to save Google instances at the image level, but to date, it is unable to restore applications in granular mode.

Note 1: The VBGP allows you to create “Application Consistency” backups of the instances through:

  • le VSS (Windows Volume Snapshot Copy Services ) for Microsoft-Windows operating systems.
  • Customizable scripts for Linux operating systems.

In cases where transaction log backup or granular recovery of application objects is required, the Veeam Agent ( VA ) must be used.

Note 2: At www.gable.it you will find many articles detailing how to implement Veeam Agents.

Note 3: The Backup Server VBR can be installed both in the cloud (for example as an instance in GCP ) and on-premises. Correct connectivity between components must be ensured in all scenarios.

Note 4: VBR version 12 (due out in 2022) will add a number of Cloud enhancements. For example, the ability to manage the deployment and Veeam Agent components, without having to create a VPN between the on-premises VBR and the instances to be protected in advance.

Let’s now see the two main phases to perform the Backup of the instance:

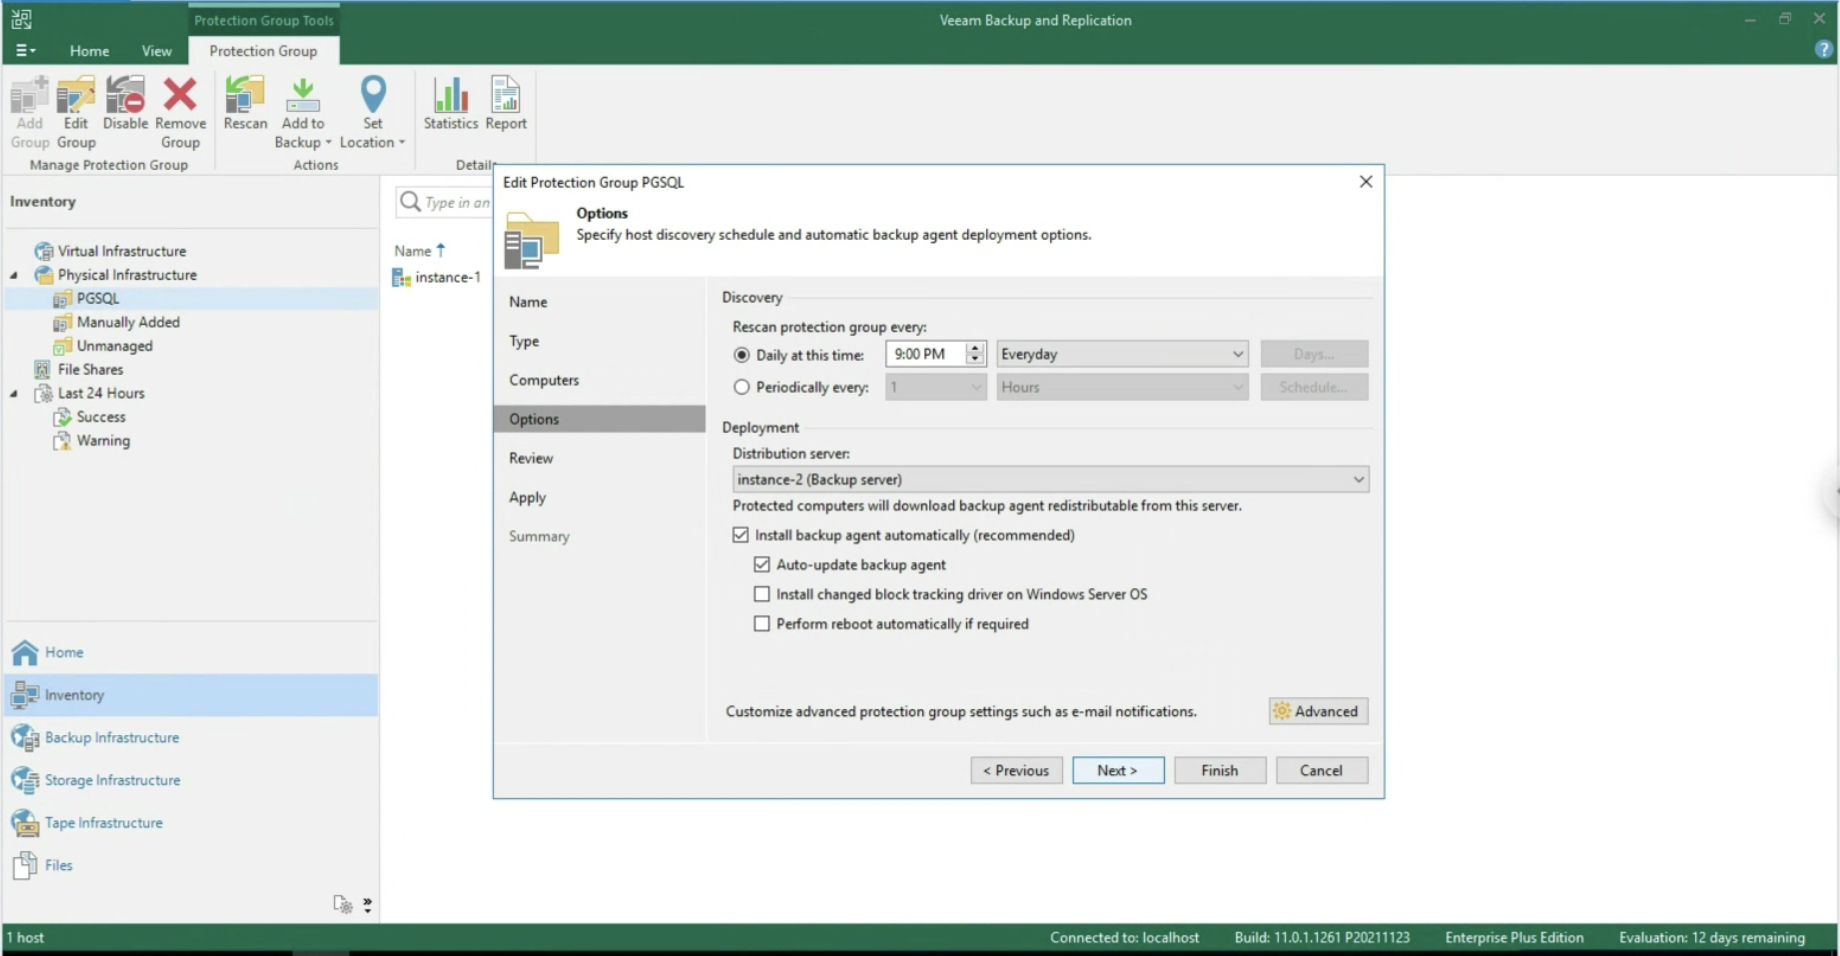
The first phase has the purpose of carrying out discovery and deployment of the Agent on the instance (see image 1) (Inventory menu, Create a Protection Group).

Picture 1

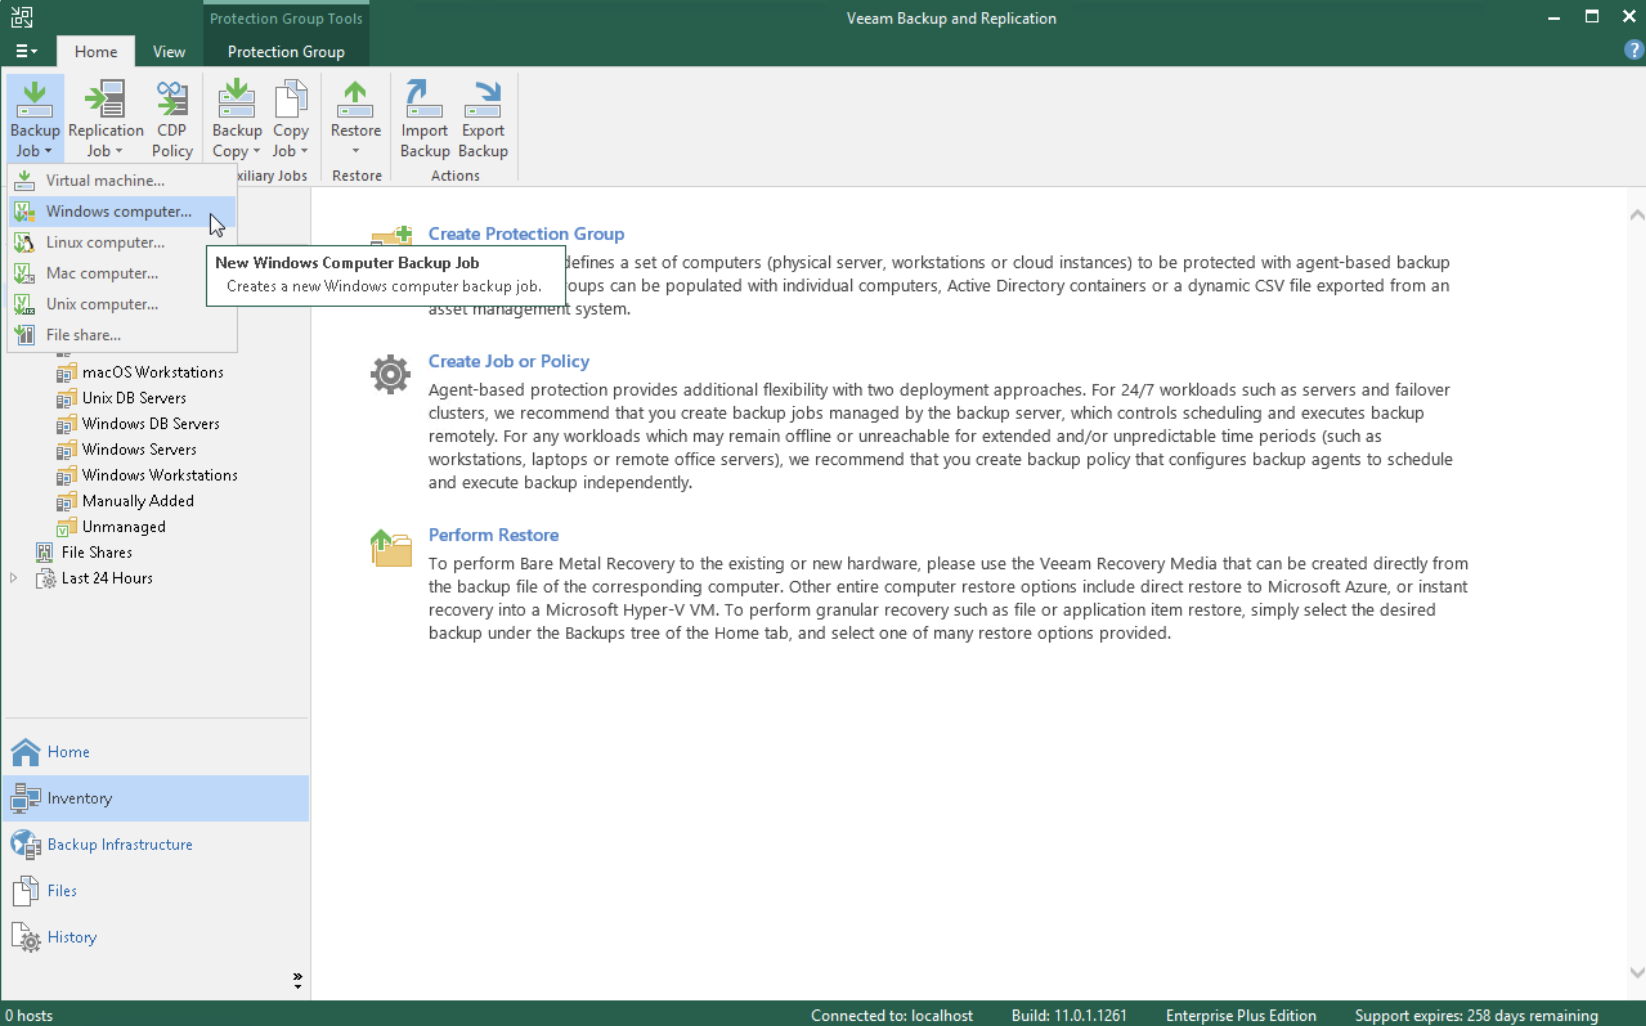
In the second phase, the creation of the Backup job by selecting Veeam Agent for Windows (Image 2)

picture 2

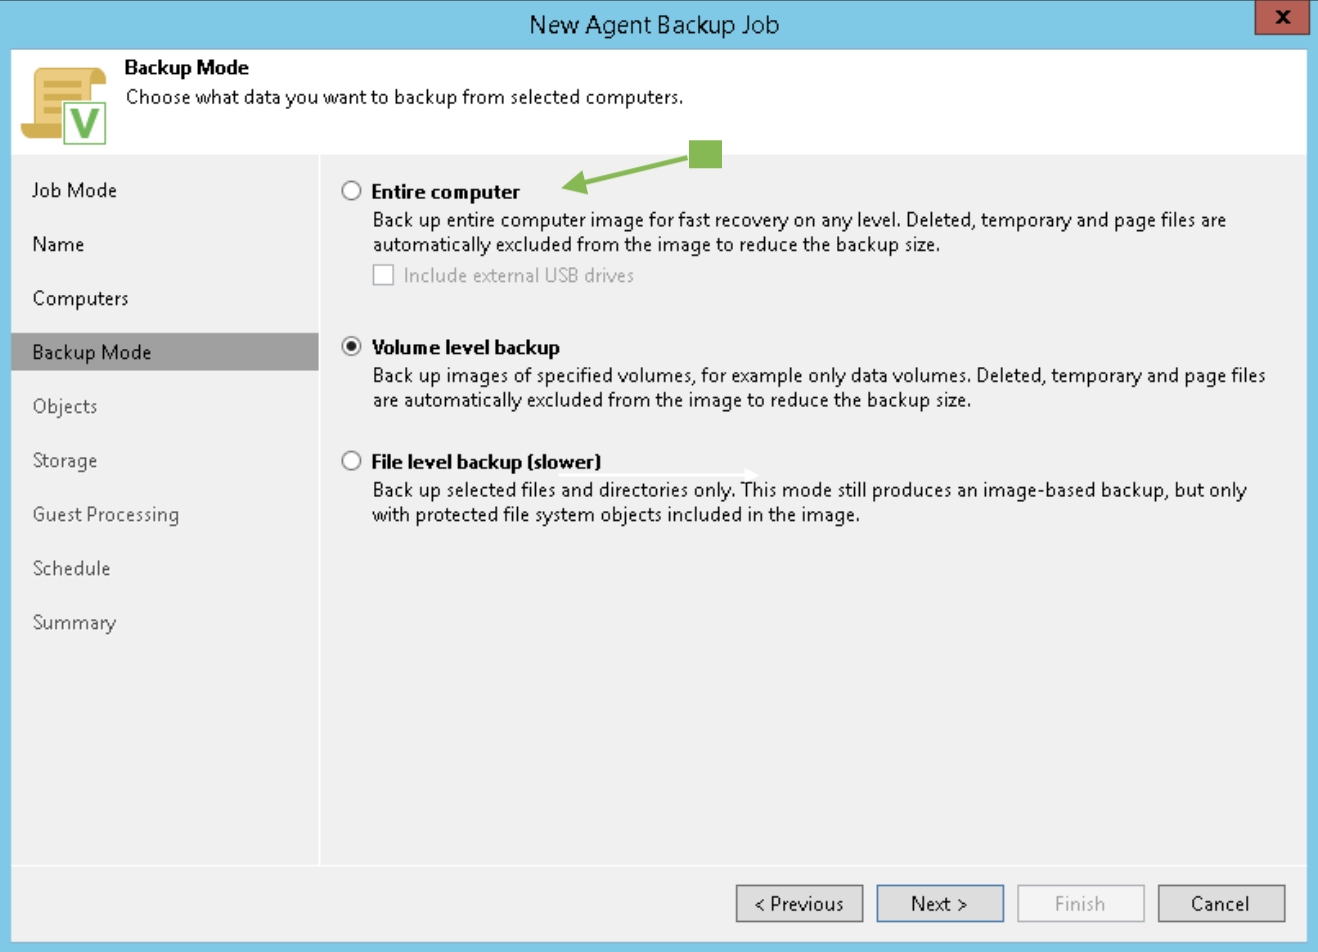
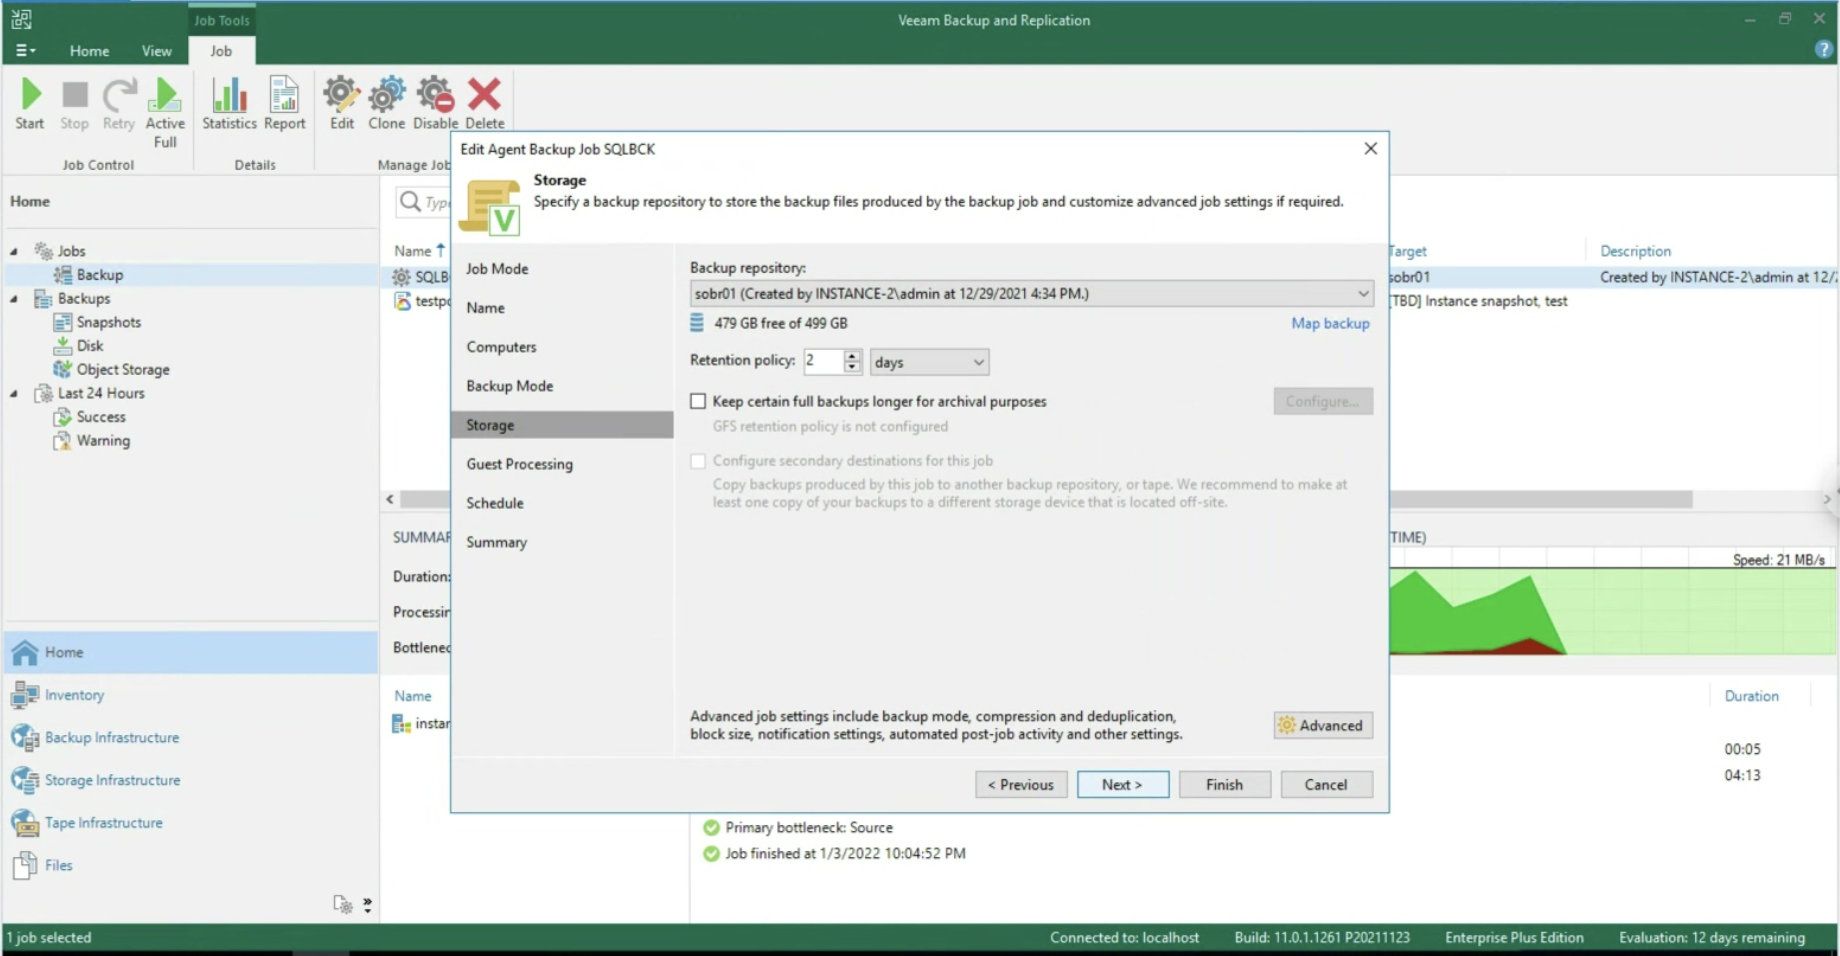
During the Wizard, select the Backup Repository (image 4) under Backup Mode, Entire Computer (image 3), and Storage.

Picture 3

Picture 4

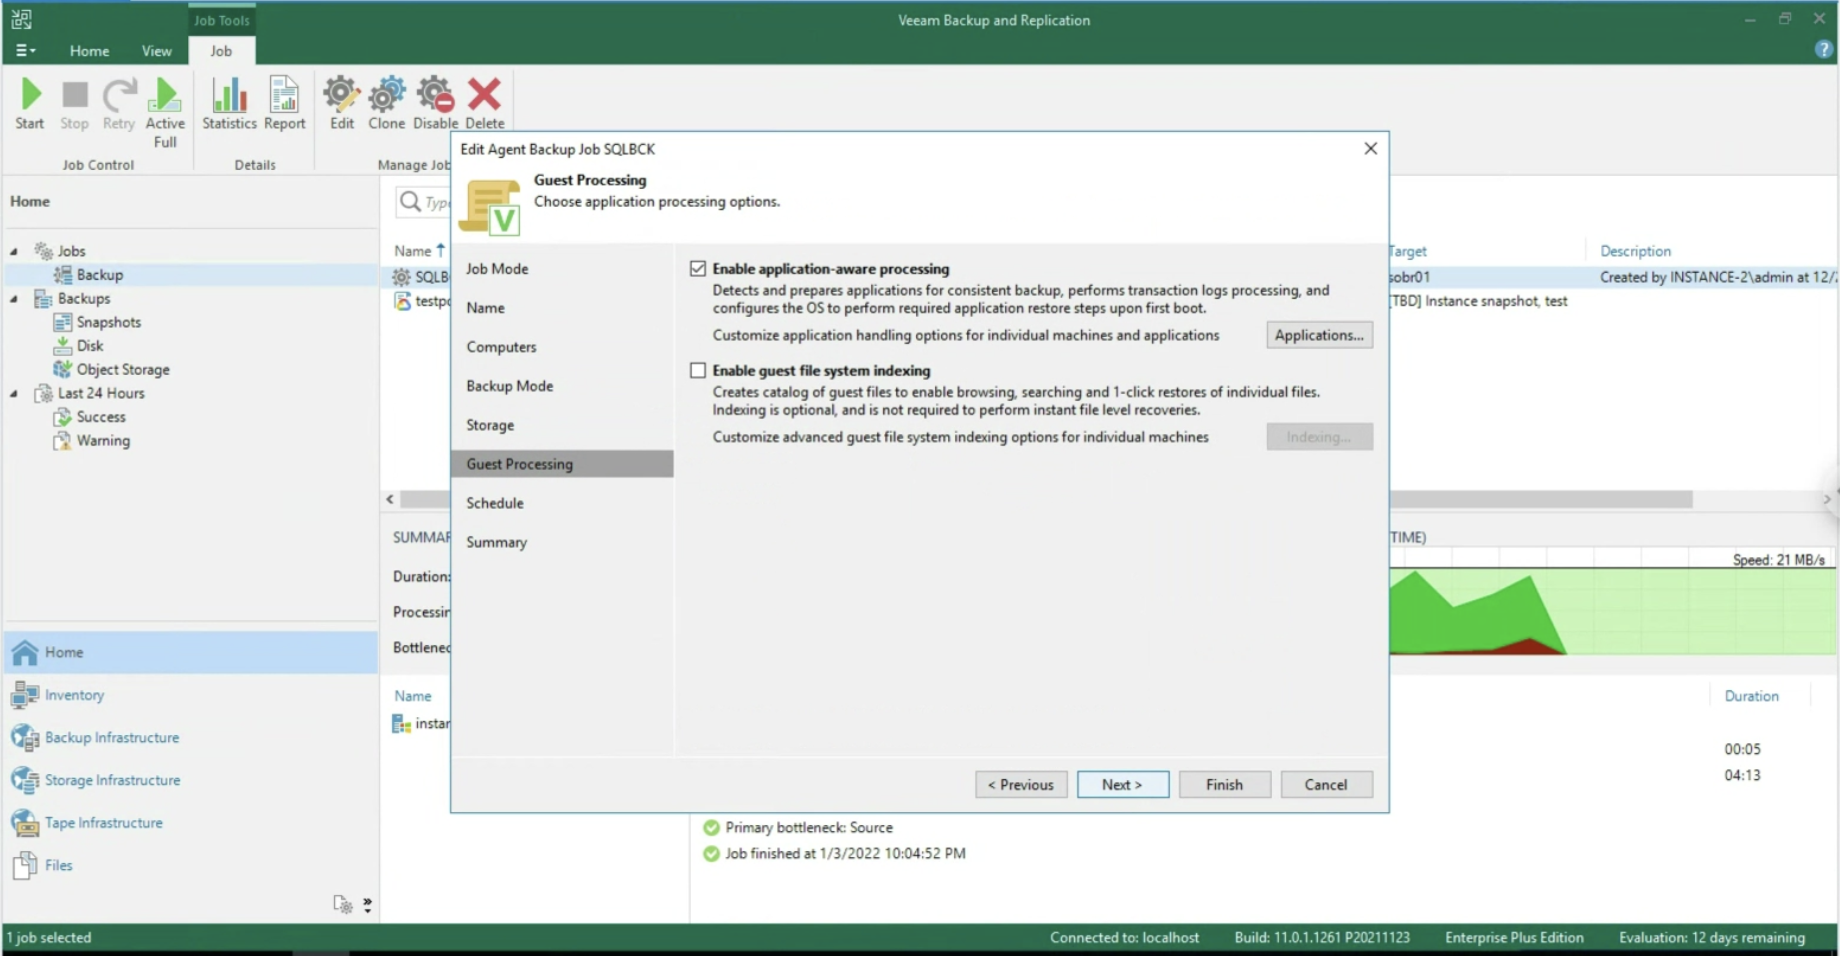
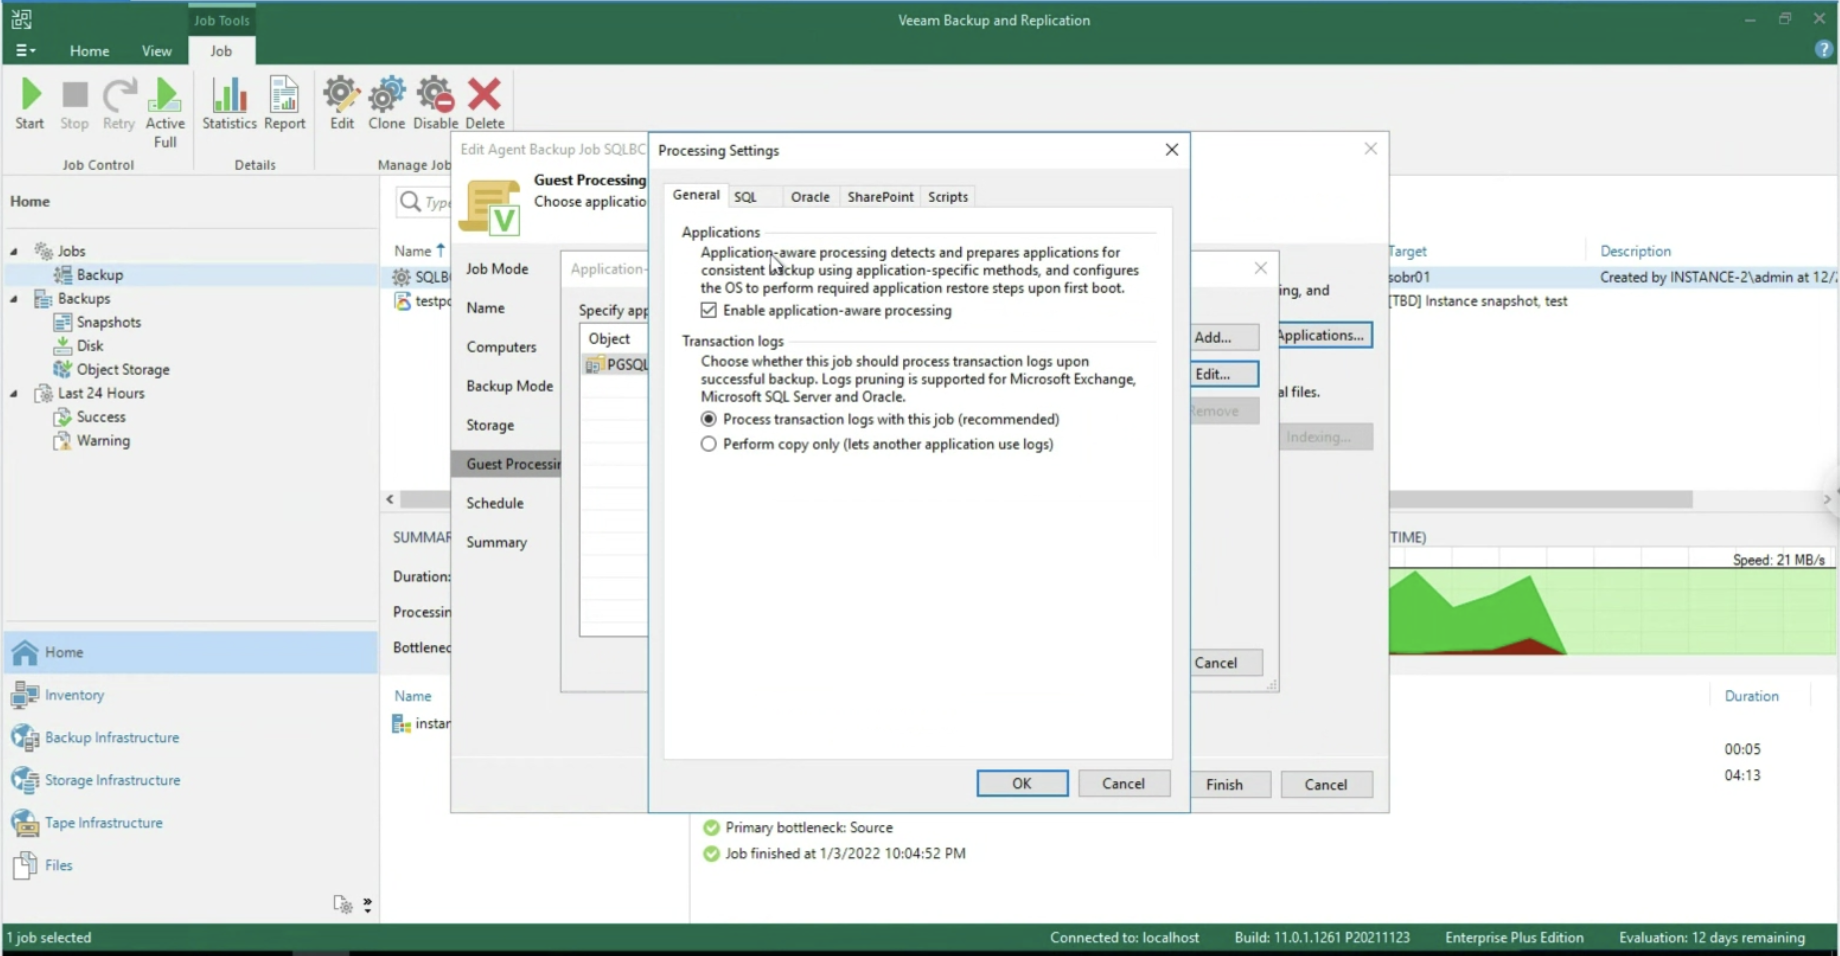
The focus of this article is managing application security (in this MS-SQL scenario).

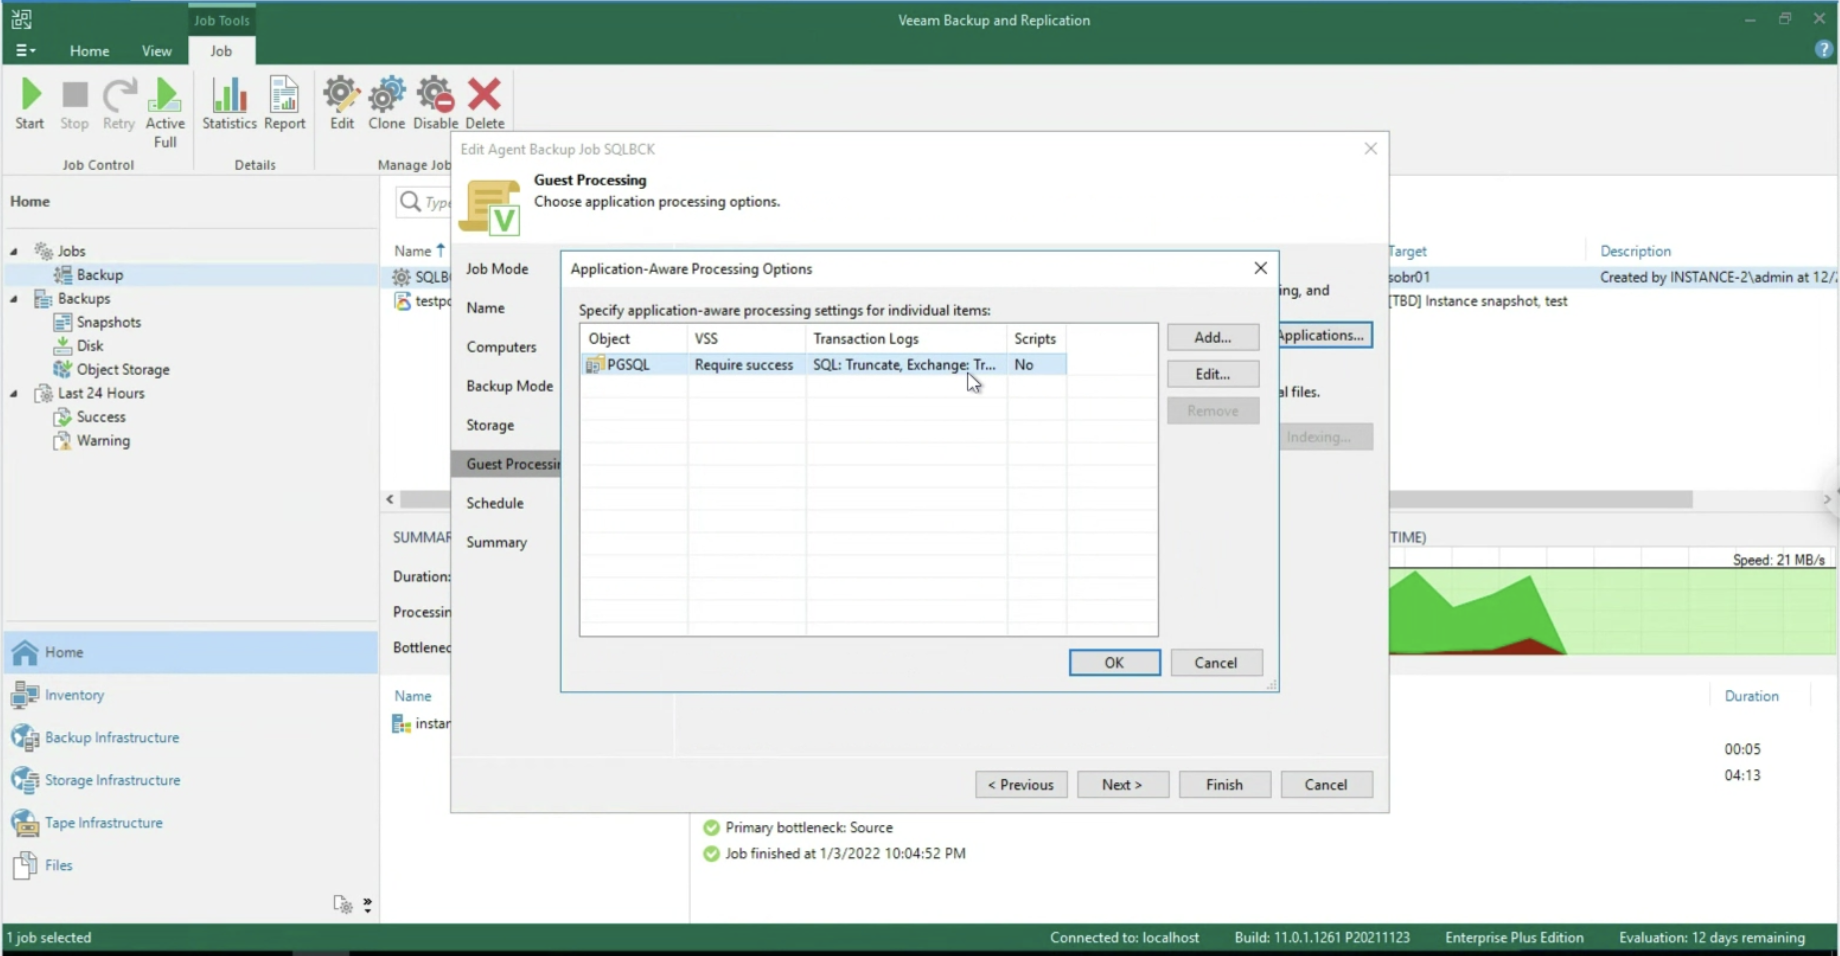
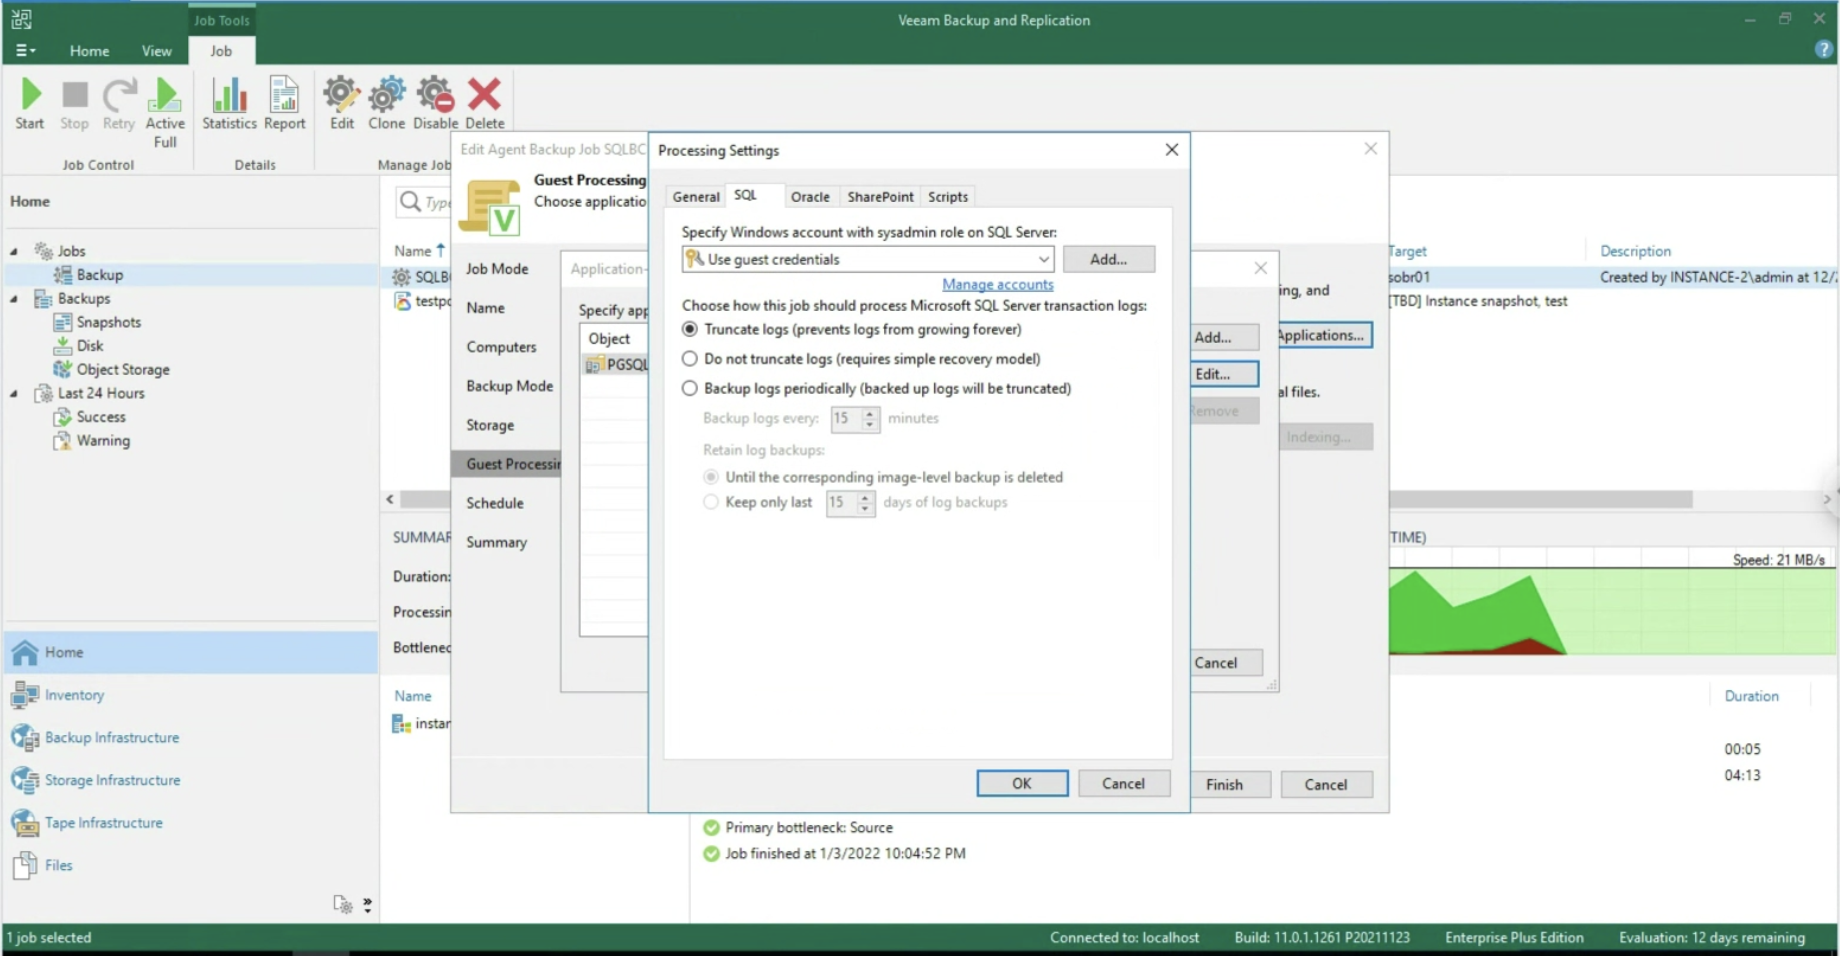
After enabling the application-aware processing (image 5), it is possible to operate at the Transaction Log level, selecting whether to delete them after each Backup operation (Trunking) or whether to backup only the T-Logs. (images 6-8).

Picture 5

Picture 6

Picture 7

Image 8

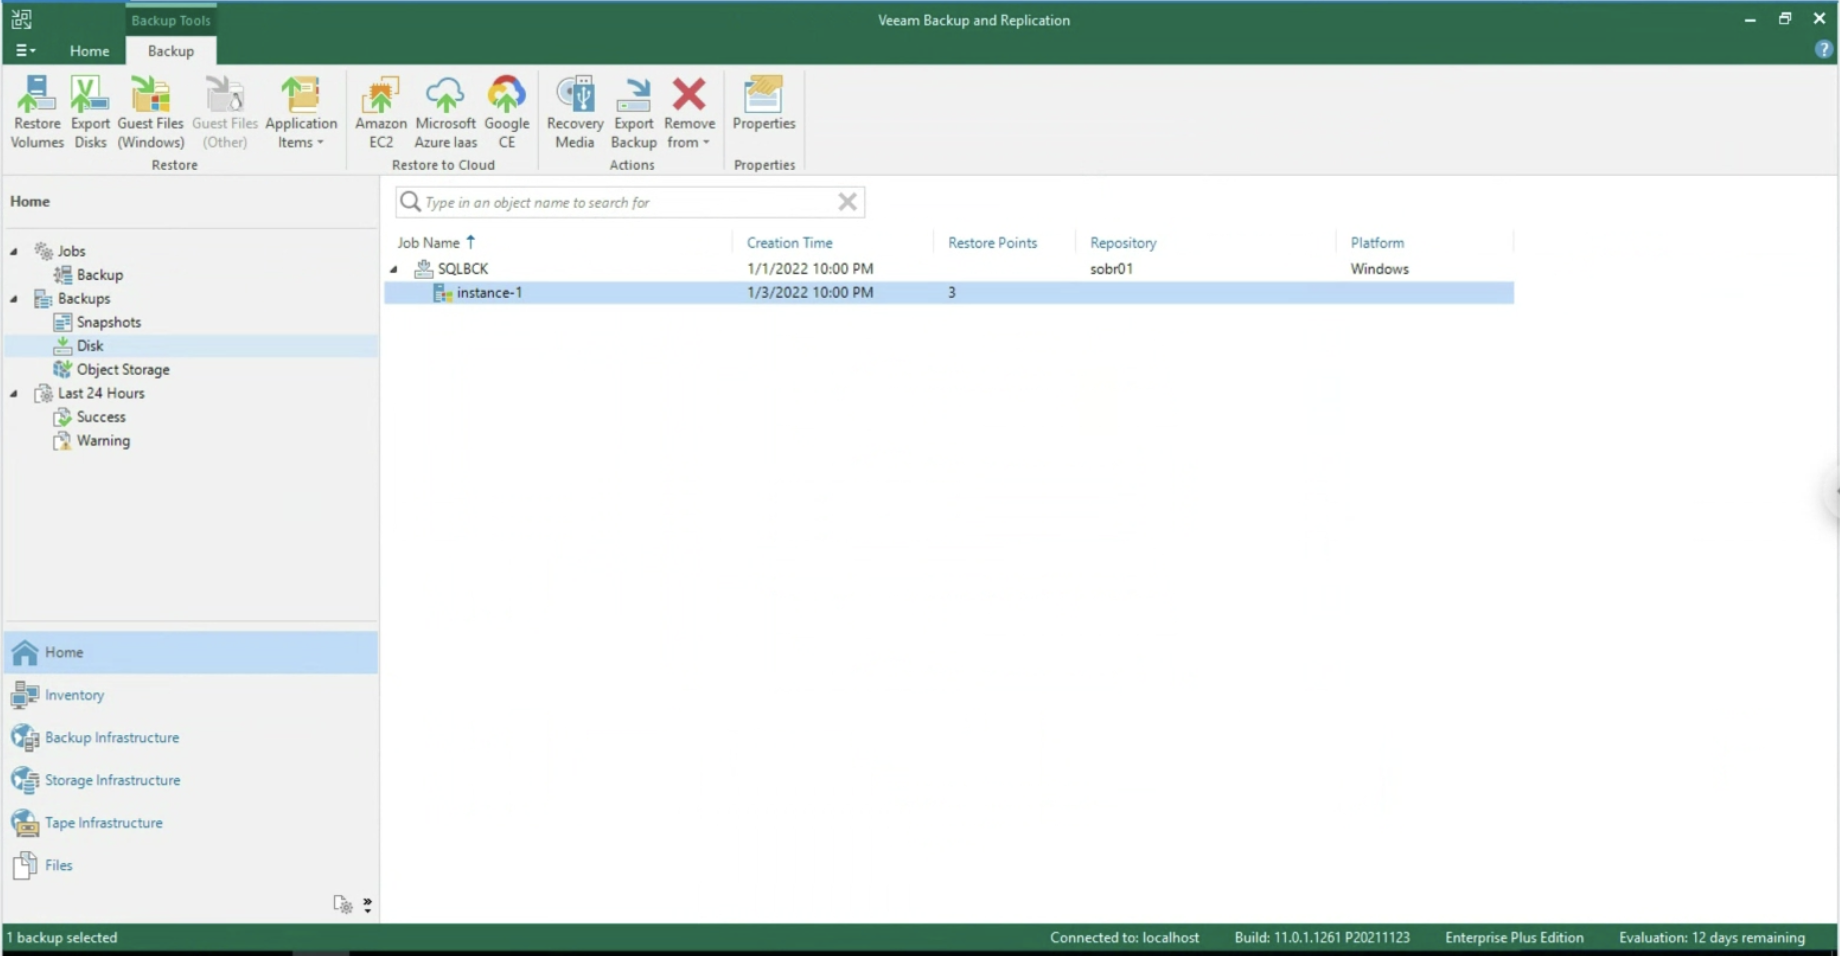
After starting the job, we check that at the Disk entry there is at least one restore point (see image 9).

Image 9

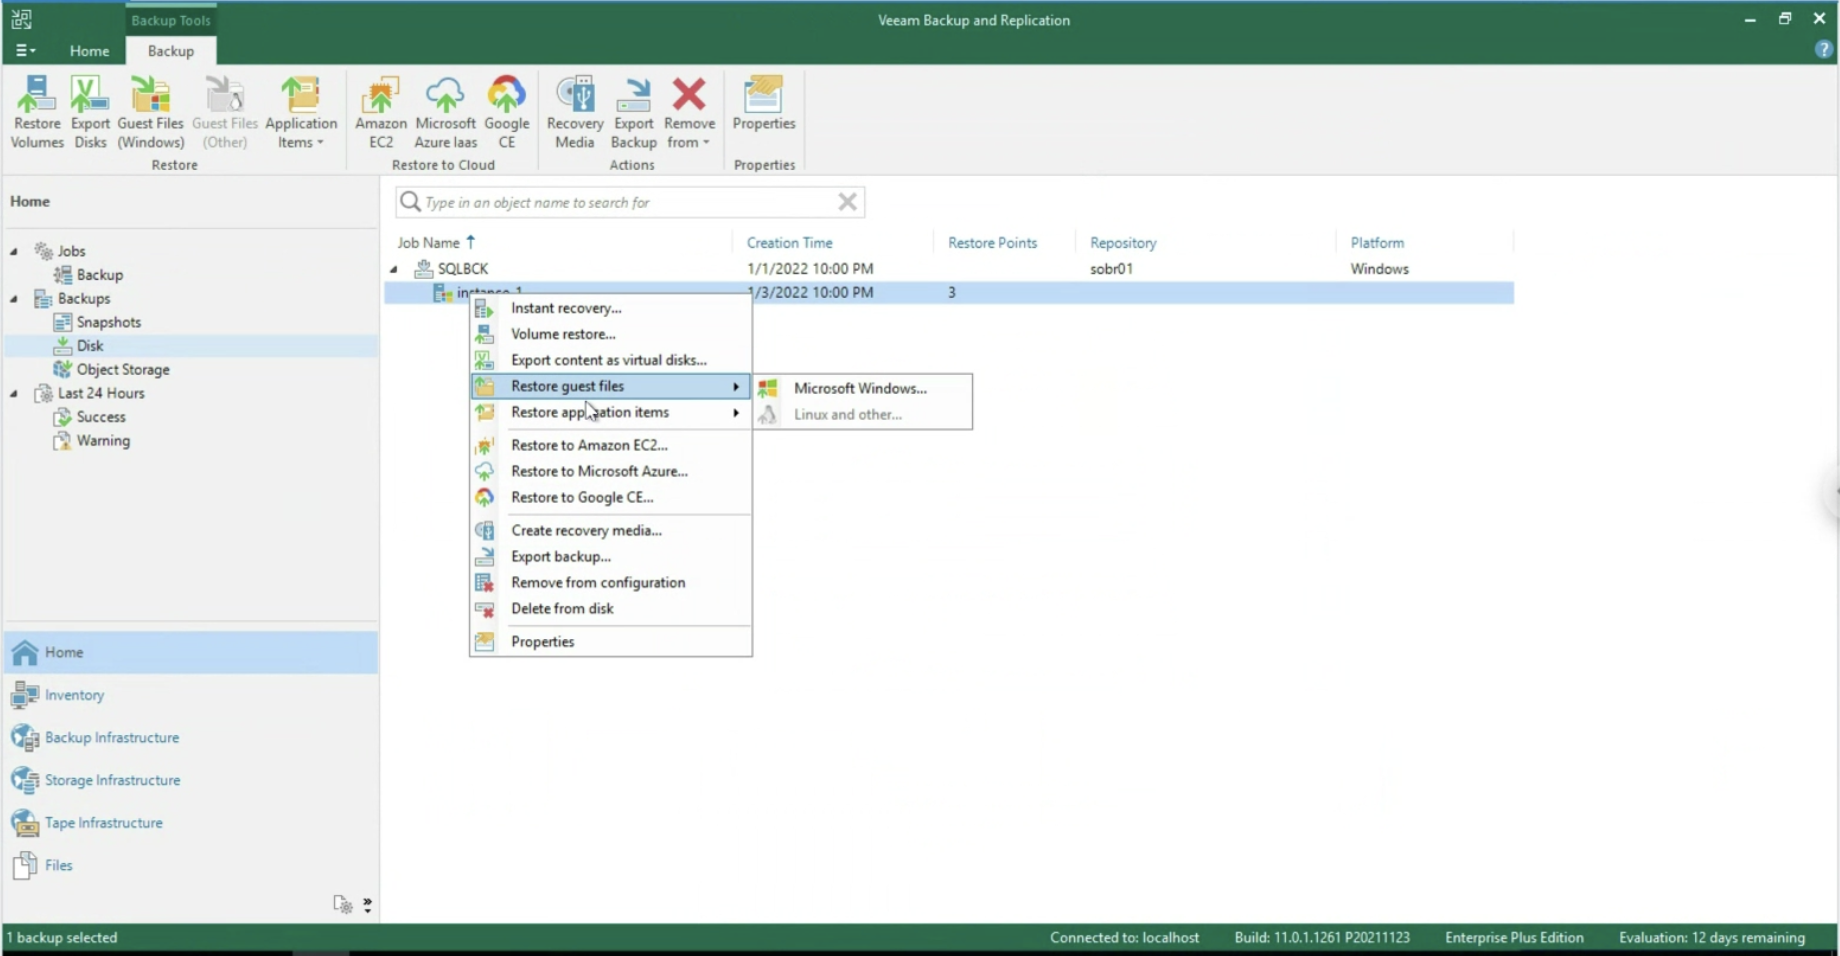
We conclude this article by explaining the recovery options of the Veeam Agent for Windows: (image 10)

  • Towards VMware & Hyper-V virtual architectures
    • Instant Recovery
    • Restoring Volumes
    • Exporting Disks (VMDK, VHD, VHDX)
  • Towards Public Cloud architectures
    • AWS
    • Azure
    • GCP
  • The creation of a Recovery Media to perform a Bare Metal Restore
  • File and Folder recovery (image 10, also available with VBGP )
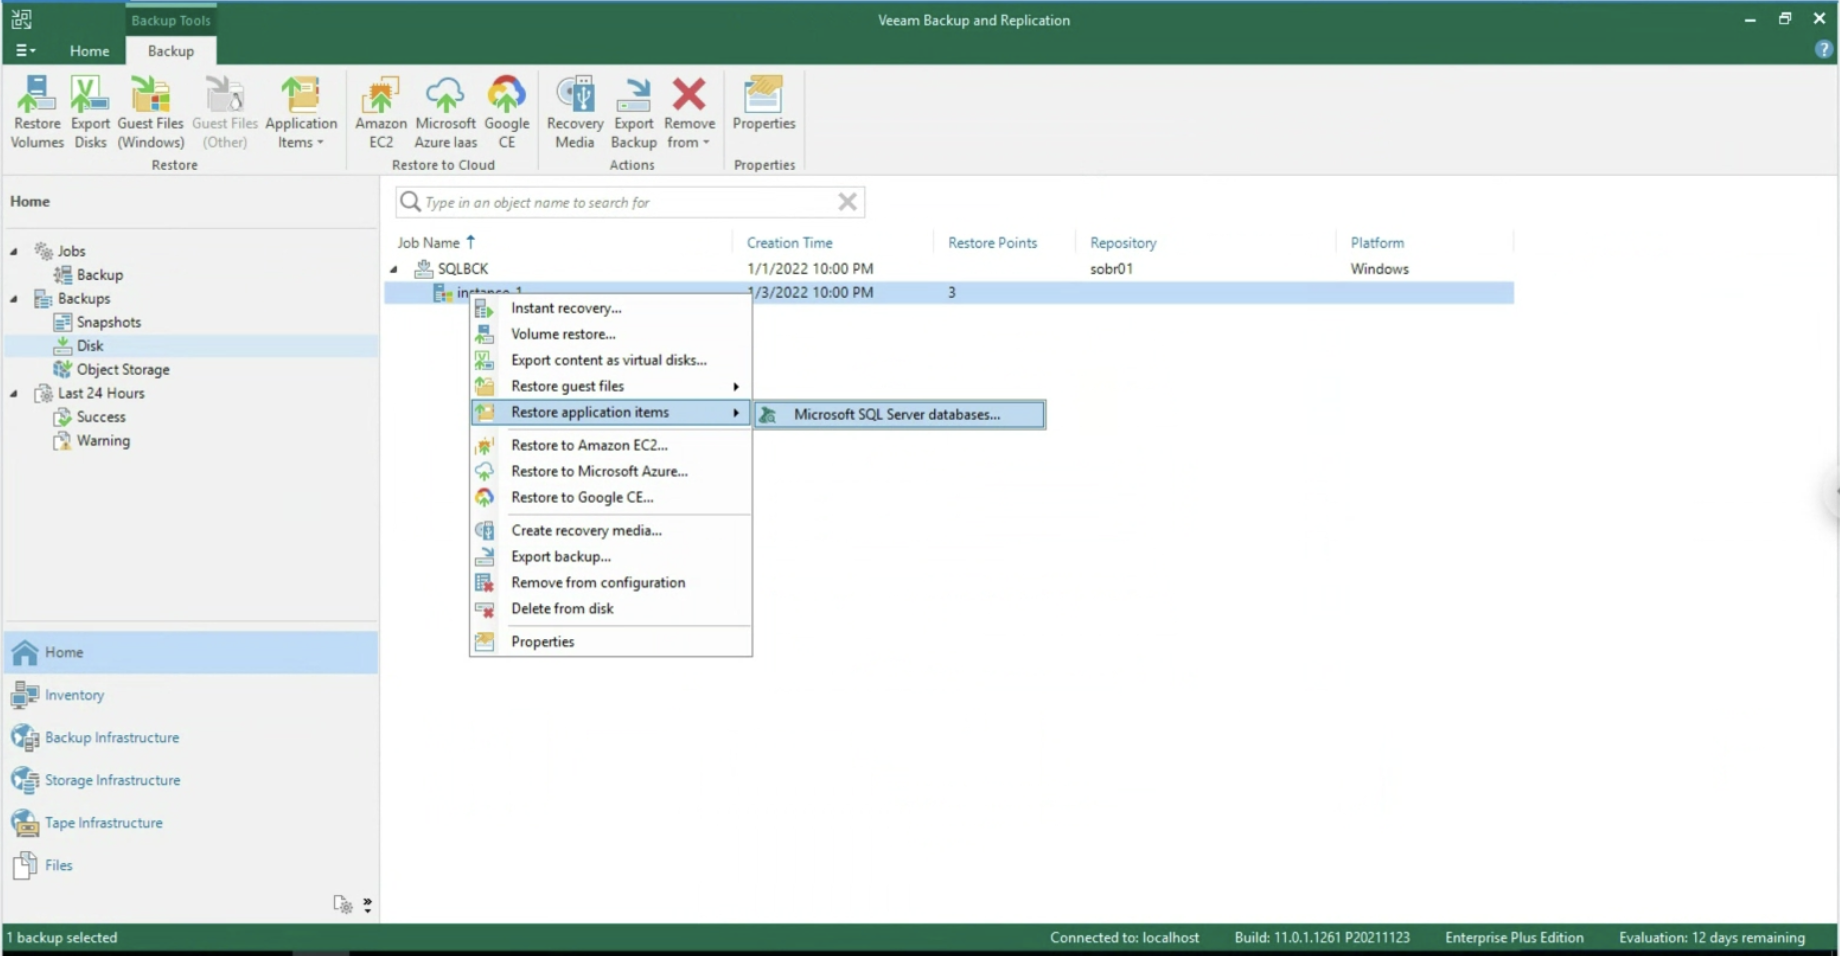
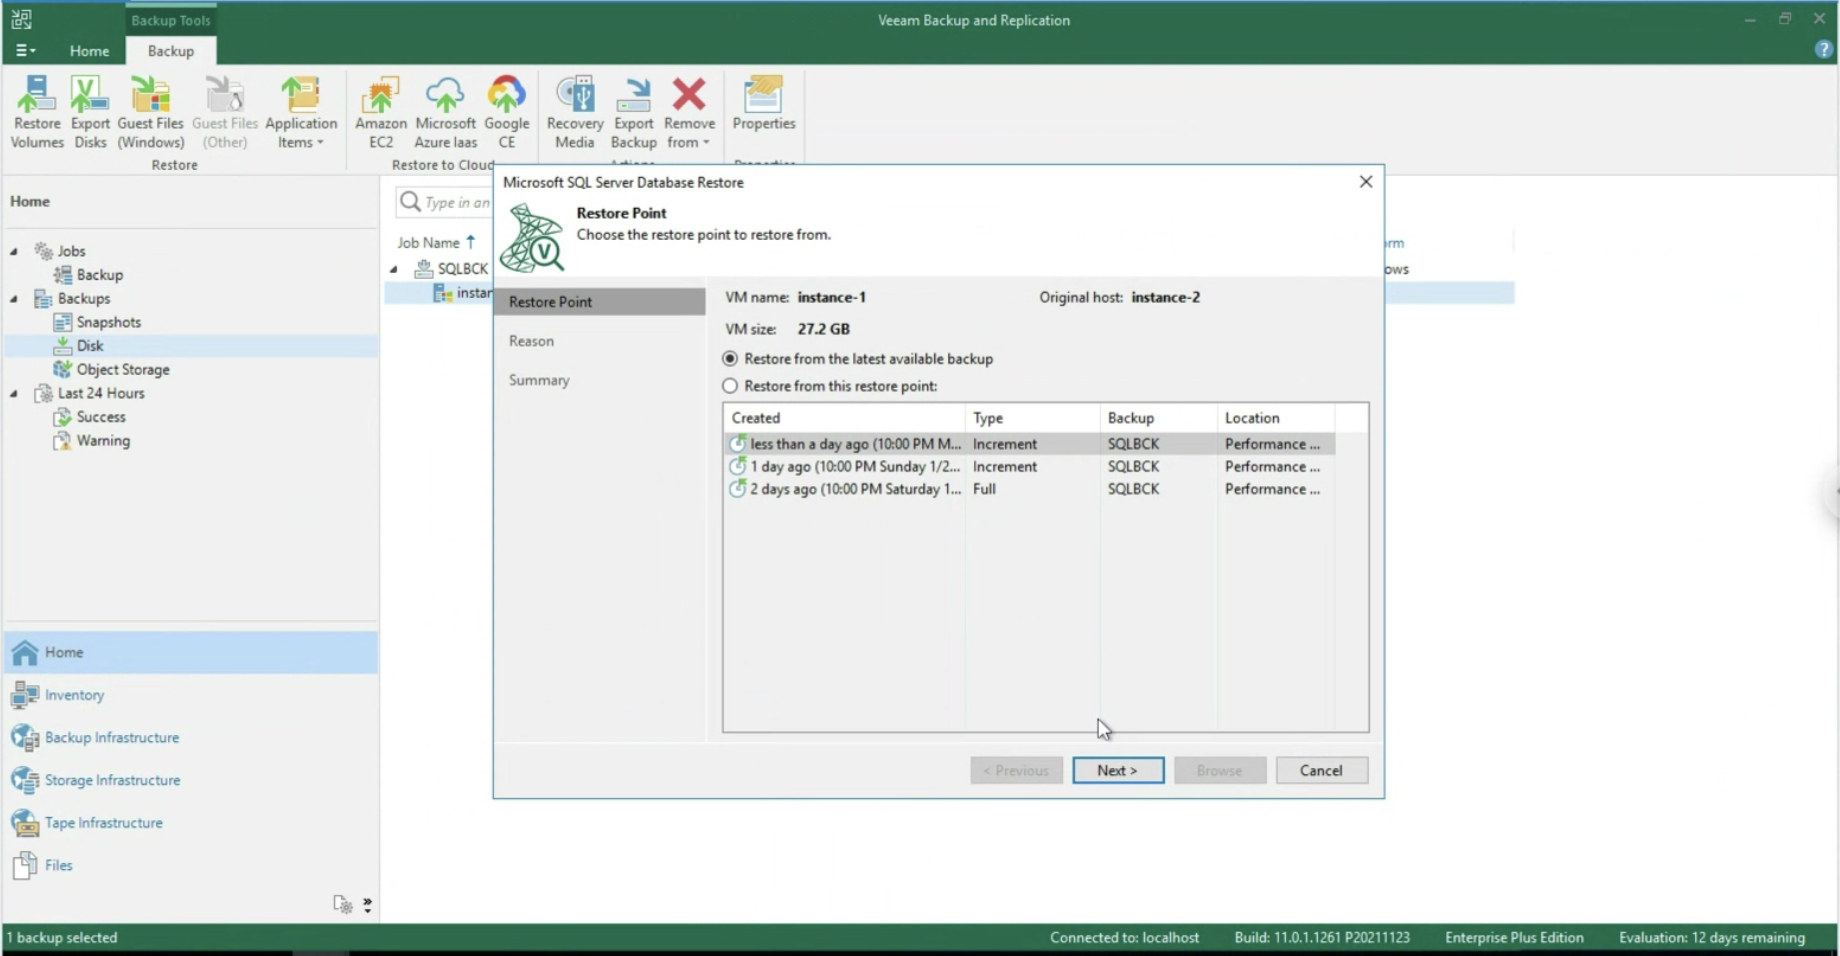
  • Application object recovery (image 11 & 12, available only via VA )

Image 10

Image 11

Image 12

All recovery options using Veeam Explorer for SQL are available at the following site .

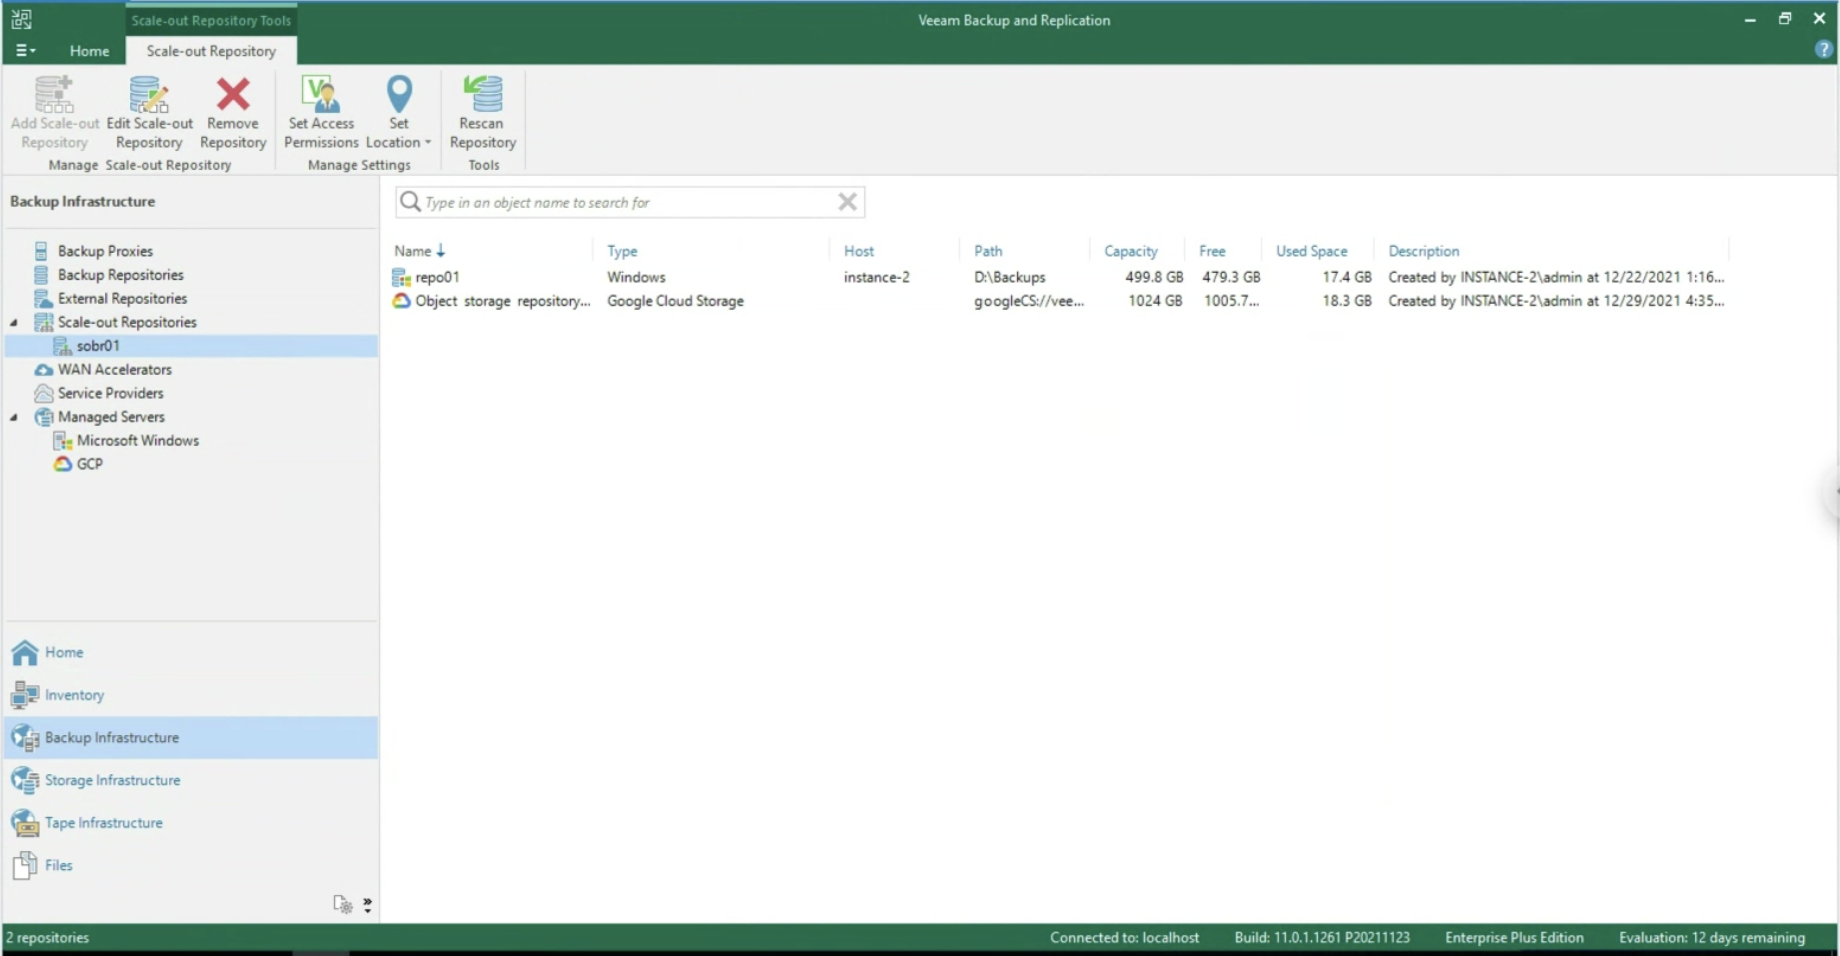
Note 5 : In the example, a Scale Out Backup Repository has been chosen which has the advantage of copying data to the Google Object Storage (see image 13). Version 12 of VBR will allow direct writing to the Object Storage

Image 13

See you soon

Veeam & Google Cloud Platform – Part 1

The first article of 2022 is dedicated to how to secure Google instances ( GCPs ).

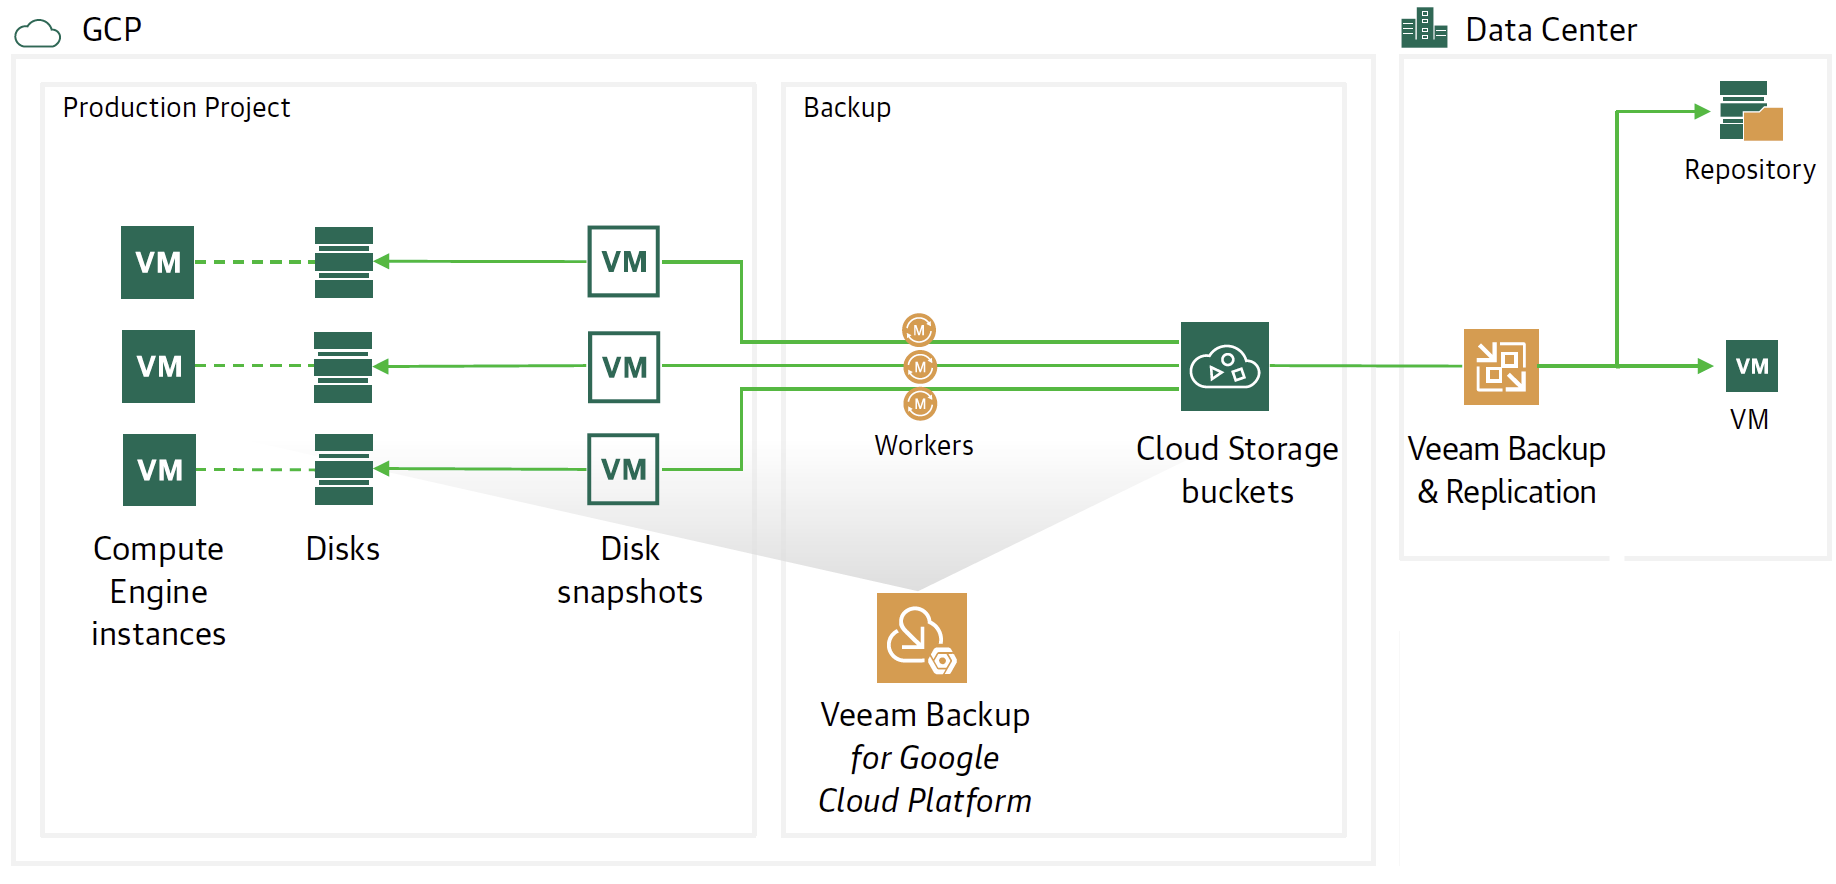
The flow and protection architecture is shown in image 1 where there are two Veeam components.

  1. The Veeam Backup for Google Platform ( VBGP ) instance is responsible for making backups and restores of GCP instances.
  2. Veeam Backup & Replication ( VBR ) has the responsibility to centrally manage the movement of Backup data to and from the cloud (Data Mobility).

Picture 1

  • Note 1 : VBGP can be installed in stand-alone mode or using the VBR wizard.
  • Note 2: This article will show how to hook a VBGP instance already present in GCP from VBR.

Let’s see the steps in detail:

From the VBR console, we choose the Backup Infrastructure item.

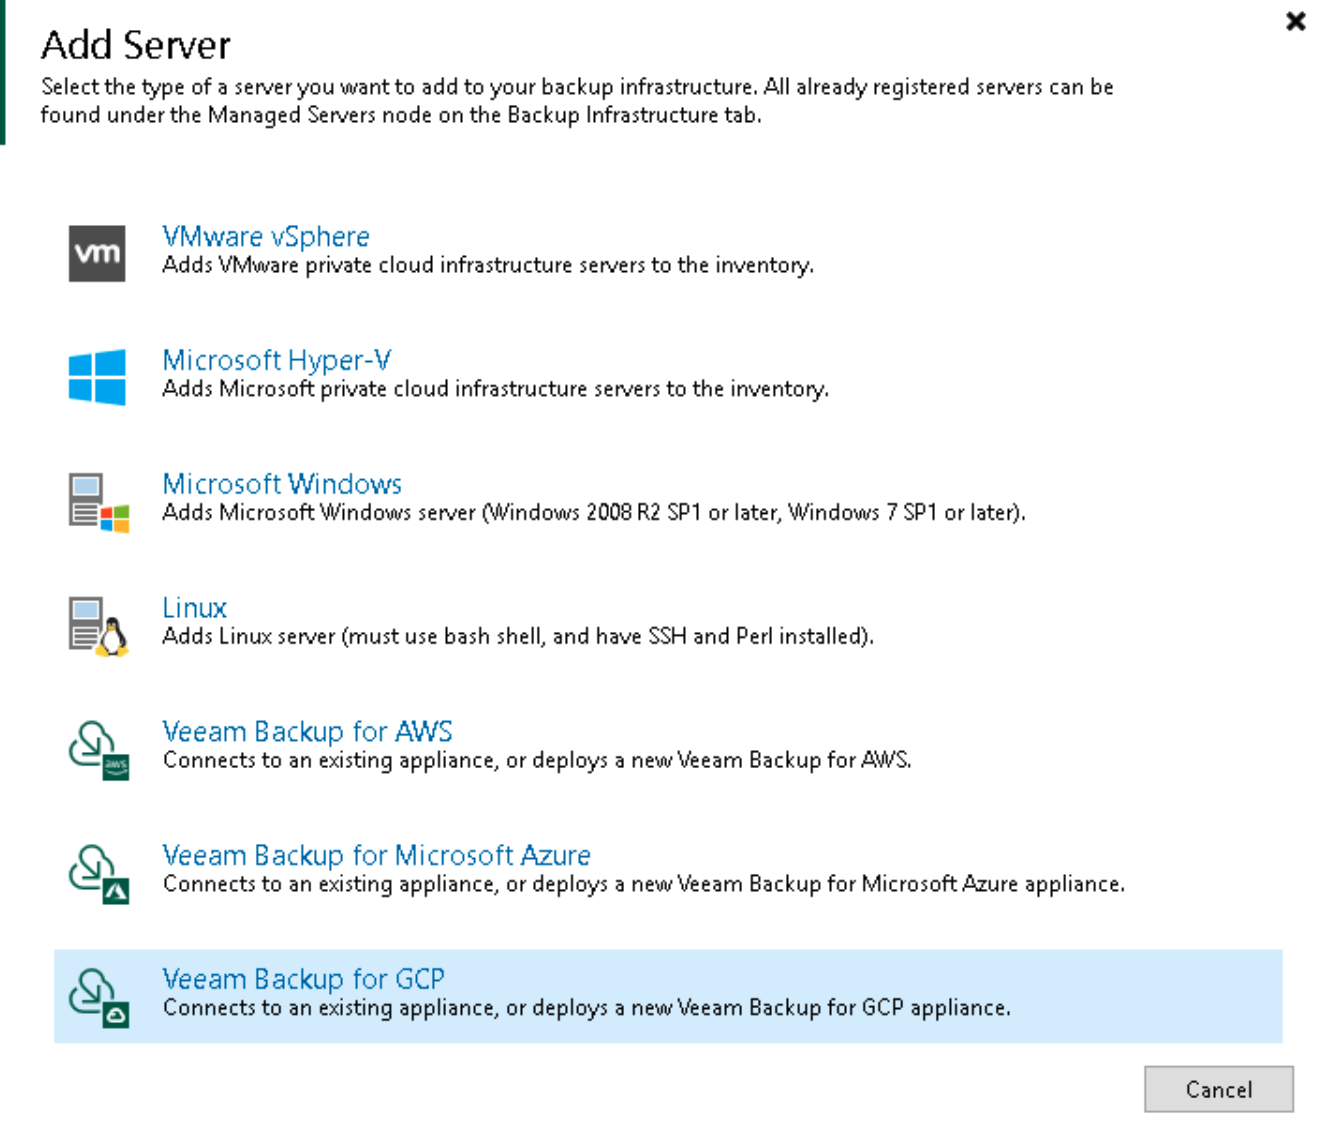
By clicking with the right mouse button, select add server and then Google Cloud Platform (see image 2)

picture 2

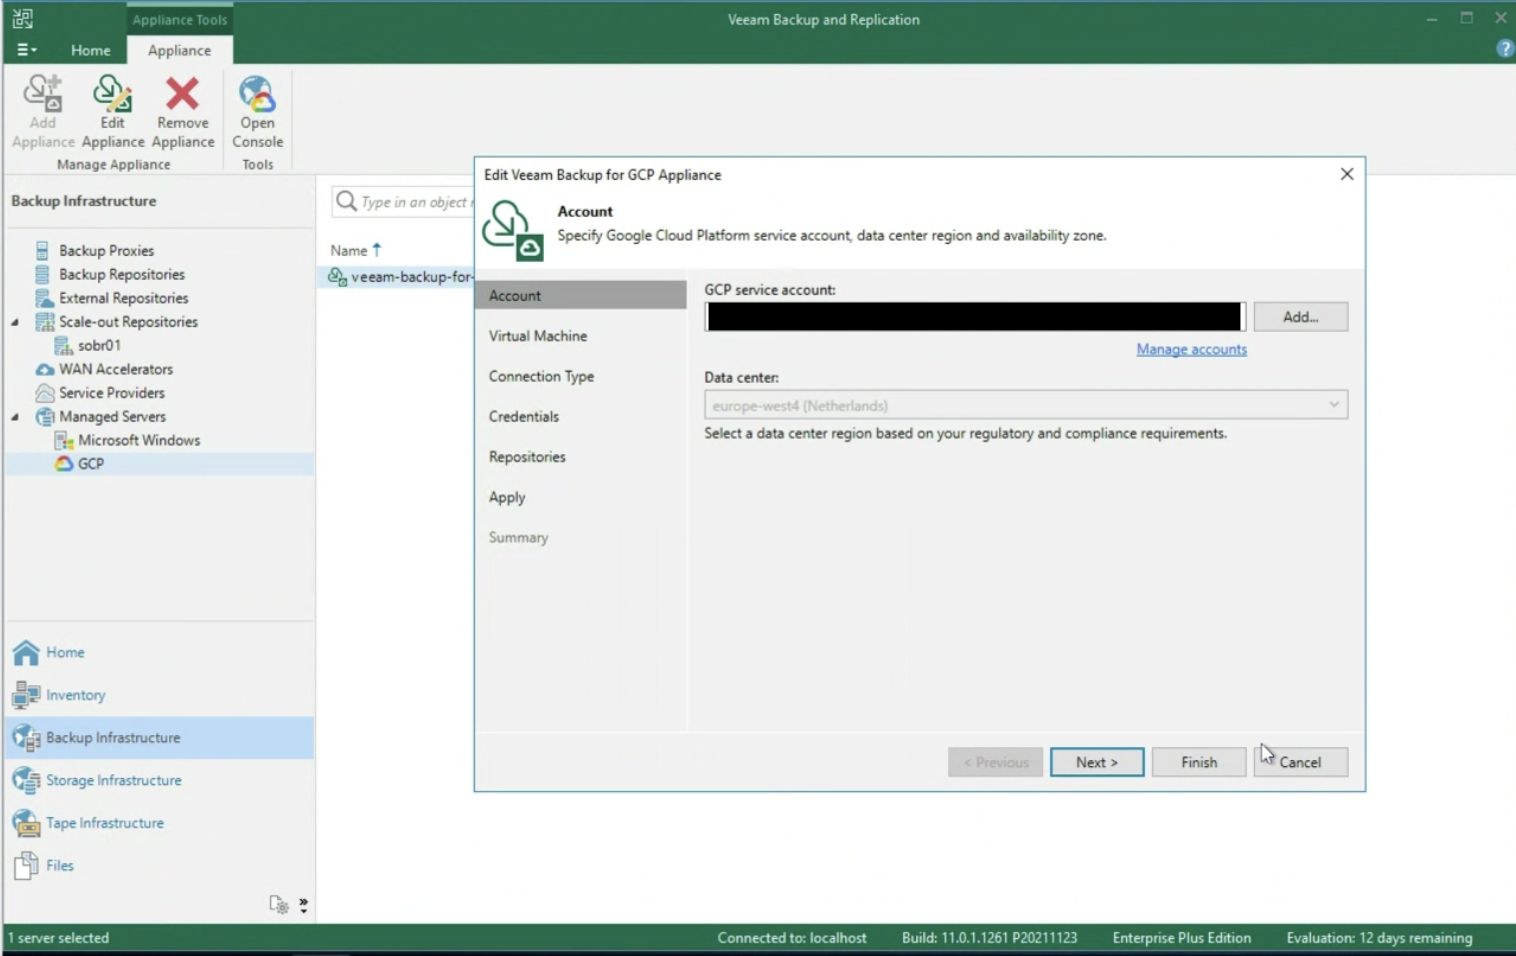
The next step is to enter the login credentials to the Google Service Account (image 3)

Picture 3

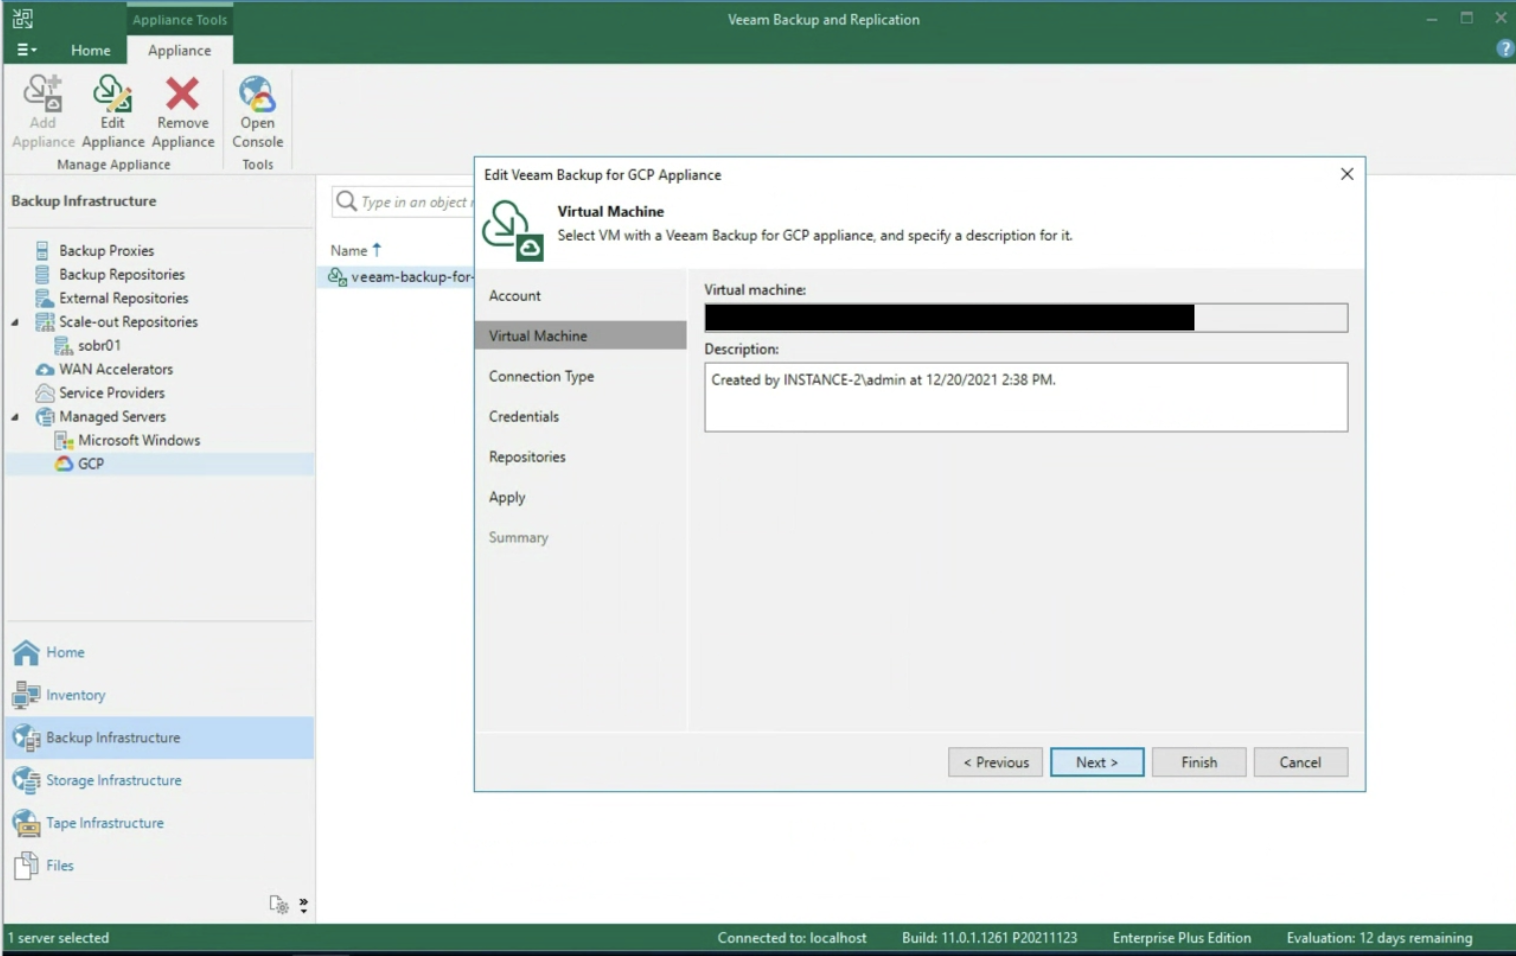
The wizard continues asking you to enter the name of the VBGP server already created (image 4)

Picture 4

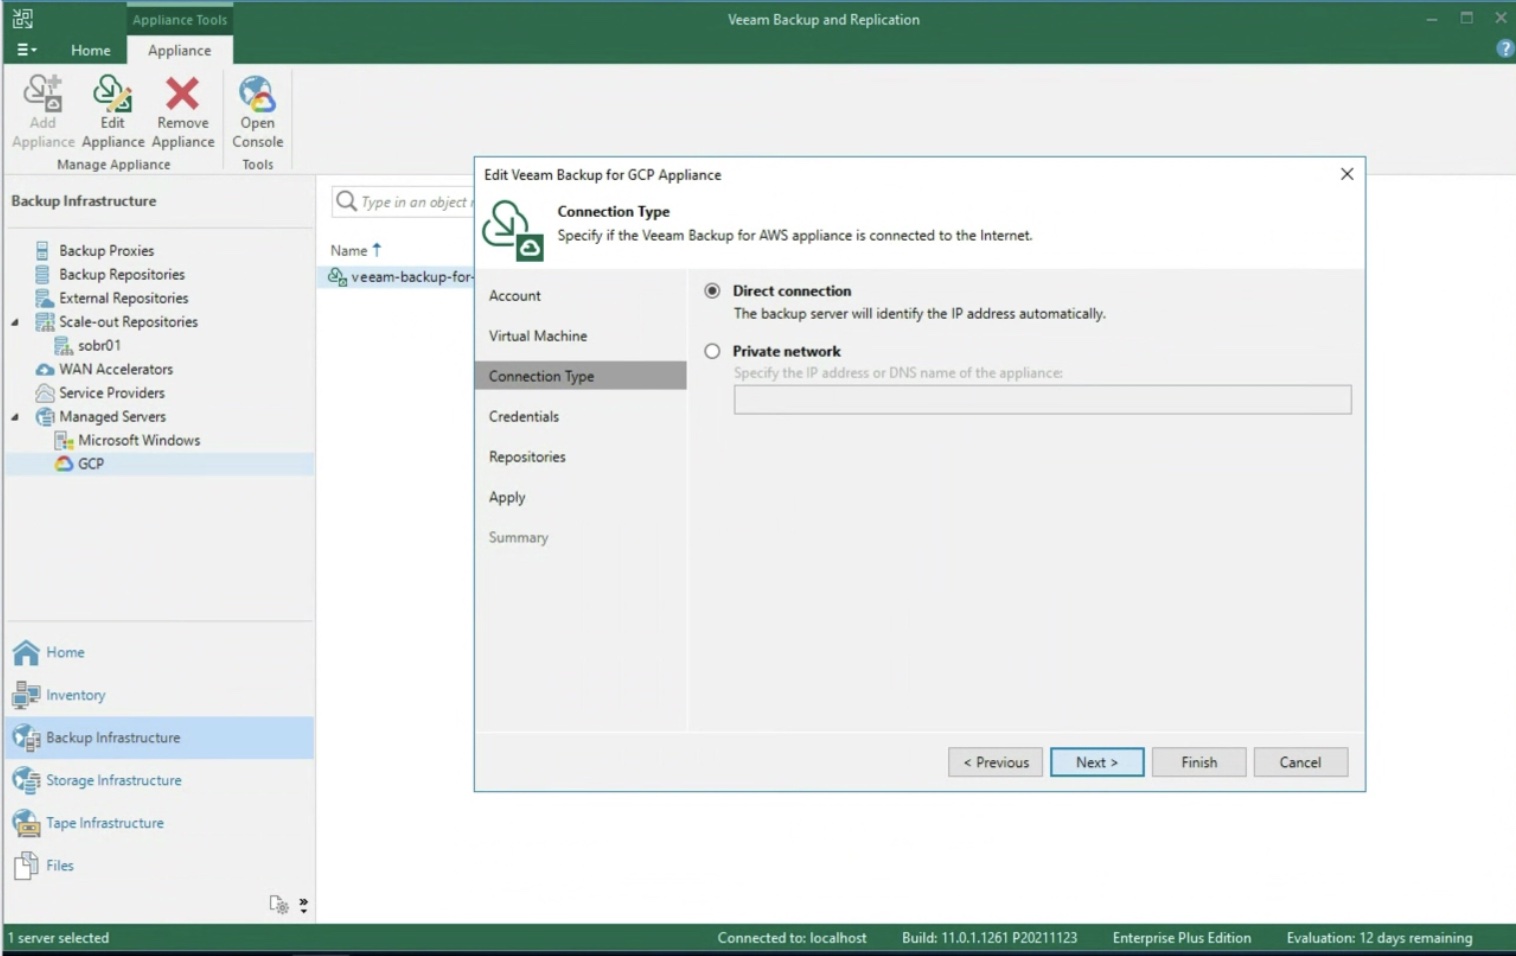
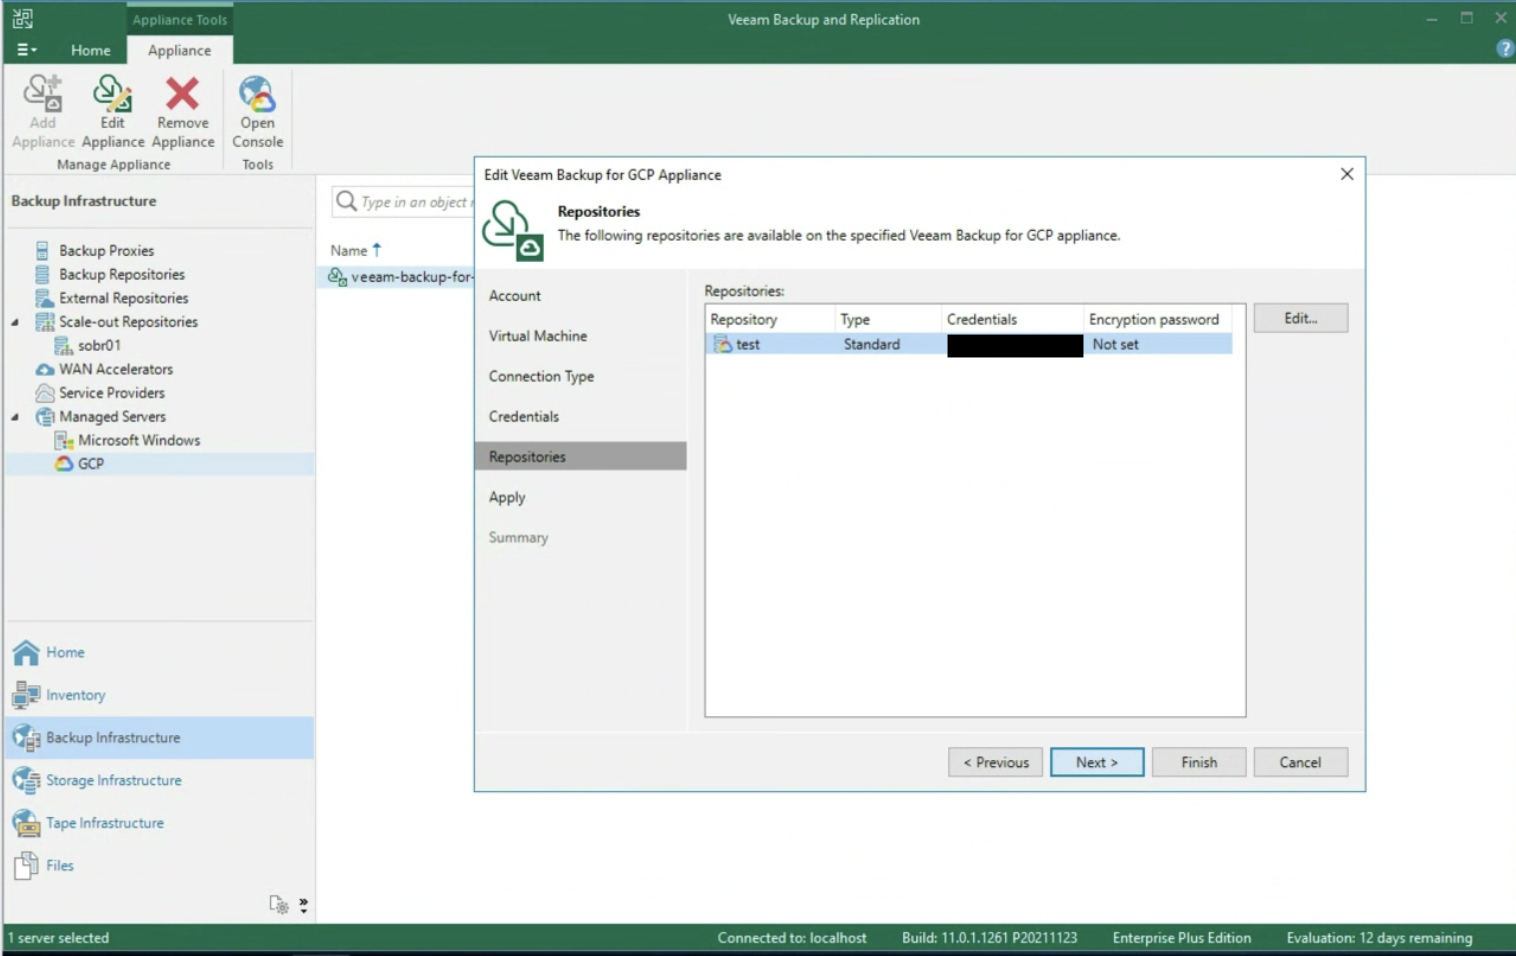
After selecting the type of network present (image 5), the next step is to enter the credentials to access the Repository (image 6).

Remember that the best protection practice is to back up the instance as a snapshot, then pour the snapshot into Google’s Cloud Object Storage.

Thus the 3-2-1 rule is respected, i.e. having 3 copies of data (Production + Snapshot + Object Storage) on two different media (Primary Storage + Object Storage) with an offsite copy (Object storage should belong to another region).

Picture 5

Picture 6

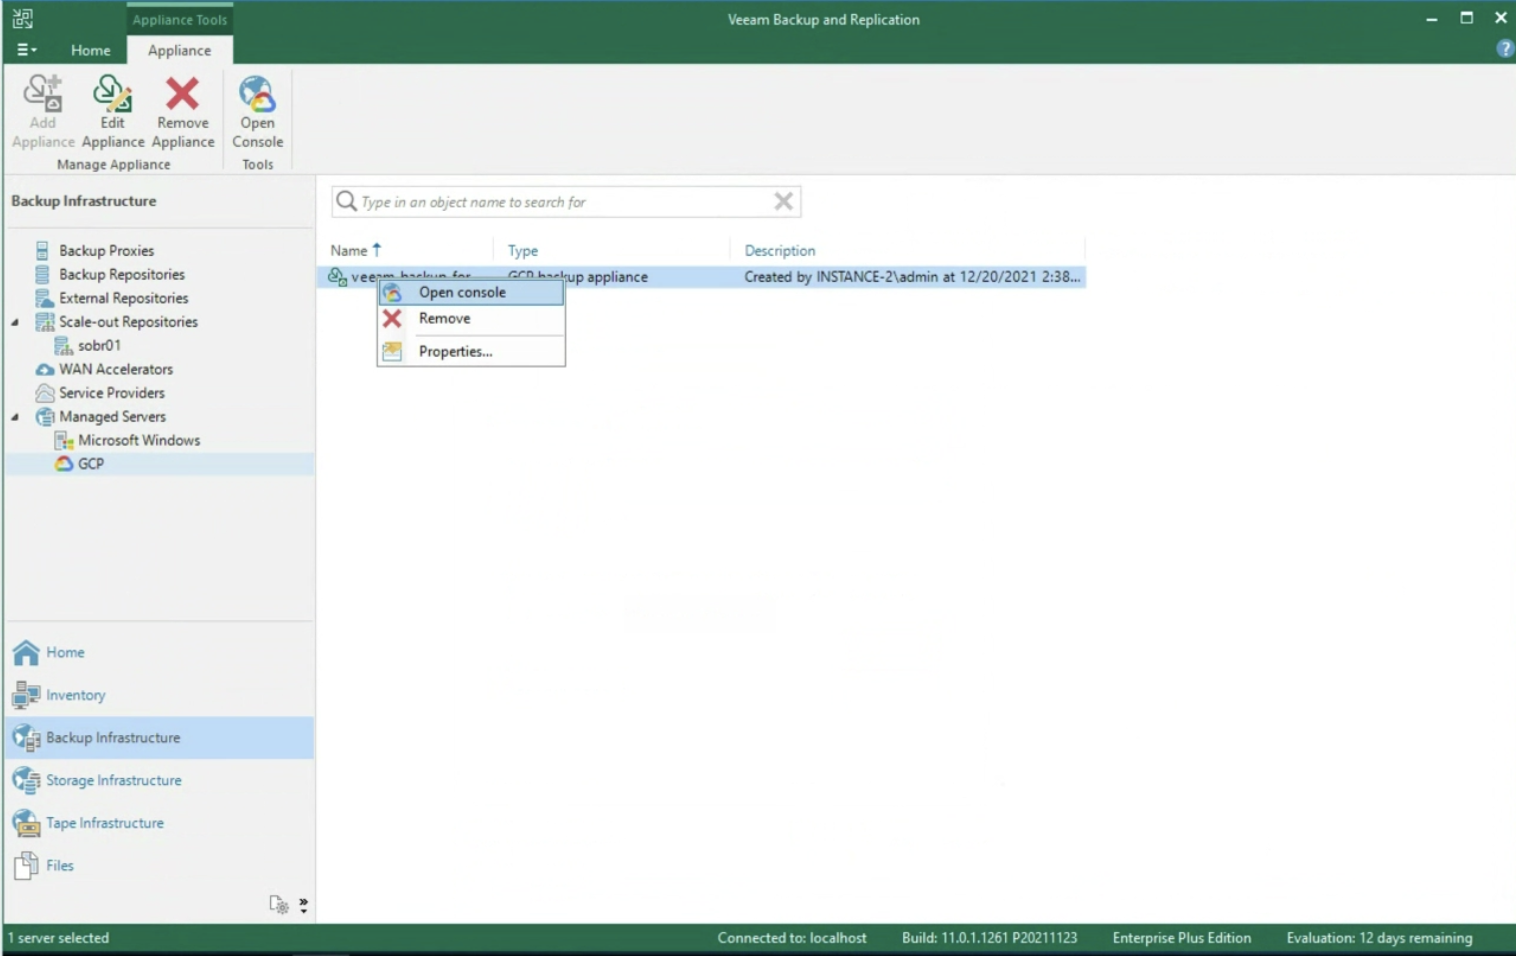
Once the wizard is finished, still from the VBR console we can connect to the console to the VBGP server (image 7) to start creating protection policies.

Picture 7

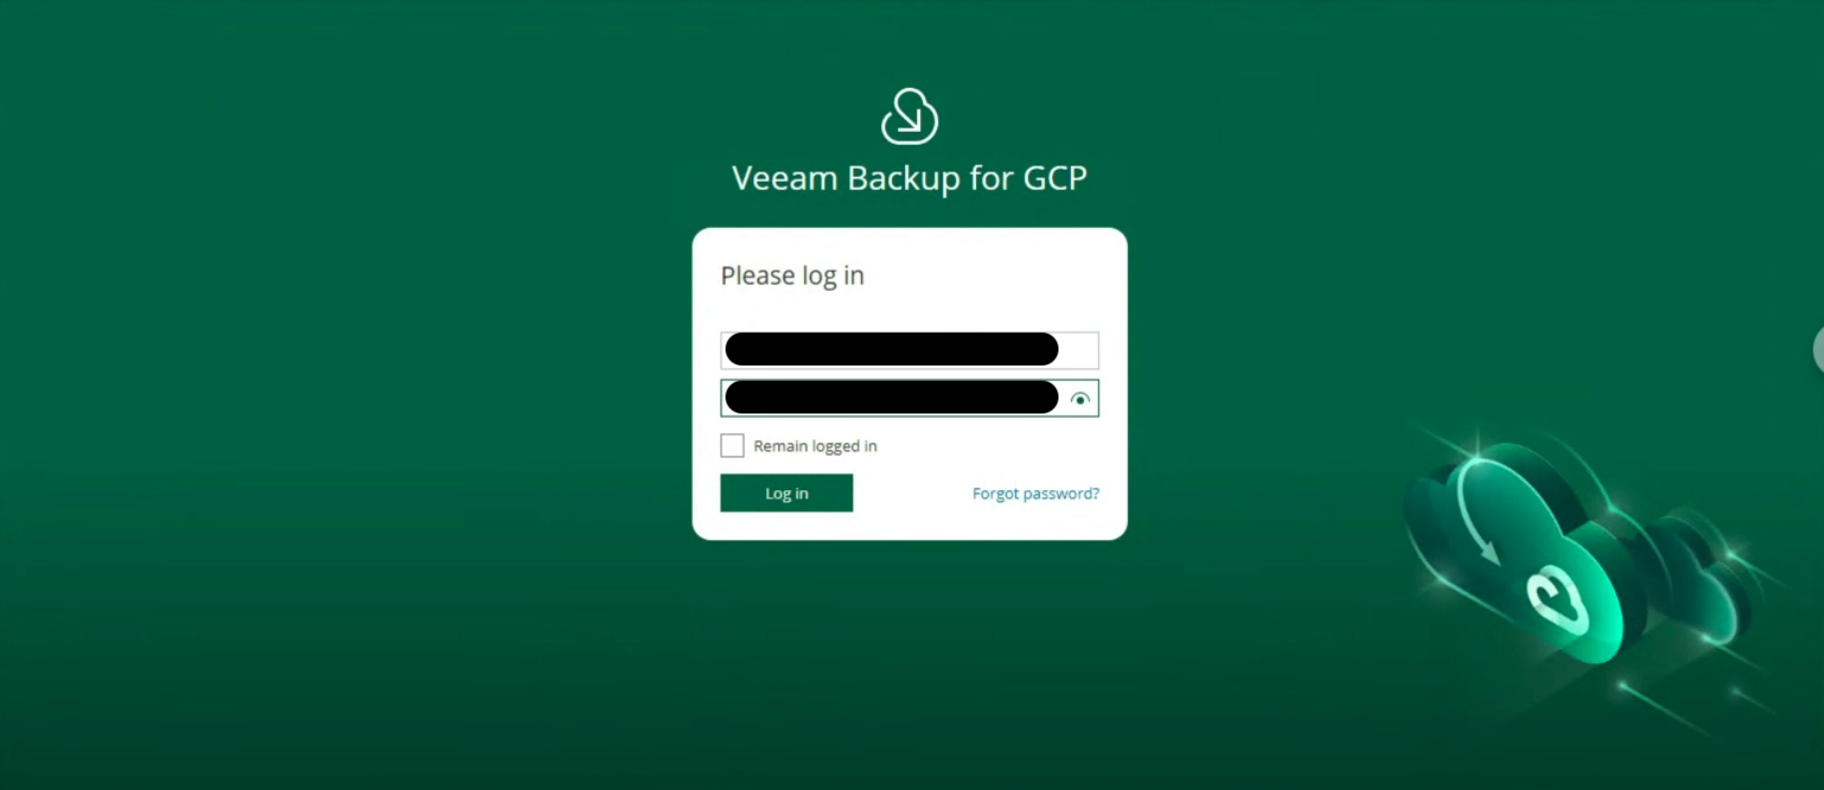
After entering the login credentials (image 8)

Image 8

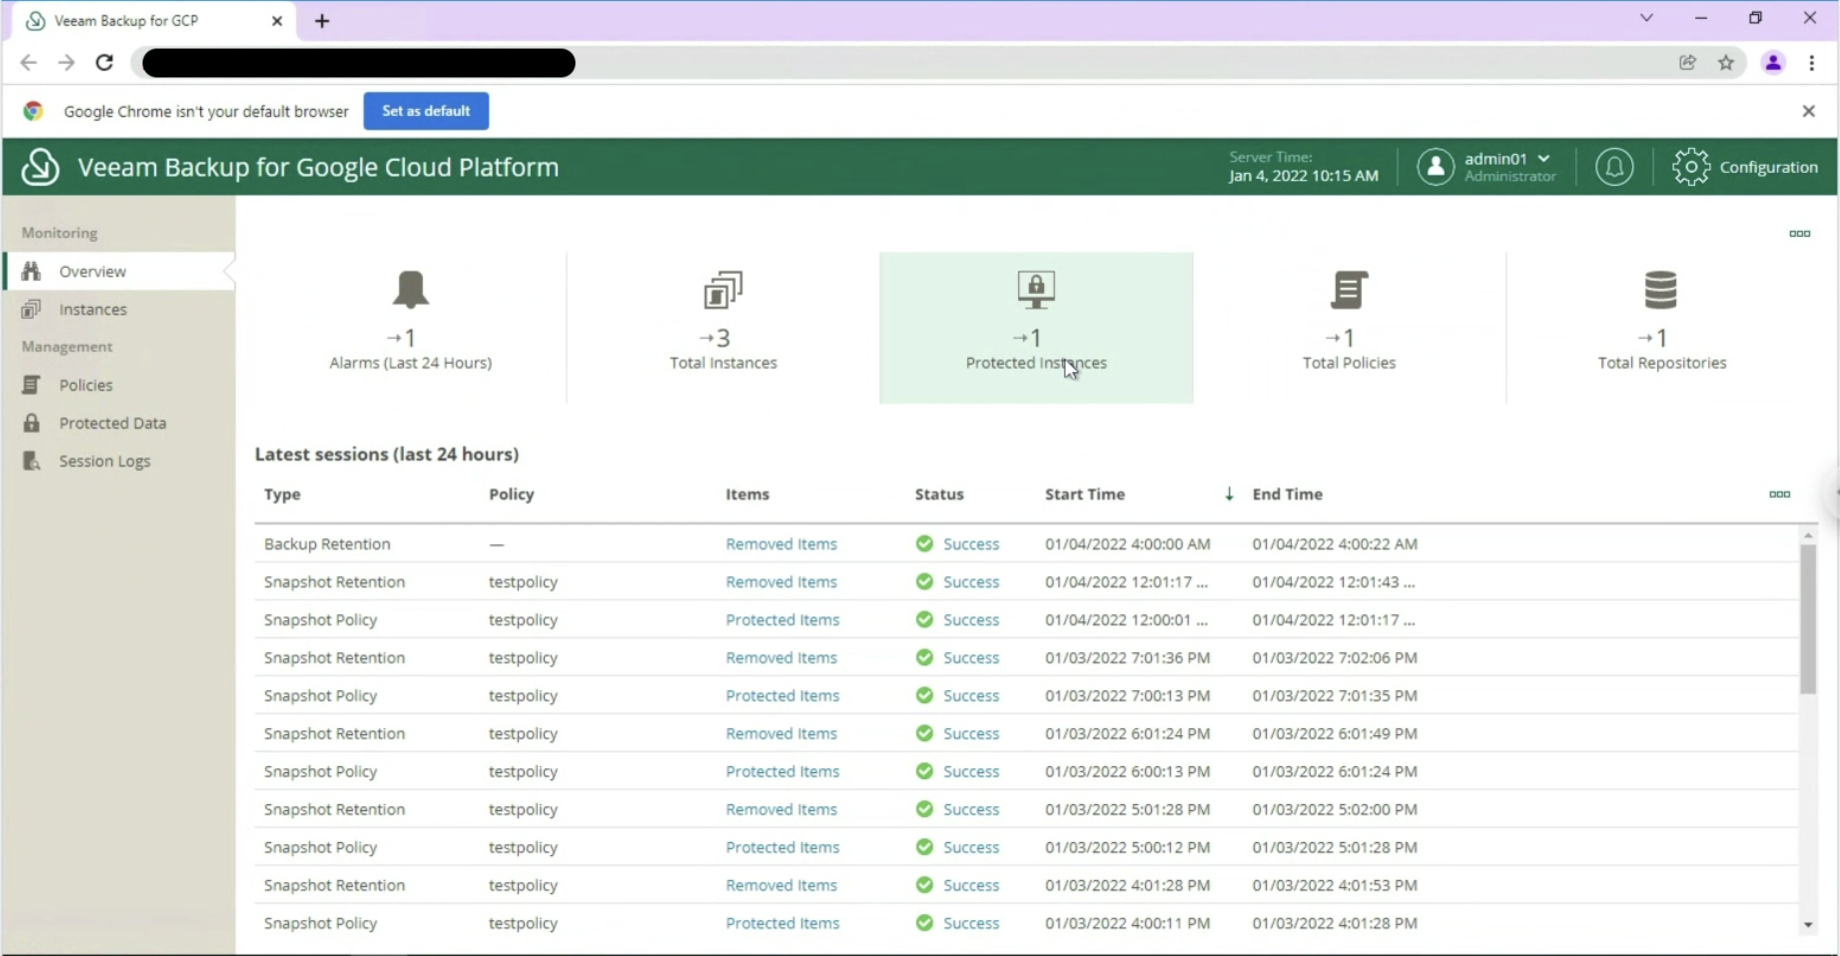
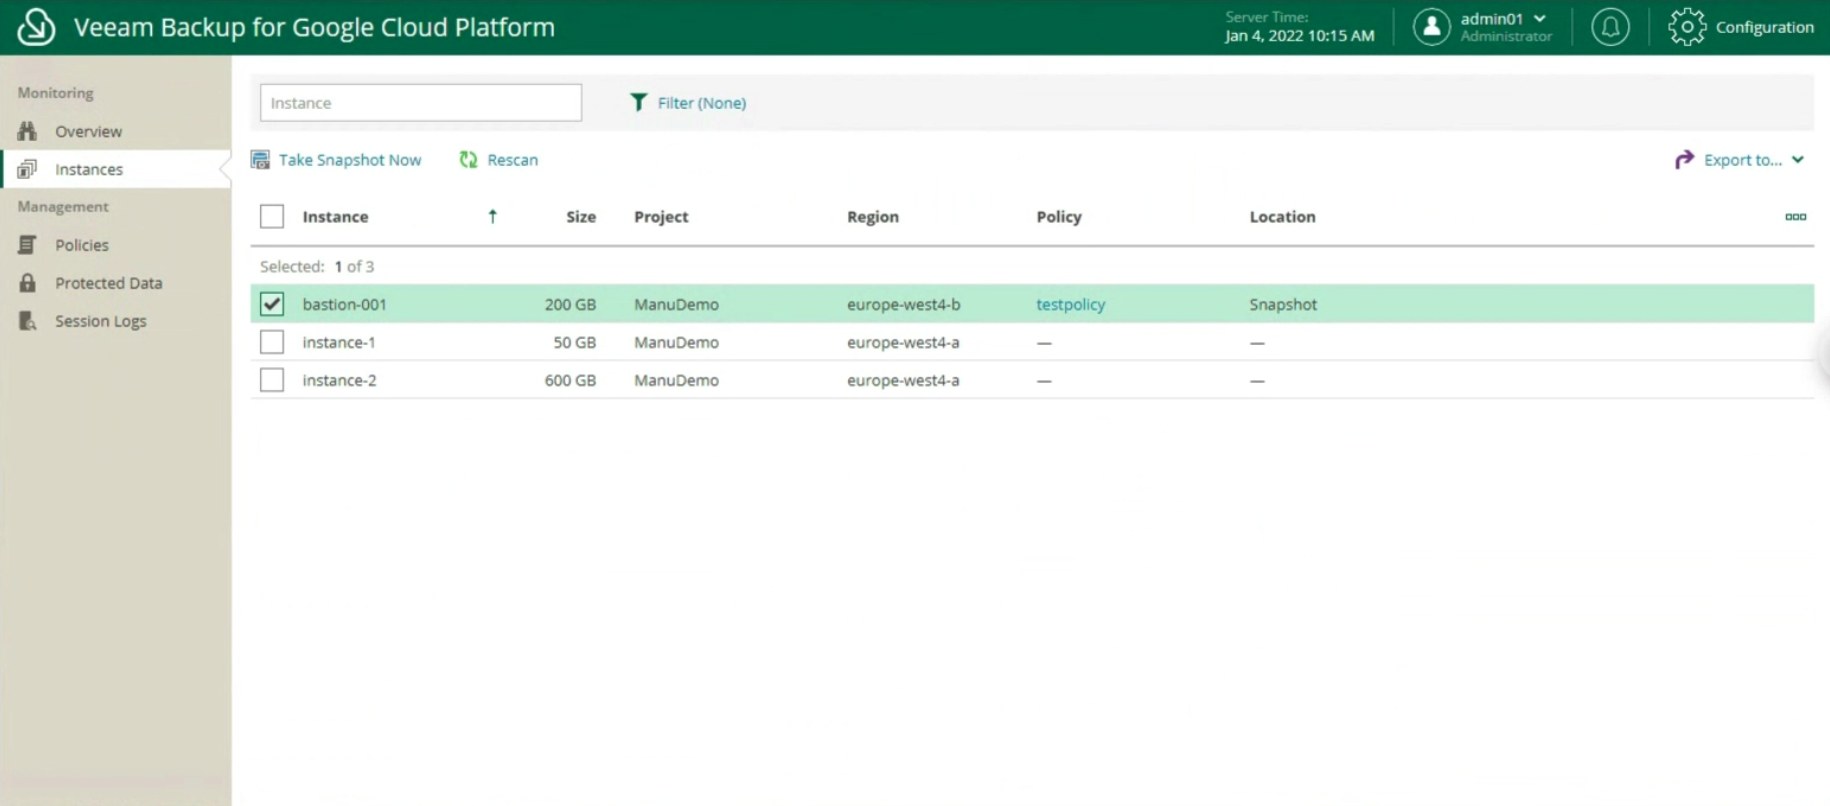
it is possible to monitor the environment through an overview of the present instances, of the protected ones (image 9 & 10)

Image 9

Image 10

Manage protection policies through:

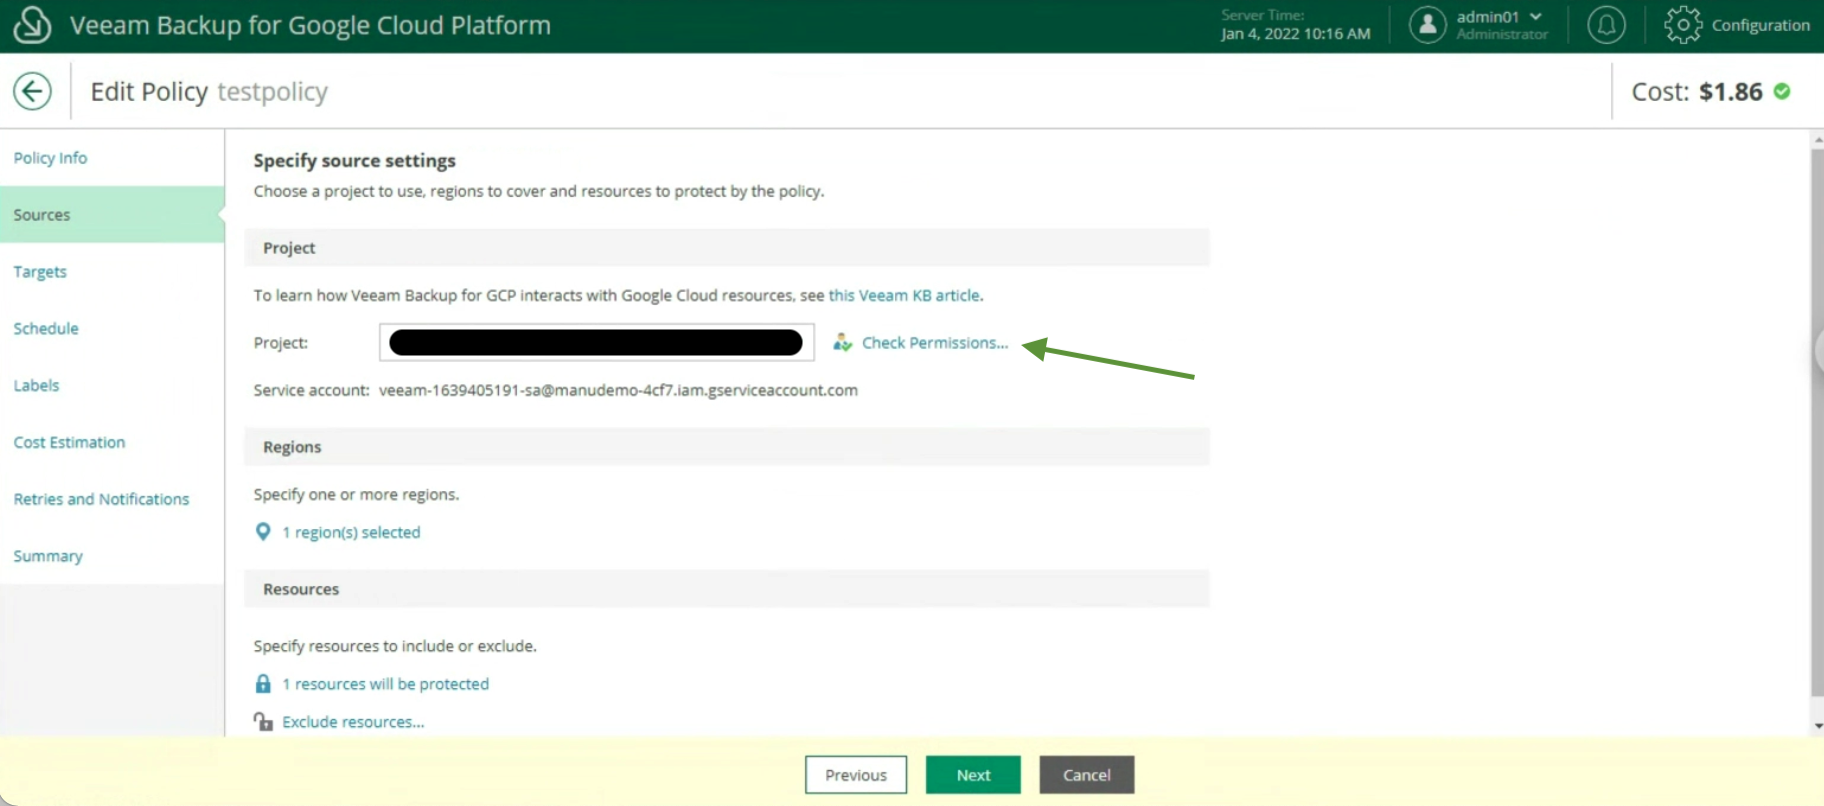
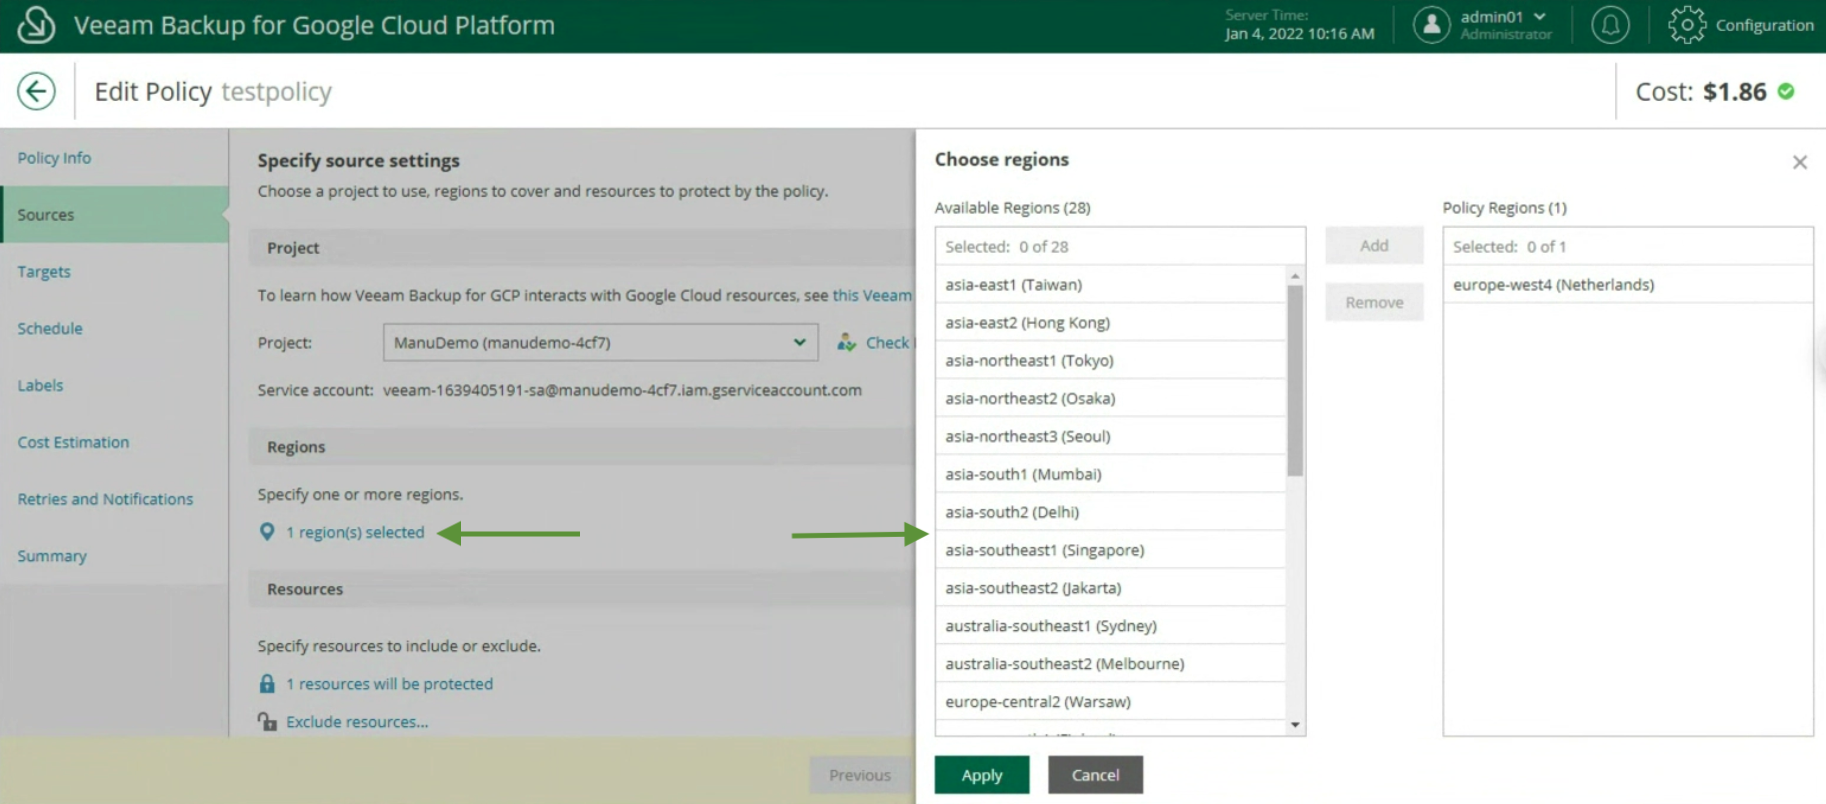
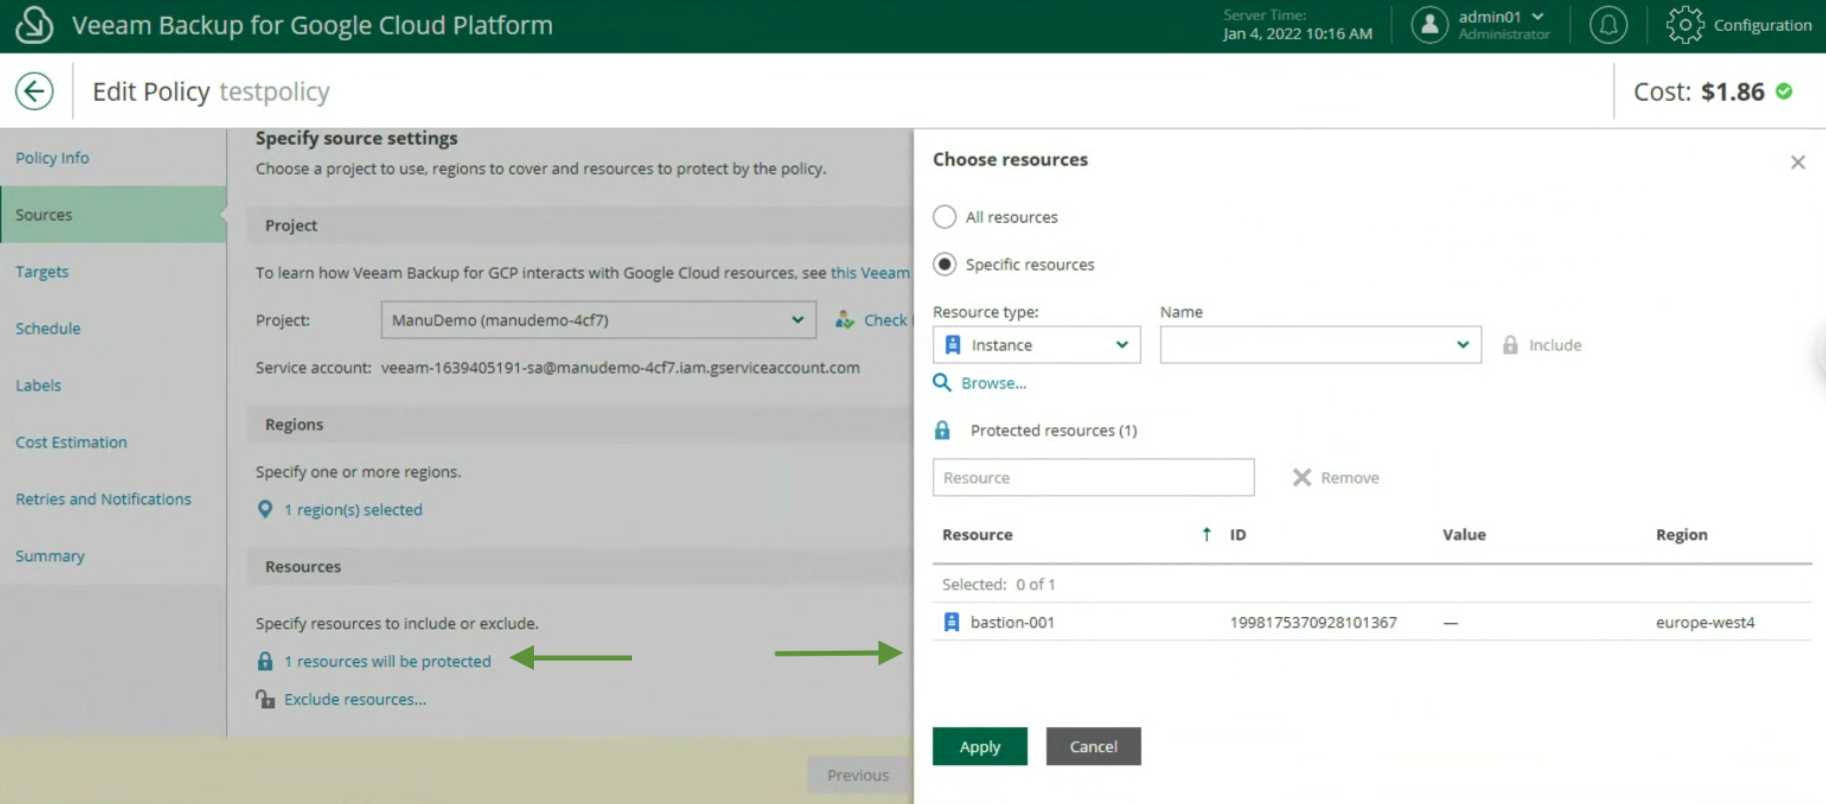
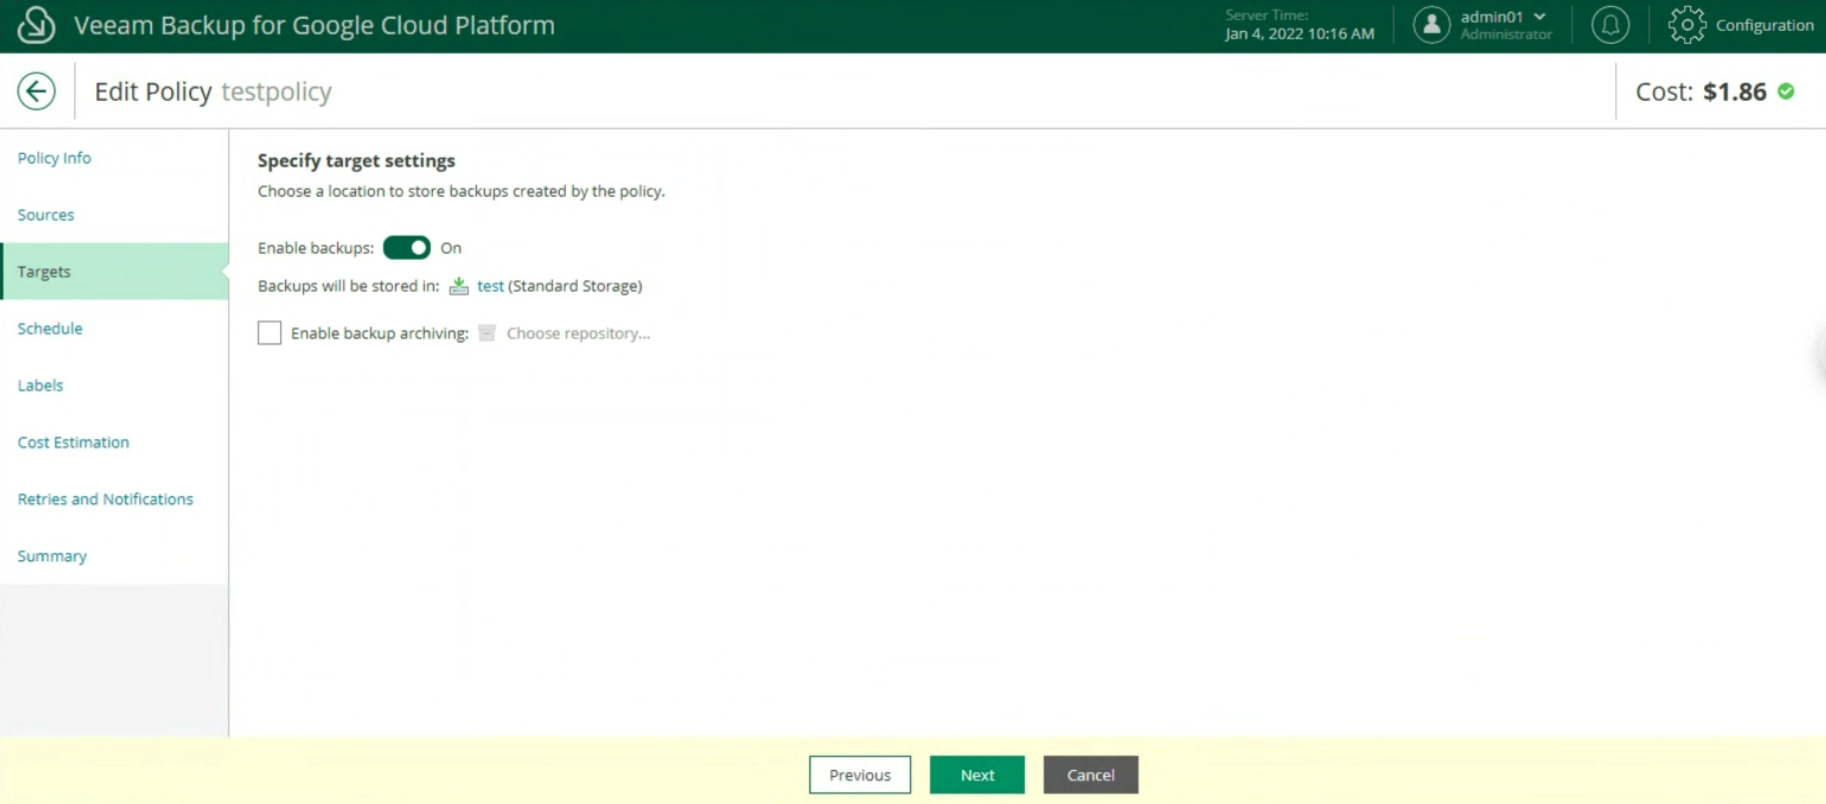
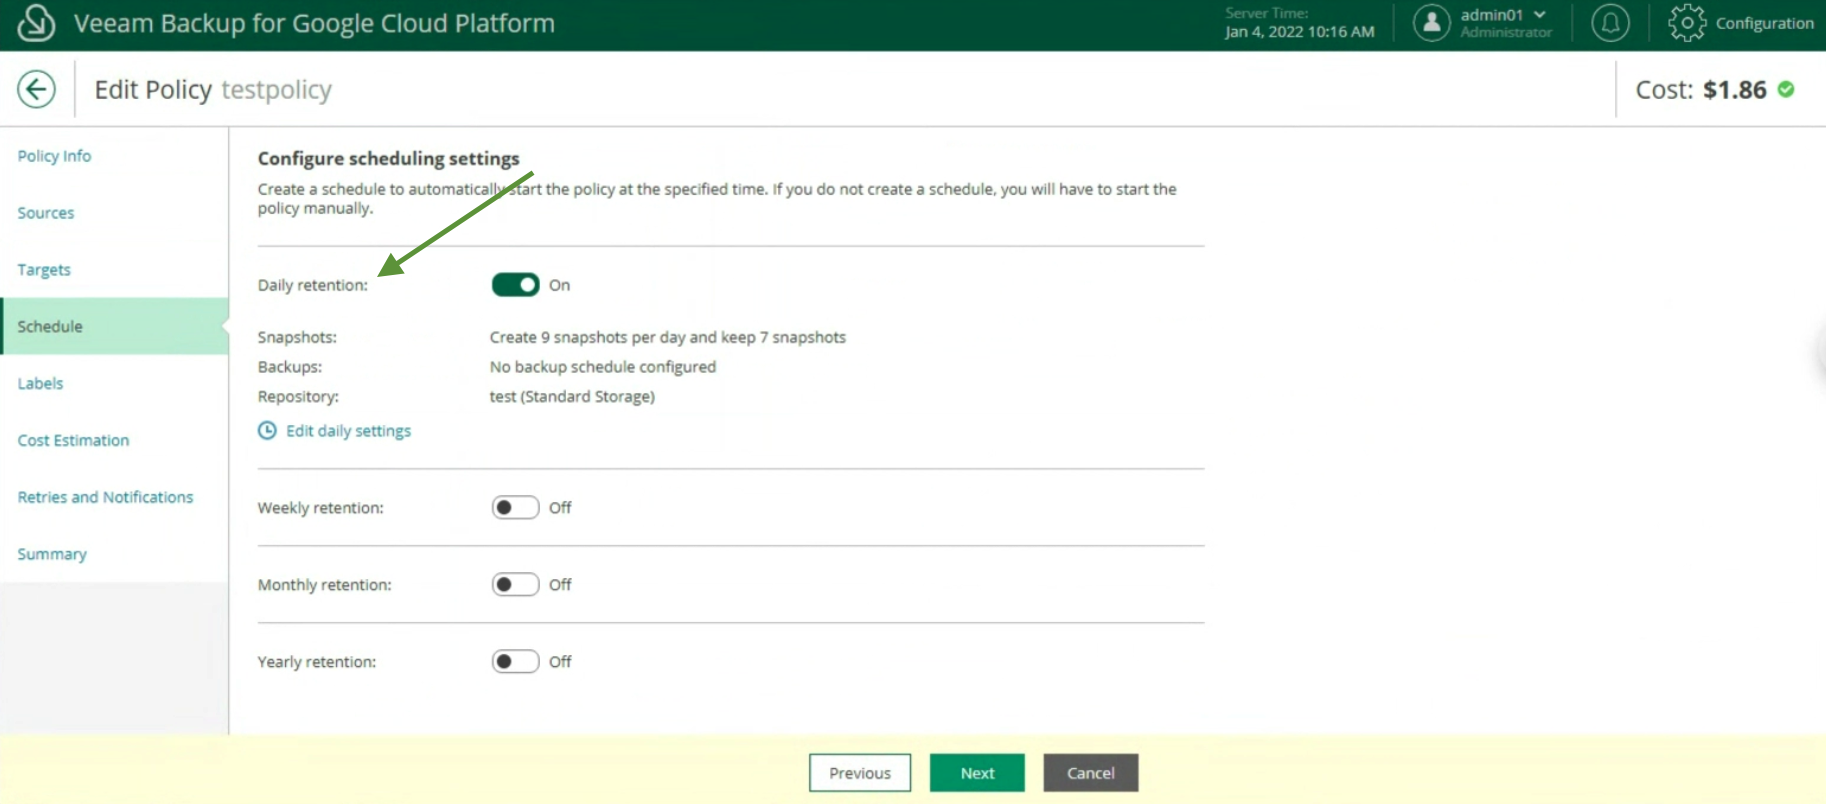
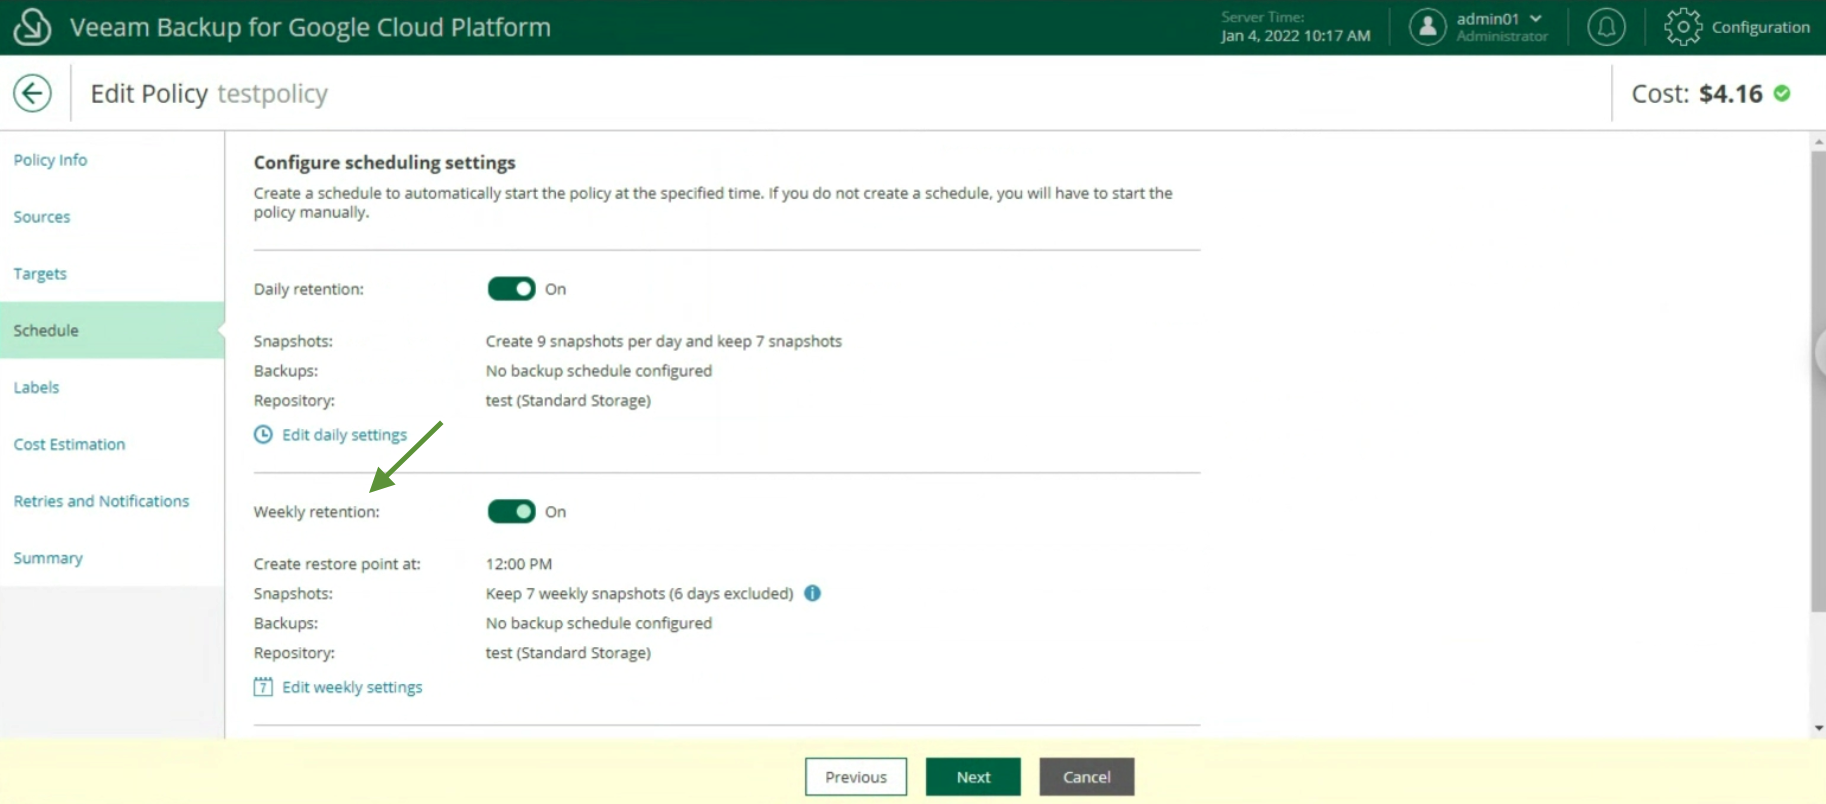
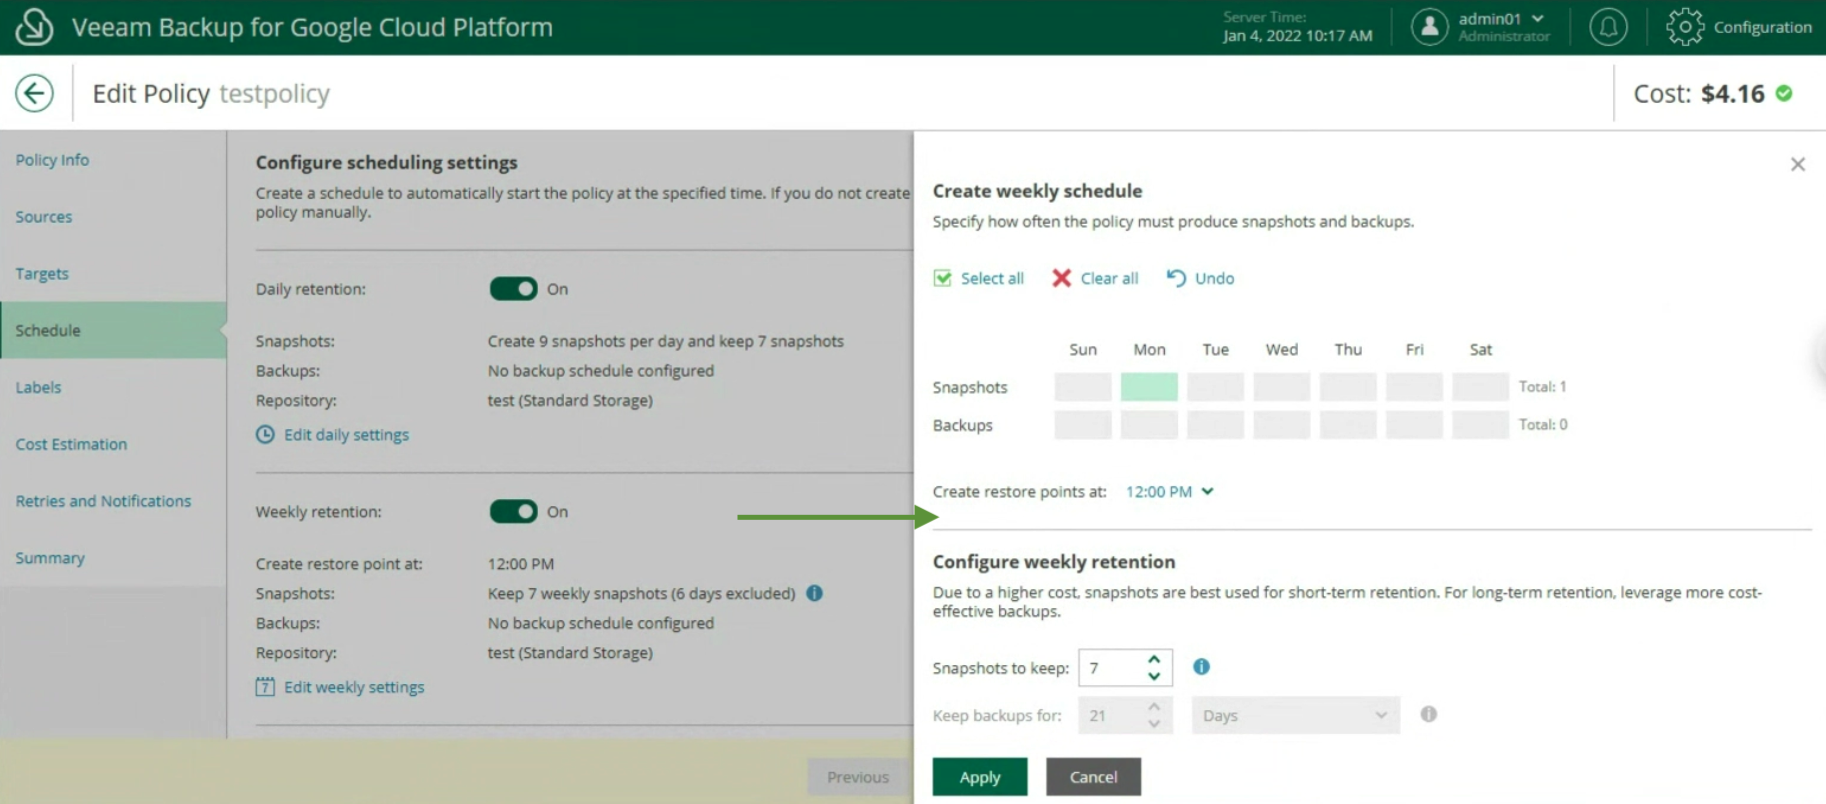
The creation of the Backup policies, indicating the name (image 12), selecting the project (image 13), the region (image 14), the resources (image 15), the Backup target (image 16), the schedule, and the type backup (images 17 to 19)

Image 11

Image 12

Image 13

Image 14

Image 15

Image 16

Picture 17

Image 18

Image 19

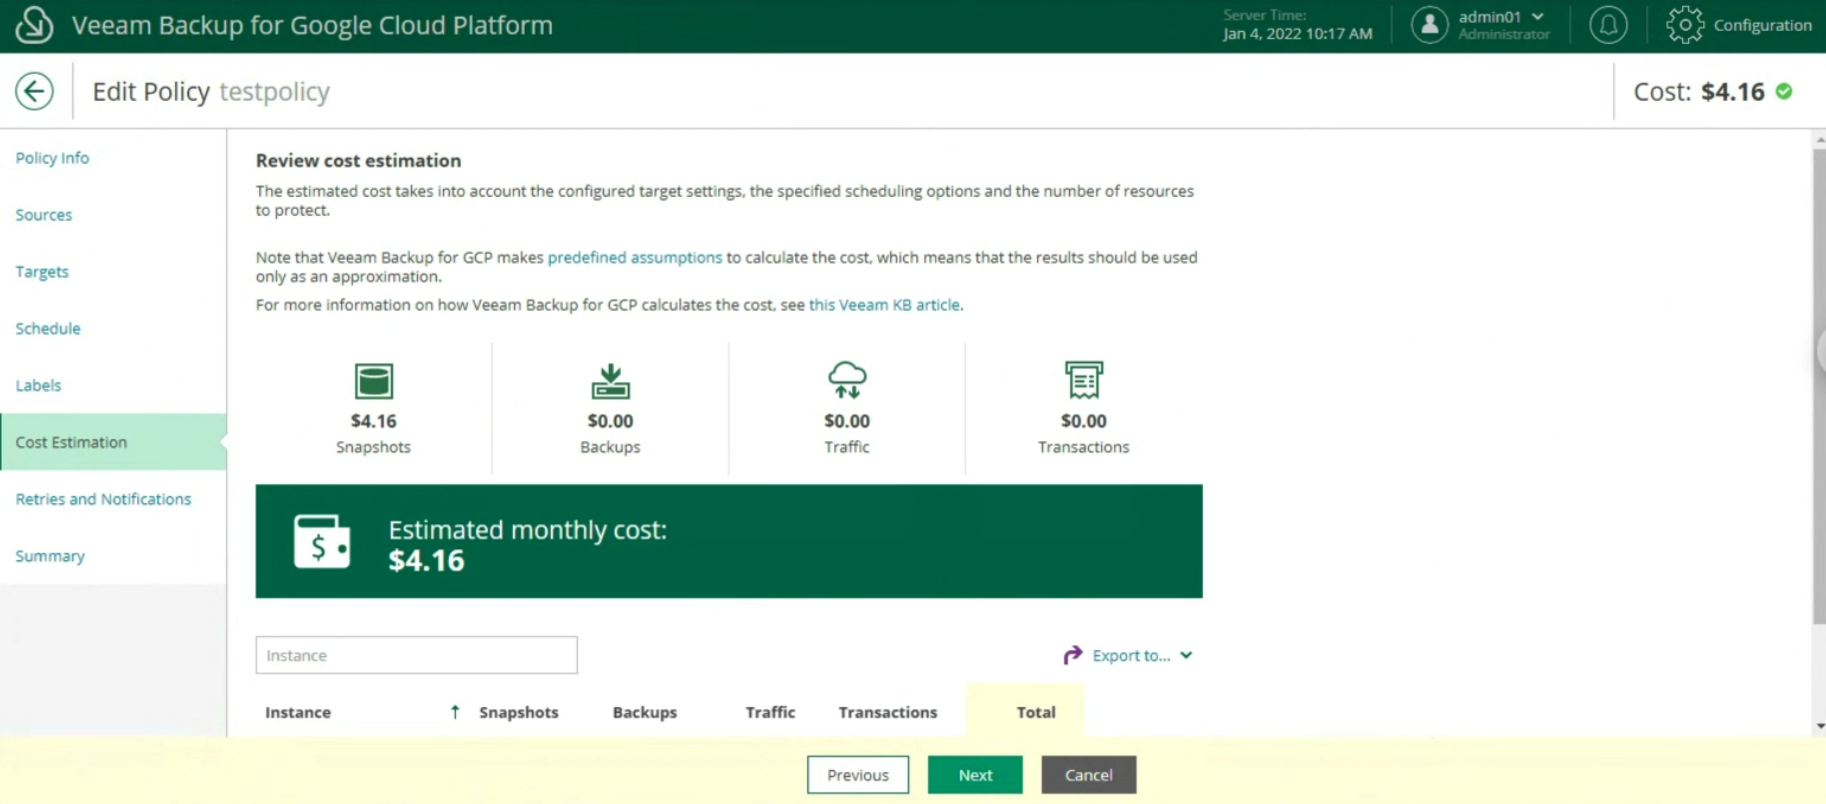
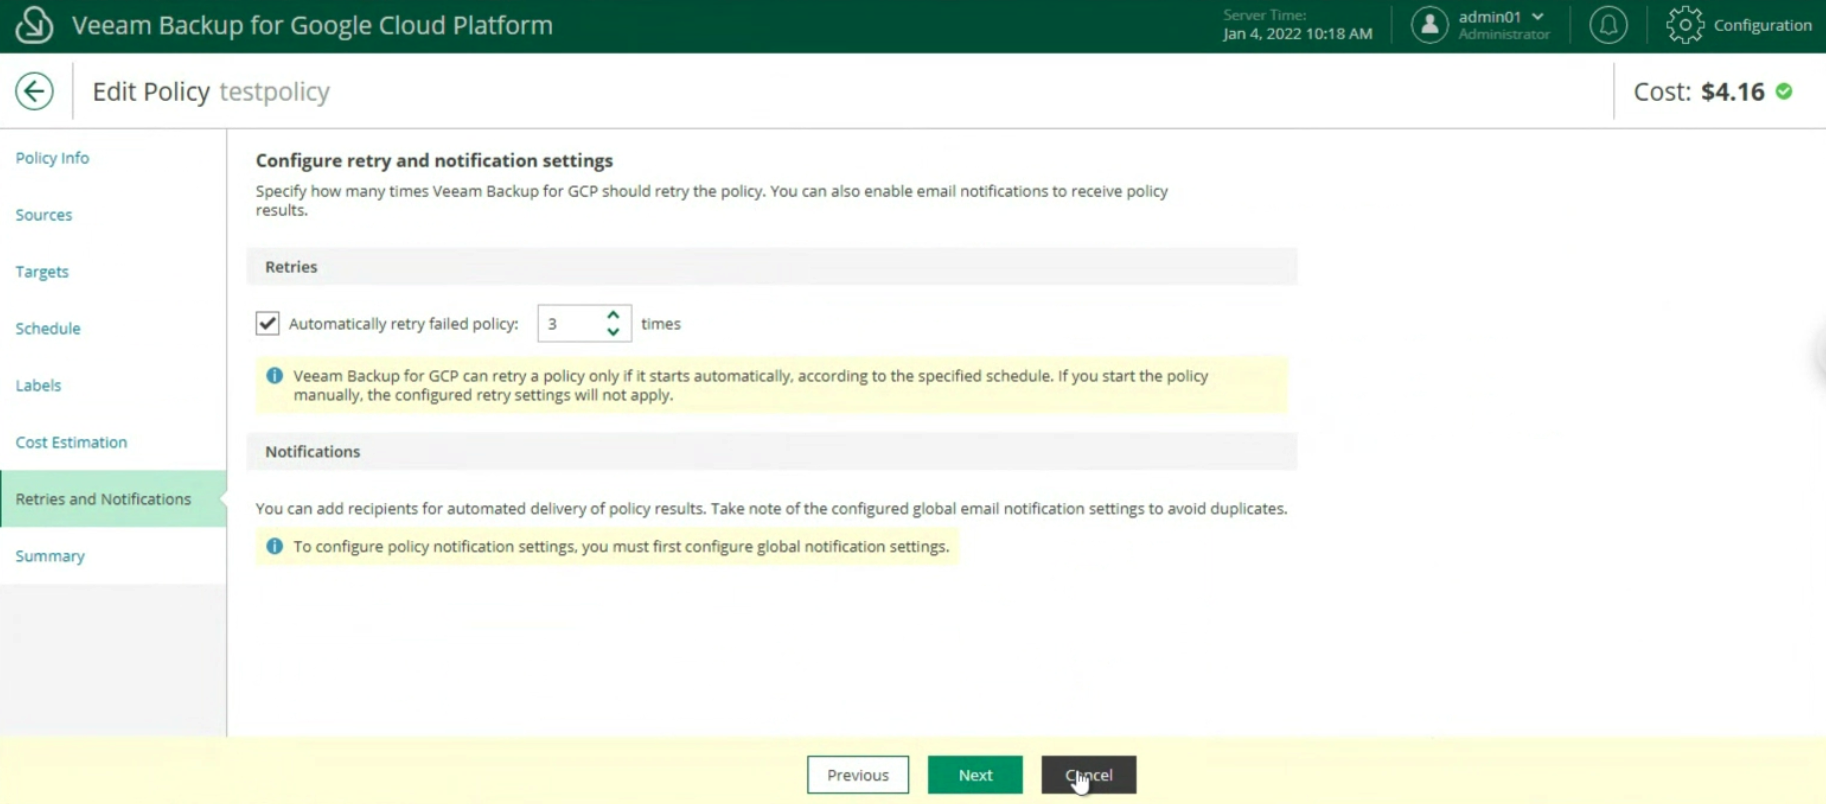
The last two items indicate the estimated monthly costs to implement the backup policy (image 20) and the setting of retries and notifications (image 21)

Image 20

Image 21

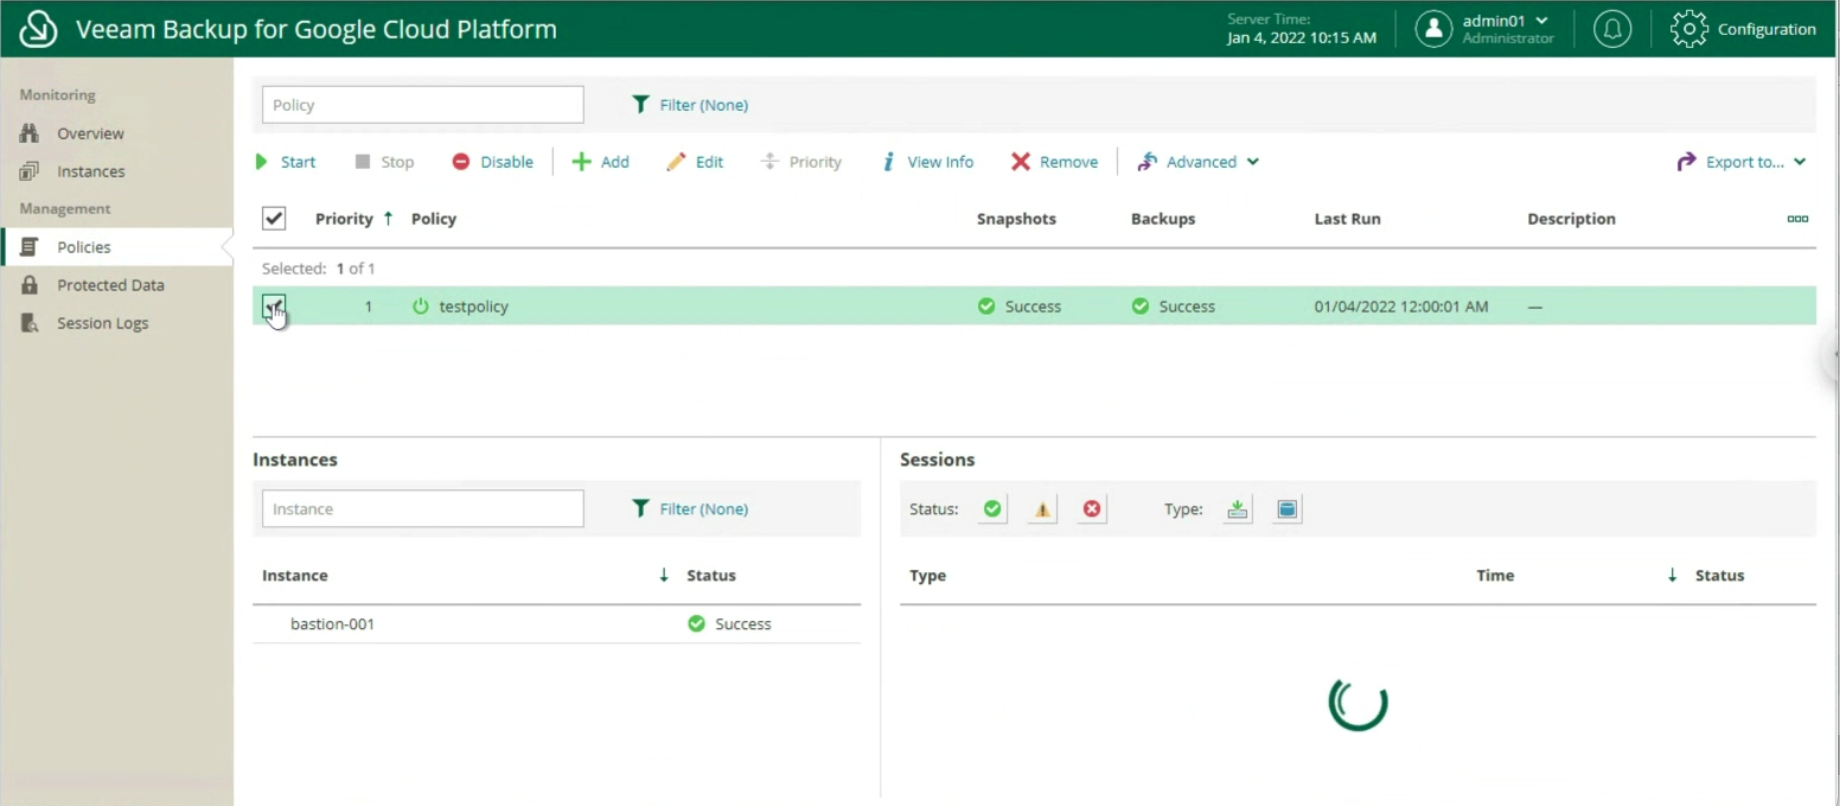
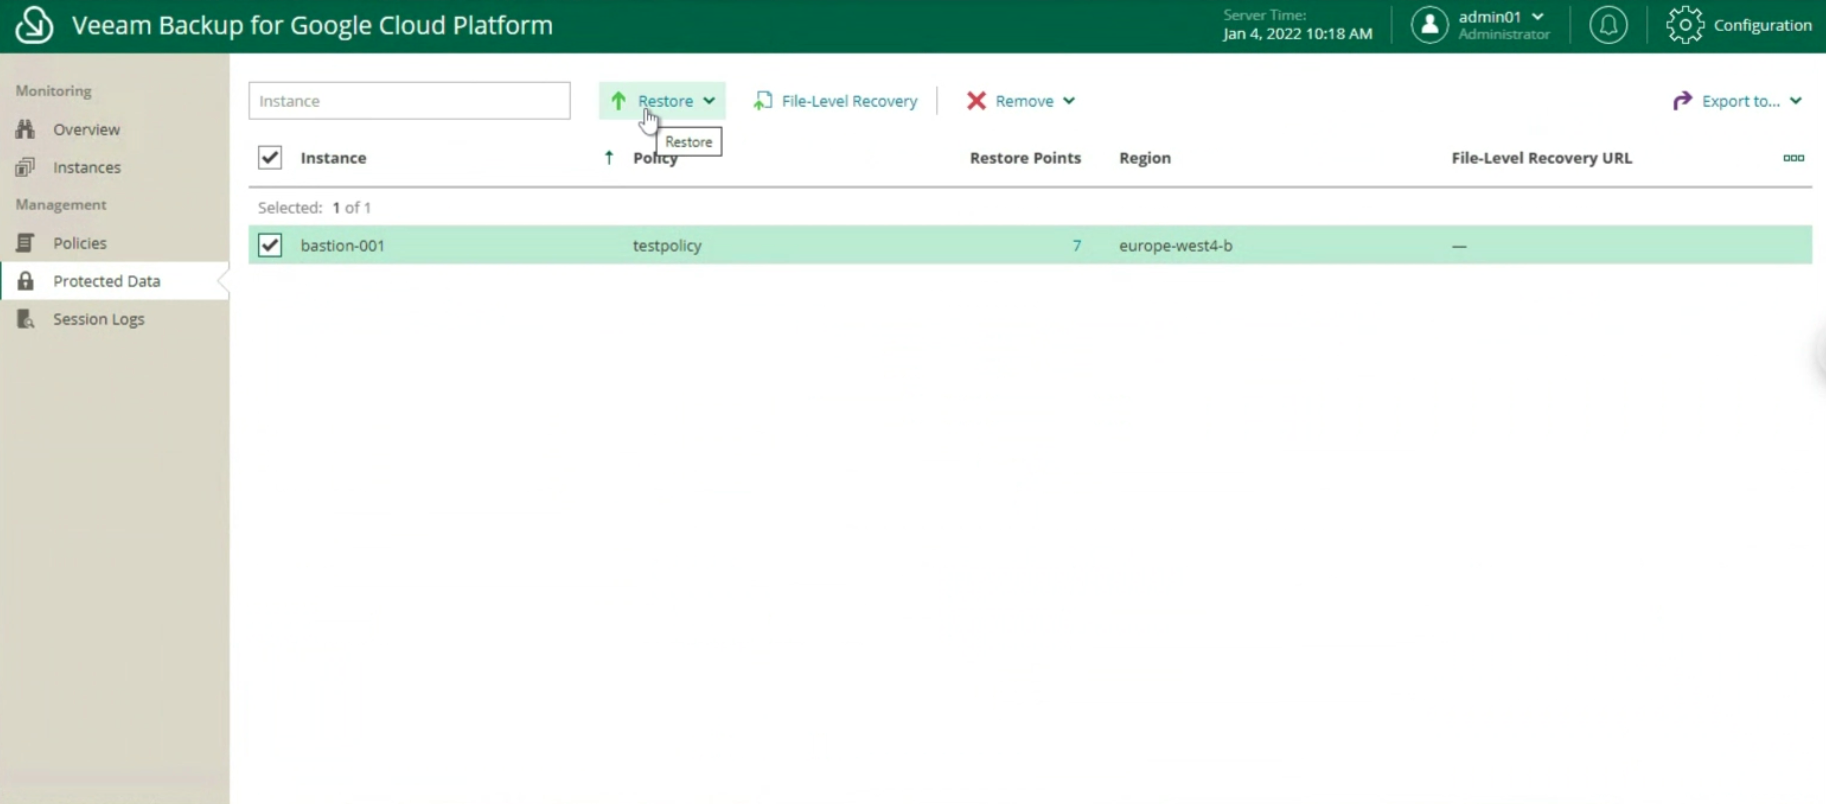
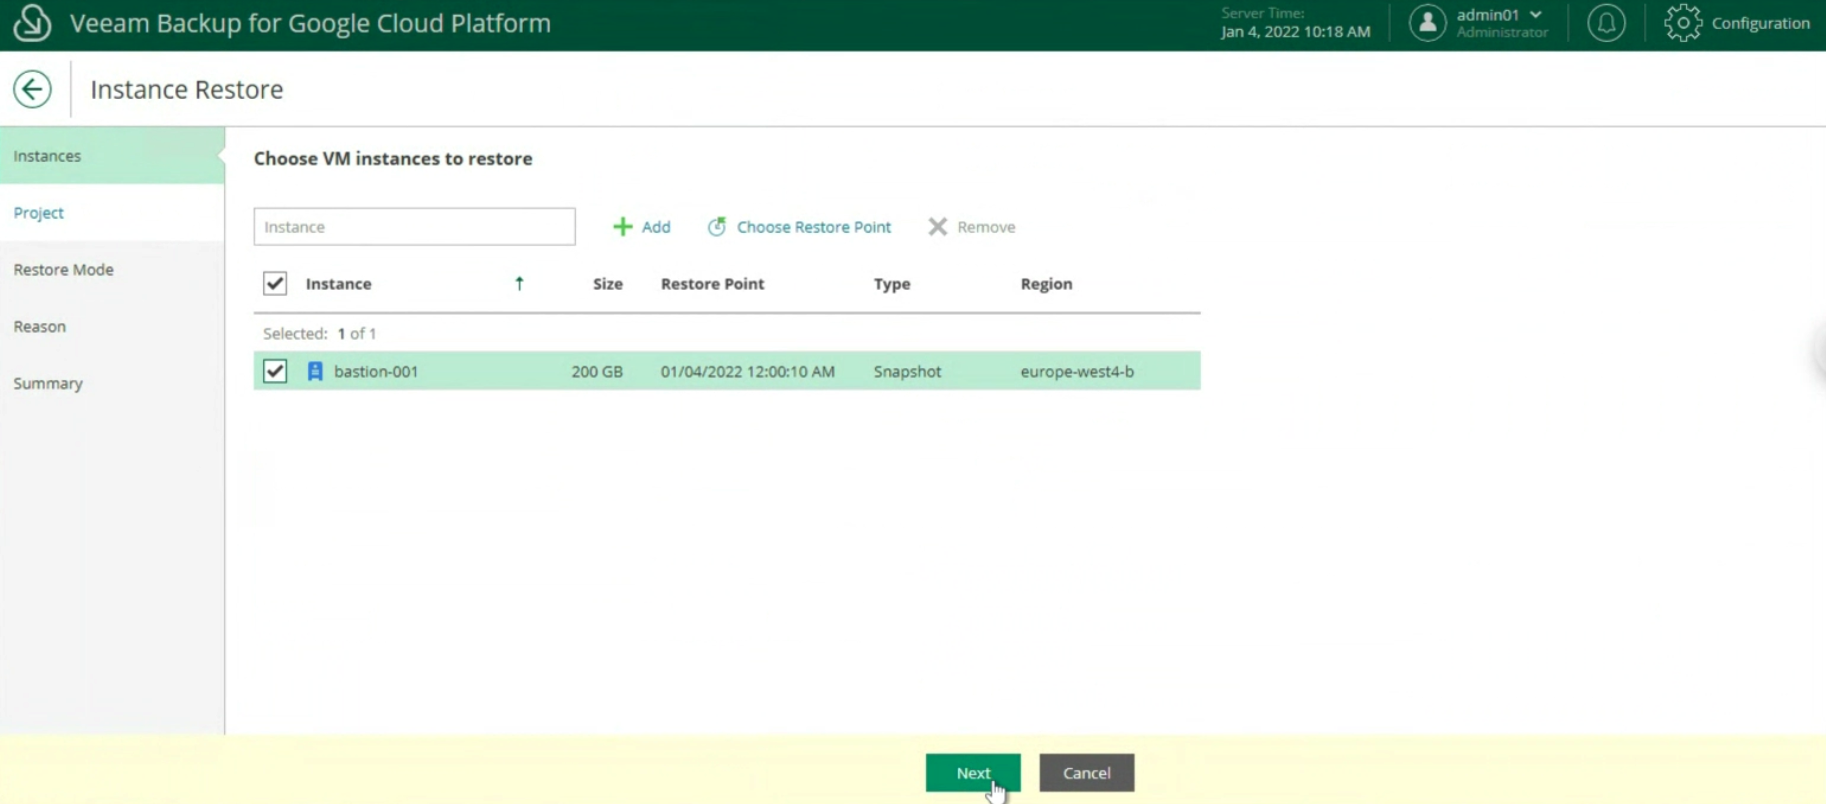
Once the configuration is complete and the monitoring has verified that the policy has been completed successfully, it is possible to proceed with the recovery (image 22).

Image 22

The available options are:

  • Entire Instance
  • Files and Folders

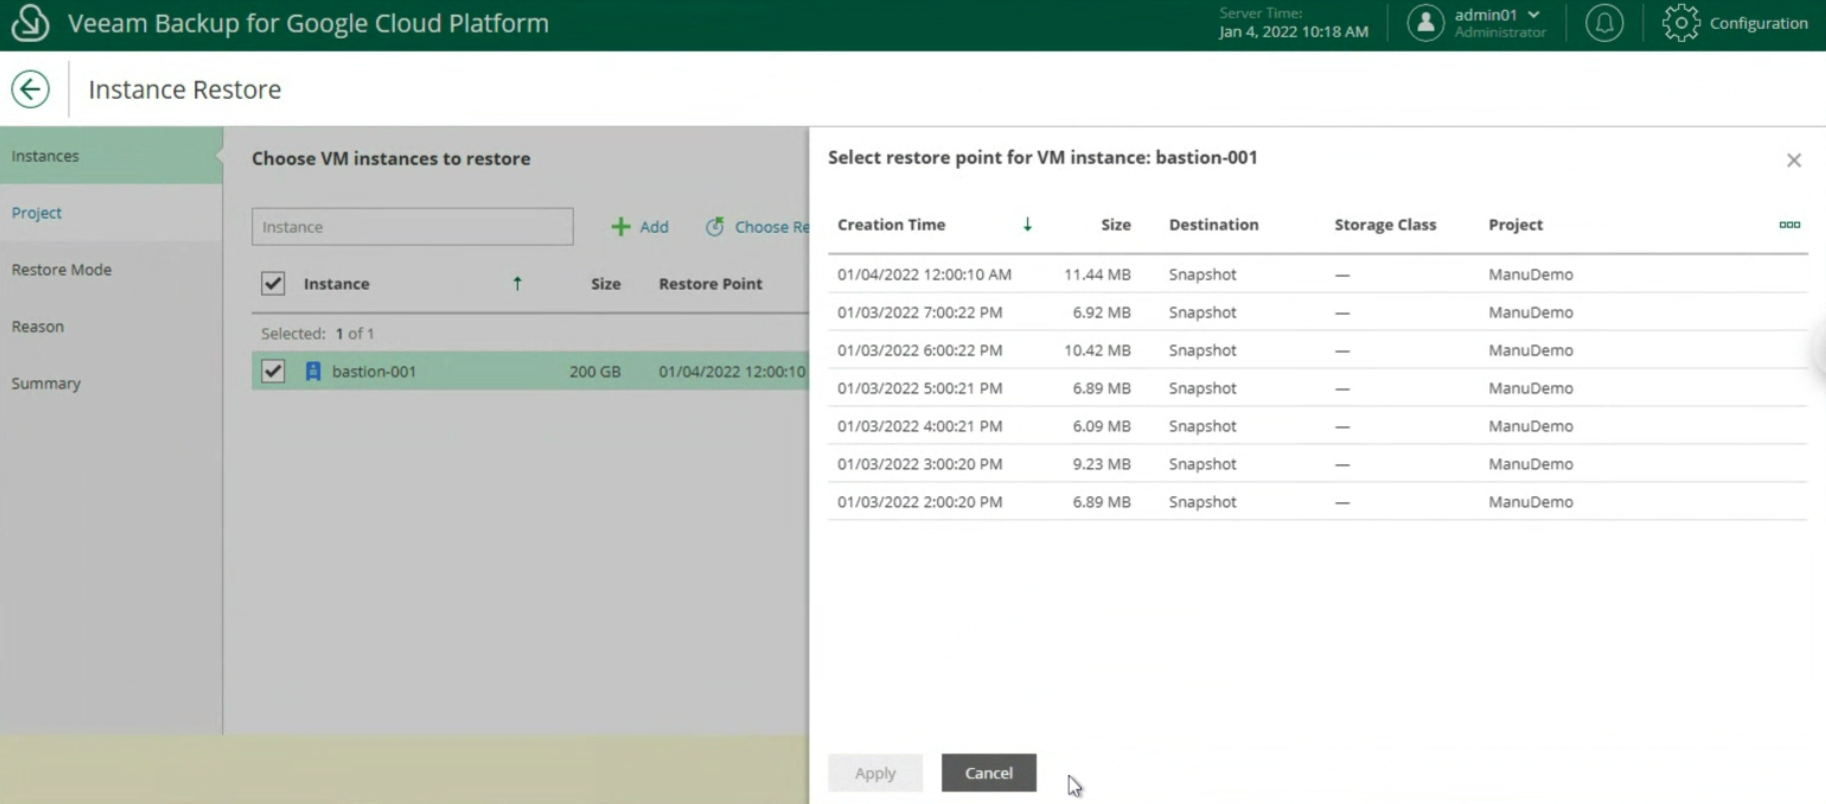
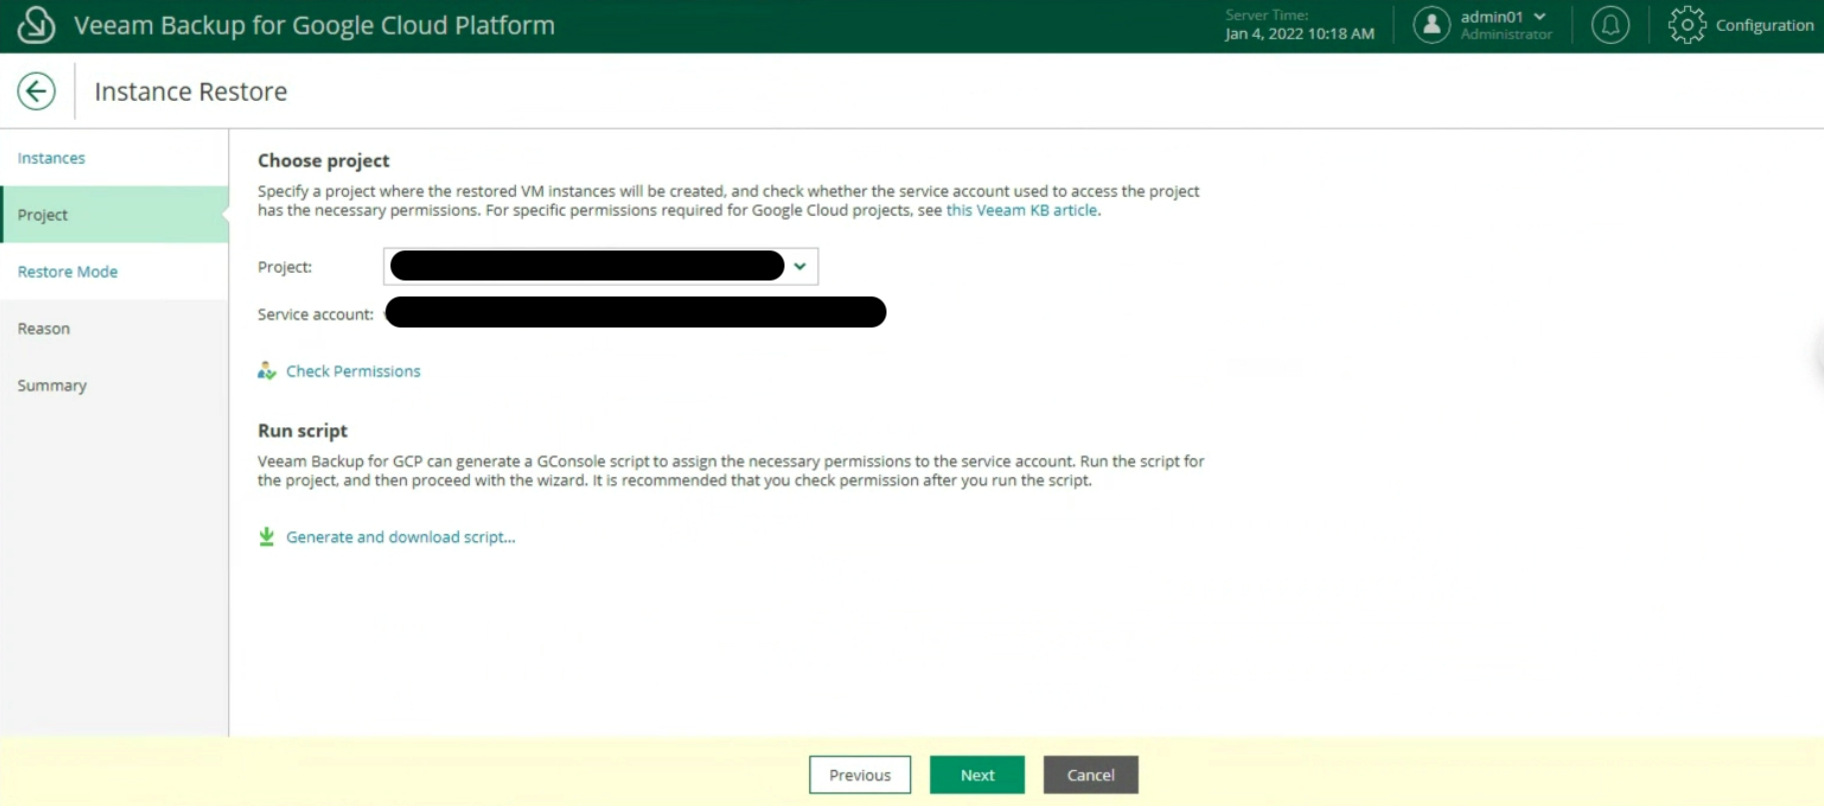
The next images (23-24-25) show the key steps to restore the entire instance.

Image 23

Image 24

Image 25

In the next article we will see how to protect and restore a SQL DB present in a GCP instance

See you soon

VBR – Mac Backup

Veeam Backup & Replication (VBR) version 11 has a new feature and Mac users will fall in love with it.

It is now available for the backup and restores of your MACOS files.

It supports the last Operating Systems starting from High-Sierra (Big Sur 11.X.X / Catalina 10.15.X / Mojave 10.14.X / High Sierra 10.13.6).

Note 1: The Veeam Agent for Mac (VAM) version 1 supports the M1 processor via Rosetta.

Note 2: The VAM supports consistent data backup with snapshots for the APFS file system.

In the other file systems, the backup is created via a snapshot-less approach.

Note 3: At the moment it’s possible to perform the backup of user data (with a custom scope too). The image of the entire machine and a Bare Metal Restore are not available yet.

The configuration steps are quite easy as shown in the official guide:

To recap, the procedure consists of:

  1. From the VBR console create a resource group using a flexible scope
  2. Copy the files generated from VBR to the MAC to protect
  3. Install the package to your machine and import the created configuration. (It allows the communication between VBR and the Mac)
  4. From the VBR console creating the backup policy and apply it

The following video shows how it works in a managed VBR architecture.

Take care and see you soon.

A flexible file backup Strategy – Part 3

This article’s topic is how to set up and work VBR when it is combined with the NDMP protocol.

This type of configuration is part of the category “file to tape” I treated in my last article “A flexible file backup Strategy – Part 2”.

One more note before starting: VBR requires NDMP version 4 and later.

  • How does it work?

Picture 1

The architecture is quite easy.

Files are gathered from the File Server through the data mover present on the Gateway server. Then they are sent to the Tape Server that performs the write on Tape.

The Datamover installed on Tape Server has the ownership of managing the data traffic to Tape Device.

VBR has the task of enumerating the Volumes and launch the command to Tape Devices.

Point-1: VBR works with a 3 layer backup architecture. It means there is no direct connection between File Servers and Tape Devices. All Data have to pass through the tape Sever.

In this article, I’m not covering the procedure to set up the NAS correctly. Please ask your storage vendor specialist to get all details needed.

How to add the NDMP server to VBR and set up a backup job?

The next video will answer the question.

Video 1

After the backup is completed how to perform a restore?

NDMP backup files are available to perform restores from the FILE menu at the voice Tape and then NDMP as shown in picture 2

Picture 2


Please have a look at the next short video (video 2) to see the easy step to perform a restore.

Video 2

Point-2: The backup chain stored on tapes will consist of 10 restore points maximum. On the 11th run, VBR will force an active full.

  • Common scenarios

One of the main characteristics of NDMP backup is that it allows to perform backup and restore of entire volumes.

The most common scenario is the Disaster Recovery of the entire Filer. Imagine the case in which the customer NAS filer is completely out of order and the only way to restart the file sharing service is formatting all the disks and then restoring the volumes (or the worst case is getting a new NAS).

In this case, NDMP volume restores from tape is an excellent low-cost solution.

Main Pro:

NDMP servers backup to tape is available in the Enterprise Plus Edition of VBR.

It means that there is no limit on the amount of data that can be saved. Could be 1 TB or 100 PB it doesn’t matter.

Veeam Universal License (VUL) has the Enterprise Plus Edition available. Is it time to move your old sockets license to the subscription model (VUL)?

Cons:

The granular restore (files and folders) it’s not an available option with VBR and NDMP backup.

Please note that NAS backup is now completely supported by VBR (please refer to article 1 of this series) and it’s the fastest way to perform the granular restores.

Point-3: Even if the NAS device supporting NDMP protocol is already added to VBR, you need to add the NDMP server as a separate procedure. Otherwise, you will not be able to perform file backup to tape.

The next article will cover a recap of the different techniques and show a hidden gem of VBR.

See you next week and take care

Ransomware defense part 2: Hardening

There are many documents on the internet that describe how to address this common request.

In this article, I’ll give you a track to move easier around this topic pointing out the most interesting articles.

Before starting let me thank Edwin Weijdema who created an  exhaustive guide to answer the common question (please click here to get it)

Are you ready? Let’s start

1- The first magic point for starting is Wikipedia where I got a good definition:

In computinghardening is usually the process of securing a system by reducing its surface of vulnerability, which is larger when a system performs more functions; in principle, a single-function system is more secure than a multipurpose one. Reducing available ways of attack typically includes changing default passwords, the removal of unnecessary software, unnecessary usernames or logins, and the disabling or removal of unnecessary services.

2- The second point is to understand the concept of Perimeter security:

It is natural barriers or artificially built fortifications that have the goal of keeping intruders out of the area . The strategies can be listed as:

  • Use rack-mount servers
  • Keep intruders from opening the case
  • Disable the drives
  • Lock up the server room
  • Set up surveillance

A complete article is available by clicking here

3- The third point is  Network segmentation:

It is the division of an organization network into smaller and, consequently, a more manageable grouping of interfaces called zones. These zones consist of IP ranges, subnets, or security groups designed typically to boost performance and security.

In the event of a cyberattack, effective network segmentation will confine the attack to a specific network zone and contain its impact by blocking lateral movement across the network via logical isolation through access controls.

Designating zones allows organizations to consistently track the location of sensitive data and assess the relevance of an access request based on the nature of that data.  Designating where sensitive data reside permits network and security operations to assign resources for more aggressive patch management and proactive system hardening.

A complete article is available by clicking here

4- Hardening your Backup Repositories

The next good rules involve your backup architecture and in specific the Backup Repositories:

Windows:

a. Use the built-in local administrator account

b. Set permissions on the repository directory

c. Modify the Firewall

d. Disable remote RDP services

Linux:

e. Create a Dedicated Repository Account

f. Set Permissions on the Repository Directory

g. Configure the Linux Repository in VeeamModify the Firewall

h. Use Veeam Encryption

Do you want to know more about security? If so the Veeam Best Practices are for sure the answer.

The next article will cover monitoring and automatic actions using Veeam-ONE.

5- Prevent injection of shady boot code​

Code injection, also called Remote Code Execution (RCE), occurs when an attacker exploits an input validation flaw in software to introduce and execute malicious code.

To prevent the attack please follow the following rules:

a. Run with UEFI Native Mode​
b. Use UEFI with Secure Boot Standard Mode​
c. Combine Secure Boot with TPM
d. Equip critical servers with a TPM 2.0

Stay tuned and see you soon