L’integrazione tra Proxmox Virtual Environment (PVE) e Veeam Backup & Replication (VBR) rappresenta un passo significativo per ottimizzare le politiche di backup e recupero. Questo articolo illustra i passaggi chiave per abilitare il plug-in di VBR, a partire dall’architettura del sistema, fino all’installazione e configurazione del plug-in, e all’aggiunta del server Proxmox nella console di VBR.
Si noti che le istruzioni si basano sulla versione Beta del plug-in, pertanto potrebbero esserci differenze nella versione ufficiale.
Rileggendo l’articolo scritto qualche mese fa (disponibile su questo sito al seguente link), credo che chi considera la virtualizzazione una commodity sceglierà PVE per uscire rapidamente dall’incertezza causata dalle scelte commerciali di Broadcom.
Nota 1: PVE è una distribuzione Linux basata su Debian con kernel Ubuntu che consente l’implementazione e la gestione sia di macchine virtuali che di container.
Nota 2: Proxmox è un’azienda Europea con sede in Austria.
In questo primo articolo (di tre) vedremo i passaggi fondamentali per abilitare il plug-in che permette a VBR di realizzare politiche di backup e ripristino.
Chiedete al vostro Veeam SE di riferimento per testare la versione Beta.
Architettura:
L’immagine 1 riporta lo schema di funzionamento dell’integrazione. Il Plug-in è il componente che abilita la comunicazione tra il Backup Server Veeam (VBR) e l’architettura Proxmox.
Nota 3: Il ruolo Proxy (qui denominato Worker) ha il compito di raccogliere i dati delle VM da proteggere per copiarli verso il Backup Repository.
Il processo di Backup prevede l’innesco di snapshot e la connessione tra il server Proxmox e VBR avviene tramite API REST.
Immagine 1
Una volta installato il plug-in sul server VBR è necessario:
Dalla consone di VBR all voce Backup Infrastructure aggiungere il server Proxmox (immagine 2 e 3).
Immagine 2
Immagine 3
2. Nelle successivle immagini (dalla 4 alla 9) sono mostrati i semplici passaggi per aggiungere l’architettura PVE nella console di VBR.
Immagine 4
Immagine 5
Immagine 6
Immagine 7
Nota 4: E’ possibile selezionare lo storage ove le snapshot verranno salvate.
Immagine 8
Immagine 9
Al termine è possibile effettuare immediatamente il deploy del worker (proxy). Il vantaggio è quello di accelerare il processo di backup (immagine 10).
Immagine 10
Nota 5: Per chi proviene dal mondo VMware è esattamente come abilitare il metodo di trasporto virtual appliance.
In quest’ultima fase è possibile configurare su quale host effettuare il deploy del worker, quale storage utilizzare (immagine 11), quali risorse assegnare (immagine 12) e su quali reti operare (immagine 13, 14 e 15 ).
Immagine 11
Immagine 12
Immagine 13
Immagine 14
Immagine 15
Dopo aver controllato che tutte le configurazioni soddisfino le desiderate (immagine 16), cliccando su finish il setup è completato.
Immagine 16
Nel prossimo articolo vedremo come configurare i job di Backup.
Integrating Proxmox Virtual Environment (PVE) and Veeam Backup & Replication (VBR) is a significant step in optimizing backup and recovery policies. This article outlines the key steps to enable the plug-in of VBR, starting with the system architecture, installing and configuring the plug-in, and adding the Proxmox server to the VBR.
Note that the instructions are based on the Beta version of the plug-in, so there may be differences in the official version.
Rereading the article written a few months ago (available on this site at the following link), I believe that those considering virtualization as a commodity will choose PVE to quickly escape the uncertainty caused by Broadcom’s business choices.
Note 1: PVE is a Debian-based Linux distribution with Ubuntu kernel that allows virtual machines and containers to be deployed and managed.
Note 2: Proxmox is a European company based in Austria.
In this first article (of three) we will look at the basic steps to enable the plug-in that allows VBR to implement backup and recovery policies.
Ask your referring Veeam SE to test the Beta version.
Architecture:
Image 1 shows the operation diagram of the integration. The Plug-in is the component that enables communication between the Veeam Backup Server (VBR) and the Proxmox architecture.
Note 3: The Proxy role (referred to here as Worker) is responsible for collecting the data from the VMs to be protected and copying it to the Backup Repository.
The Backup process involves the triggering of snapshots, and the connection between the Proxmox server and VBR is via REST API.
Picture 1
Once the plug-in is installed on the VBR server, it is necessary:
From the console of VBR under Backup Infrastructure add the Proxmox server (images 2 and 3).
picture 2
Picture 3
2. The next images (4 through 9) show the simple steps to add the architecture PVE in the console of VBR.
Picture 4
Picture 5
Picture 6
Picture 7
Note 4: It is possible to select the storage where the snapshots will be saved.
Image 8
Image 9
When finished, you can immediately deploy the worker (proxy). The advantage is to speed up the backup process (image 10).
Image 10
Note 5: For those coming from the world VMware is exactly how to enable the virtual appliance transport method.
In this last step, it is possible to configure which host to deploy the worker, which storage to use (image 11), which resources to assign (image 12), and which networks to operate on (images 13, 14, and 15 ).
Image 11
Image 12
Image 13
Image 14
Image 15
After checking that all configurations meet the desired ones (image 16), clicking finish completes the setup.
Image 16
In the next article, we will see how to configure Backup jobs.
Immaginate un disastro, in cui l’infrastruttura virtuale deve essere ripristinata da zero.
È tutto perso, tranne i file di backup, che sono ancora disponibili su almeno un repository, meglio se immutabile, on-premises o in cloud.
Per ripristinare l’ambiente avete a disposizione cinque differenti opzioni che sono in funzione da come è stata disegnata e implementata l’architettura di protezione e resilenza Veeam Backup & Replication.
Nota 1: Veeam Backup & Replication verrà d’ora in avanti indicato con l’acronimo VBR.
Scenario A (Ripristino da zero):
Non avete effettuato il backup application aware del server VBR.
Non avete effettuato la Replica application aware del server VBR.
Non è disponibile l’export della configurazione del DB del server VBR.
Volete ripristinare immediatamente i workload di produzione.
In questo passaggio è spesso sufficiente cliccare solo su “next” per completare l’operazione.
Nota 3: si consiglia di utilizzare il proprio file di licenza (può essere scaricato da my.veeam.com) anche se la Community Edition (senza licenza) è spesso sufficiente per la maggior parte ripristini necessari in questa fase.
Passaggio 2A: Aggiungere l’infrastruttura virtuale di produzione ove si voglia ripristinare i carichi di lavoro protetti da VBR.
Come: dopo aver completato il primo passaggio, dalla console di VBR aggiungete l’infrastruttura virtuale (Menù: “Inventory” -> “Vmware vSphere“-> “Add Server”) (Immagine 2).
Immagine 2
I passaggi seguenti dipendono dalla tipologia di Hypervisor (VMware vSphere, Microsoft Hyper-V, Nutanix AHV, …) ma risultano sempre molto semplici.
Passaggio 3A (opzionale): Aggiungere i proxy di backup.
Anche se stiamo operando a livello di ripristino, è sempre una buona idea per migliorare le prestazioni di aggiungere proxy di backup.
Passaggio 4A: Aggiunta dei repository di backup Veeam.
L’ultima fase propedeutica prima di avviare i ripristini è quella di aggiungere i repository con i dati di backup.
Come: dalla console selezionare la voce “Backup Infrastructure”, “Backup Repository” e quindi “Add Repository” (immagine 3).
Immagine 3
Passaggio 5A: Avvio dei ripristini.
Come: dalla console di VBR selezionare dalla voce “Home”, “Backup”, “Disk imported”, la VM che si vuole ripristinare e cliccando con il tasto destro del mouse avviare il processo di ripristino (Immagine 4).
Immagine 4
Nota 4: Il ripristino può essere istantaneo. Con questa modalità le VMs sono avviate direttamente dal repository di backup. In questa opzione il repository funge da archivio dati (per VMware il DataStore) per l’ambiente virtuale.
(L’instant VM recovery è stato inventato da Veeam più di dieci anni fa e da allora ne ha migliorato performance e flessibilità).
Ora la vostra architettura di produzione è tornata operativa!
Nota 5: Esiste anche l’opzione di Extract da linea di comando per piattaforme Windows e Linux.
Passaggio 2B: Avviare l’Extract, selezionare il backup del VBR e una volta creati i file della VM-VBR copiateli nel Datastore VMware che preferite.
Ora dal vCenter registrate la VM appena copiata.
(Immagine 6)
Nota 6: E’ disponibile l’opzione di extract da linea di comando per piattaforme Windows e Linux.
Nota 7: E’ possibile automatizzare e semplificare la copia verso il Datastore VMware pubblicando una share di rete NFS come indicato nel seguente articolo:
Passaggio 3C: Una volta completato il ripristino del passaggio 2C, avviare il VBR e realizzare le operazioni standard di ripristino come indicato nel passaggio 5A.
Scenario D: Il VBR è una VM replicata.
Non avete effettuato il backup application aware del server VBR.
Avete effettuato la Replica application aware del server VBR.
Non è disponibile l’export della configurazione del DB del server VBR.
Volete ripristinare immediatamente il server VBR.
Cosa fare?
Passaggio 1D: Connettersi al vCenter e ricercare il VBR già replicato.
Immagine 9
Passaggio 2D: Innescare il failover del VBR.
Immagine 10
Passaggio 3D: Realizzare le operazioni di gestione di VBR come da punto 5A.
Scenario E: La configurazione del VBR.
Non avete effettuato il backup del server VBR.
Non avete effettuato la Replica del server VBR.
E’ disponibile l’export della configurazione del DB del server VBR.
Volete ripristinare immediatamente il server VBR.
Cosa fare?
Passaggio 1E: Installare VBR sul server (fisico o virtuale, vedi punto 1A).
Passaggio 2D: Effettuare il ripristino della configurazione del VBR come indicato nella guida.
Passaggio 3D: Realizzare le operazioni di gestione di VBR come da punto 5A.
Nota 8: E’ sempre buona norma salvare la configurazione del server di Backup.
Nota Finale: Il consiglio è di adoperarsi al fine di poter utilizzare tutte le strategie descritte in questo articolo in modo che se una non fosse disponibile, si possa utilizzarne una seconda.
Imagine a disaster, in which the virtual infrastructure has to be restored from scratch.
All is lost except the backup files, which are still available on at least one repository, preferably immutable, on-premises or in the cloud.
To restore the environment you have five different options that are a function of how the Veeam Backup & Replication protection and resilience architecture is designed and implemented.
Note 1: Veeam Backup & Replication will hereafter be referred to as. VBR.
Scenario A (Restoration from scratch):
You have not made an application-aware backup of the server VBR.
You have not performed application aware replication of the server VBR.
Export of server DB configuration is not available VBR.
You want to restore production workloads immediately.
In this step, just clicking “next” to complete the operation is often sufficient.
Note 3: It is recommended that you use your license file (which can be downloaded from my.veeam.com) although the Community Edition (unlicensed) is often sufficient for most restores needed at this stage.
Step 2A: Add the production virtual infrastructure where you want to restore workloads protected by VBR.
How: after completing the first step, from the console of VBR add the virtual infrastructure (Menu: “Inventory” -> “Vmware vSphere“-> “Add Server“) (Image 2).
picture 2
The following steps depend on the type of Hypervisor (VMware vSphere, Microsoft Hyper-V, Nutanix AHV, …) but are always very simple.
Step 3A (optional): Add backup proxies.
Even if we are operating at the recovery level, improving the performance by adding backup proxies is always a good idea.
Step 4A: Adding Veeam backup repositories.
The last preparatory step before starting restores is to add the repositories with the backup data.
How: from the console, select “Backup Infrastructure,” “Backup Repository,” and then “Add Repository” (image 3).
Picture 3
Step 5A: Starting the restore
How: from the console of VBR select “Home,” “Backup,” “Disk imported,” the VM you want to restore, and right-click to start the restore process (Image 4).
Picture 4
Note 4: Recovery can be instantaneous. With this mode, VMs are started directly from the backup repository. In this option, the repository serves as the data store (for VMware the DataStore) for the virtual environment.
(Instant VM recovery was invented by Veeam more than a decade ago and has since improved its performance and flexibility.)
Now your production architecture is back up and running!
Note 5: There is also a command-line Extract option for Windows and Linux platforms.
Step 2B: Start Extract, select the backup of the VBR, and once the files of the VM-VBR are copied them to your preferred VMware datastore.
Now from the vCenter register the VM you just copied.
(Image 6)
Note 6: A command-line extract option is available for Windows and Linux platforms.
Note 7: It is possible to automate and simplify copying to the VMware Datastore by publishing an NFS network share as mentioned in the following article:
Step 3D: Realize the management operations of VBR as per Step 5A.
Note 8: It is always a good idea to save the Backup server configuration.
Final Note: The advice is to strive to be able to use all the strategies described in this article so that if one is not available, a second one can be used.
Nel precedente articolo abbiamo visto come operare sui job di backup per ottenere dei Full che possano essere utilizzati per creare una politica di retention GFS quando la destinazione dei job è un nastro.
In questo secondo articolo, scopriamo come sia possibile ottenere un risultato simile copiando i nastri.
Nota1: Per perseguire questa processo di protezione è necessario che nel DataCenter sia presente una seconda libreria a nastro.
Nota2: Il caso d’uso più comune per il Copy-Tape è quello di migrare i dati contenuti sui nastri di una vecchia tecnologia (LT06) verso una nuova (LTO9), visto che la nuova tecnologia non sarebbe in grado di leggere nativamente i dati contenuti sui vecchi nastri.
Le fasi che ci permetteranno di raggiungere il nostro scopo sono due:
Fase 1: creazione di un pool di nastri afferente alla seconda libreria.
Fase 2: job di copia del tape.
Fase 1
La creazione del Media Pool (immagine 1), dovrà essere personalizzato impostando:
L’utilizzo di un nuovo nastro per ogni sessione di copia (immagine 2).
Impostazione di una retention che per quel gruppo di nastri coincida con quella richiesta dalla politica GFS (immagine 3).
Immagine 1
Immagine 2
Immagine 3
Nota3: Nell’immagine 3 è stata impostata una retention di 4 settimane che risponde alla necessità di tenere il full settimanale per 1 mese.
Nota4: L’immagine 4 evidenzia la possibilità di realizzare una politica di Vault per l’archiviazione dei nastri.
Immagine 4
FASE 2
Dall’interfaccia grafica di VBR selezionando con il tastro destro del mouse il nastro da copiare (immagine 5) è possibile avviare il comando di copia.
Immagine 5
I semplici passaggi successivi mostrati dalle immagini 6,7,8 e 9 mostrano come completare l’operazione di copia.
Immagine 6
Immagine 7
Immagine 8
Immagine 9
Ultime note:
La documentazione alla quale fare riferimento per conoscere quante risorse è indispensabile assegnare ai vari componenti è disponibile al seguente link.
In the previous article, we saw how to operate on backup jobs to obtain Fulls that can be used to create a GFS retention policy when the destination of the jobs is a tape.
In this second article, we find out how a similar result can be achieved by copying tapes.
Note1: A second tape library must be present in the DataCenter to pursue this protection process.
Note2: The most common use case for Copy-Tape is to migrate data contained on tapes from an old technology (LT06) to a new one (LTO9), since the new technology would not be able to natively read the data contained on the old tapes.
There are two steps that will enable us to achieve our goal:
Step 1: Creation of a tape pool afferent to the second library.
Step 2: Tape copy job.
Stage 1
The creation of the Media Pool (image 1), will need to be customized by setting:
The use of a new tape for each copy session (image 2).
Setting a retention that for that tape group coincides with that required by the GFS policy (image 3).
Picture 1
picture 2
Picture 3
Note3: A 4-week retention was set in Image 3, which addresses the need to keep the full weekly for 1 month.
Note4: Image 4 highlights the possibility of implementing a Vault policy for tape storage.
Picture 4
PHASE 2
From the VBR GUI by selecting the tape to be copied with the right mouse button (image 5), the copy command can be initiated.
Picture 5
The simple next steps shown by images 6,7,8 and 9 show how to complete the copying operation.
Picture 6
Picture 7
Image 8
Image 9
Latest notes:
Documentation to refer to in order to know how many resources it is essential to allocate to the various components is available at the following link.

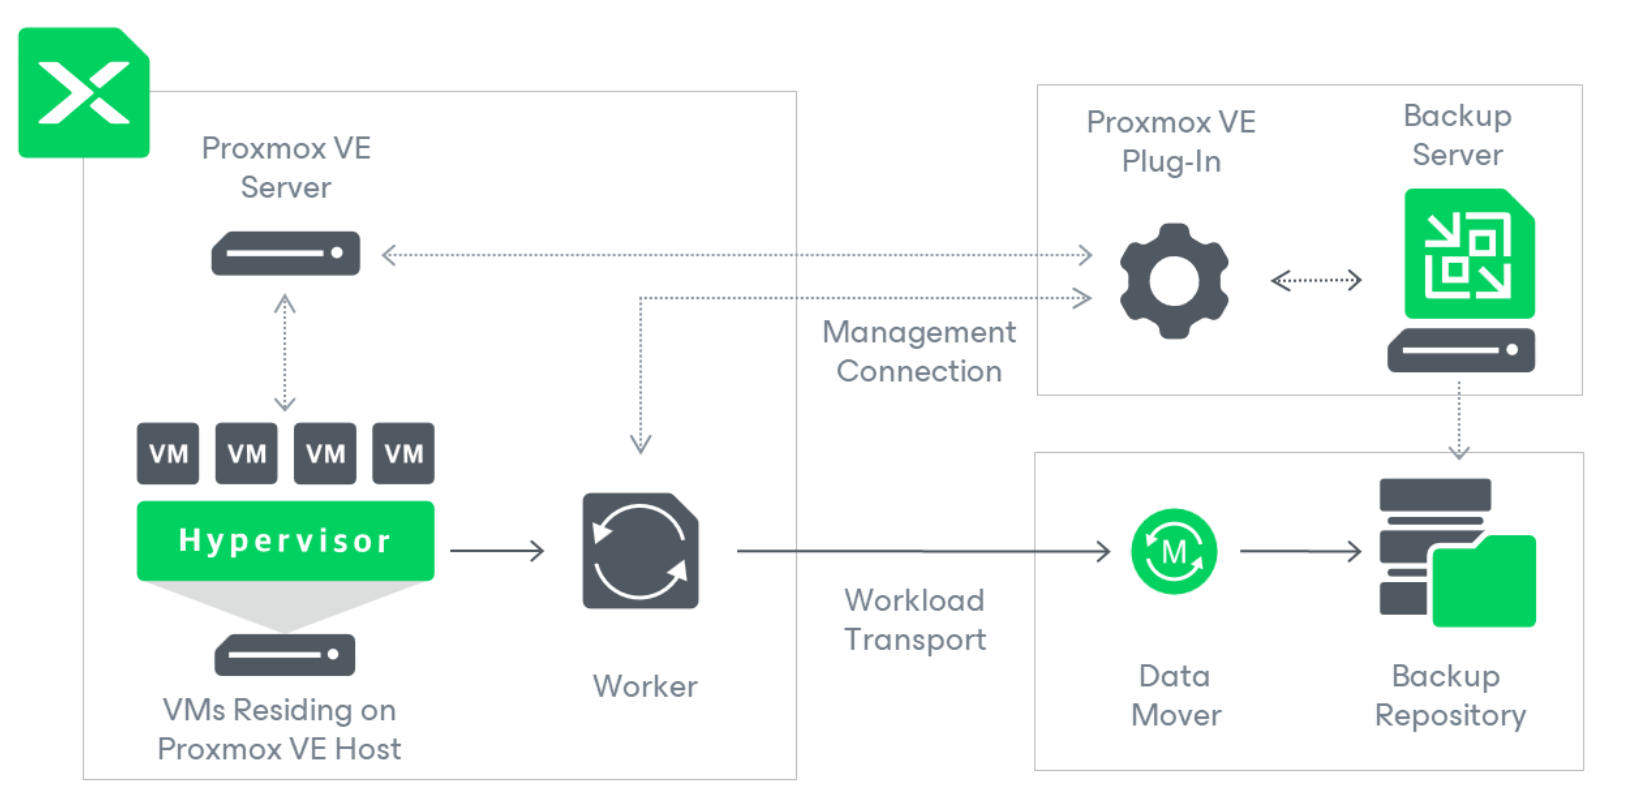 Immagine 1
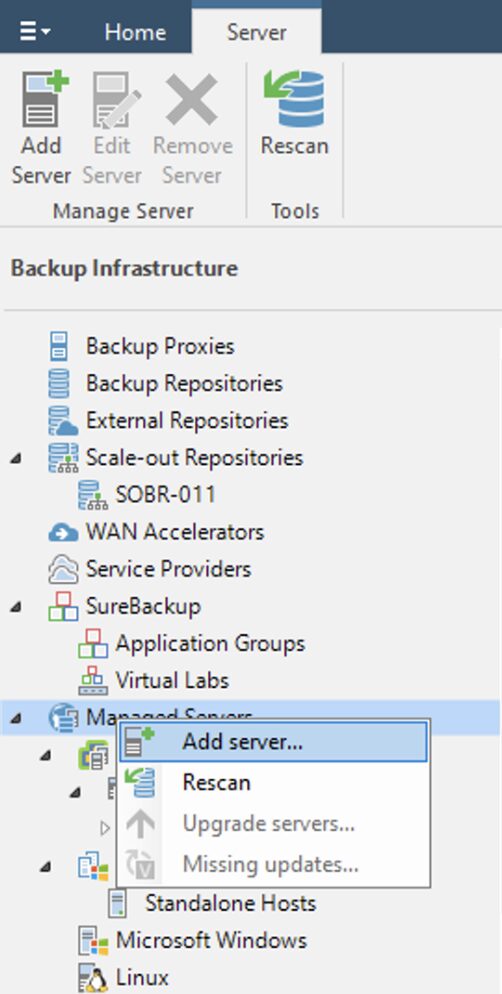 Immagine 2
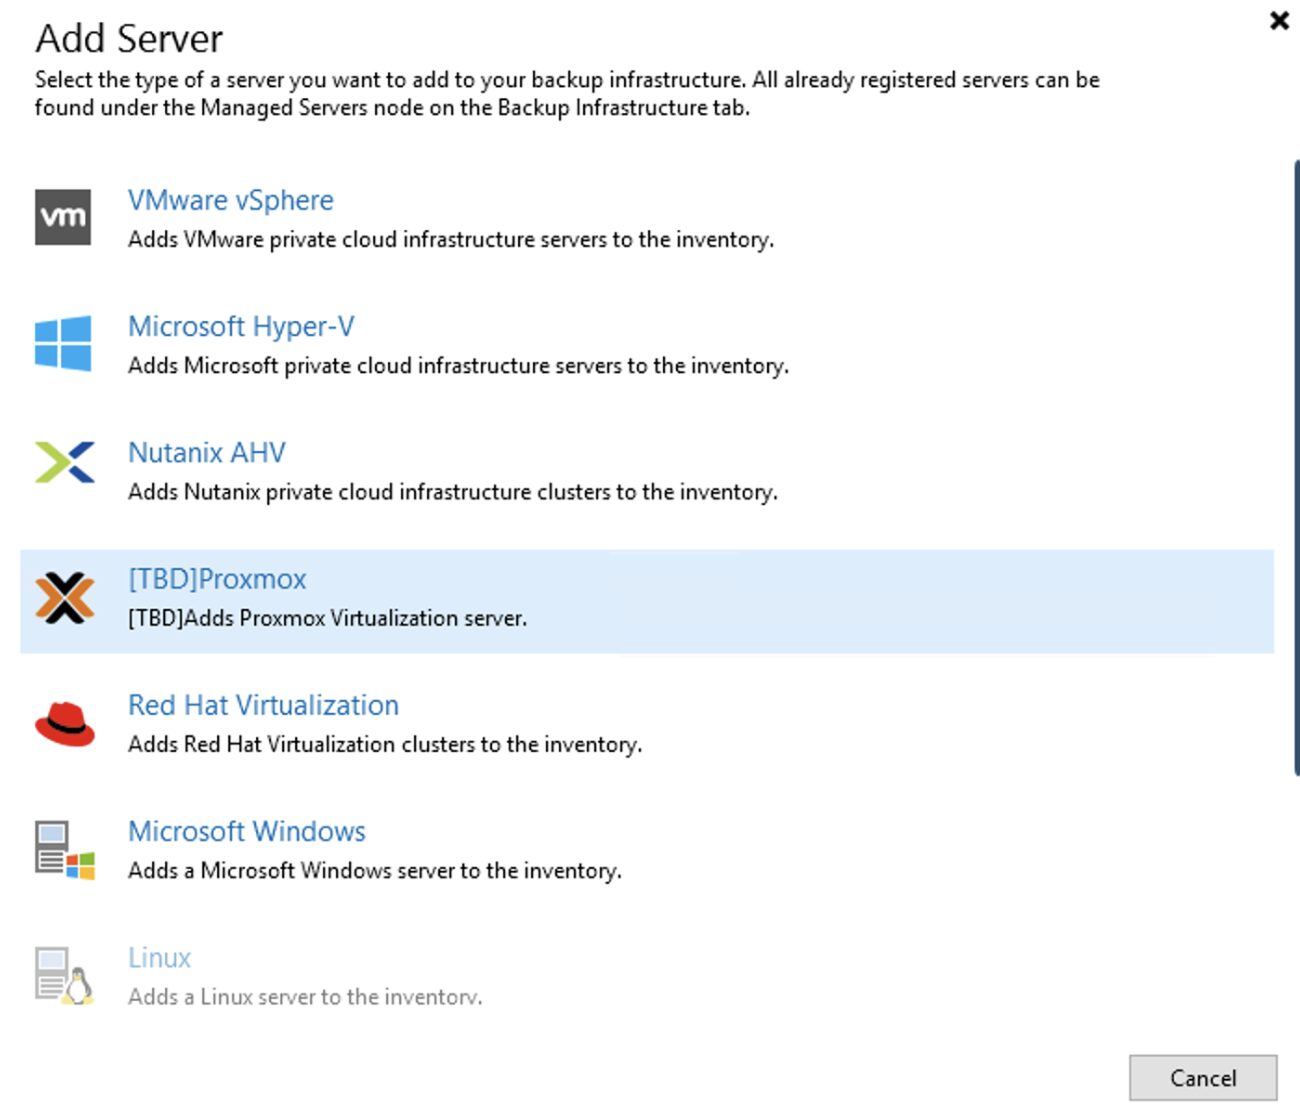 Immagine 3
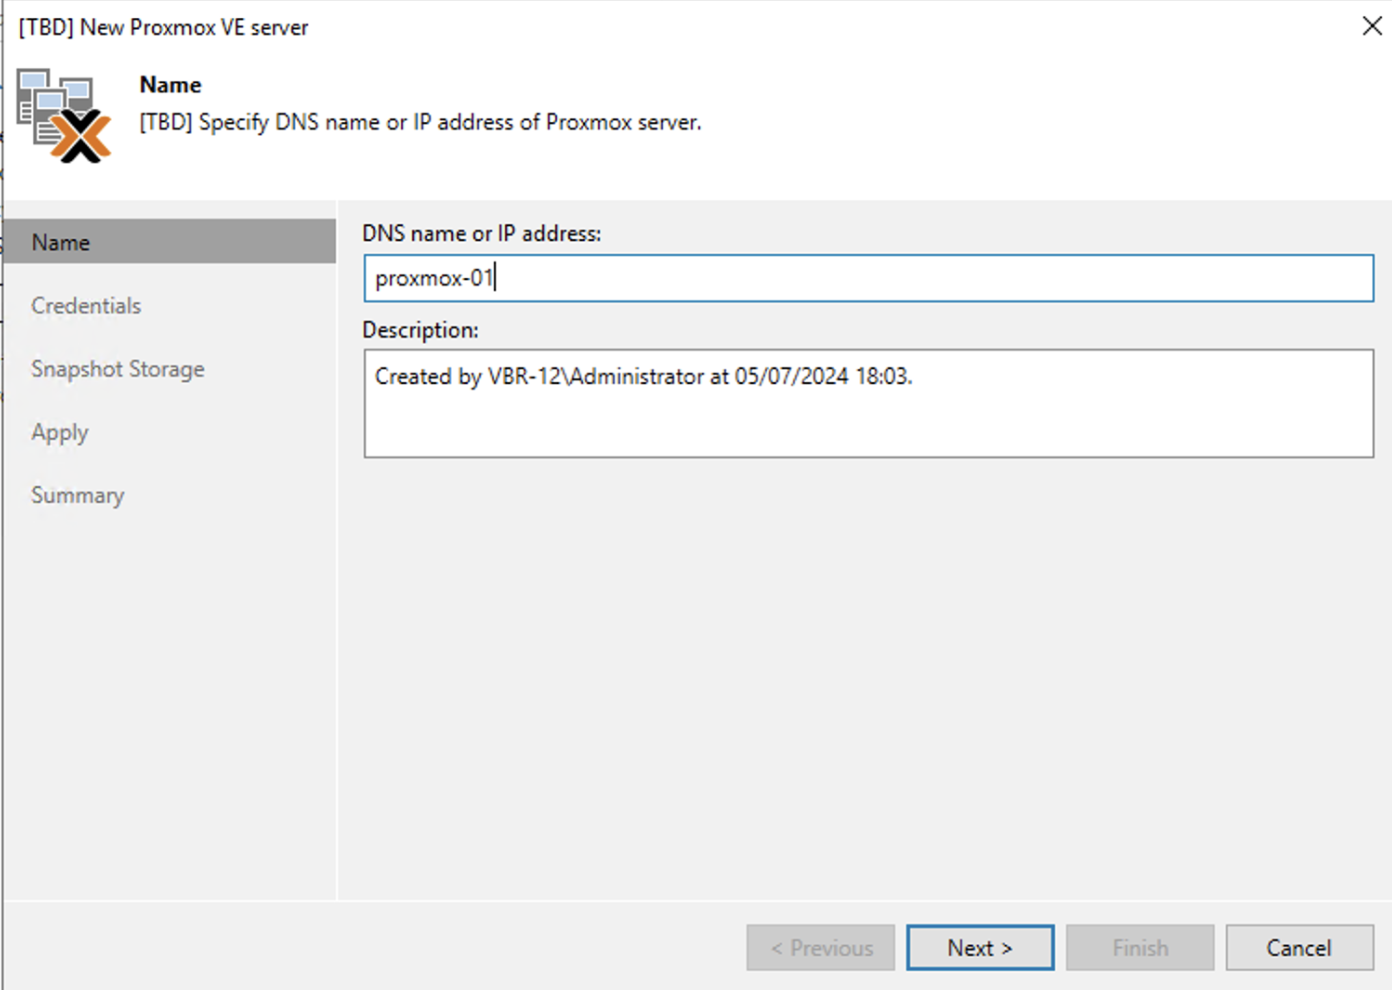 Immagine 4
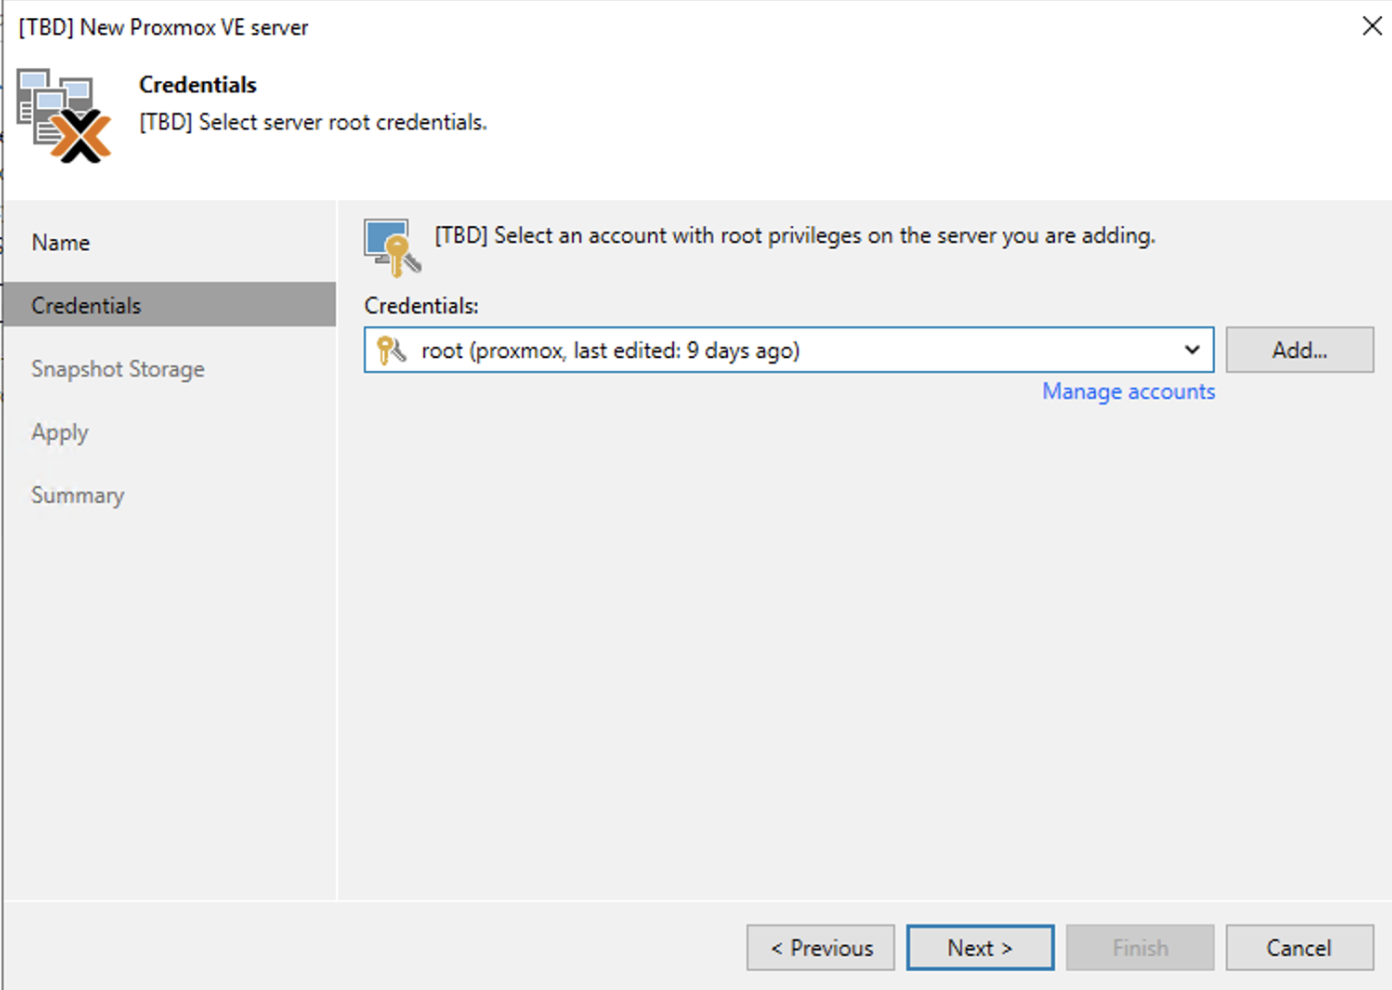 Immagine 5
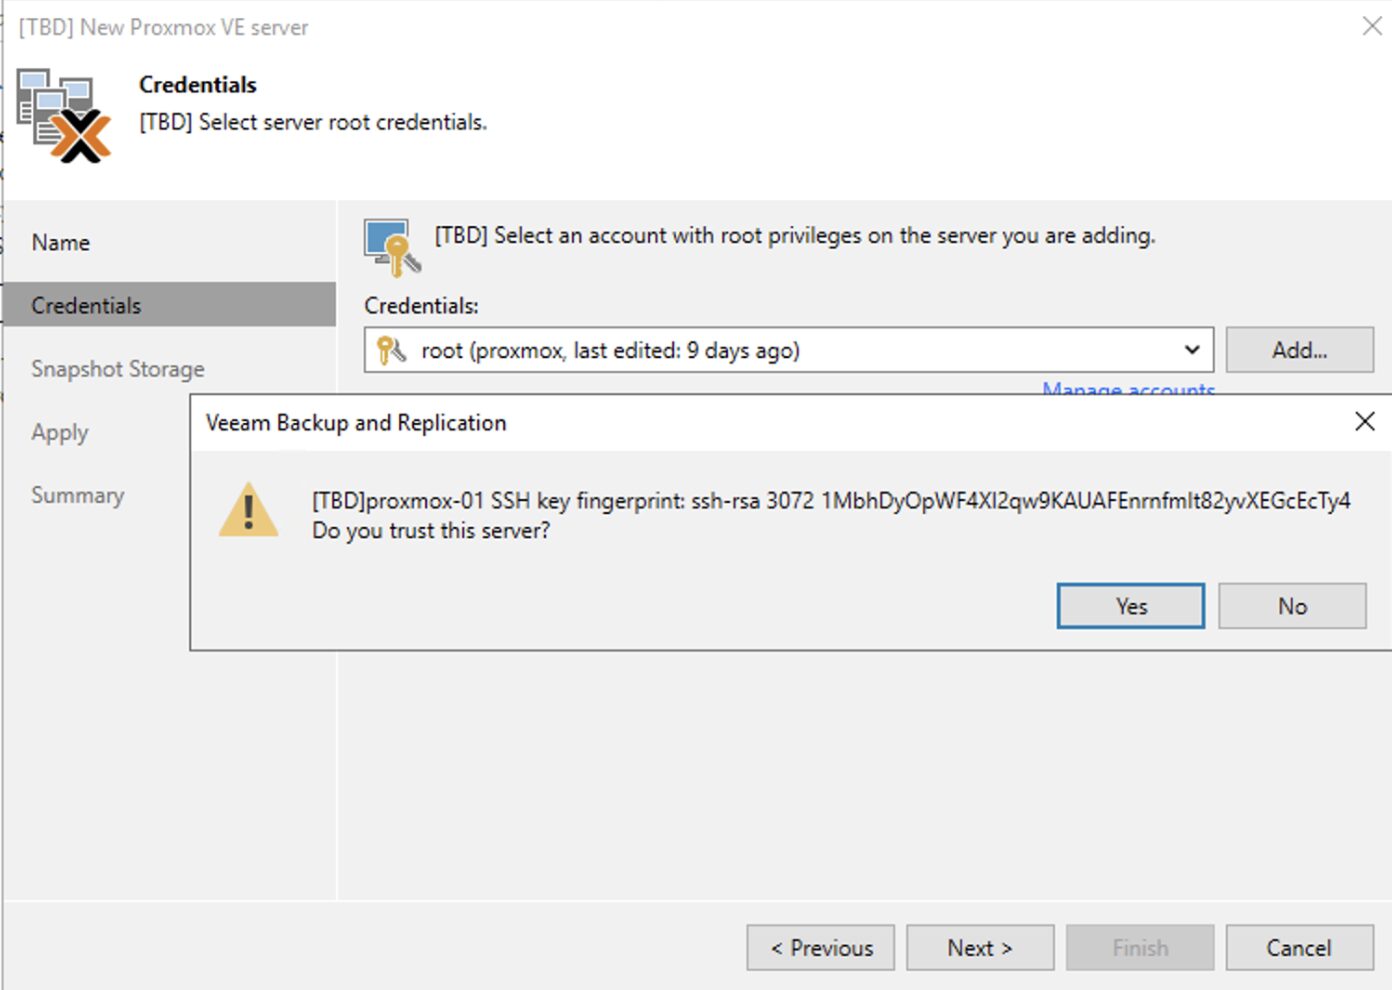 Immagine 6
 Immagine 7
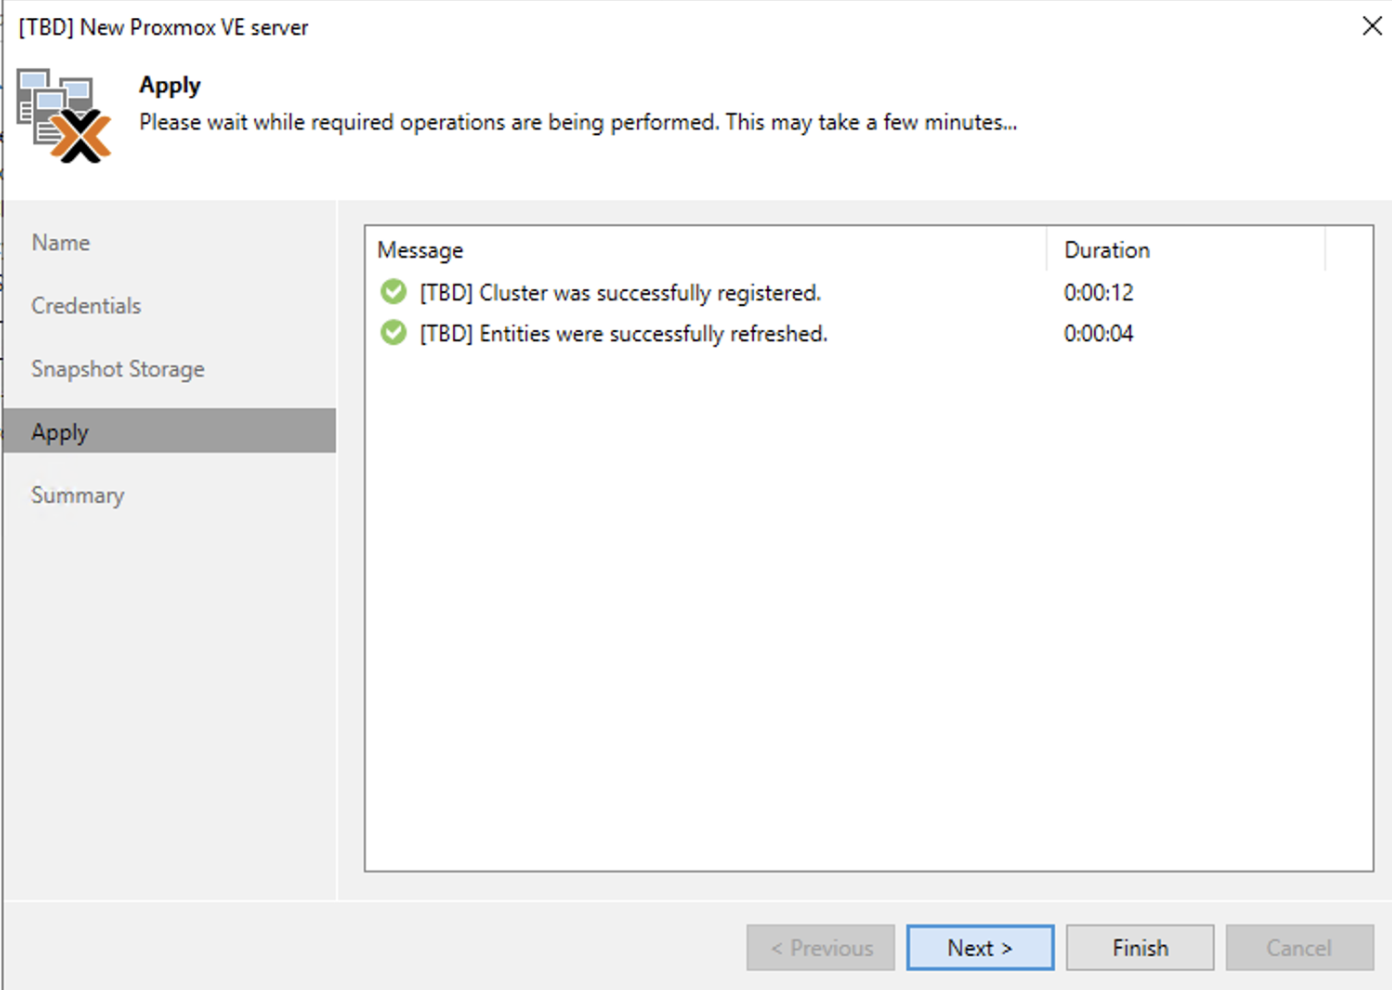 Immagine 8
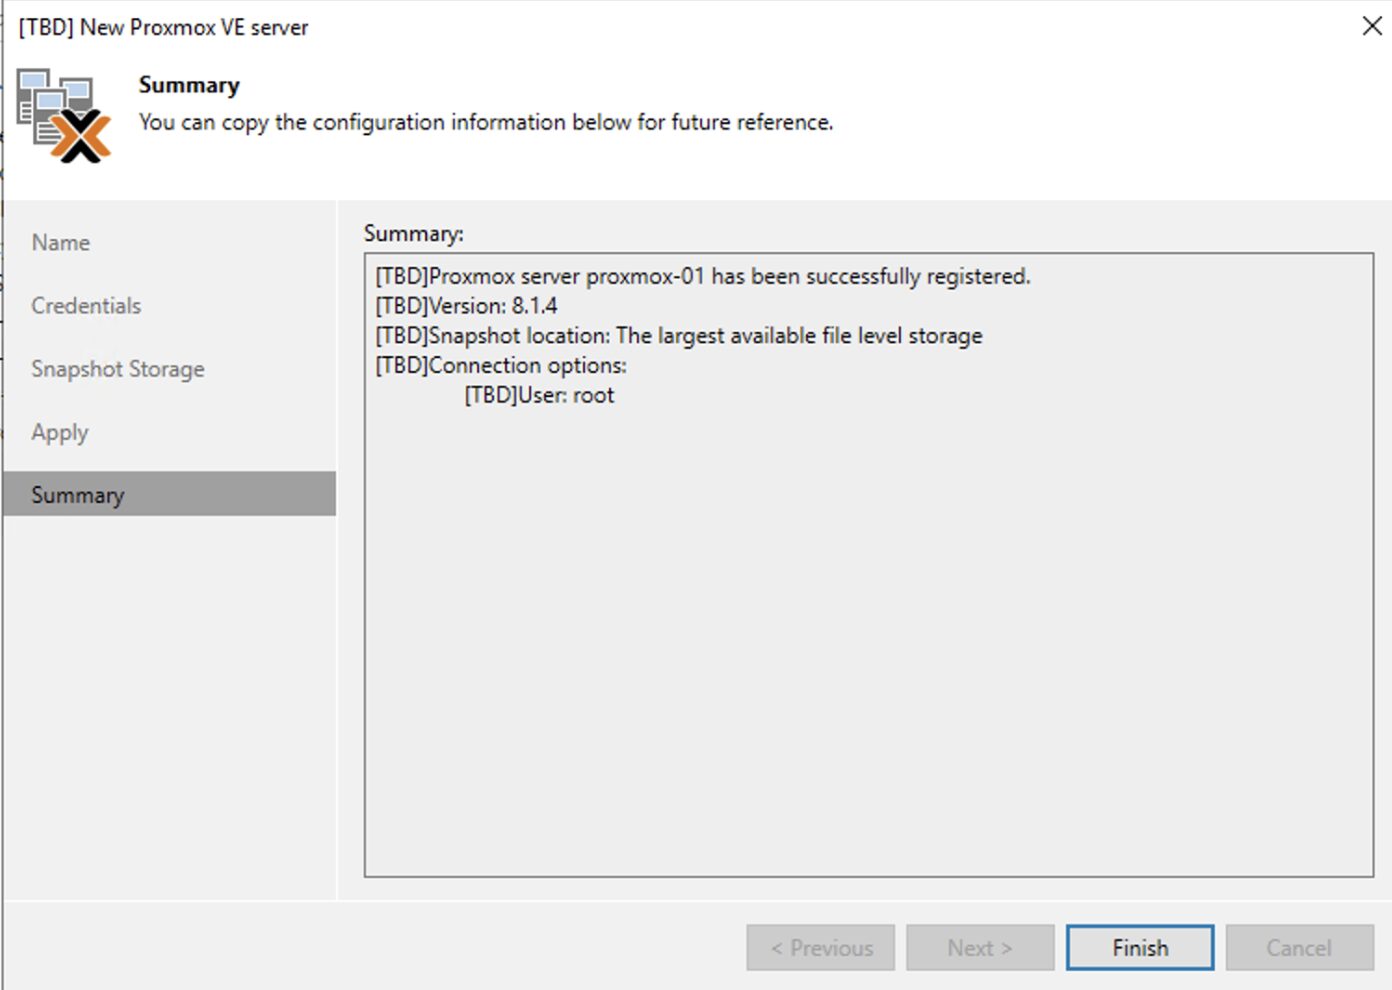 Immagine 9
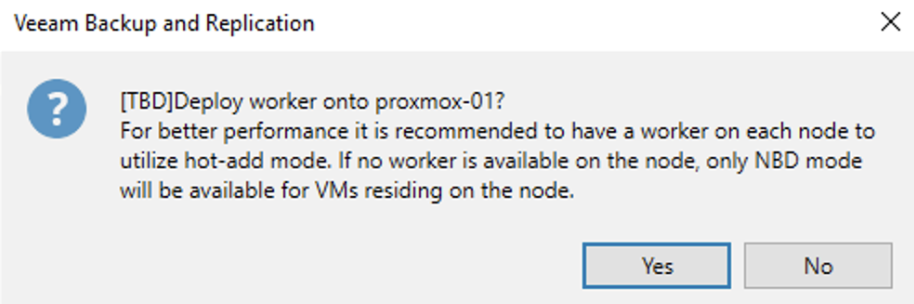 Immagine 10
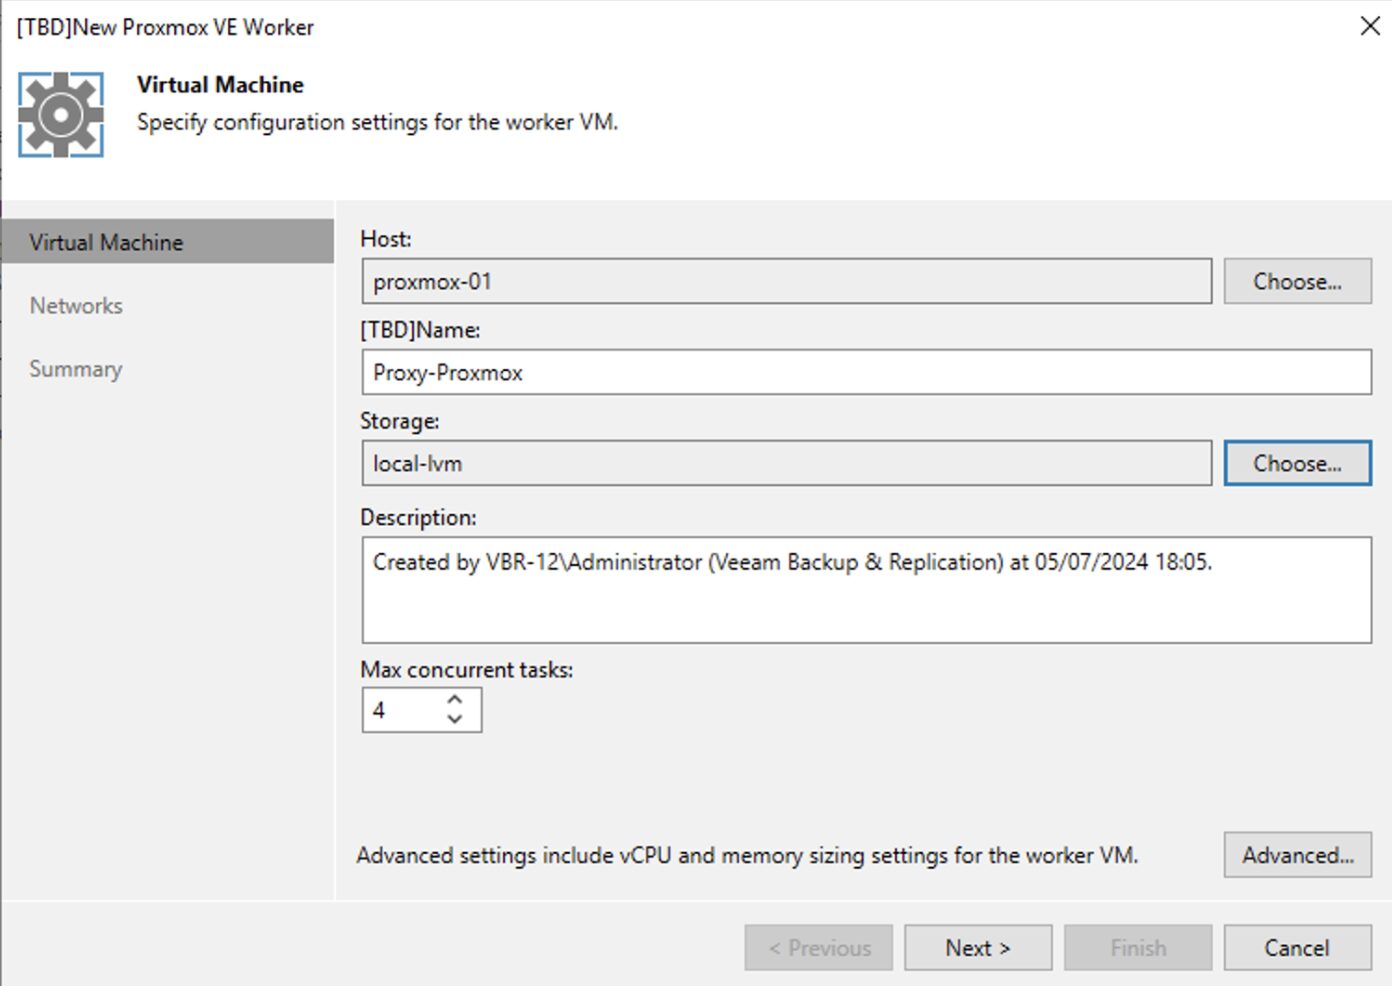 Immagine 11
 Immagine 12
 Immagine 13
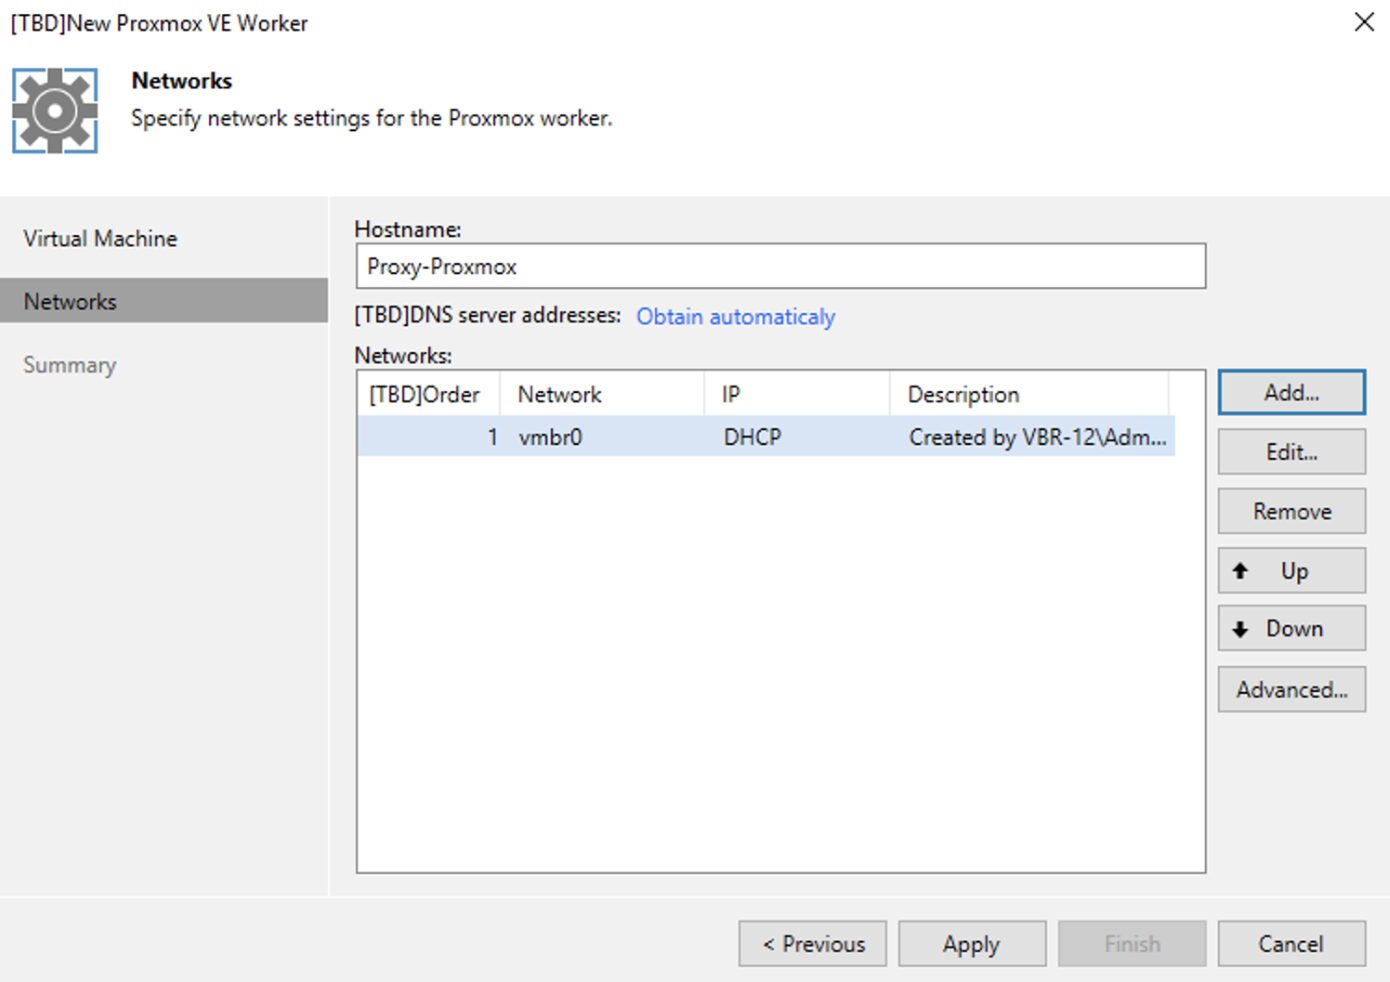 Immagine 14
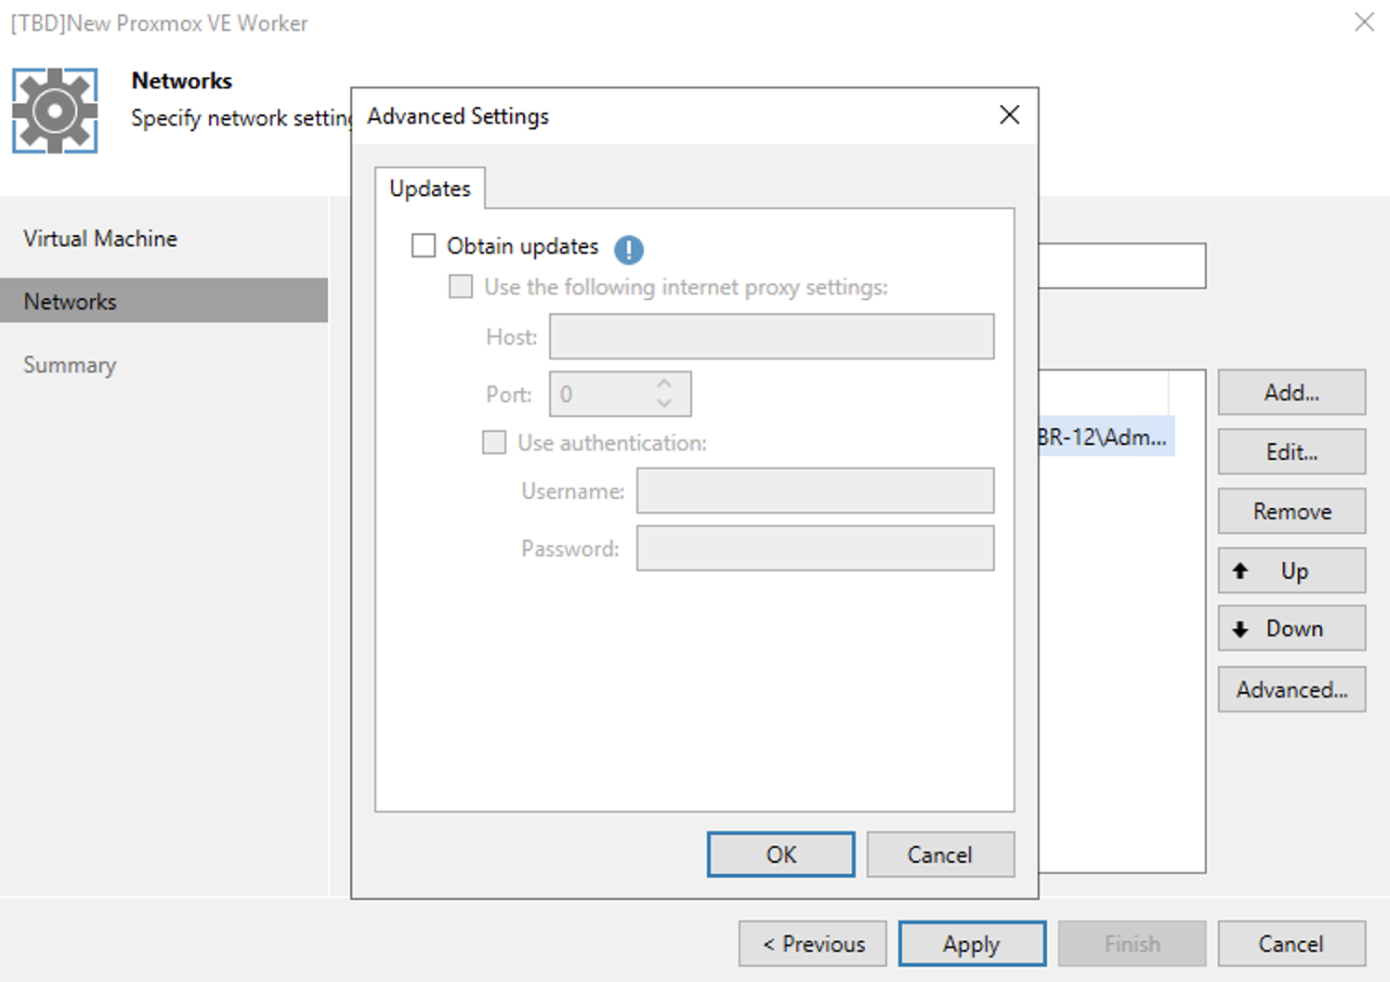 Immagine 15
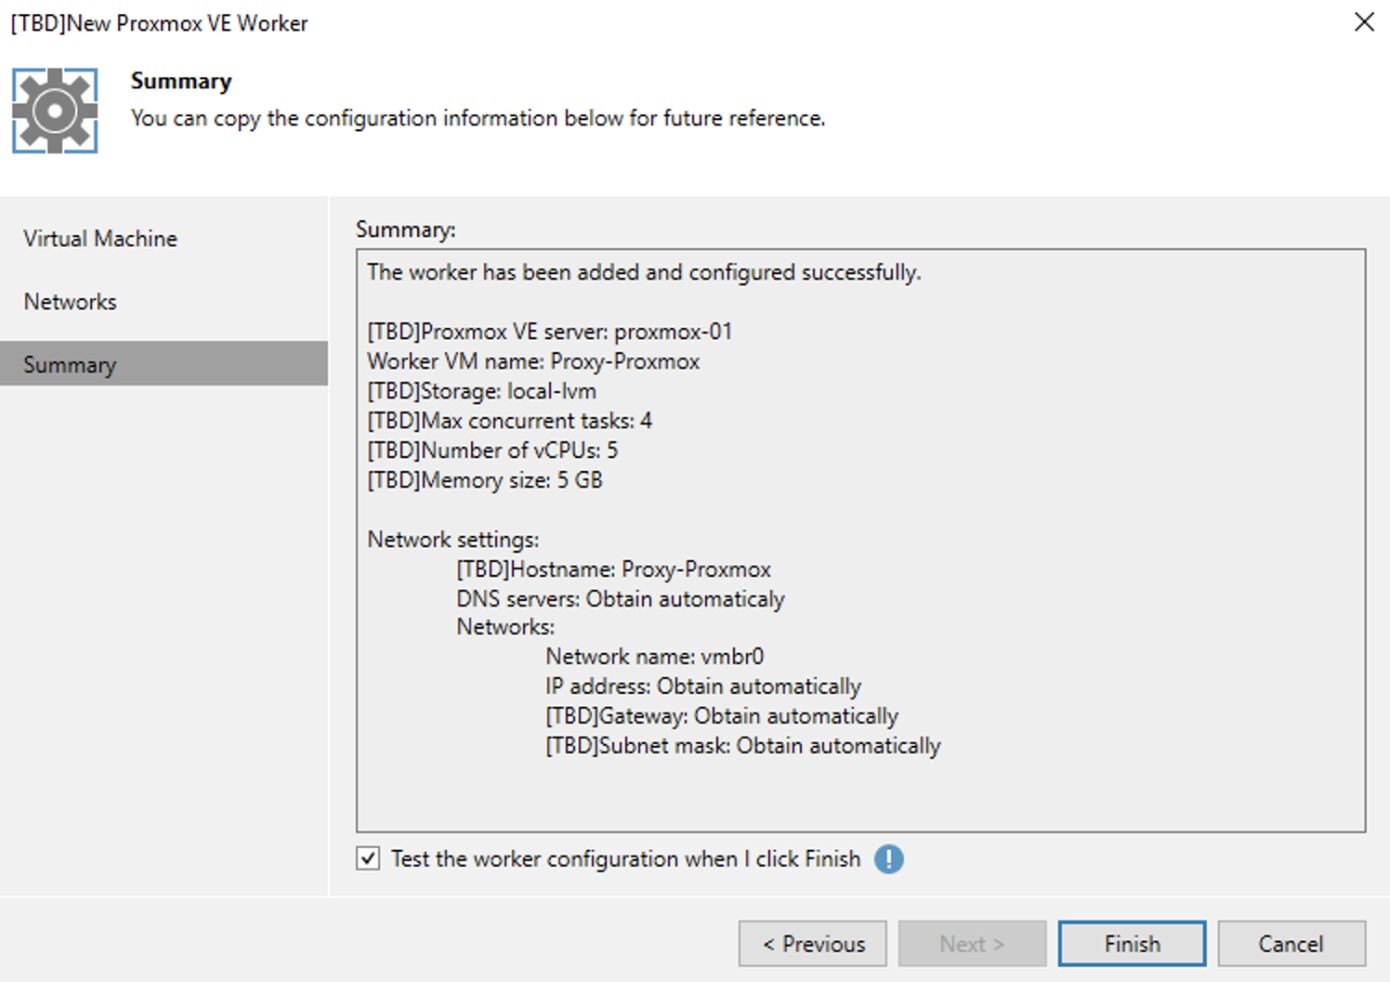 Immagine 16
 Immagine 1
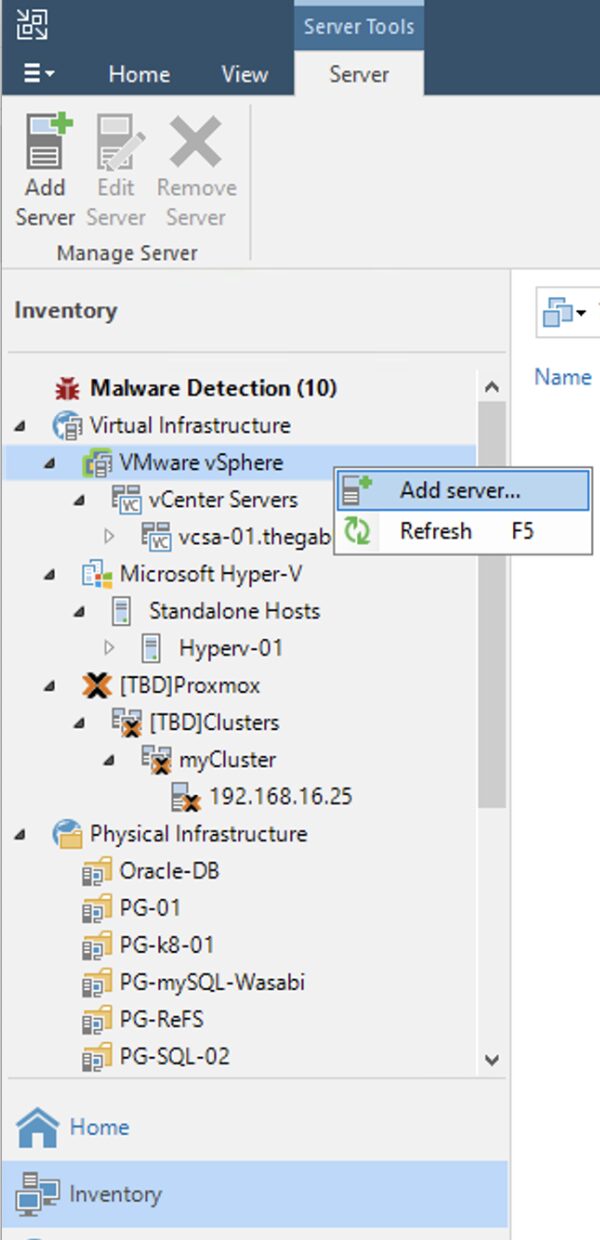 Immagine 2
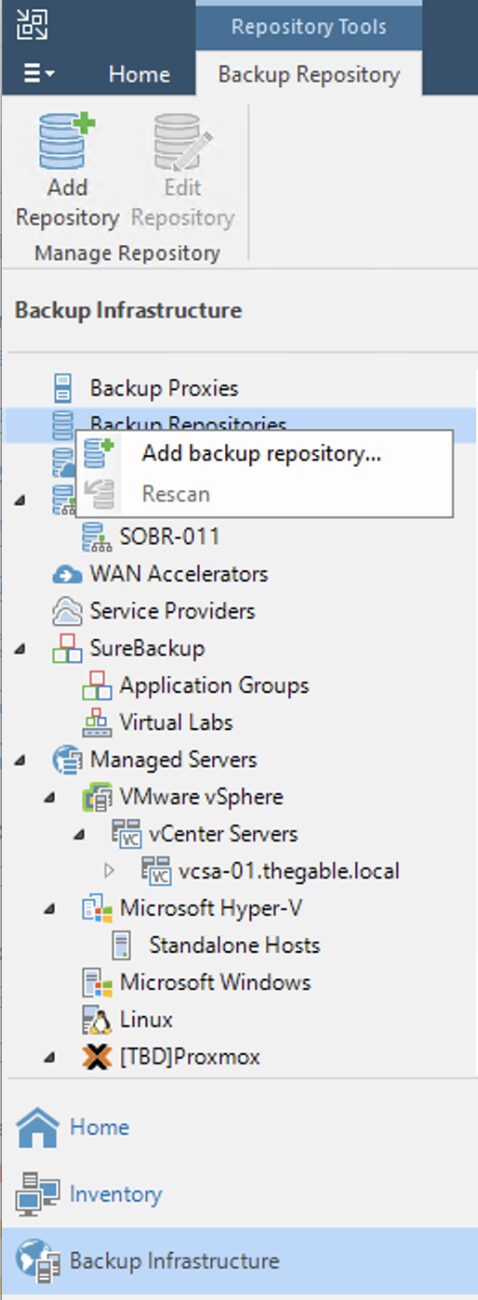 Immagine 3
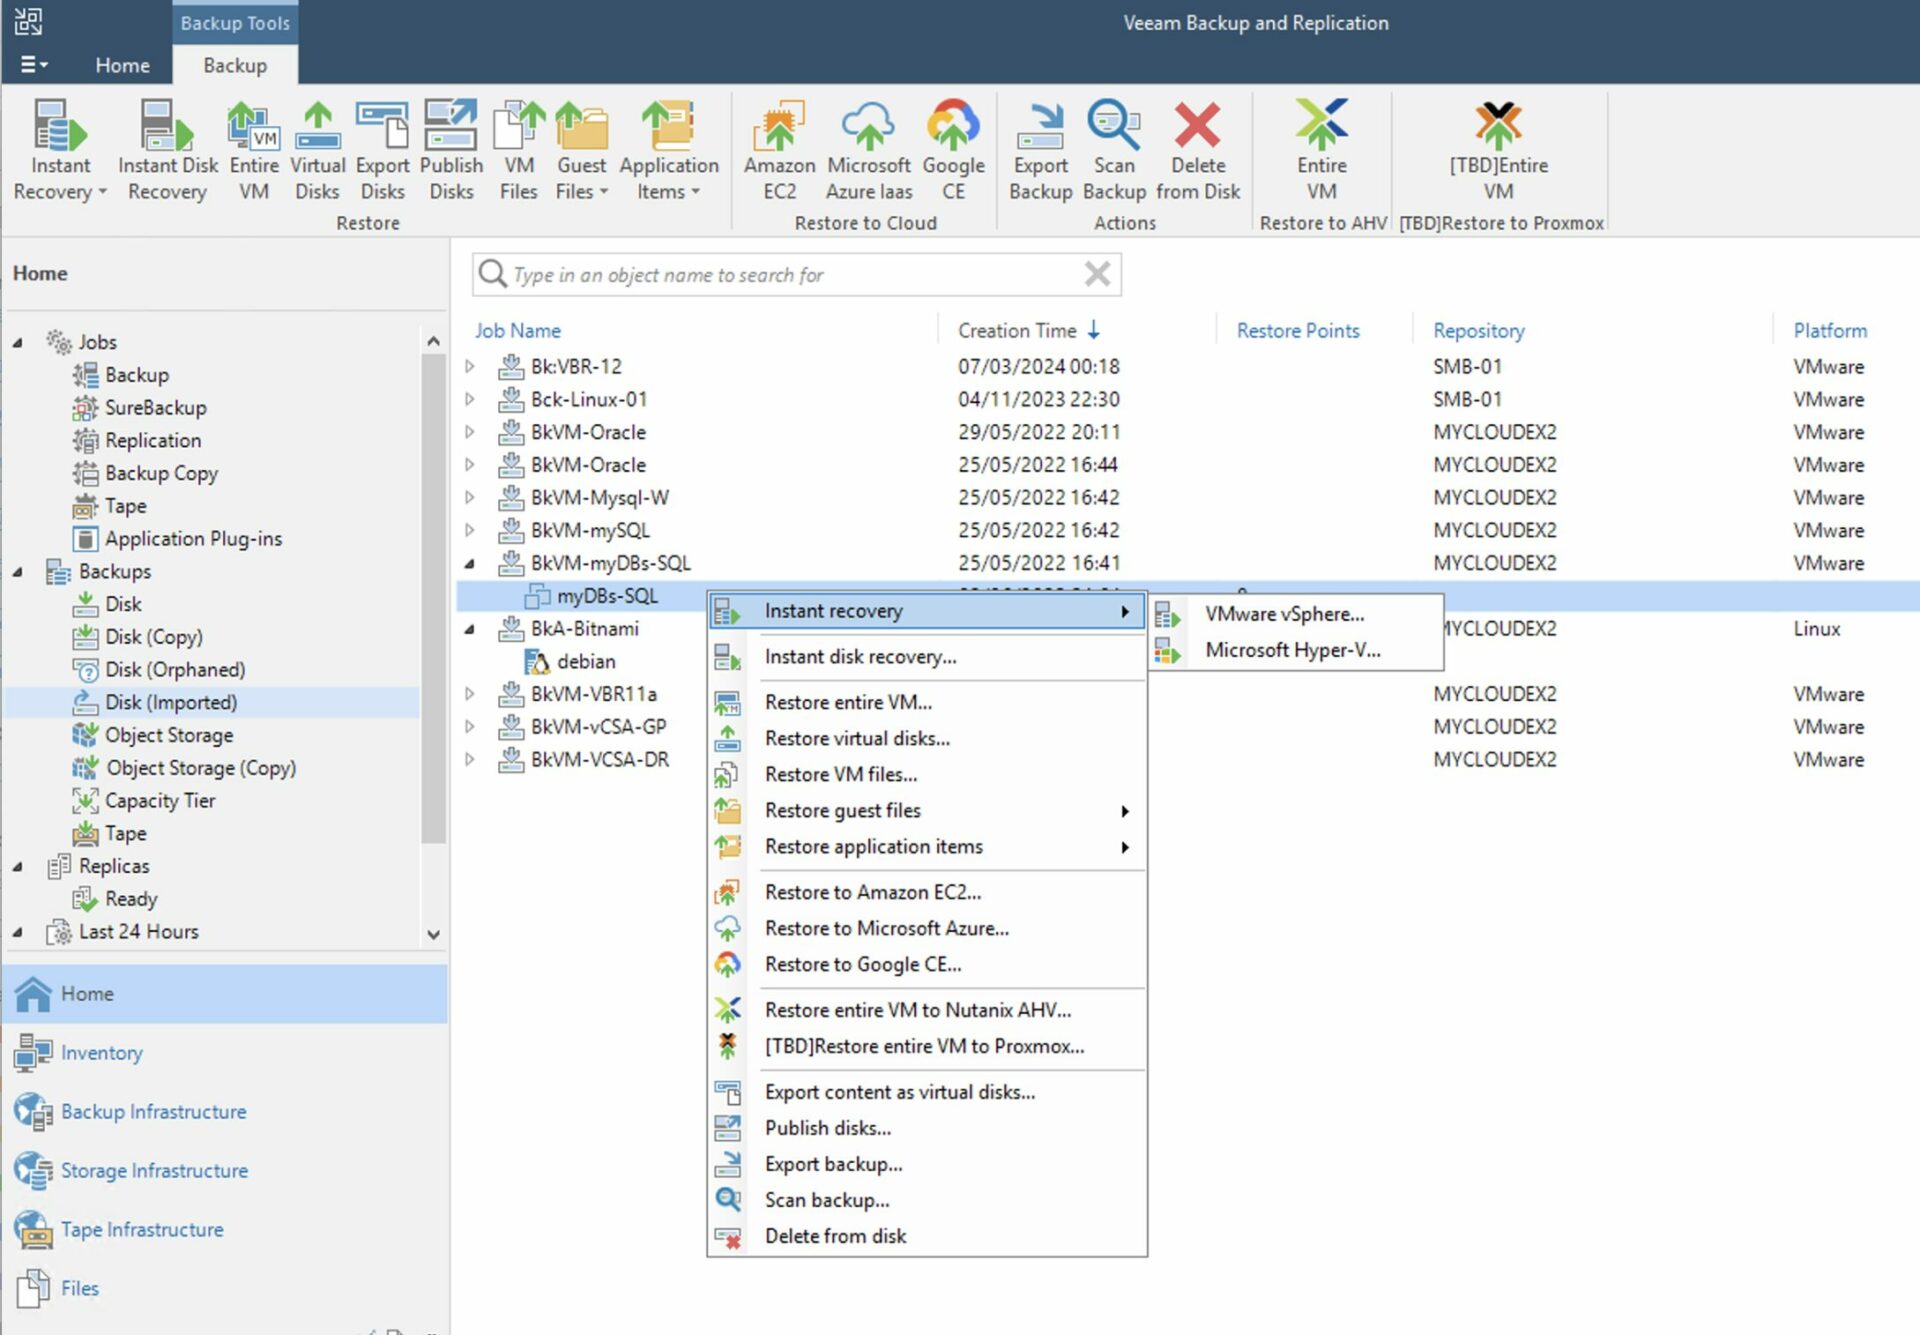 Immagine 4
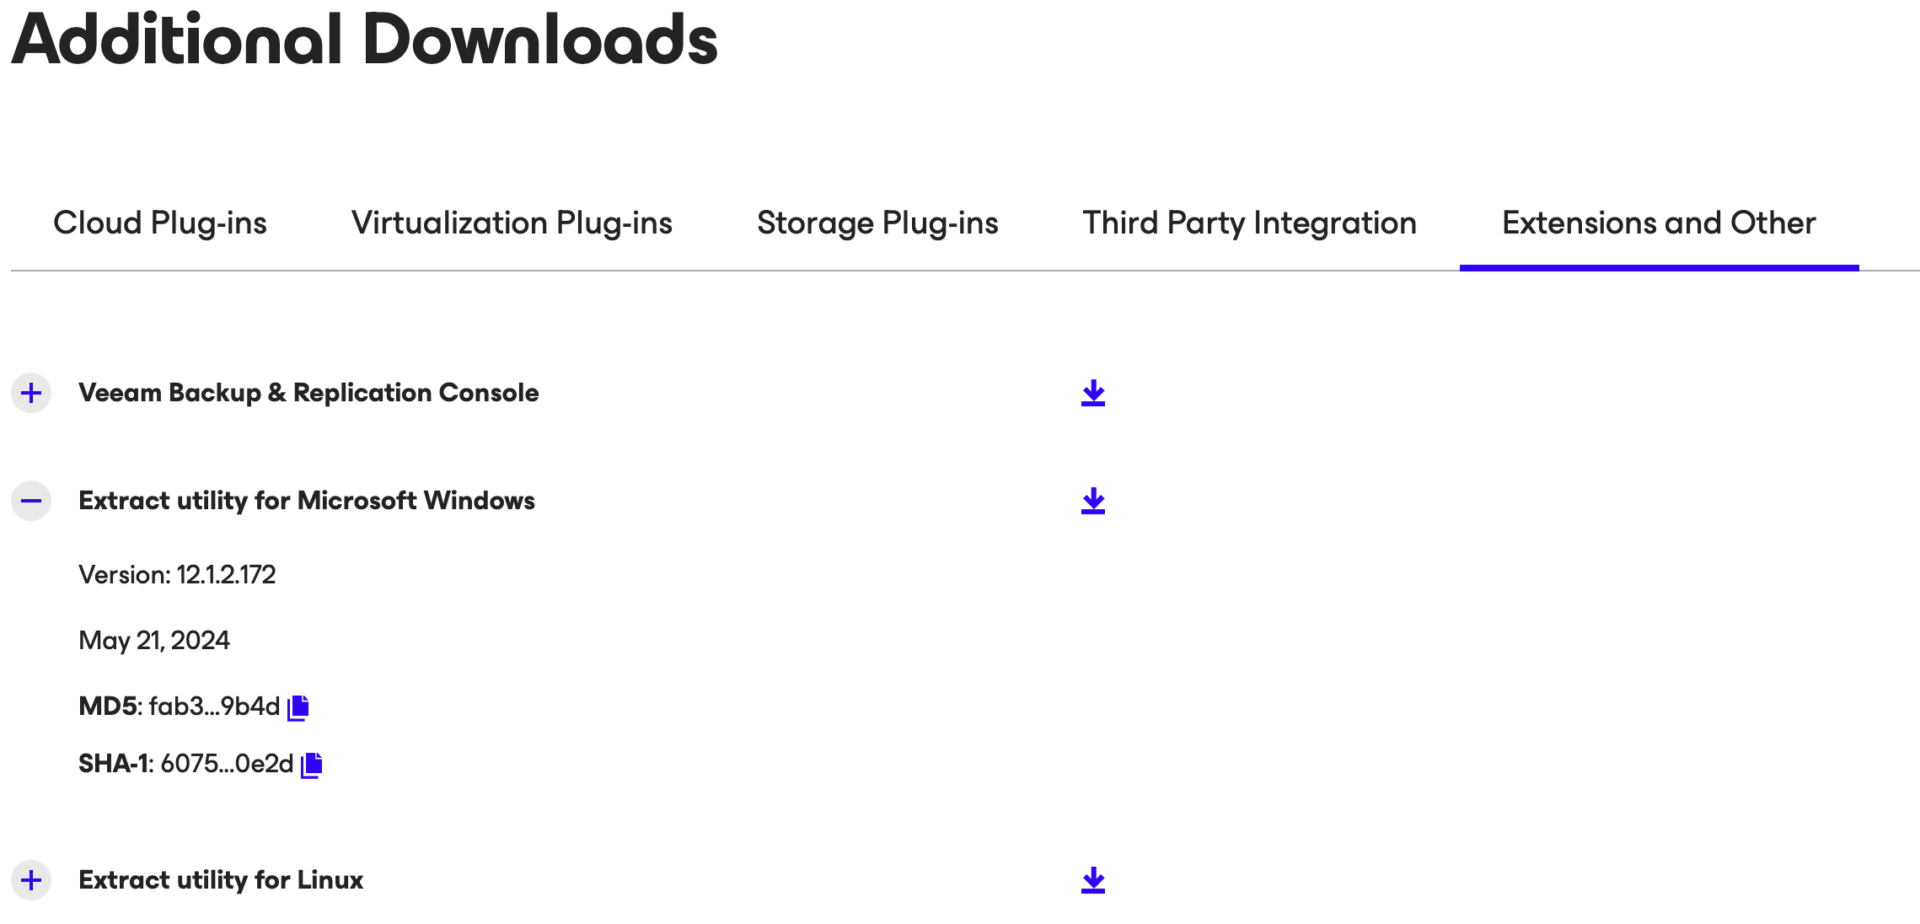 Immagine 5
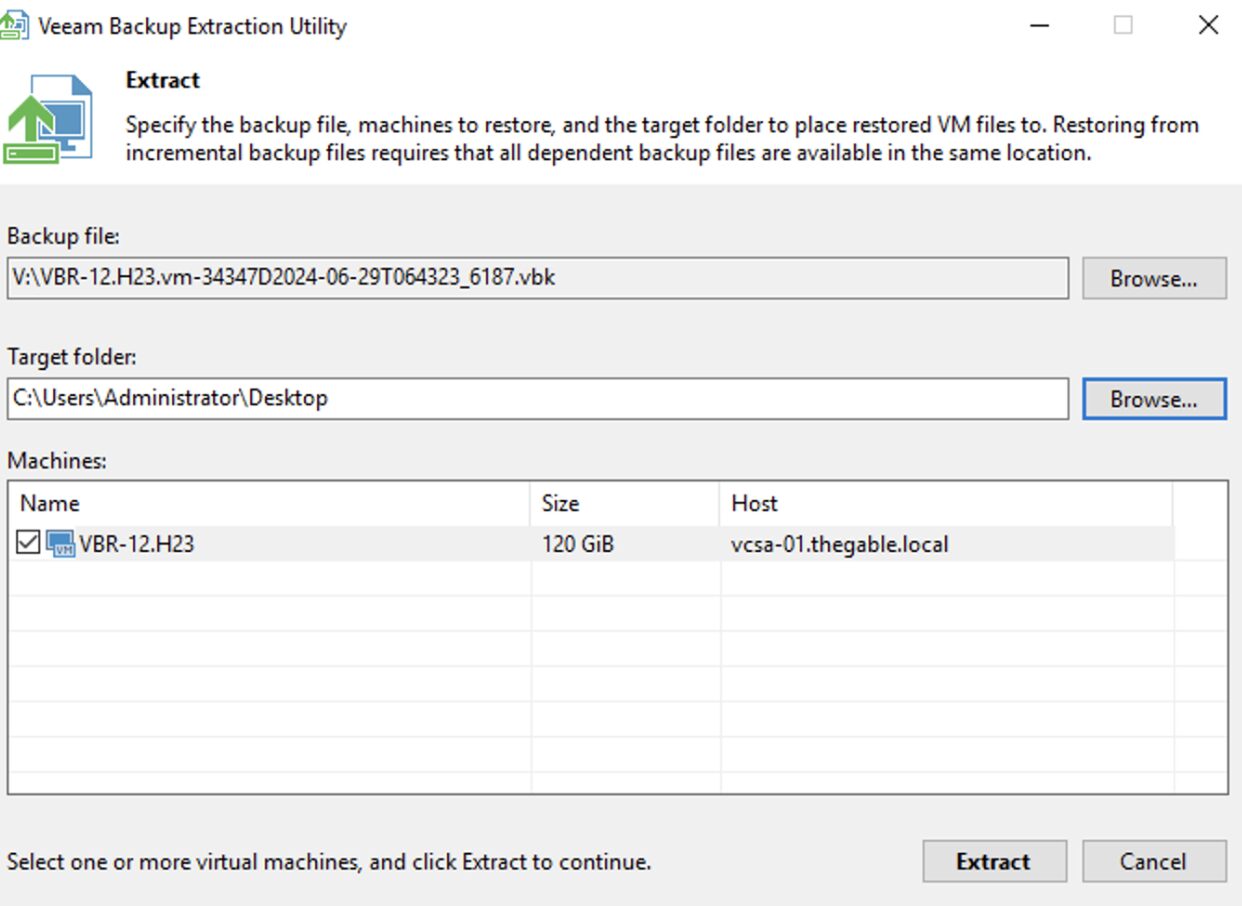 (Immagine 6)
 Immagine 7
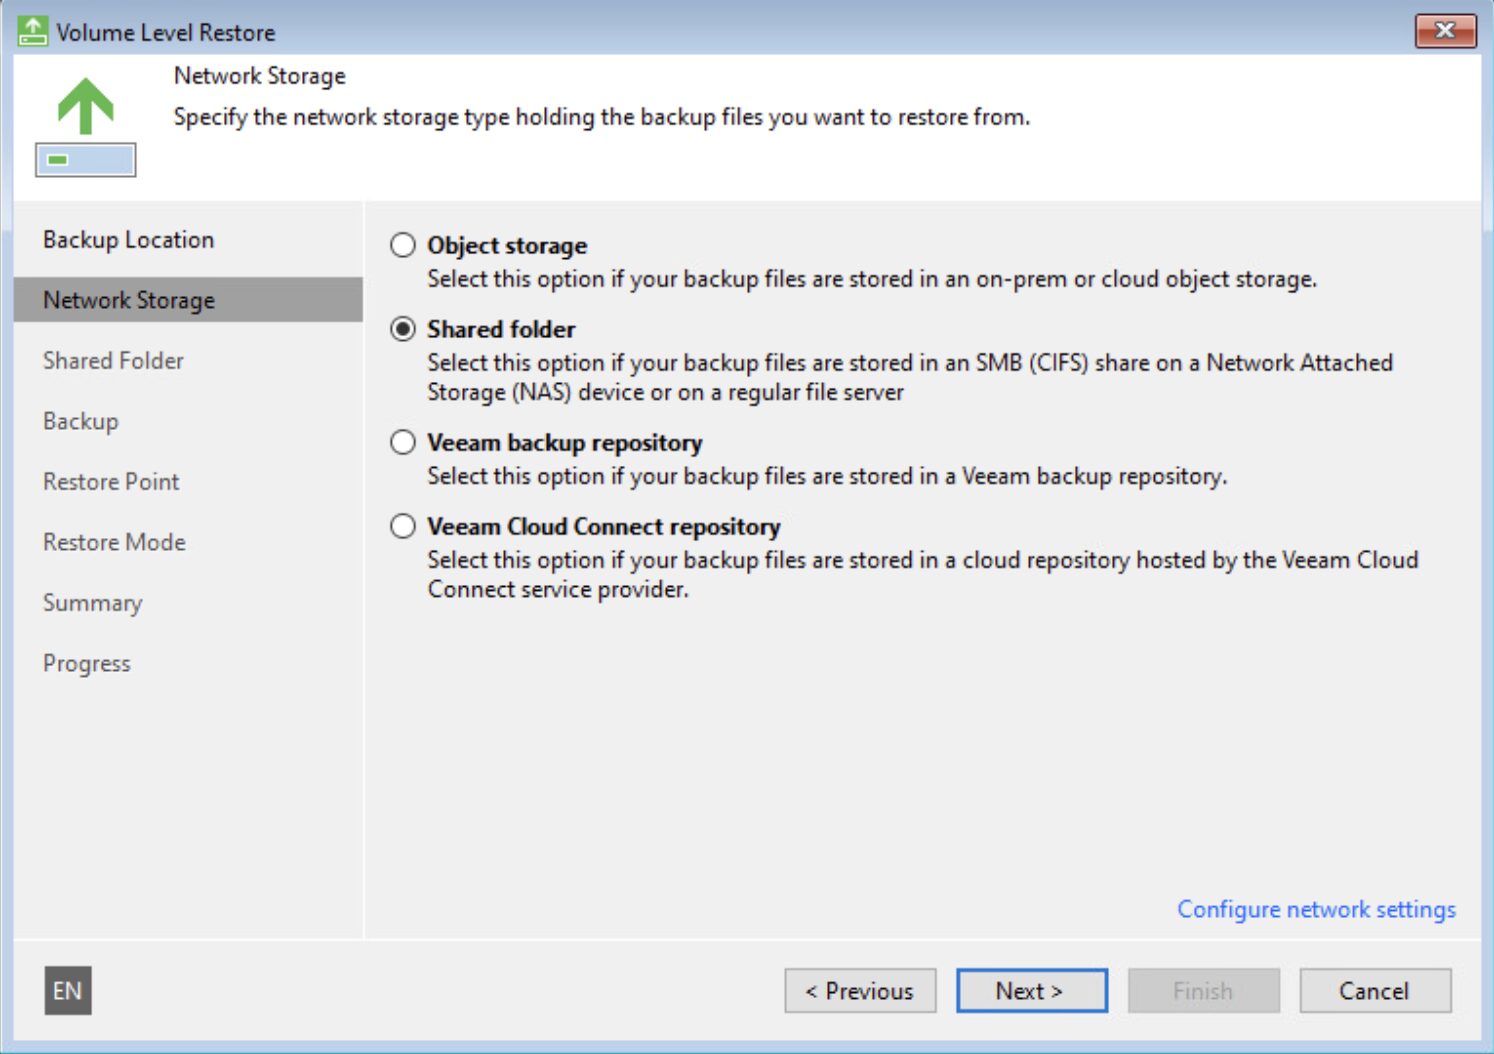 Immagine 8
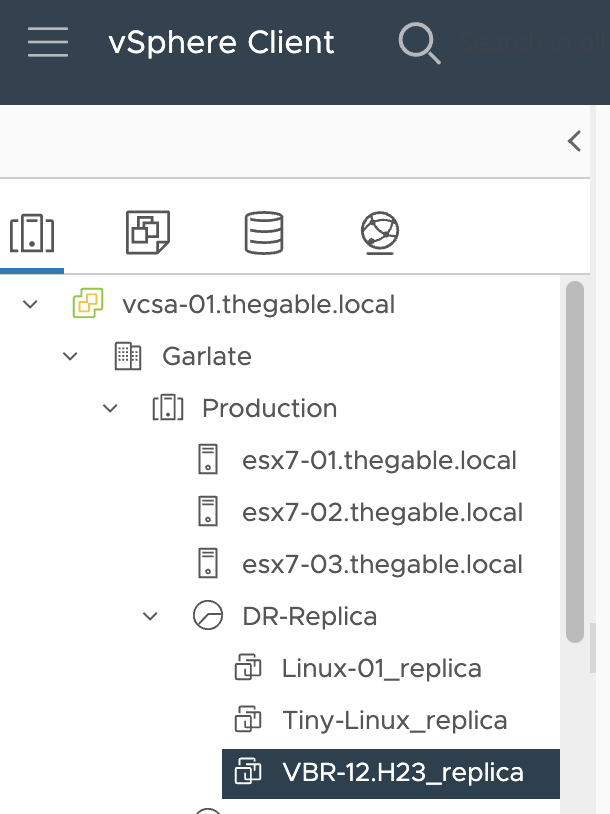 Immagine 9
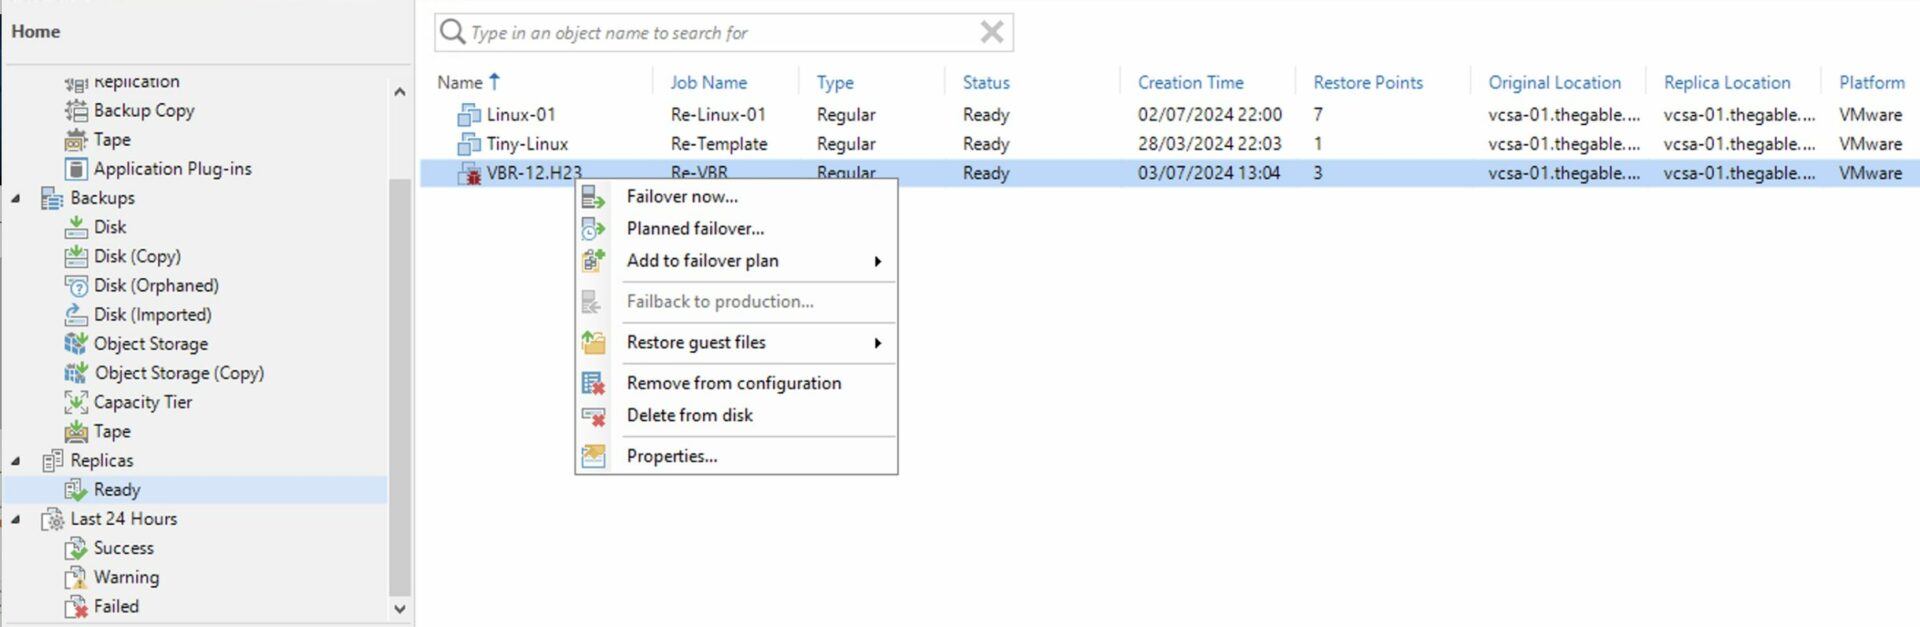 Immagine 10
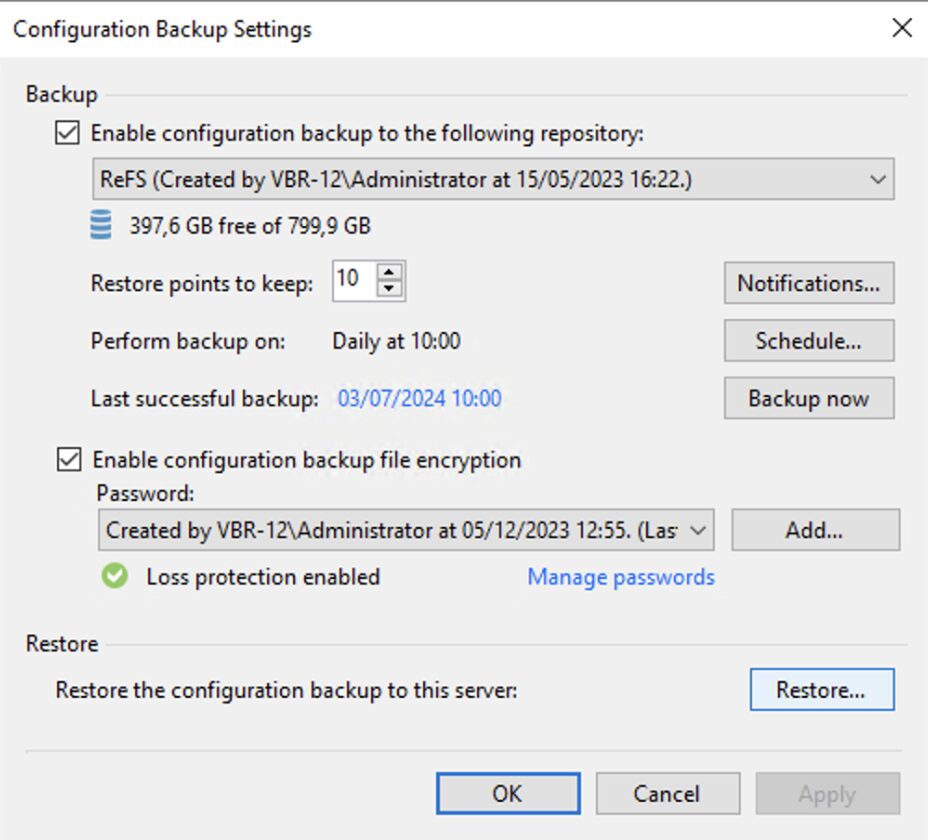 Immagine 11
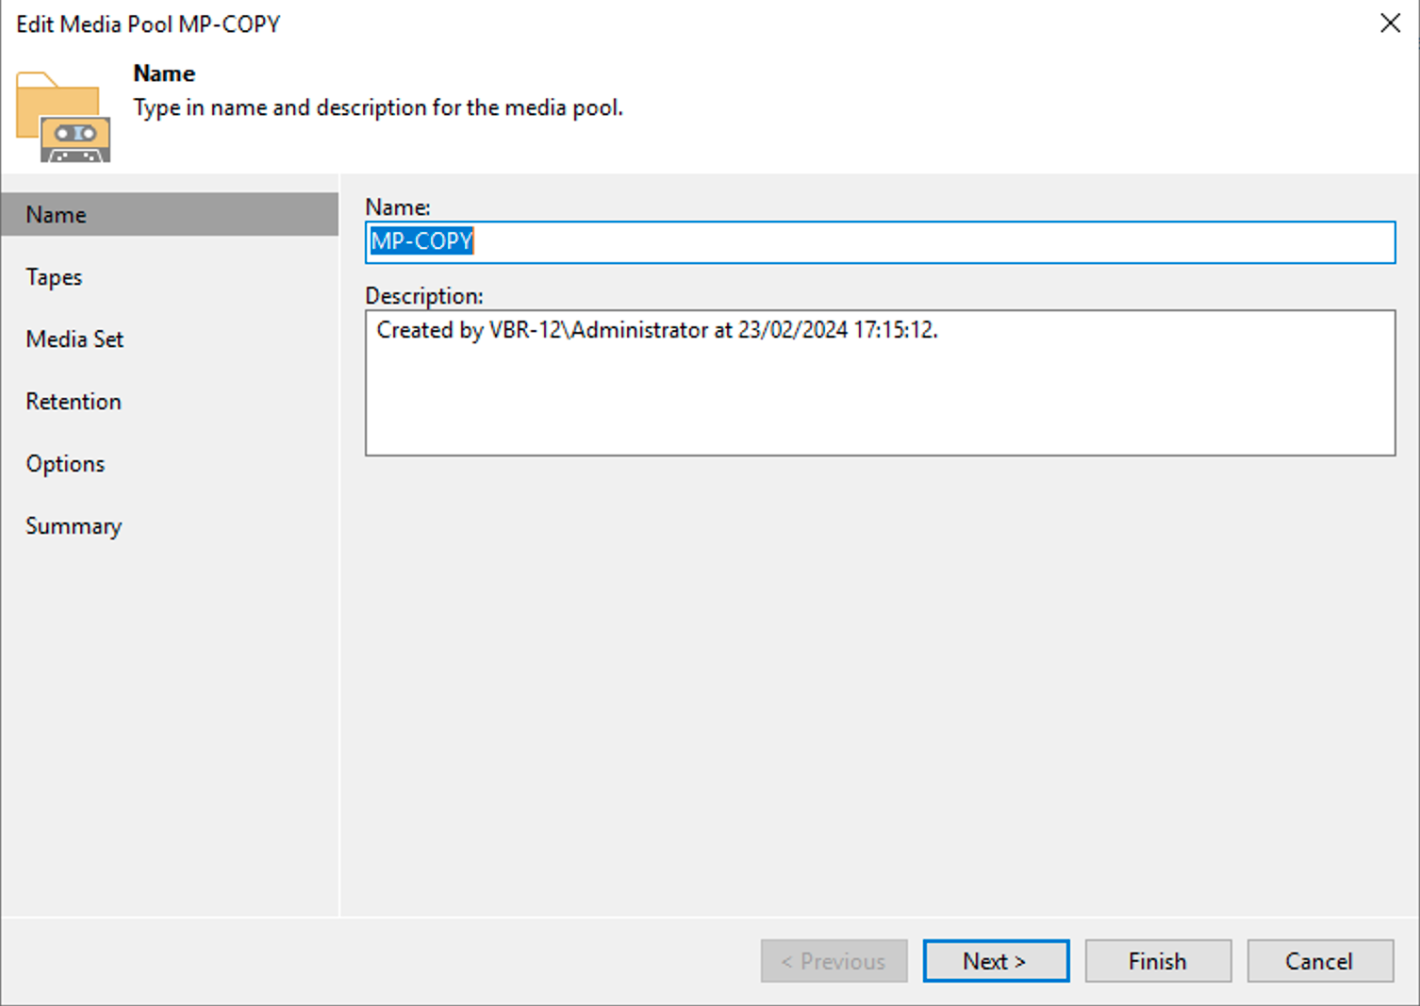 Immagine 1
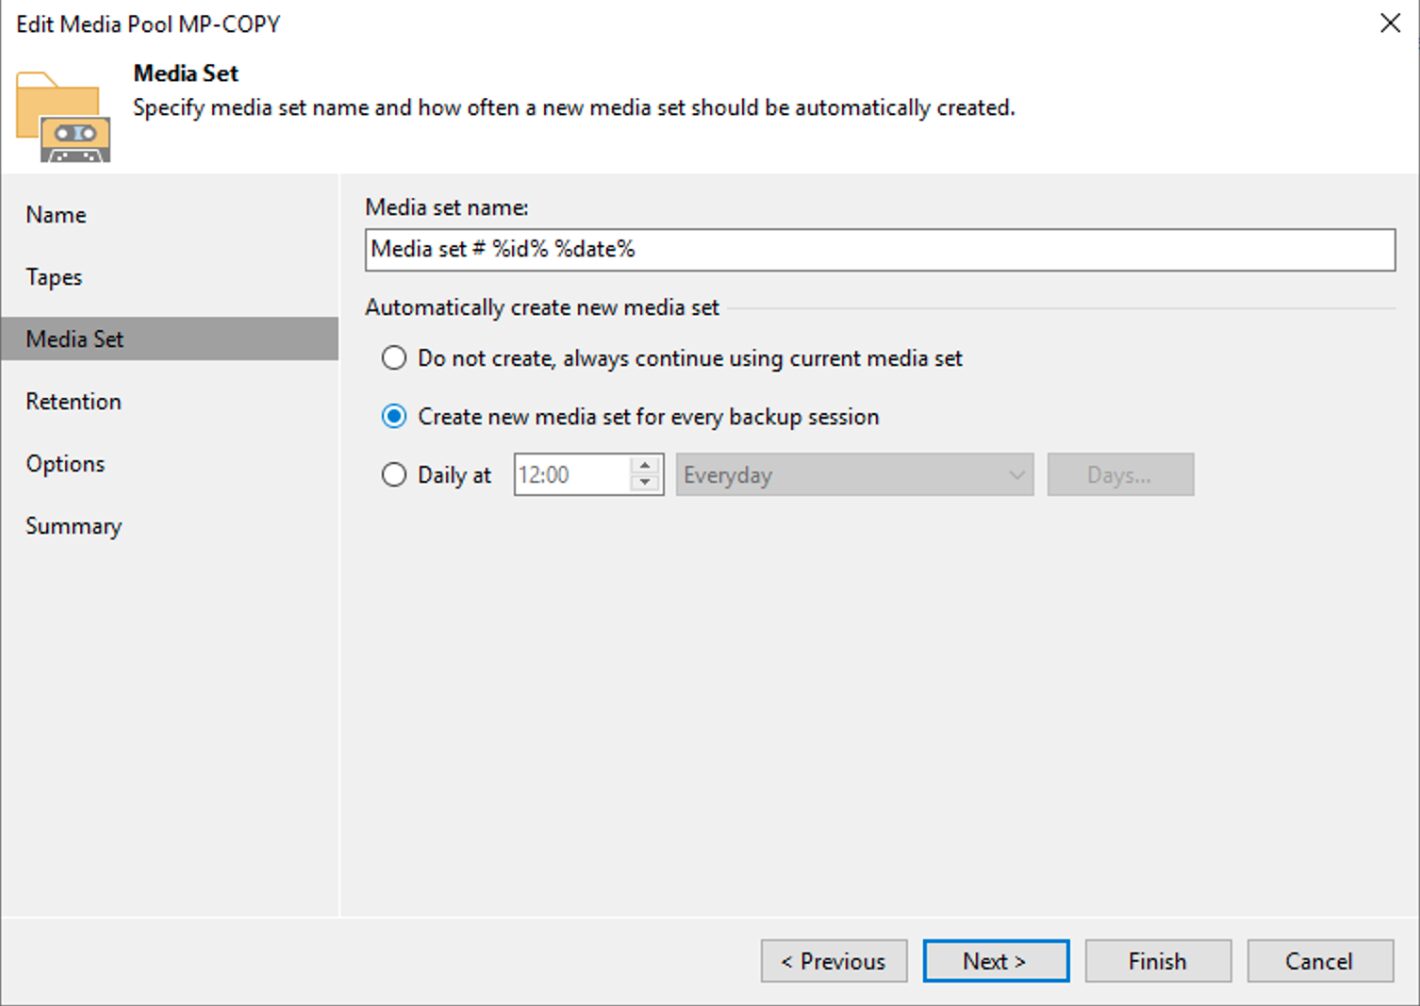 Immagine 2
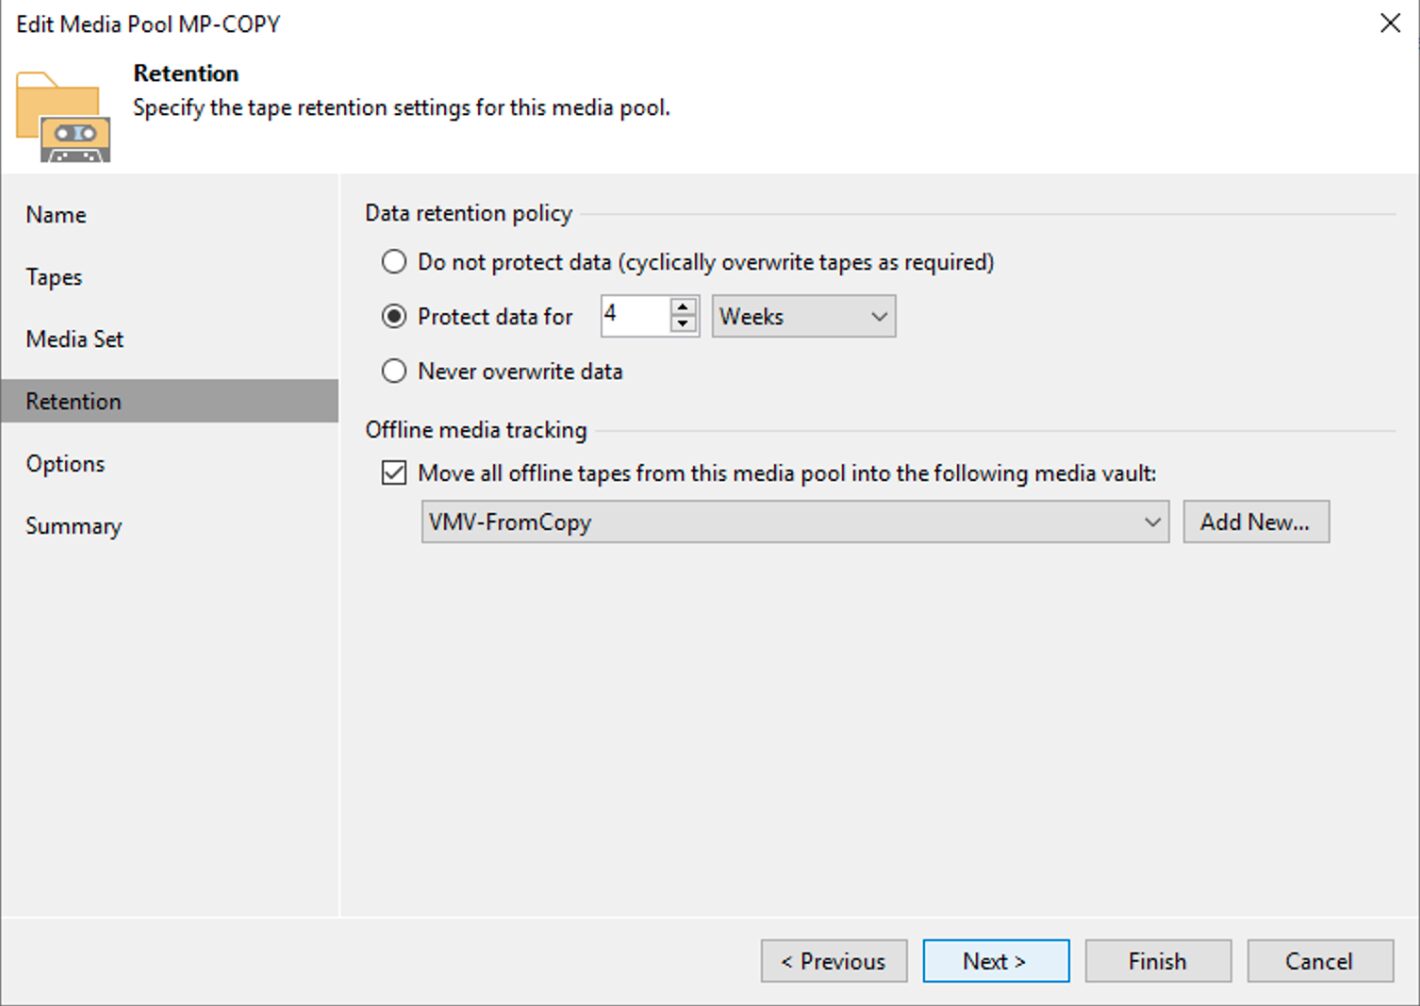 Immagine 3
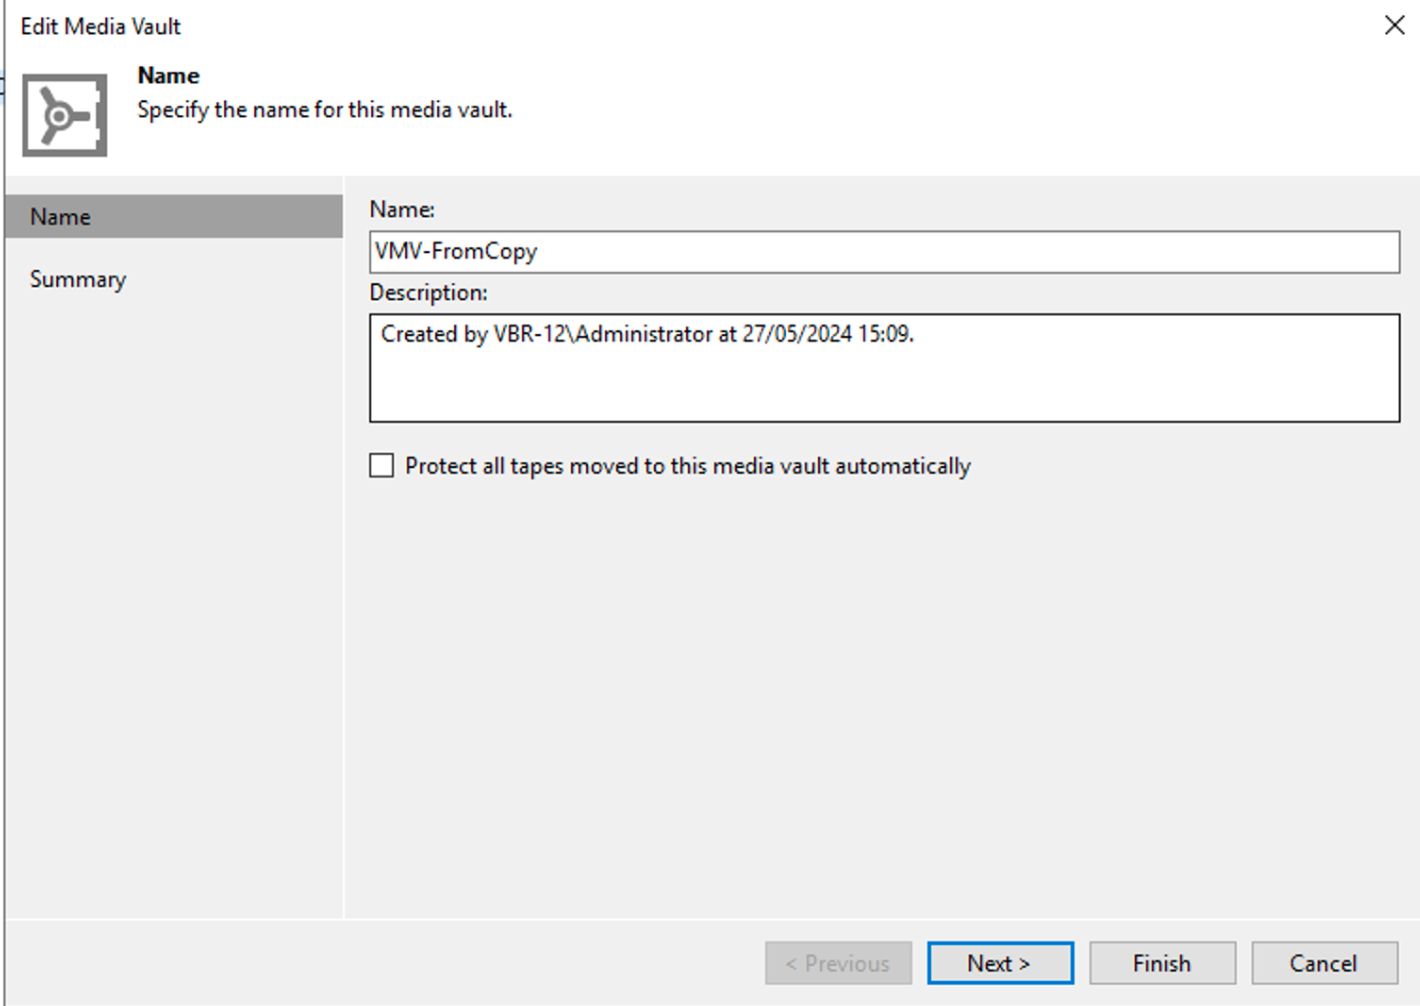 Immagine 4
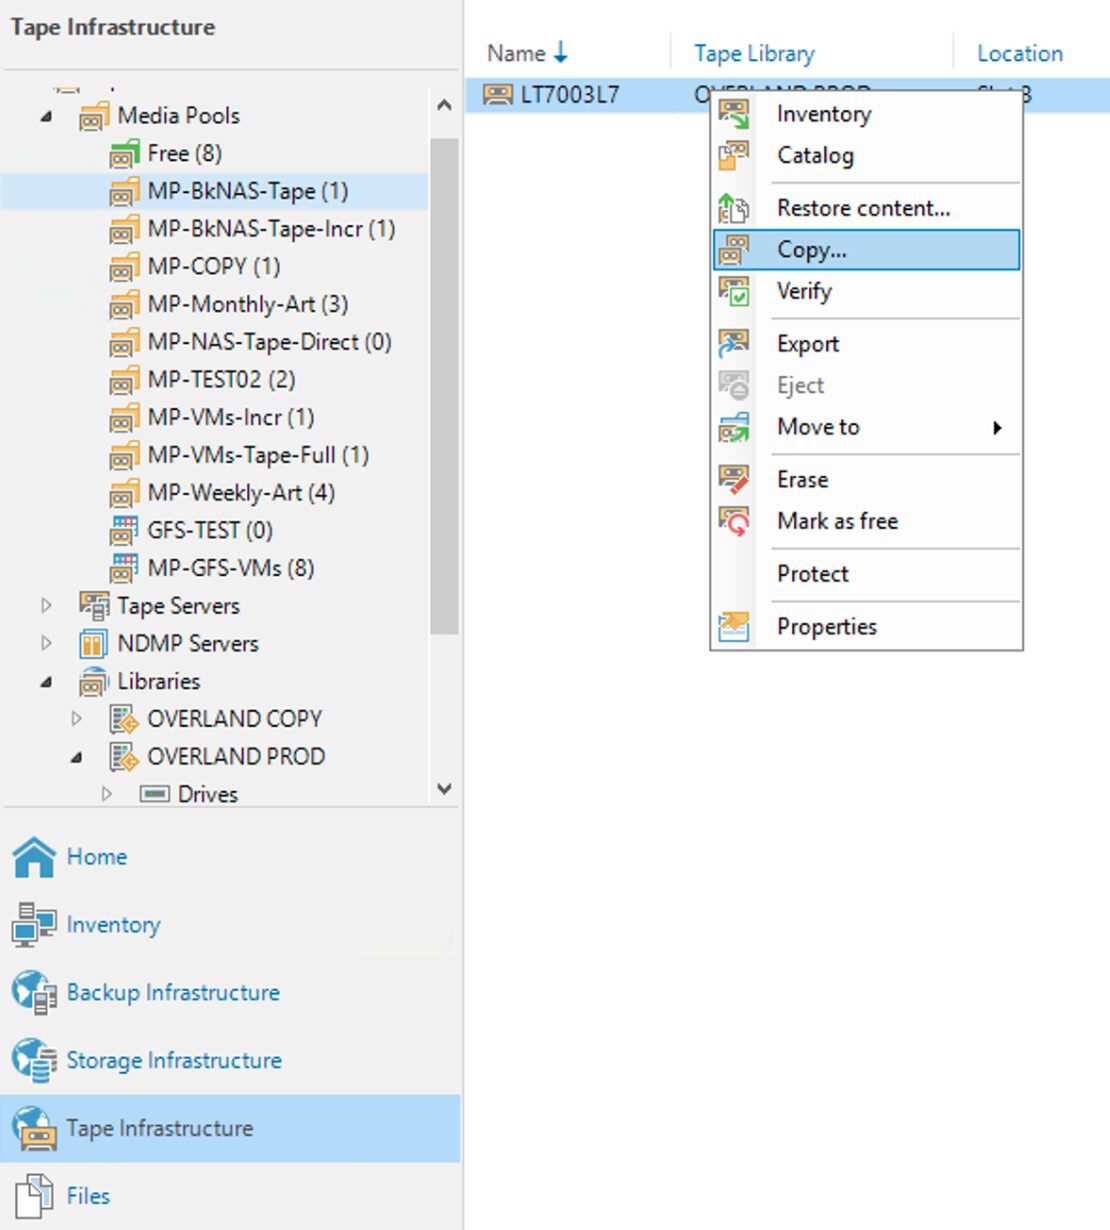 Immagine 5
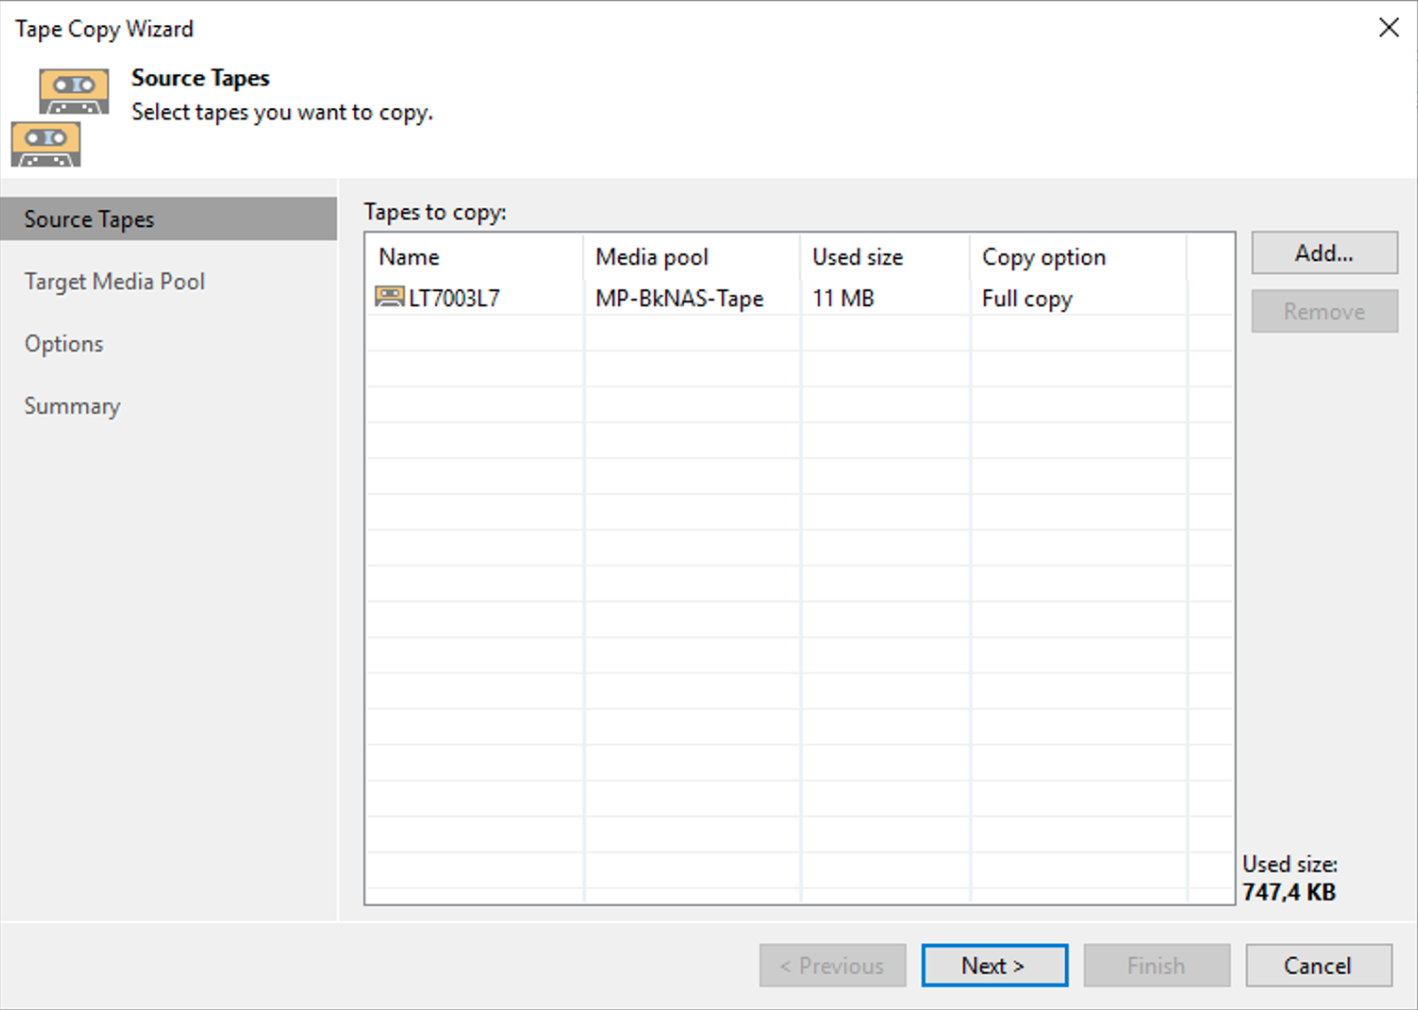 Immagine 6
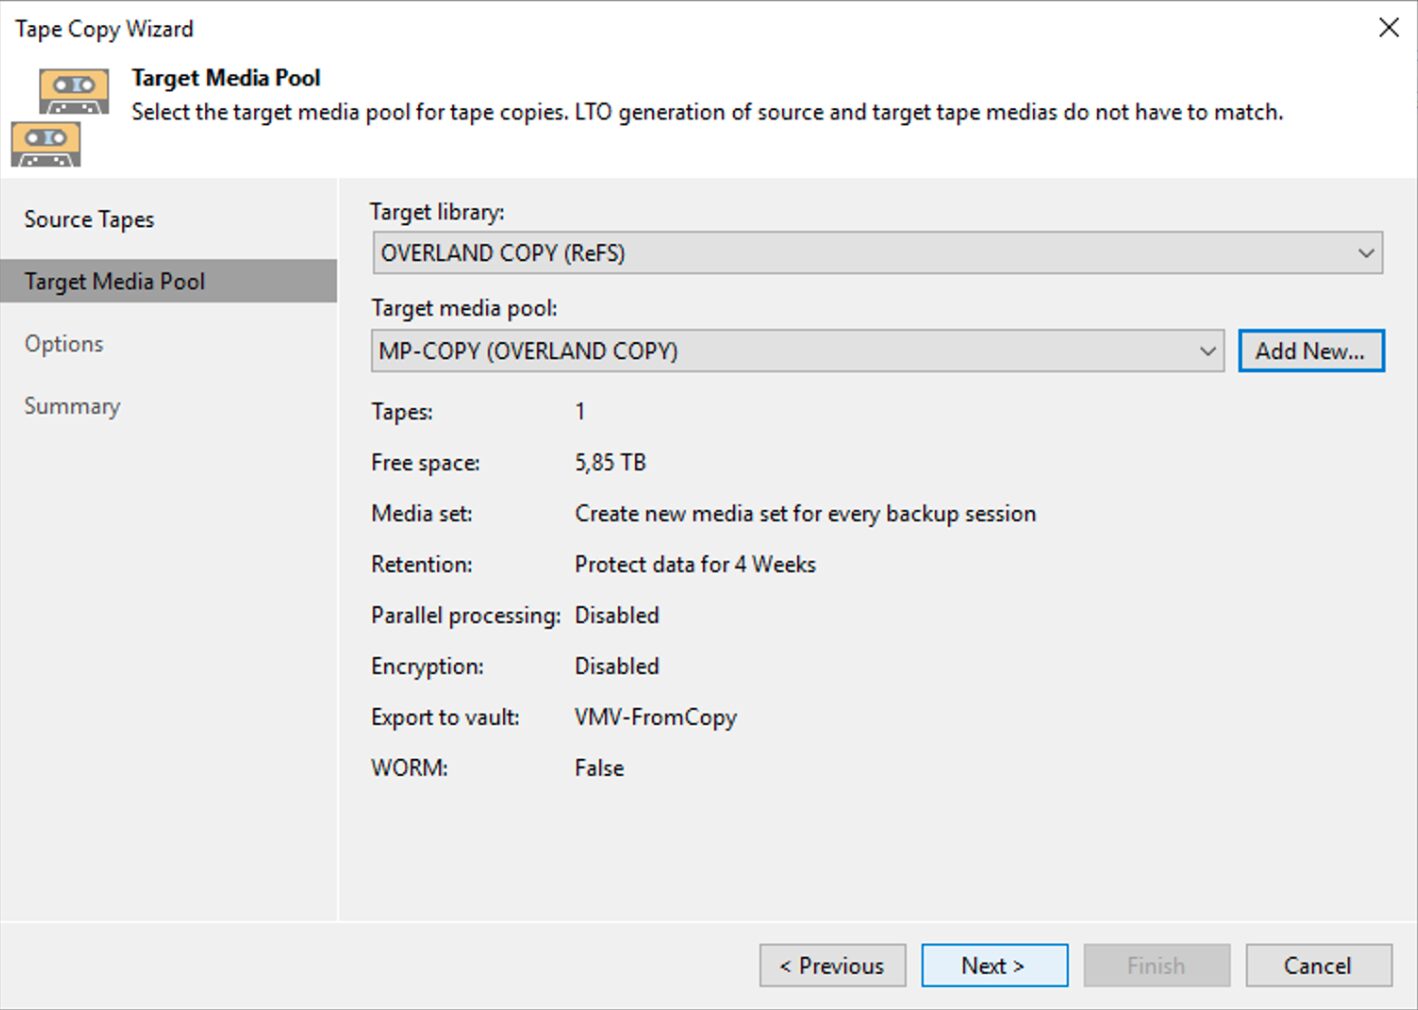 Immagine 7
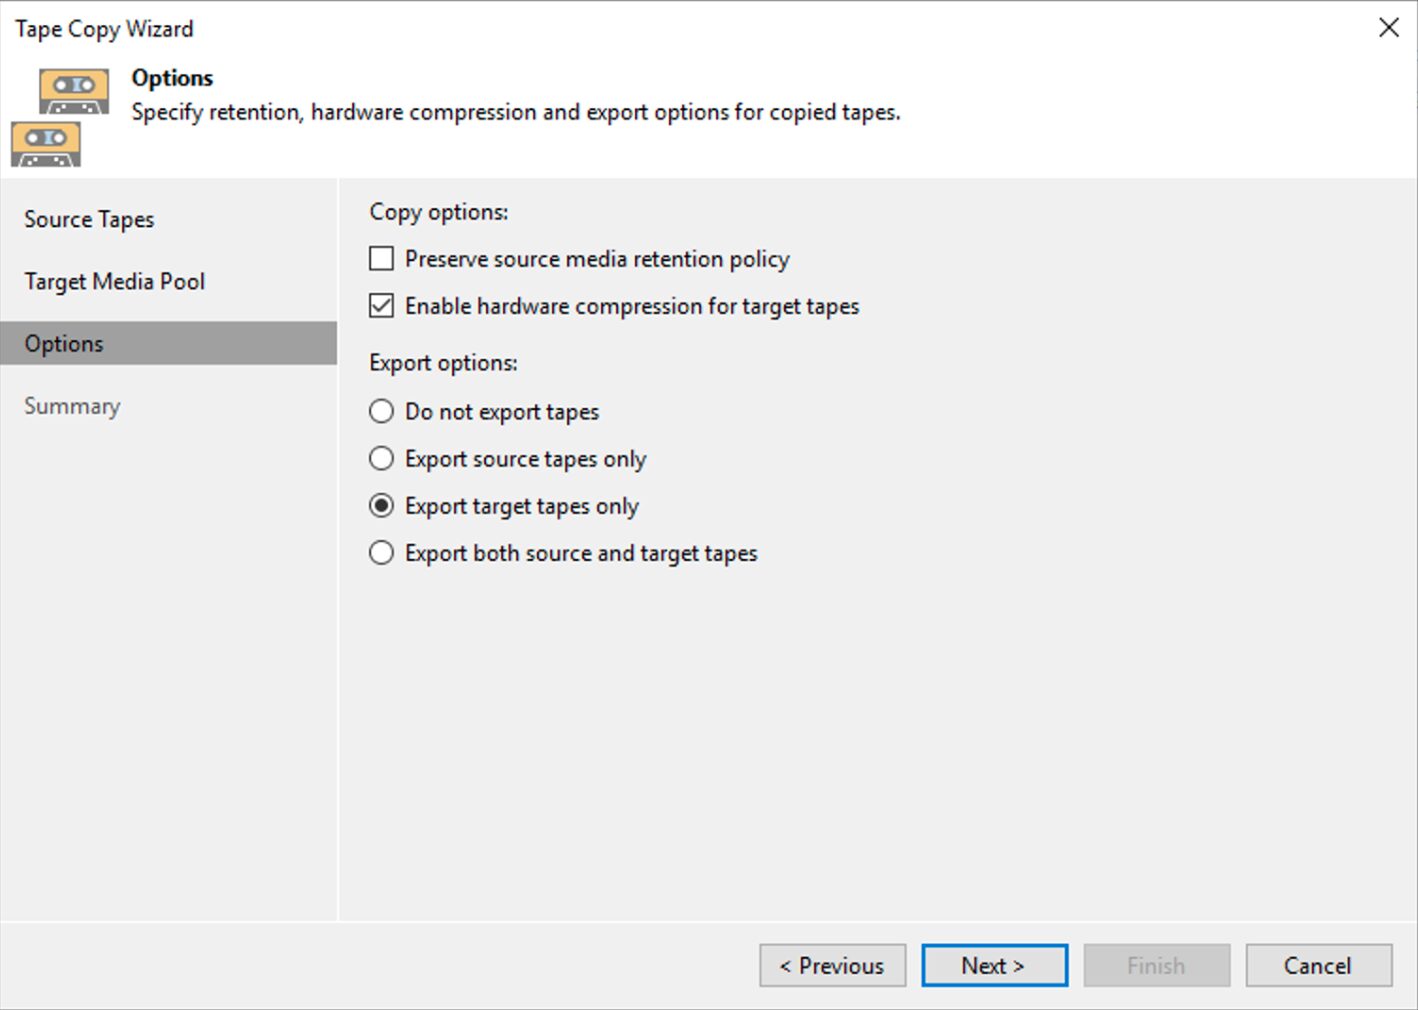 Immagine 8
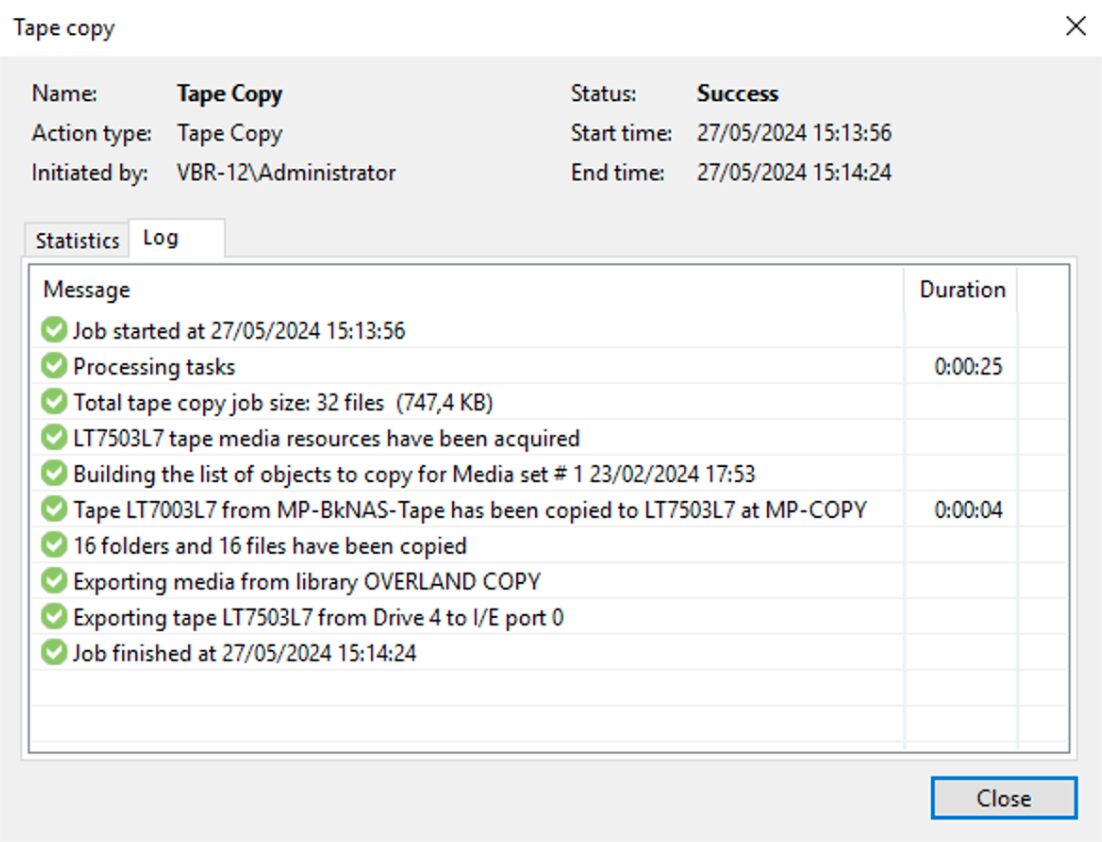 Immagine 9