VMware Broadcom – Cosa fare ?

Broadcom's Acquisition of VMware Closed: What Now?

Broadcom ha dato una grande scossa al  2024.

Dagli ultimi rumors, sembra che il licensing della appena acquisita VMware verrà pesantemente rivisto.

Uno dei primi risultati è che molti clienti si chiedono cosa sia giusto fare.

Non ho la pretesa di conoscere la risposta corretta.

Ho effettuato alcune riflessioni che mi hanno portato a pensare a quattro futuri scenari  dei quali vi parlerò nel presente articolo.

  1. Il cliente continua la collaborazione con VMware/Broadcom.
  2. Il cliente sostituisce la tecnologia Hypervisor.
  3. Il cliente migra il proprio datacenter verso un Hyperscaler o  un Service Cloud Provider Locale.
  4. Il cliente trasforma il proprio Datacenter in un  “Datacenter as a Software”.

Per ogni scenario andrò ora a descrivere i macroscopici pro e contro.

1. Credo che il desiderato di Broadcom sia quello di semplificare il più possibile il licensing al fine di avere a portfolio soluzioni snelle e semplici da proporre.

Ciò implica eliminare alcune delle soluzioni ora presenti per concentrare le  energie unicamente su quelle a maggior rilevanza d’uso e guadagno.

Ora vi domando: Le soluzioni VMware ora presenti nel vostro datacenter sono quelle strategiche anche per Broadcom?

E ancora, siamo certi che l’ottimizzazione Broadcom non toccherà il dipartimento R&D di VMware che sviluppa le soluzioni divenute ora strategiche?

E non per ultimo, quale sarà il prezzo per poter rimanere nell’ecosistema Broadcom-VMware?

2. La prima sfida è quella di fornirsi di strumenti in grado di migrare le VM da una tecnologia HyperVisor all’altra.

La seconda è quella di proteggerle.

(NDR. Meno male che Veeam Backup & Replication permette di realizzare con un solo strumento entrambe le cose 🙂 )

Aggiungo, che bisognerà essere anche fortunati nello scegliere un vendor che non sia nel mirino di una nuova Broadcom, perché finire nello stesso giro dantesco sarebbe diabolico.

Pensare ad una tecnologia open-source based?

3. Il modello degli Hyper-Scaler è quello di fornire una serie di servizi  personalizzabili.

Spesso sento qualcuno affermare che esistano dei “costi nascosti”.  Non è vero, sono tutti ben illustrati, solo che capirli preventivamente è spesso molto difficile.

Avrà quindi particolare importanza la fase di creazione del progetto di migrazione che dovrà essere particolarmente accurata al fine di non ritrovarsi brutte sorprese  a fine mese .

4. Data Center as a Software è sinonimo di un’architettura Cloud Native.

Ciò implica riscrivere applicazioni e servizi in modo tale che siano  indipendenti dal HyperVisor.

E’ il nuovo approccio che negli anni diventerà un comune standard per scrivere codice.

Nel sito troverete una serie di articoli sul mondo Container e kubernetes ai quali vi rimando.

Tante domande, una sola risposta giusta?

No, credo che la migliore strategia sia quella di ricercare il miglior bilanciamento nell’utilizzo delle diverse opzioni disponibili, per arrivare a regime con la soluzione che si adatta al meglio alle necessità della vostra azienda in un corretto bilanciamento tra costi e benefici.

Ultima nota: Non dimenticate mai di aggiungere dei piani di formazione del personale perchè il training on the job in scenari particolarmente complessi NON è mai la via migliore per rendere sicuri i vostri sistemi ovunque questi siano

VMware VCSA 7.03b Backup

Dopo aver aggiornato i vCenter all’ultima versione disponibile, (7.0.3.00100), mi sono accorto che i backup precedentemente configurati non venivano completati con successo.

L’errore che compariva era il seguente: “Path not exported by the remote filesystem” (vedi immagine 1).

Immagine 1

Una veloce indagine sul sito VMware ha spiegato la ragione:

Quando la destinazione del  backup è una share di tipo SMB, la VCSA non è in grado di scrivere sul target i file di backup.  (https://kb.vmware.com/s/article/86069)

Riconfigurato il  job in modo tale che scrivesse verso un target di tipo NFS, speravo di aver risolto questo inconveniente ma … un nuovo errore ha fatto la sua comparsa.

“Db health is UNHEALTHY, Backup Failed. Disable health check to take backup in the current state”  (vedi immagine 2):

Immagine 2

Nuova indagine e nuova risposta esauriente da VMware.

Dalla kb 86084 (https://kb.vmware.com/s/article/86084) l’errore può comparire dopo aver installato la patch 7.0.3

La procedura è molto semplice e consiste nel collegarsi come utente root e via SSH alla VCSA e lanciare il seguente comando:

/usr/bin/dbcc -fbss embedded (vedi immagine 3).

Immagine 3

Completata l’operazione è possibile salvare la configurazione della VCSA (vedi immagini 4 e 5).

Immagine 4

Immagine 5

A presto!

Persistent Data & Resource Management

Persistent Data

In previous articles, we have seen that if a POD is decommissioned or the container is restarted, all data on the POD file system is erased.

It is a winning approach for all those stateless applications (for example a web front-end ) but it is not for stateful applications where, for example, not registering a record of a DataBase means losing vital information for the service provided.

Kubernetes brilliantly overcomes the obstacle through the use of Persistent Data technology.

It is the yaml file that defines the Persisten Data in the POD through the entries:

  • Volumes describing the volumes available for the POD.
  • VolumeMounts describing the path or usage of the volume (e.g. / mydata /)

Volumes are categorized into three main categories created based on their use:

1- Communication / synchronization

It is the shared volume to synchronize with the images of a remote Git.

The life of the volume is limited to the existence of the POD and the volume can be shared between multiple containers.

2- Persistent Data

To ensure high reliability and best performance, the PODs must be able to move freely between the nodes of the kubernetes cluster.

As a result, volumes that contain persistent and vital application information must always be reachable by the POD.

Kubernetes to ensure visibility supports many types of volumes such as NFS, iSCSI , Amazon’s Elastic Block Store, Azure File and Disk Storage, as well as Google Persistent Disk.

Note1: If you move your POD , Kubernetes can automatically unmount the volume from the old host and make it available on the new one.

3- Host filesystem

Some applications not only need a persistent volume, but also a file system available at the host level. The need is addressed through the hostPath volume (e.g. /var/mygp/).

Resource Management

The cost of operating a machine in a data center is independent of the amount of CPU & RAM that the single VM in operation uses.
On the other hand, ensuring that CPU & RAM resources are distributed in the best possible way within the infrastructure impacts the efficiency of the environment.

Example:

Let’s imagine two services. The former uses 20% of the memory of a VM configured with 5GB of RAM, the latter uses 50% of a second VM configured with 4GB RAM.

The total use of RAM memory is 1 + 2 = 3GB of the total 9GB allocated.

Utilization metric ( MU ) is defined as the percentage value between the ratio of the amount of actively used resources and the number of purchased resources.

In our example MU = 3/9 = 33%

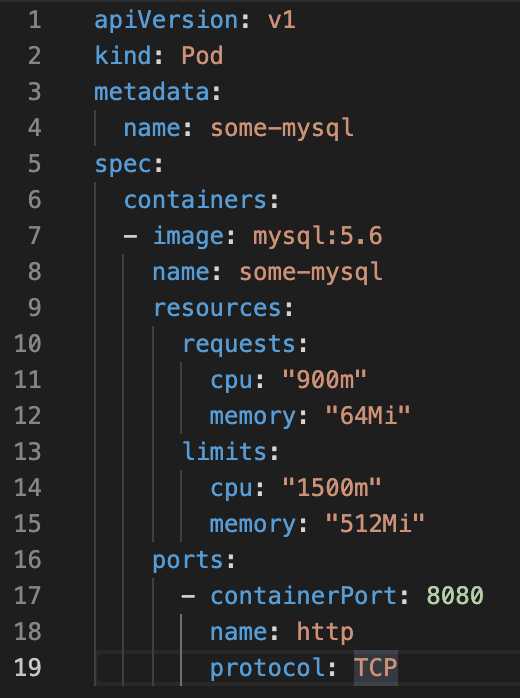
In order to control resource usage, Kubernetes allows users to specify two different metrics at the POD level.

  • Resource Request specifies the minimum amount that can be assigned to the resource.
  • Resource limits specify the maximum amount that can be assigned to the application.

The example of Figure 1 shows an example of a resource limit

Figure 1

Kubernets: Health-Check & Port-Forwarding

HEALTH-CHECK

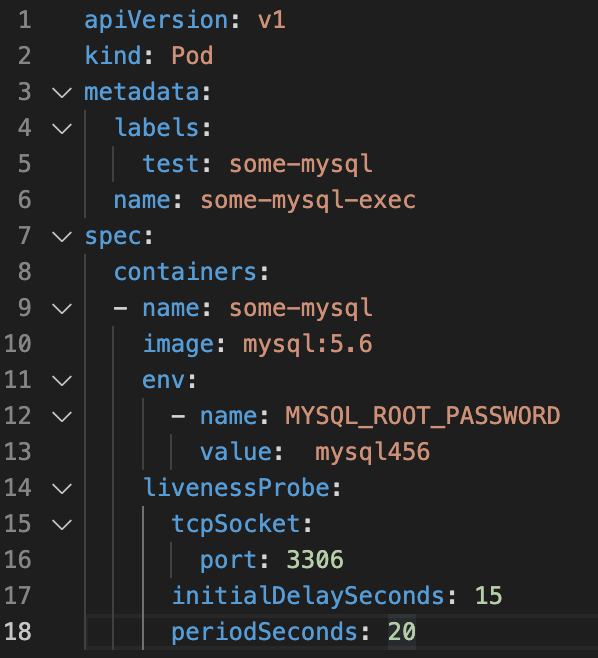
One of the advanced and most important features of kubernetes is the health-check which allows you to check the integrity of the services.

It is an additional layer that adds to the standard controls that guarantee that the application processes are always running ( livenessProbe ), the application integrity controls ( ReadinessProbe )

The advantage of the health check is that:

  • It is specific for each container.
  • It uses the same logic as the application (for example, loading a web page, pinging a DB ).
  • The livenessProbe determines if the application is running correctly. Otherwise, the application is restarted.
  • The ReadinessProbe describes when the container is ready to satisfy the requests of the users (and therefore of the service)

The configuration of the health -check is done by adding the livenessProbe and ReadinessProbe items to the POD configuration yaml file (see figure 1)

Figure 1

PORT-FORWARDING

Port forwarding authorizes the service (configured at the POD level) to communicate both with other PODs and with the outside world. Without Port Forwarding, the service is totally isolated.

The simplest example is that of a website. As long as port-forwarding is not started, the pages of the site are not available to users.

In our example ( some-mysql ), after POD has started, the command to enable application port-forwarding on port 8000 is:

kubectl port forward some-mysql 8000: 8000

An article is available on the website www.gable.it that explores the networking issue of Container environments. To read it click here.

In a future article, we will talk about load balancers that help networking management.

Soon


Kubernetes: Pods

In previous articles, we have seen that containers are ” abstractplaces where applications run in the form of images.

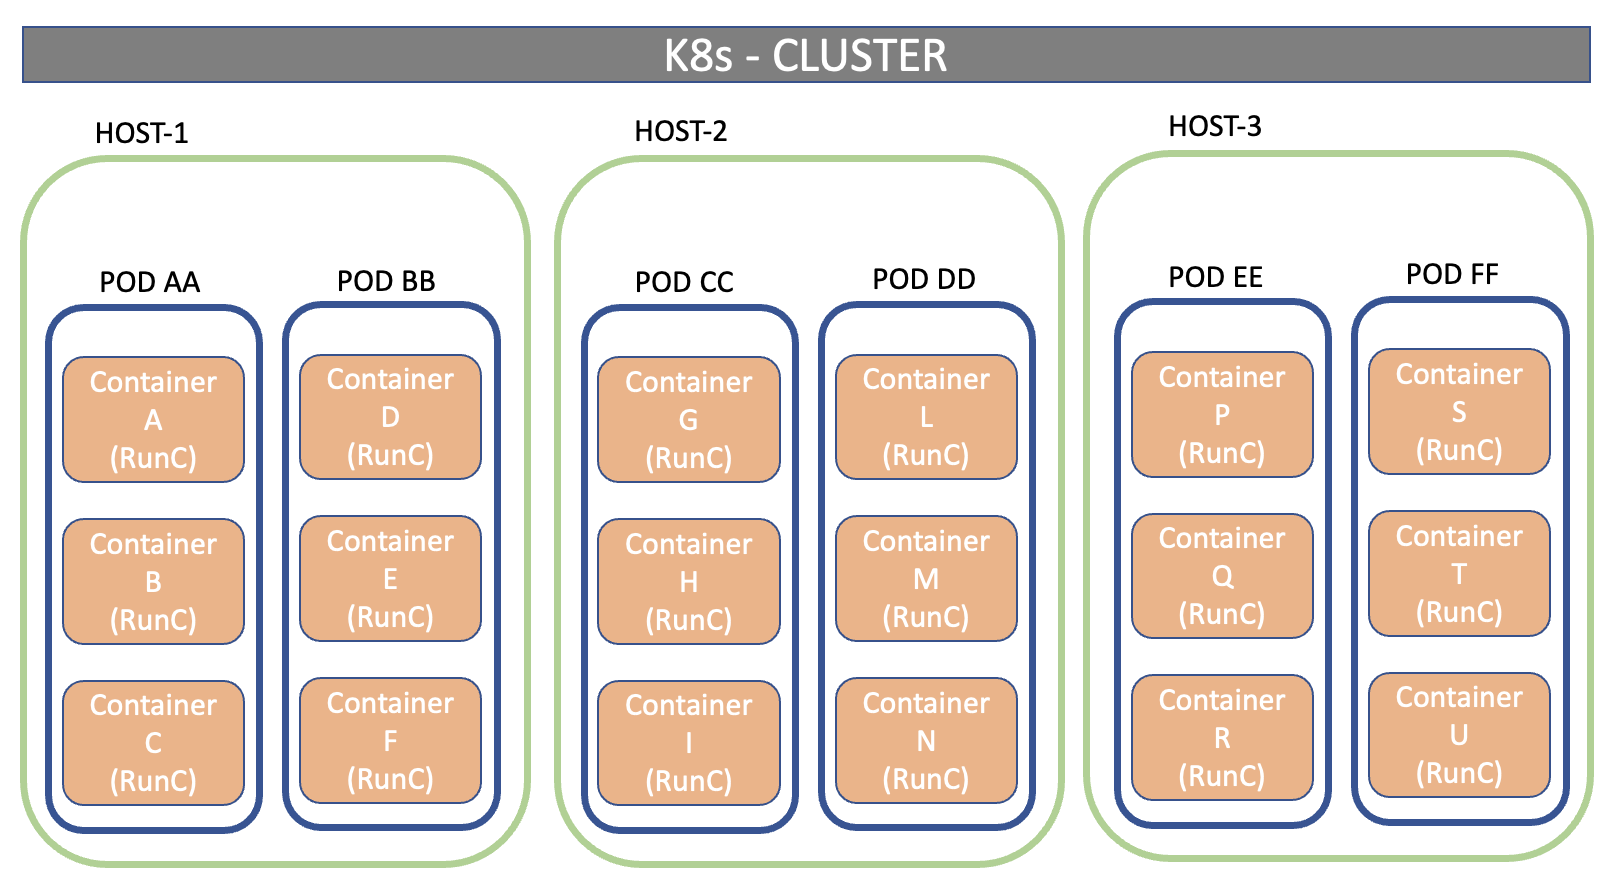
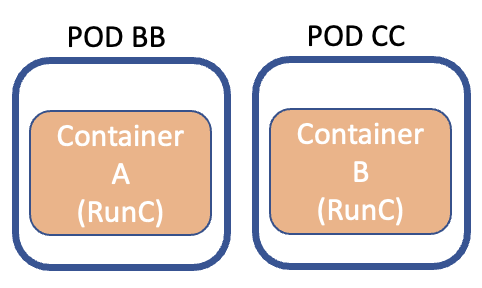
PODs are the aggregation of multiple containers .

A service is the aggregation of several PODs .

The image in figure 1 shows the concept just explained.

Figure 1


All applications (images) present within the same POD will have the same (shared) IP address and the same Hostname (UTS NameSpace).

Communication between containers within the same HOST occurs through POSIX or System V IPCs

Now imagine you want to provide the ” the-gable-svc ” service, built with two images (containers): a Database and a Front-End.

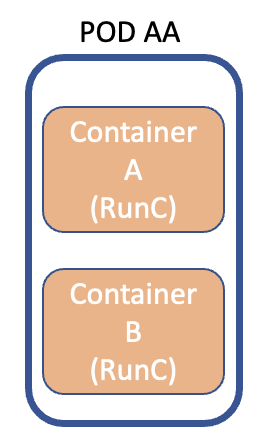
During the design phase, is it better to design a single POD that contains the two containers ( figure 2 ) or two PODs with a container each ( figure 3 )? ( 1POD x 2 CONTAINER or 2 POD x 1 CONTAINER )

Figure 2

Figure 3

To answer accurately, you need to understand which application needs the most scalability and flexibility.

In our example it is the DB that could require more resources (RAM & CPU) to manage access peaks.

If I had designed a single POD, the increase in resources would involve both applications, effectively not optimizing energy expenditure.

Note 1: CPU & RAM resources are allocated during POD creation.

Is it always better to create more PODs?

This latter statement does not align with K8s’ resilience policy, where PODs should run on different physical hosts ( k8s is a cluster).

To resolve the demise, there is a good rule :

If the service works fine even though the PODs are spread across multiple hosts, then it is better to use multiple PODs (Figure 2).

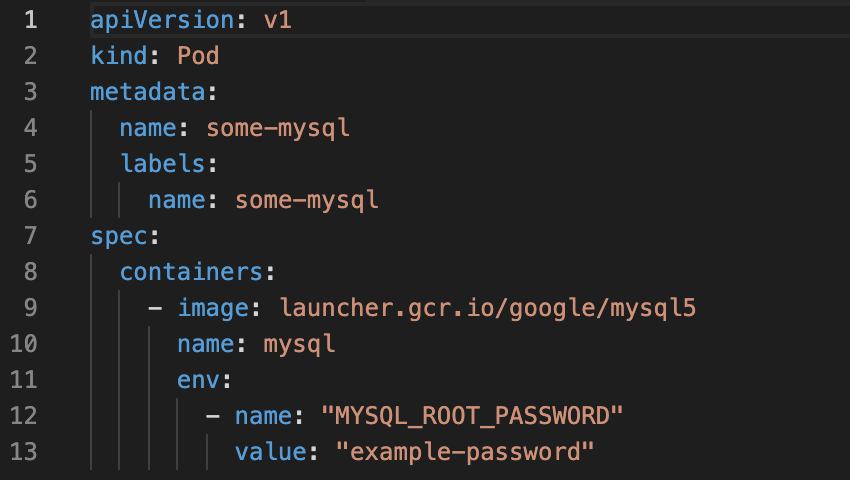
Figure 4 shows the contents of the mysql-pod.yaml file that creates the POD for the mySQL application.

Figure 4

Let’s see the basic POD management syntax:

  • To start it just run the command: kubectl apply -f mysql-pod.yaml
  • To check its status: kubectl get pods
  • To get all the details: kubectl describe pods some-mysql
  • If we wanted to delete it: kubectl delete -f mysql-pod.yaml

For today it’s all in a little bit where we will talk about Access to the POD, how to copy files and much more.

Soon