
| Rank | Pair # | Names | % |
|---|---|---|---|
| 1 | 14 | Garghentini Cesare, Dalli Cardillo A. | 74.07 |
| 2= | 10 | Colombo Gloria B., Gioia Giovanni | 60.19 |
| 2= | 3 | Alessandro Carletti, Riccardo de Lodi | 60.19 |
| 4 | 13 | Resnati Roberta, Tersch Federica | 53.75 |
| 5 | 6 | Roberto Licini, Giuliano Giacomo | 51.39 |
| 6= | 12 | Paola Tencati, Moscatelli Michele | 49.54 |
| 6= | 8 | Dal Monte Sergio, Querci Aldo | 49.54 |
| 8 | 9 | Mariani Angelica, Azzimonti Annarita | 48.75 |
| 9 | 7 | De Martinisi Carlo, De Berardinis A. | 47.69 |
| 10= | 2 | Croci Alessandro, Bacci Luciana | 47.22 |
| 10= | 4 | Zanchi Luciano, Pasquale Bellusci | 47.22 |
| 12 | 5 | Michele Severo, Clemencigh Sandra | 43.33 |
| 13 | 16 | Gaburri Elio, Mariagrazia Dusci | 42.92 |
| 14 | 1 | Cuter Angelam Nisoli Rosanna | 40.00 |
| 15 | 15 | Cristiano Magnabosco, Mazza Silvana | 36.57 |
Digital Trasformation & Data Mobility

If Cloud has been the most used word in the last five years, the words that have been buzzing the IT world in the last five months are Digital Transformation
From Wikipedia:
“Digital Transformation (DT or DX) is the adoption of digital technology to transform services and businesses, through replacing non-digital or manual processes with digital processes or replacing older digital technology with newer digital technology”.
Or: Digital Transformation must help companies to be more competitive through the fast deployment of new services always aligned with business needs.
Note 1: Digital transformation is the basket, technologies to be used are the apples, services are the means of transport, shops are clients/customers.
1. Can all the already existing architectures work for Digital Transformation?
- I prefer to answer rebuilding the question with more appropriate words:
2. Does Digital transformation require that data, applications, and services move from and to different architectures?
- Yes, this is a must and It is called Data Mobility
Note 2: Data mobility regards the innovative technologies able to move data and services among different architectures, wherever they are located.
3. Does Data-Mobility mean that the services can be independent of the below Infrastructure?
- Actually, it is not completely true; it means that, despite nowadays there is not a standard language allowing different architecture/infrastructure to talk to each other, the Data-mobility is able to get over this limitation.
4. Is it independent from any vendors?
-
When a standard is released all vendors want to implement it asap because they are sure that these features will improve their revenue. Currently, this standard doesn’t still exist.
Note 3: I think the reason is that there are so many objects to count, analyze, and develop that the economical effort to do it is at the moment not justified
5. Is already there a Ready technology “Data-Mobility”?
The answer could be quite long but, to do short a long story, I wrote the following article that is composed of two main parts:
- Application Layer (Container – Kubernetes)
- Data Layer (Backup, Replica)
Application Layer – Container – Kubernetes
In the modern world, services are running in a virtual environment (VMware, Hyper-V, KVM, etc).
There are still old services that run on legacy architecture (Mainframe, AS400 ….), (old doesn’t mean that they are not updated but just they have a very long story)
In the next years, the services will be run in a special “area” called “container“.
The container runs on Operating System and can be hosted in a virtual/physical/Cloud architecture.
Why containers and skills on them are so required?
There are many reasons and I’m listing them in the next rows.
- The need of IT Managers is to move data among architectures in order to improve resilience and lower costs.
- The Container technology simplifies the developer code writing because it has a standard widely used language.
- The services ran on the container are fast to develop, update and change.
- The container is de facto a new standard that has a great advantage. It gets over the obstacle of missing standards among architectures (private, hybrid, and public Cloud).
A deep dive about point d.
Any company has its own core business and in the majority of cases, it needs IT technology.
Any size of the company?
Yes, just think about your personal use of the mobile phone, maybe to book a table at the restaurant or buying a ticket for a movie. I’m also quite sure it will help us get over the Covid threat.
This is the reason why I’m still thinking that IT is not a “cost” but a way to get more business and money improving efficiency in any company.
Are there specif features to allow data mobility in the Kubernetes environment?
Yes, an example is Kasten K10 because it has many and advanced workload migration features (the topic will be well covered in the next articles).
Data-Layer
What about services that can’t be containerized yet?
Is there a simple way to move data among different architectures?
Yes, that’s possible using copies of the data of VMs, Physical Servers.
In this business scenario, it’s important that the software can create Backup/Replicas wherever the workloads are located.
Is it enough? No, the software must be able to restore data within architectures.
For example, a customer can need to restore some on-premises workloads of his VMware architecture in a public cloud, or restore a backup of a VM located in a public cloud to a Hyper-V on-premises environment.
In other words, working with Backup/Replica and restore in a multi-cloud environment.
The next pictures show the Data Process.
I called it “The cycle of Data” because leveraging from a copy it is possible to freely move data from and to any Infrastructure (Public, hybrid, private Cloud).
Pictures 1 and 2 are just examples of the data-mobility concept. They can be modified by adding more platforms.
The starting point of Picture 1 is a backup on-premises that can be restored on-premises and on-cloud. Picture 2 shows backup of a public cloud workload restored on cloud or on-premises.
It’s a circle where data can be moved around the platforms.
Note 4: A good suggestion is to use data-mobility architecture to set up a cold disaster recovery site (cold because data used to restore site are backup).
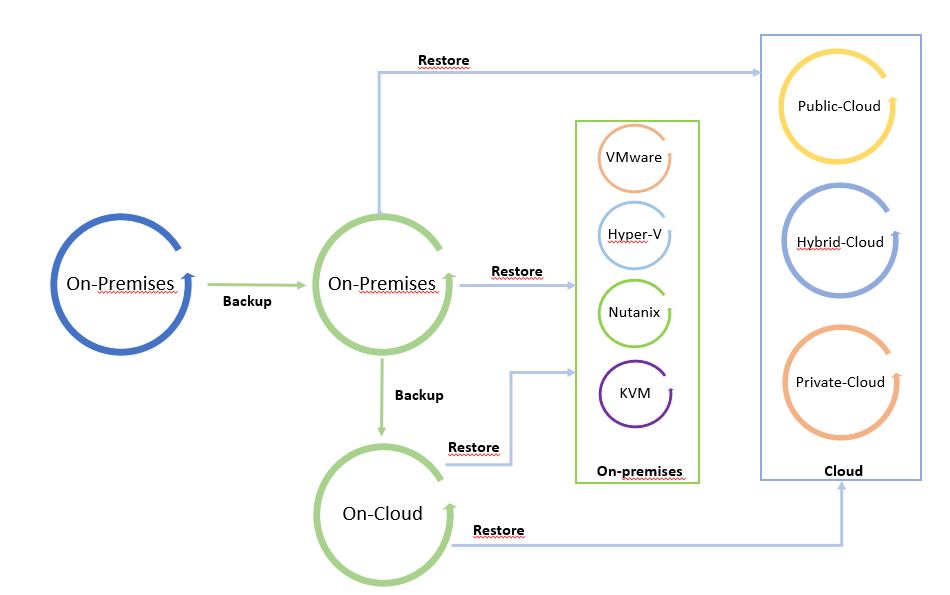 Picture 1
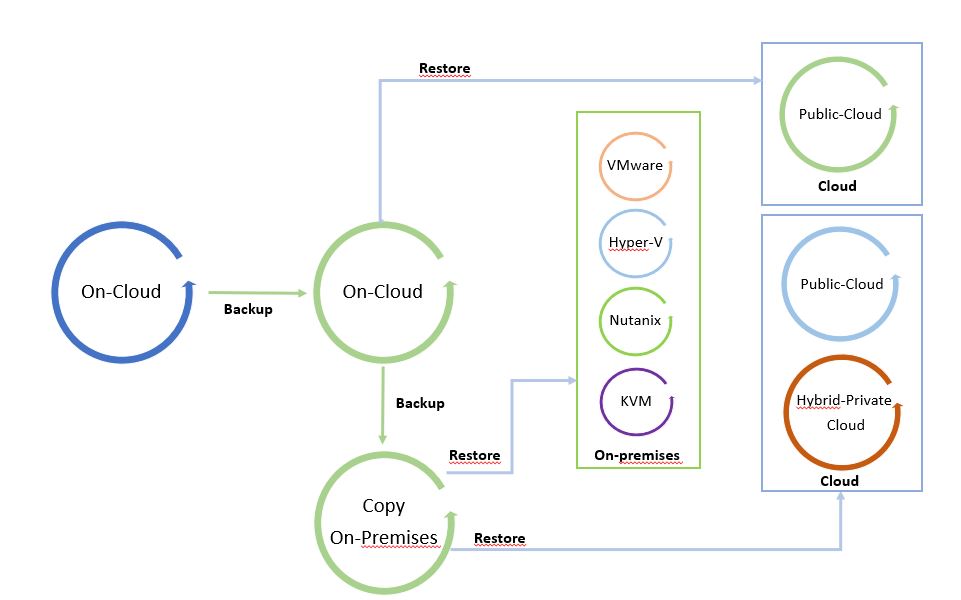 Picture 2
There is one last point to complete this article and that is the Replication features.
Note 5: For Replica I intend the way to create a mirror of the production workload. Comparing to backup, in this scenario the workload can be switched on without any restore operation because it is already written in the language of the host hypervisor.
The main scope of replica technology is to create a hot Disaster Recovery site.
More details about how to orchestrate DR are available on this site at the voice Veeam Availability Orchestrator (Now Veeam Disaster Recovery Orchestrator)
The replica can be developed with three different technologies:
- Lun/Storage replication
- I/O split
- Snapshot based
I’m going to cover those scenarios and Kasten k10 business cases in future articles.
That’s all for today folks.
See you soon, and take care.
A flexible file backup Strategy – Part 3
This article’s topic is how to set up and work VBR when it is combined with the NDMP protocol.
This type of configuration is part of the category “file to tape” I treated in my last article “A flexible file backup Strategy – Part 2”.
One more note before starting: VBR requires NDMP version 4 and later.
- How does it work?
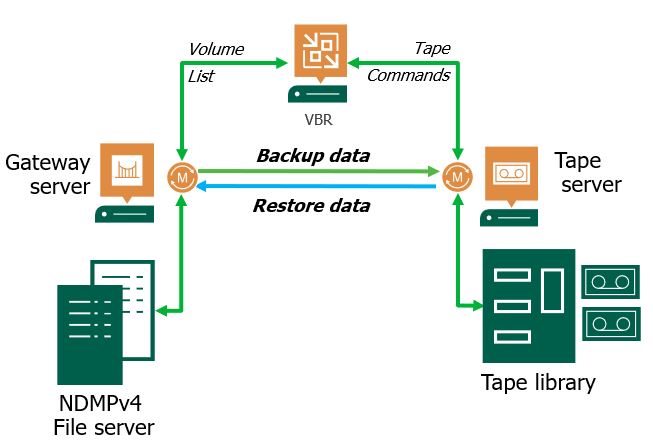
Picture 1
The architecture is quite easy.
Files are gathered from the File Server through the data mover present on the Gateway server. Then they are sent to the Tape Server that performs the write on Tape.
The Datamover installed on Tape Server has the ownership of managing the data traffic to Tape Device.
VBR has the task of enumerating the Volumes and launch the command to Tape Devices.
Point-1: VBR works with a 3 layer backup architecture. It means there is no direct connection between File Servers and Tape Devices. All Data have to pass through the tape Sever.
In this article, I’m not covering the procedure to set up the NAS correctly. Please ask your storage vendor specialist to get all details needed.
How to add the NDMP server to VBR and set up a backup job?
The next video will answer the question.
Video 1
After the backup is completed how to perform a restore?
NDMP backup files are available to perform restores from the FILE menu at the voice Tape and then NDMP as shown in picture 2
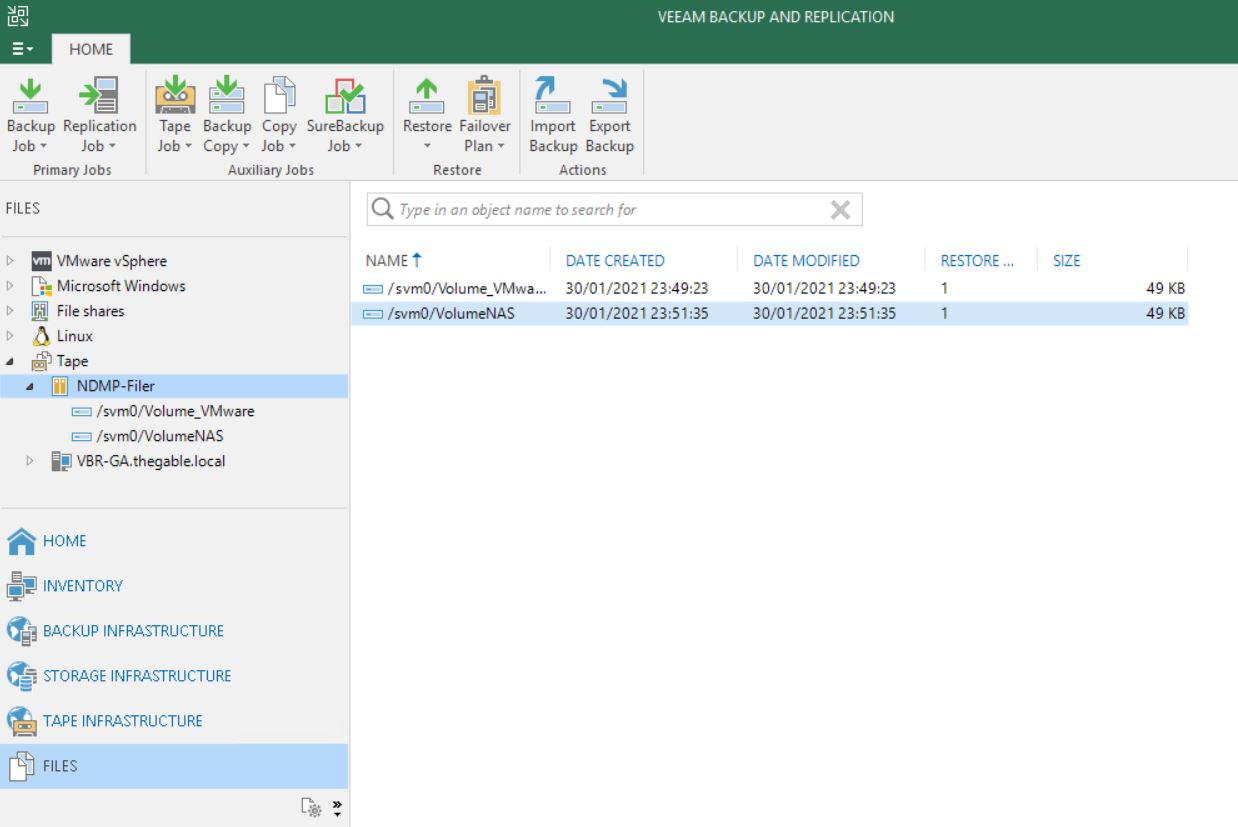 Picture 2
Please have a look at the next short video (video 2) to see the easy step to perform a restore.
Video 2
Point-2: The backup chain stored on tapes will consist of 10 restore points maximum. On the 11th run, VBR will force an active full.
- Common scenarios
One of the main characteristics of NDMP backup is that it allows to perform backup and restore of entire volumes.
The most common scenario is the Disaster Recovery of the entire Filer. Imagine the case in which the customer NAS filer is completely out of order and the only way to restart the file sharing service is formatting all the disks and then restoring the volumes (or the worst case is getting a new NAS).
In this case, NDMP volume restores from tape is an excellent low-cost solution.
Main Pro:
NDMP servers backup to tape is available in the Enterprise Plus Edition of VBR.
It means that there is no limit on the amount of data that can be saved. Could be 1 TB or 100 PB it doesn’t matter.
Veeam Universal License (VUL) has the Enterprise Plus Edition available. Is it time to move your old sockets license to the subscription model (VUL)?
Cons:
The granular restore (files and folders) it’s not an available option with VBR and NDMP backup.
Please note that NAS backup is now completely supported by VBR (please refer to article 1 of this series) and it’s the fastest way to perform the granular restores.
Point-3: Even if the NAS device supporting NDMP protocol is already added to VBR, you need to add the NDMP server as a separate procedure. Otherwise, you will not be able to perform file backup to tape.
The next article will cover a recap of the different techniques and show a hidden gem of VBR.
See you next week and take care
NUC upgrade to ESXi 7.0.1- Part 1
 Last weekend I upgraded all my Servers to the last VMware ESXi release (7.0.1 C) and this article is meant to describe all steps I performed.
Just a recommendation before starting. I worked in my lab that it’s not a production environment.
MyLAB before upgrade:
- NUC8i7beh2
- VMware ESXi 7.0.0 (Build 16324942)
- Every NUC has three more network cards added to the embedded standard NIC. They have been obtained through the USB ports leveraging three adapter USB/Ethernet and the flings driver. Please refer to the FLINGS website to get all info.
The procedure is composed of two main phases and this article will cover the first part.
Phase 1: Creating a customize ISO
Is this step required?
Oh well, it depends if the Standard ESXi VMware ISO has already the driver of your embedded network card inside. The standard ISO, unfortunately, does not contain the NUC8i7BEH network drive (it is named ne1000)
If you upgrade the ESXi through the standard ISO, the process fails with the error shown in picture 1.
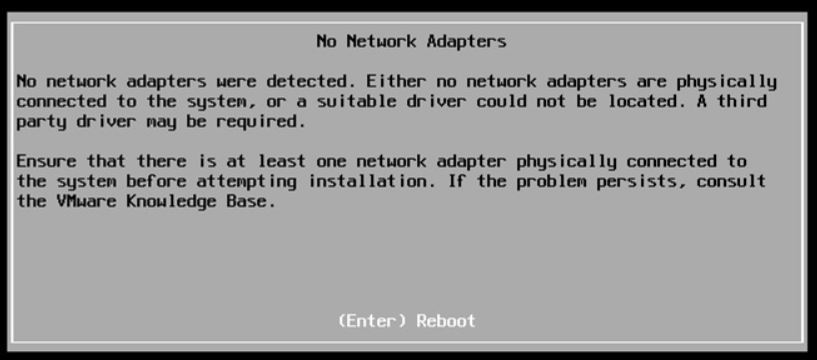 Picture 1
How to get over it?
Before upgrading it, it’s necessary to know the driver used by the embedded NIC Card. If you don’t know it, please read the next instructions carefully (they are command launched on host ESXi you are going to upgrade):
1. lspci -v | grep -A1 -i ethernet
take a note of the string composed of 4:4 values ( xxxx:yyyy)
2. lspci -n | grep xxx:yyy
take a note of how the nic is named (in my case [vmnic0])
The next step is getting the name of the driver directly from the VMware website (Matrix compatibility).
From that web page, filling up the empty field with the value yyyy and filtering the result by IO Devices, it’s possible to get the device driver name.
For my LAB the result is shown in picture 2 where I highlighted the device driver name in yellow.
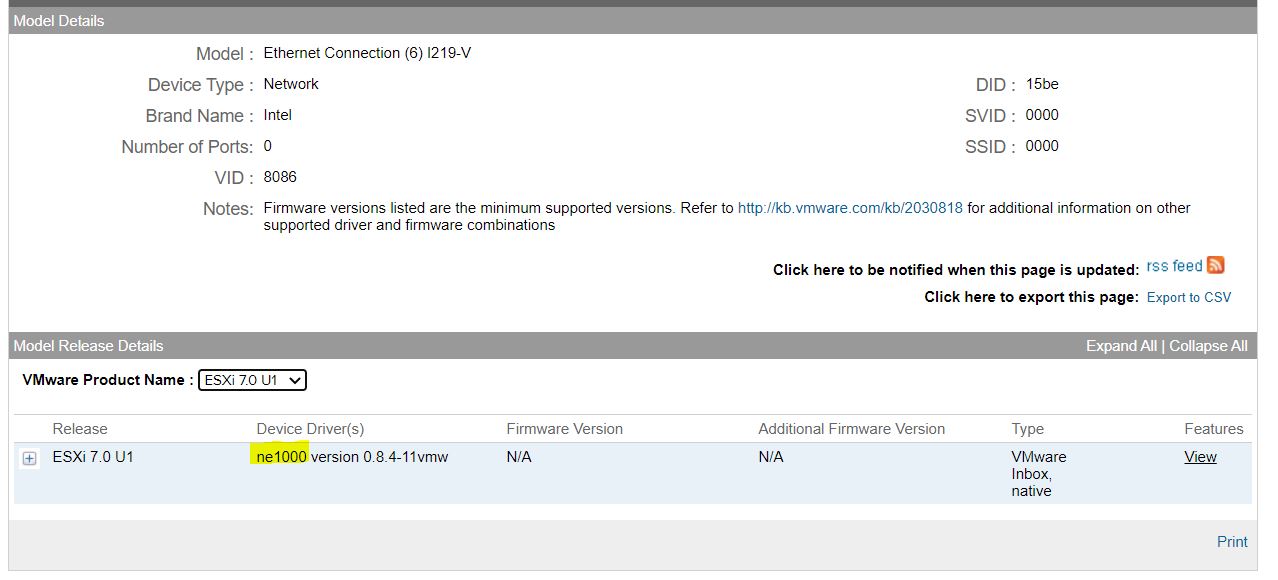 Picture 2
The last command to check if the driver is already installed (It should be present) is:
3. vmkload_mod -l | grep “Device Driver”
In my case: vmkload_mod -l | grep ne1000
ne1000 1 352
Optional: if you use the USB ports to add more NIC, please uninstall the fling drivers before proceeding.
4. esxcli software vib remove –vibname=vmkusb-nic-fling (before vibname two scores – – )
It’s time to create our custom ISO
a- Download the offline bundle from VMware Site, for example:
VMware- ESXi-7.0U1c-17325551-depot.zip
b- Download the NUC ethernet driver for your device (ne1000 in my case).
I found an useful PowerShell script to get it:
#add the software repository
Add-EsxSoftwareDepot https://hostupdate.vmware.com/software/VUM/PRODUCTION/main/vmw-depot-index.xml
#define as variable the name of the driver
$vib = Get-EsxSoftwarePackage ne1000
$vib | select Name,Version | ft -AutoSize
$vib[4] | fl
#Get the driver
Invoke-WebRequest $vib[4].SourceUrls[0] -OutFile d:\pkg\ne1000_0.8.4-10vmw.700.1.0.15843807.vib
c- The PowerShell script to create a custom ISO is available on VMware Front Experience Site.
This great script has a lot of options; please refer to the official documentation to see how to create the ISO.
In my case I just launched the following command:
.\ESXi-Customizer-PS-v2.6.0.ps1 -v701 -izip D:\ISO\ESXi-7-0-1\VMware-ESXi-7.0U1c-17325551-depot.zip -pkgDir D:\pkg\ -OutDir D:\ISO\ESXi-7-0-1\ -nsc
d- The last step is creating a bootable USB pen using the just created custom ISO as a source.
I have chosen Rufus to perform this task.
In the next article, we are going to see the final step to upgrade the NUC
Veeam NAS Backup – Scripts for Demo live
BR v.10 introduced a great new feature.
NAS Backup allows managing the protection of the environment where files and folders are a focus point for a company.
This article does not cover how a Nas Backup job works or how to set it up. Please refer to the official documentation to have all details.
What is the scope of the next lines?
It will show how easy it is to realize a script to create dummy files
before launching an incremental backup.
Why? Because the scope of this article is showing how fast a backup job can be.
1. The script is composed of four parts (in every box line 1 describes the actions that will be performed after).
| #working path $mypath=”C:\Users\VBR\Documents\NAS-Folder” Set-Location -Path $mypath |
| #creating folder to copy to share $folders_new = New-Item “$((get-date).toString(‘yyyyMMddhhmmss’))” -ItemType directory Set-Location -Path $folders_new |
| # Creating 100 files $baseFile = $rootDir + “base.txt” $desiredFileSize = 2*10KB $fileCount = 100 “start” | Out-File -Filepath $baseFile While ($(Get-ChildItem -path $baseFile).Length -lt $desiredFileSize) { $(Get-ChildItem -path $baseFile).Length | Out-File $baseFile -APPEND } for($i=1;$i -lt $fileCount;$i++) { Copy-Item $baseFile “File-NAS$i.txt” } |
| #copy to network share Set-Location -Path $mypath $pathtocopy= $folders_new.Name copy-item -path $pathtocopy -Destination \\ip-address\cifs-destination -Recurse |
2. Let’s see how to integrate the script in VBR.
The next pictures will show the Nas Backup job wizard pointing out the main point (picture 3, 4 and 5)
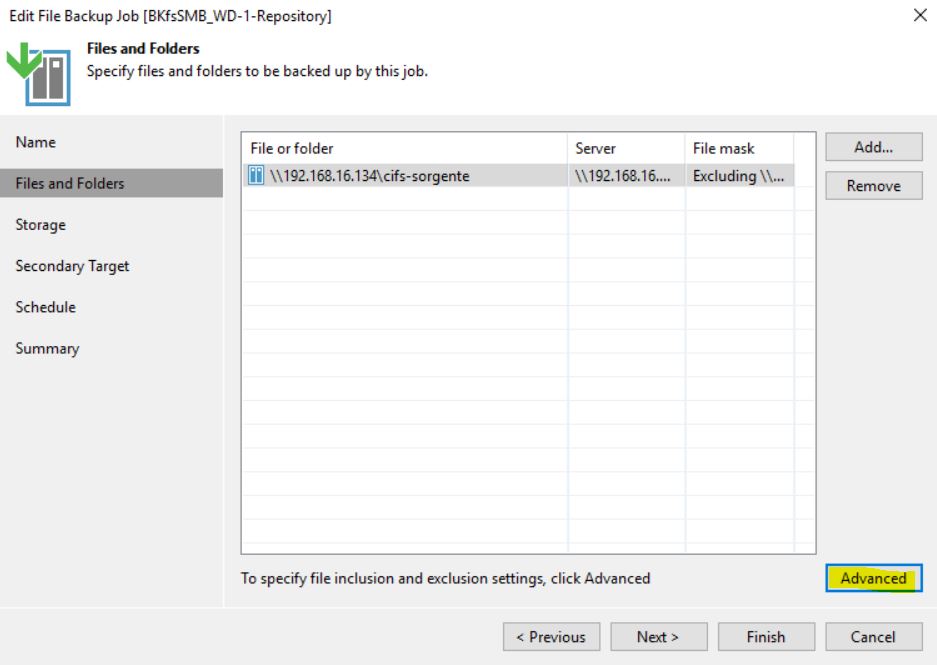
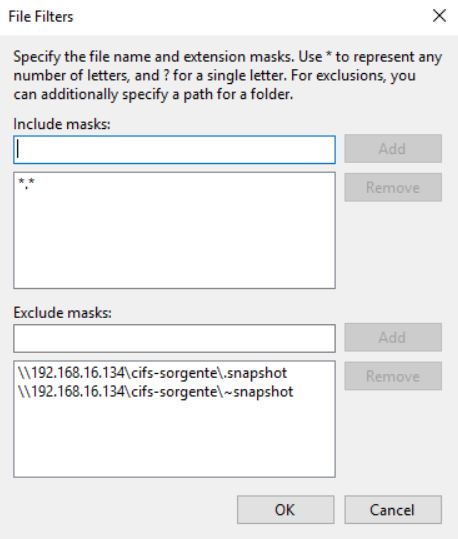
Pictures 1 and 2 show one of my favorite advance options: the possibility to select the file topology to save. For example, protecting the pdf files only. It supports wild-cat character so it’s very flexible and useful.
 Picture 1
 Picture 2
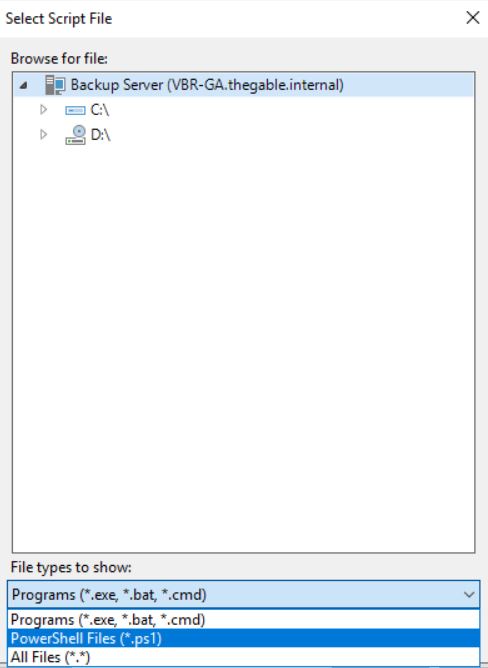
From picture 3 to 5, highlighted in yellow the step to set-up the script:
 Picture 3
 Picture 4
 Picture 5
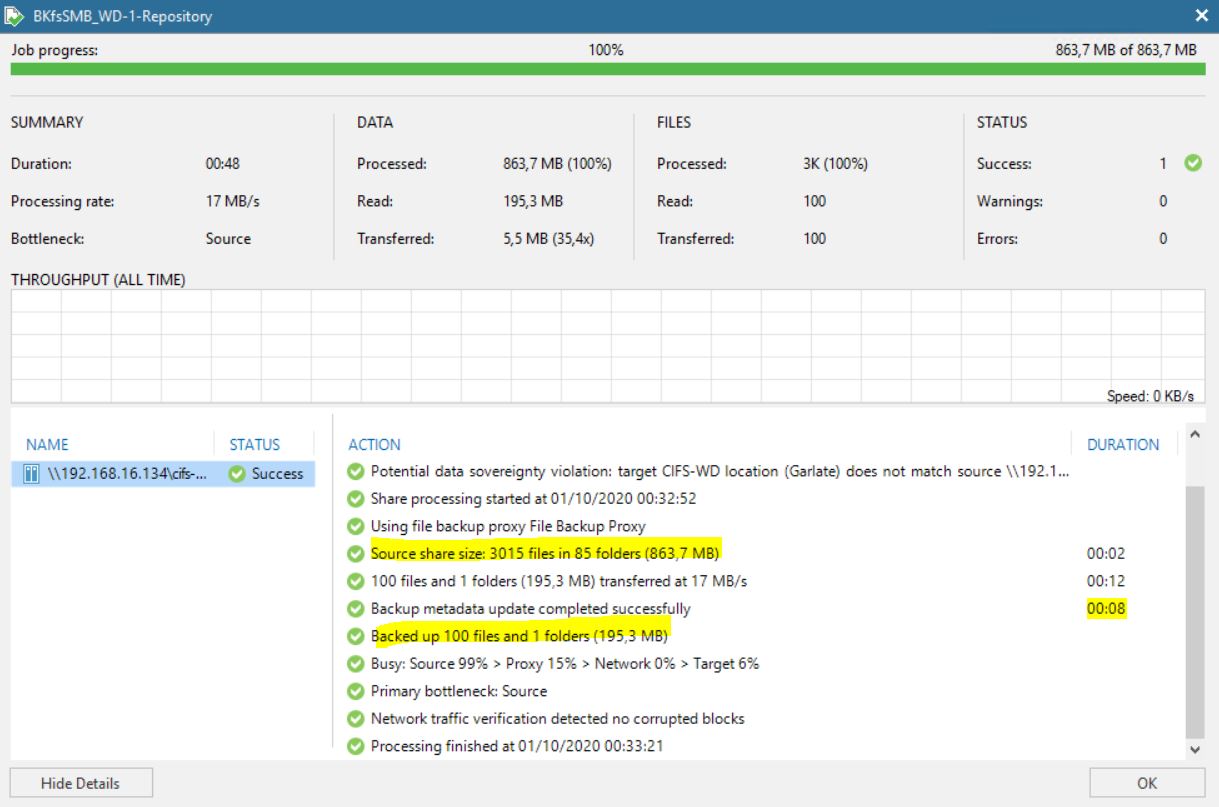
Pictures 6 and 7 show the result of the job modified in this way.
Please put your attention to the last yellow line where 195 MB of the source data is processed in 20 seconds. (In my small lab it’s a great result !!!)
 Picture 6
 Picture 7
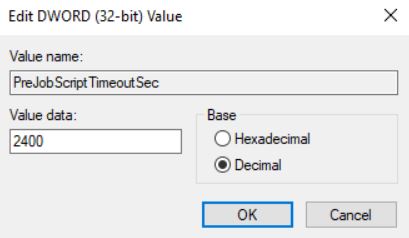
Note: If you need to change the script time execution from default 15 mins (900 secs), just add a REG-DWORD named “PreJobScriptTimeoutSec”(Computer\HKEY_LOCAL_MACHINE\SOFTWARE\Veeam\Veeam Backup and Replication). The amount has to be in seconds (Picture 8)
 Picture 8
That’s all folks
Check Replica Status – Before deleting it – Part 1
Last month, a partner had to face up a strange VBR behavior.
From the VBR console he deleted a VM’s replica (Picture 1), and suddenly the production VM has been also erased (don’t worry, before doing any activity he tested the backups using sure backup technology).
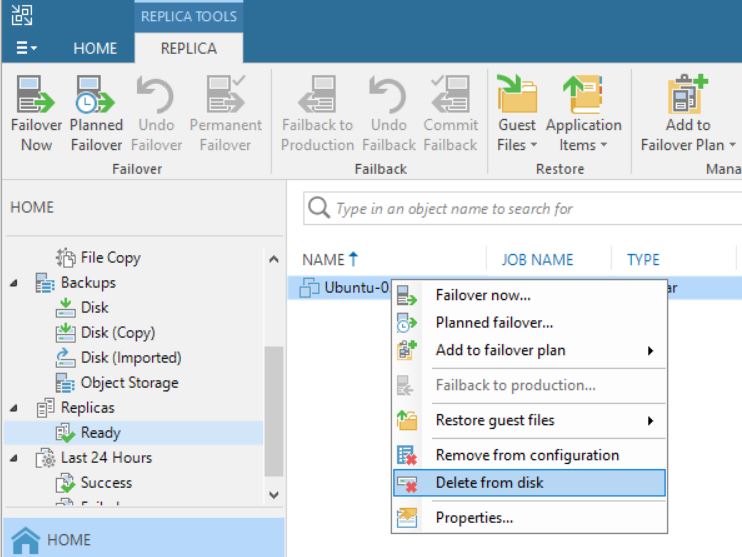 Picture 1
The reason why it happened become clear to me once I read the logs.
To do it shortly, some weeks before someone started a Failover directly from vCENTER console without doing any communication to the internal IT team.
This article wants to explain how to avoid this common mistake.
The first step is understanding some basic concepts:
a) VMware identify any single VM with a number named MorefID and a UUID.
b) Any single operating system has an identifier named Instance UUID (Universal Unique IDentifier); in my lab, I set-up more than one replica job for a single VM
Table 1. row 2. shows the name of production VM (Ubuntu-02), its morefID (vm2270), where it is running (Milan), the UUID (…bcc12) and its VM UUID … f58b.
Table 1. row 3-4 shows the name of VMs replicas, morefID, instance UUID and its UUID.
All tables shown in these articles have been created using Veeam One
| Name | PCName | morefID | DataCenter | Instance UUID | UUID | |
| Ubuntu-02 | ubuntu-02 | vm-2270 | Milan | 502d2405-cc8f-de73-1a19-57e8496bcc12 | 564d013a-7835-9d1b-841e-32855790f58b | |
| Ubuntu-02_Rep_VC01 | ubuntu-02 | vm-2694 | Milan | 502d2d90-d08f-08aa-efcf-d9feaa1d13f8 | 564d013a-7835-9d1b-841e-32855790f58b | |
| Ubuntu-02_Rep_VCDR | ubuntu-02 | vm-399 | Venice | 501d517b-672e-30e0-665a-fd4b4af7dcb6 | 564d013a-7835-9d1b-841e-32855790f58b | |
Table-1
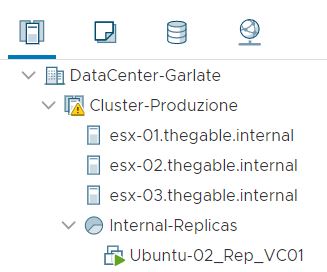
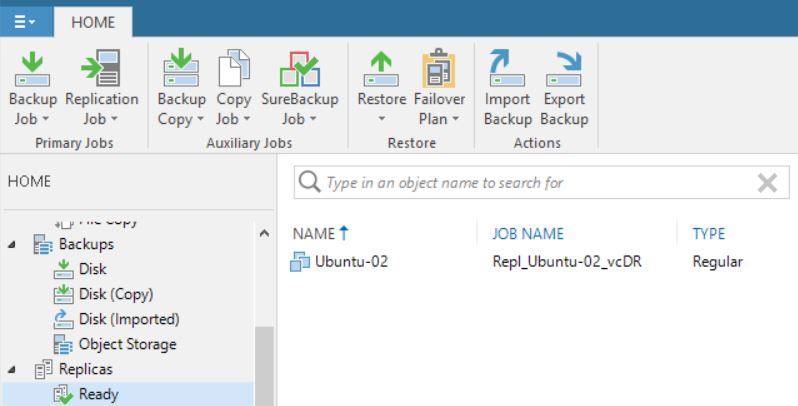
Picture 2 shows the VM source (highlighted in yellow) from vCENTER console.
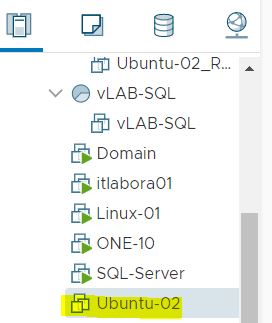
Picture 2
After checking up that the VM source is switched off, it’s possible to start a Failover (Picture 3).
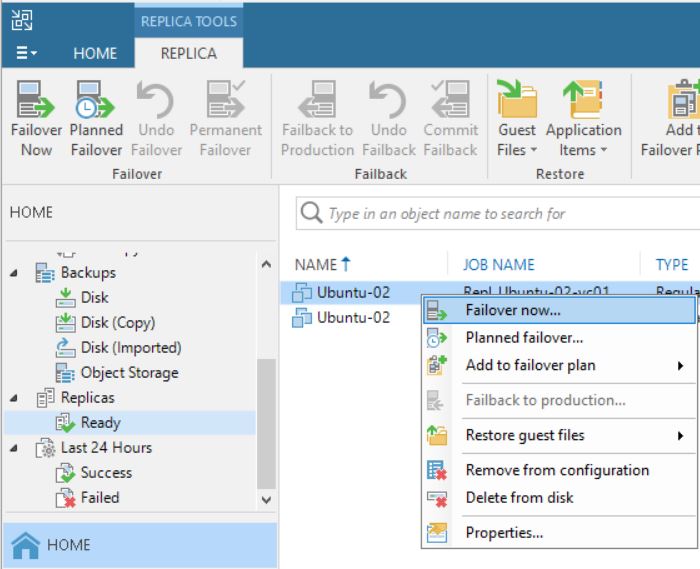 Picture 3
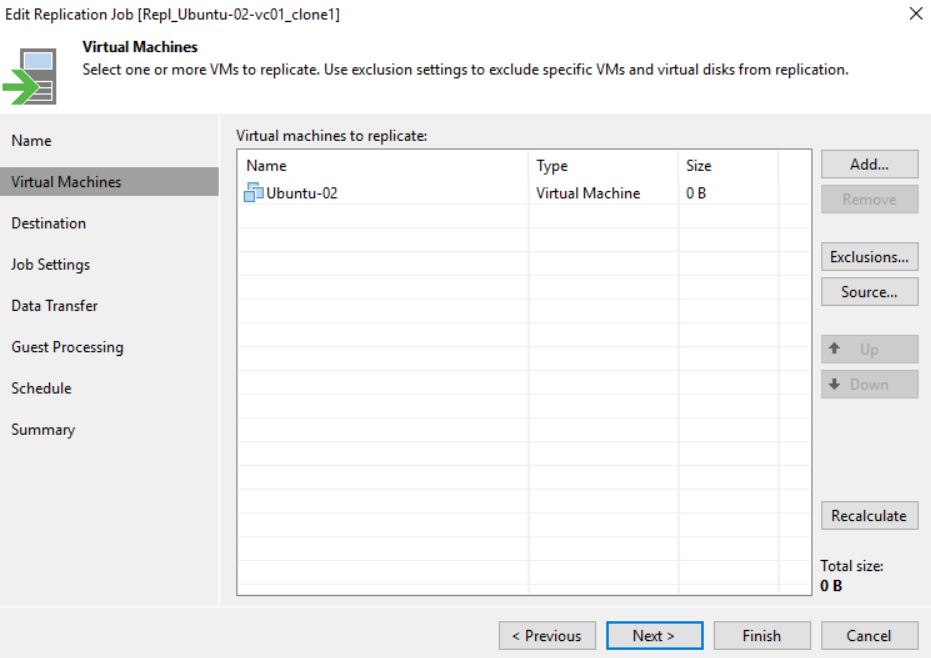
The next five pictures show the step-by-step wizard to complete the procedure correctly. As you can see from picture 4 the VM that has been replicated with two different jobs (Picture 5) is always Ubuntu-02.
 Picture 4
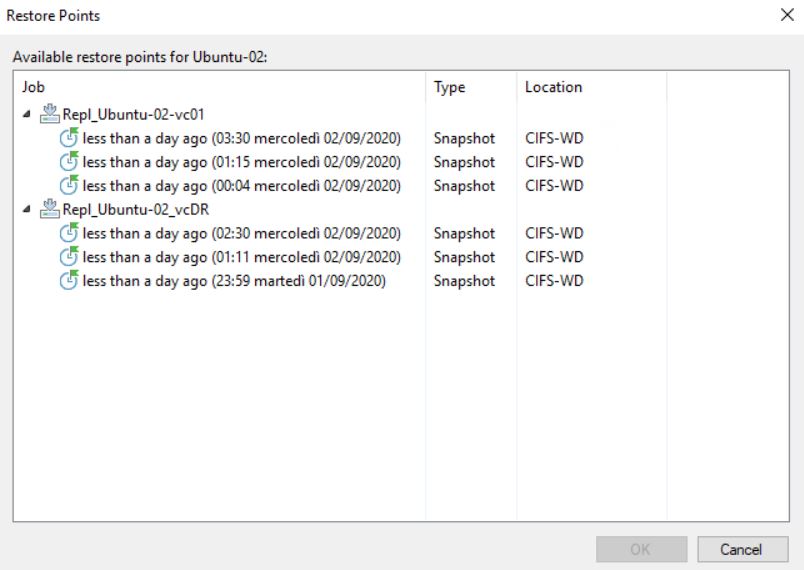 Picture 5
Pictures 6-8 show the result of the failover.
 Picture 6
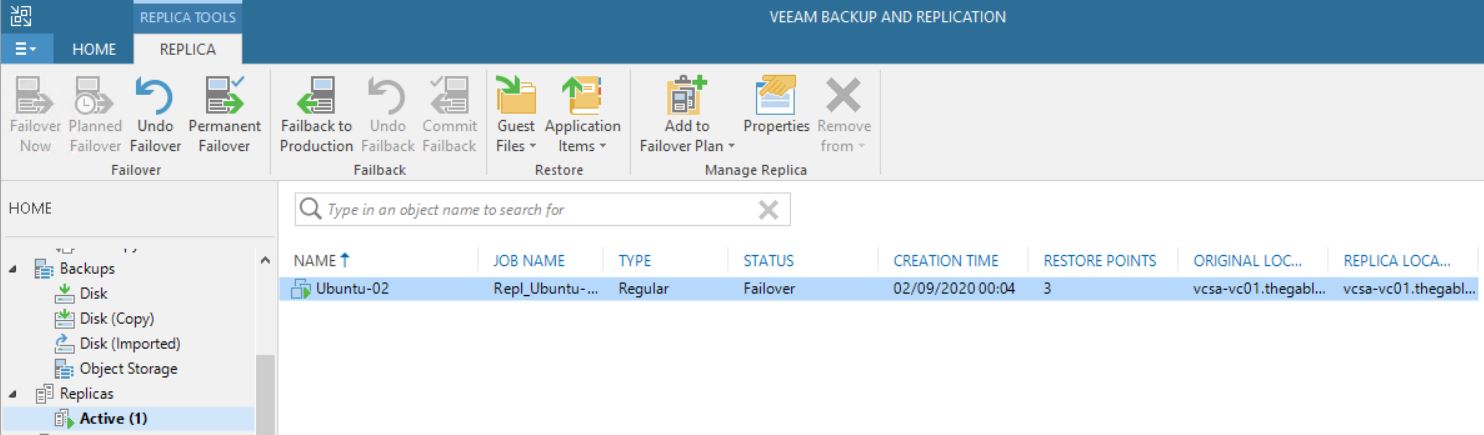 Picture 7
 Picture 8
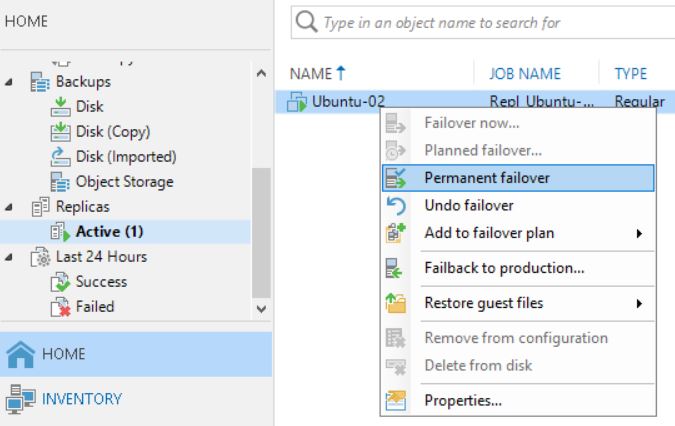
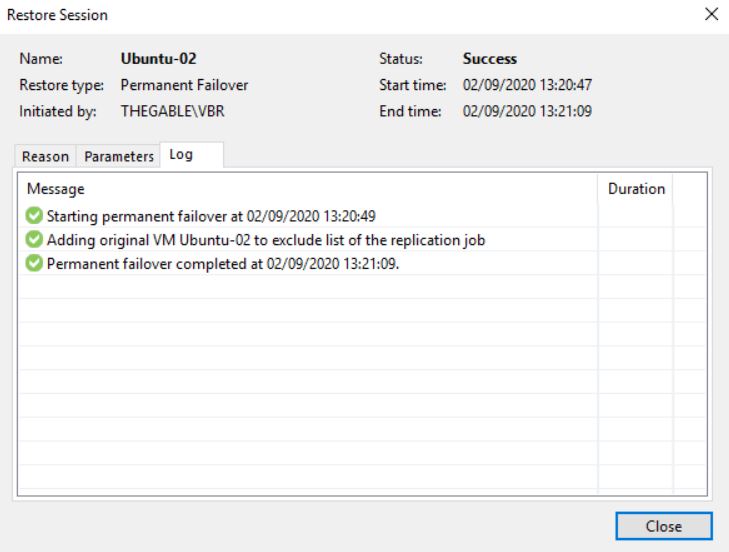
What happens when you complete the task with the Permanent failover? (Picture 9/10/11)
 Picture 9
 Picture 10
 Picture 11
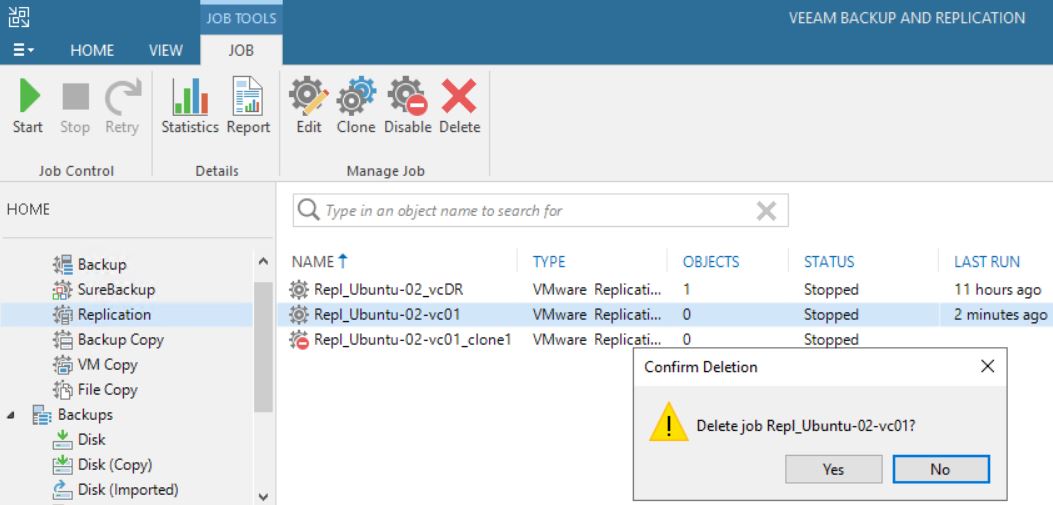
First of all, comparing picture 3 with 12 it is possible to see that one of the Replica Ready VM, and precisely the VM in permanent failover, has been deleted.
 Picture 12
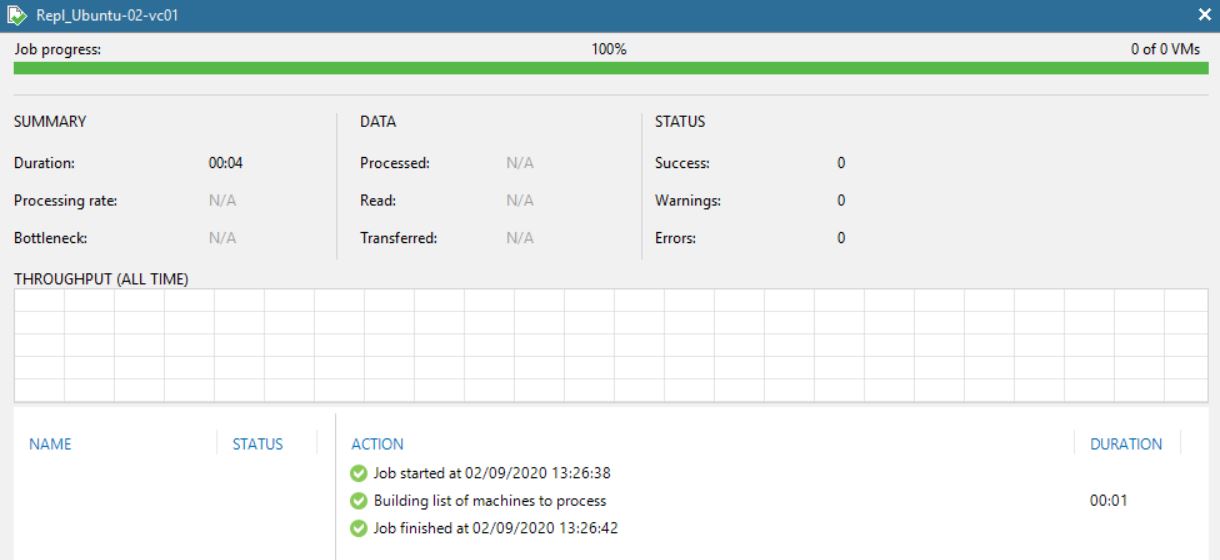
Picture 13 shows that now the replica job contains 0 objects. The right behavior is confirmed by pictures 14,15,16 and 17 where it is shown that the replica is not available anymore.
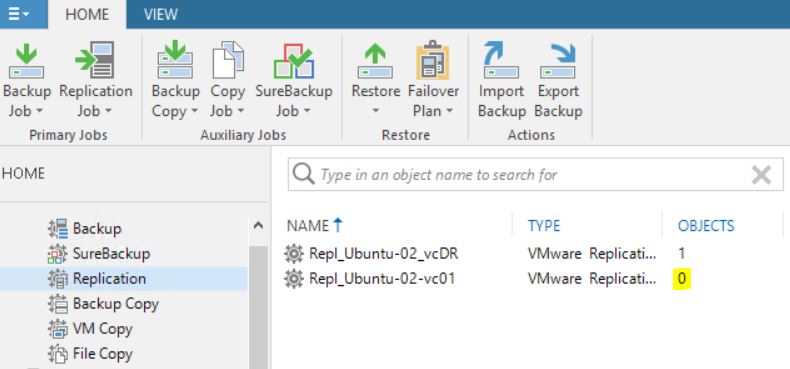 Picture 13
 Picture 14
 Picture 15
 Picture 16
 Picture 17
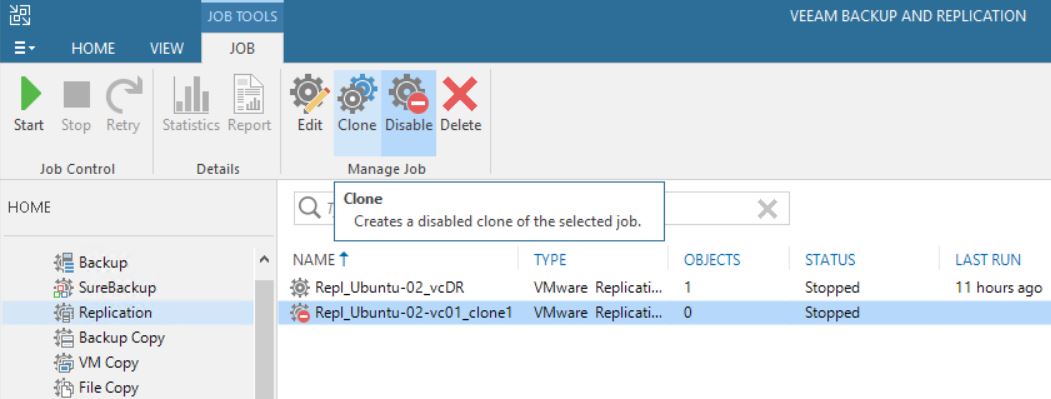
The cloning job option didn’t change the correct behavior (Pictures 18 and 19)
 Picture 18
 Picture 19
Let’s sum up. Following the right procedure, the Failover works as aspected
Now …. why the VM has been deleted? The next article will explain it in detail.