VMware Broadcom – Cosa fare ?

Broadcom's Acquisition of VMware Closed: What Now?

Broadcom ha dato una grande scossa al  2024.

Dagli ultimi rumors, sembra che il licensing della appena acquisita VMware verrà pesantemente rivisto.

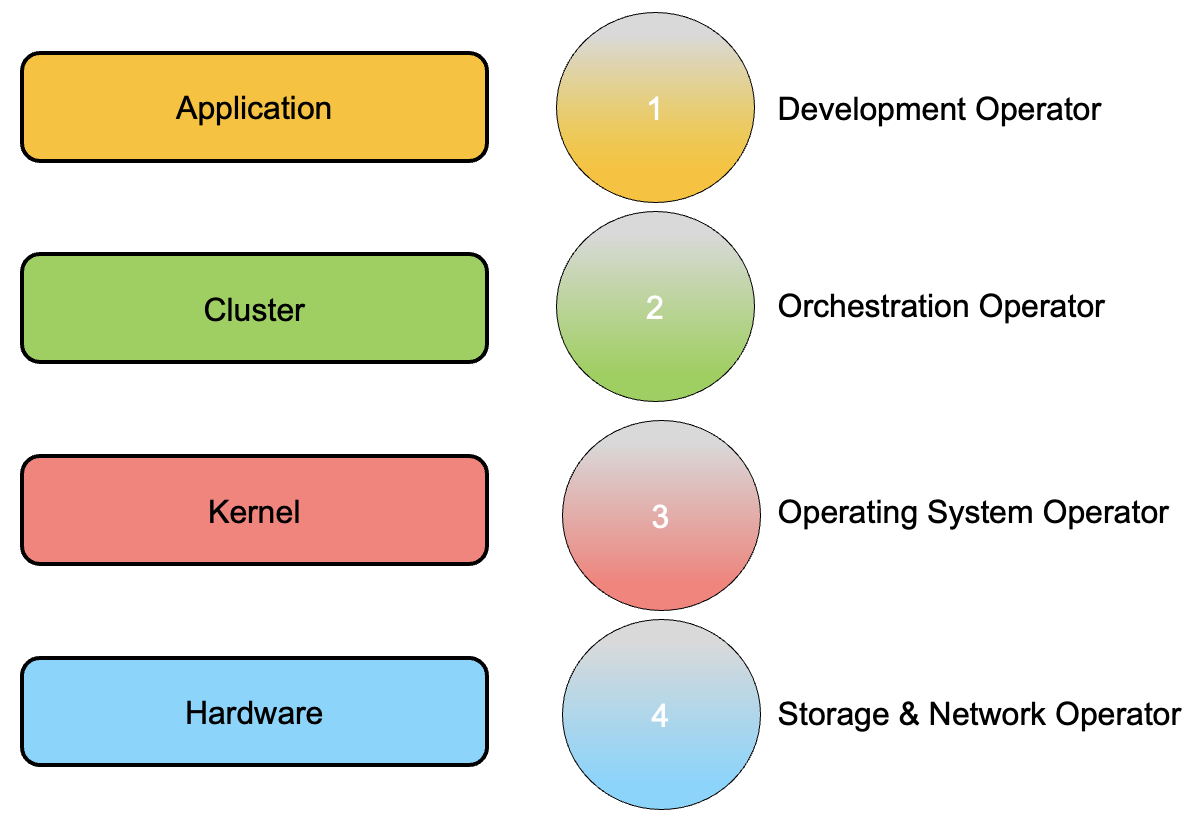
Uno dei primi risultati è che molti clienti si chiedono cosa sia giusto fare.

Non ho la pretesa di conoscere la risposta corretta.

Ho effettuato alcune riflessioni che mi hanno portato a pensare a quattro futuri scenari  dei quali vi parlerò nel presente articolo.

  1. Il cliente continua la collaborazione con VMware/Broadcom.
  2. Il cliente sostituisce la tecnologia Hypervisor.
  3. Il cliente migra il proprio datacenter verso un Hyperscaler o  un Service Cloud Provider Locale.
  4. Il cliente trasforma il proprio Datacenter in un  “Datacenter as a Software”.

Per ogni scenario andrò ora a descrivere i macroscopici pro e contro.

1. Credo che il desiderato di Broadcom sia quello di semplificare il più possibile il licensing al fine di avere a portfolio soluzioni snelle e semplici da proporre.

Ciò implica eliminare alcune delle soluzioni ora presenti per concentrare le  energie unicamente su quelle a maggior rilevanza d’uso e guadagno.

Ora vi domando: Le soluzioni VMware ora presenti nel vostro datacenter sono quelle strategiche anche per Broadcom?

E ancora, siamo certi che l’ottimizzazione Broadcom non toccherà il dipartimento R&D di VMware che sviluppa le soluzioni divenute ora strategiche?

E non per ultimo, quale sarà il prezzo per poter rimanere nell’ecosistema Broadcom-VMware?

2. La prima sfida è quella di fornirsi di strumenti in grado di migrare le VM da una tecnologia HyperVisor all’altra.

La seconda è quella di proteggerle.

(NDR. Meno male che Veeam Backup & Replication permette di realizzare con un solo strumento entrambe le cose 🙂 )

Aggiungo, che bisognerà essere anche fortunati nello scegliere un vendor che non sia nel mirino di una nuova Broadcom, perché finire nello stesso giro dantesco sarebbe diabolico.

Pensare ad una tecnologia open-source based?

3. Il modello degli Hyper-Scaler è quello di fornire una serie di servizi  personalizzabili.

Spesso sento qualcuno affermare che esistano dei “costi nascosti”.  Non è vero, sono tutti ben illustrati, solo che capirli preventivamente è spesso molto difficile.

Avrà quindi particolare importanza la fase di creazione del progetto di migrazione che dovrà essere particolarmente accurata al fine di non ritrovarsi brutte sorprese  a fine mese .

4. Data Center as a Software è sinonimo di un’architettura Cloud Native.

Ciò implica riscrivere applicazioni e servizi in modo tale che siano  indipendenti dal HyperVisor.

E’ il nuovo approccio che negli anni diventerà un comune standard per scrivere codice.

Nel sito troverete una serie di articoli sul mondo Container e kubernetes ai quali vi rimando.

Tante domande, una sola risposta giusta?

No, credo che la migliore strategia sia quella di ricercare il miglior bilanciamento nell’utilizzo delle diverse opzioni disponibili, per arrivare a regime con la soluzione che si adatta al meglio alle necessità della vostra azienda in un corretto bilanciamento tra costi e benefici.

Ultima nota: Non dimenticate mai di aggiungere dei piani di formazione del personale perchè il training on the job in scenari particolarmente complessi NON è mai la via migliore per rendere sicuri i vostri sistemi ovunque questi siano

ESXi v.7: host patching

In this article, I will explain the procedure to upgrade the ESXi Host when the VMware environment consists of only one server.

Note 1: The first task is to update the vCenter ( VCSA ) by checking which ESXi versions are supported.

Note 2: The traditional method of updating ESXi Hosts uses the automated update process managed by the vCenter console.

Note 3: The DR site of my laboratory consists of a single VMware ESXi Host on which the secondary vCenter ( VCSA ) is present; in this scenario, the methodology indicated in note 1 cannot be used, since, during the update phase, the ESXi Host is placed in maintenance mode. In this state, all the VMs present are off (including the VCSA ).

The solution is to use the procedure on the VMware ESXi Patch Tracker site which consists of the following steps:

1- Selection of the software version that will be installed on the host at the end of the process (see image 1)

Picture 1

2- Determine the CLI commands to use during the update procedure:

The procedure is illustrated in the pop-up that appears when you click on the selected package (see image 2)

picture 2

3- Enable the ESXi Host for ssh connection (image 3)

Picture 3

4- Connect via ssh to the ESXi host and run the commands previously shown in the pop-up.

In my case:

  1. esxcli network firewall ruleset set -e true -r httpClient
  2. esxcli software profile update -p ESXi-7.0U3d-19482537-standard \ -d https://hostupdate.vmware.com/software/VUM/PRODUCTION/main/vmw-depot-index.xml
  3. esxcli network firewall ruleset set -e false -r httpClient

5- Put the ESXi Host in Maintenance mode and restart it.

6- At the end, check that the update was successful (image 4 and 5)

Picture 4 – Pre Update

Picture 5 – Post Update

Note 4 : In case the hardware is not in the compatibility matrix, the advice is to use the option< –no-hardware-warning> . In my case the second command was changed to:

esxcli software profile update -p ESXi-7.0U3d-19482537-standard \ -d https://hostupdate.vmware.com/software/VUM/PRODUCTION/main/vmw-depot-index.xml –no-hardware-warning

See you soon

Tips VMware – Module MonitorLoop power on failed

During laboratory maintenance operations, suddenly a Virtual Machine was no longer able to start.

The vCENTER console reported an error in initializing the server swap file.

Like any good system engineer, before making any changes to the environment, I tried to back up the aforementioned VM.

The job stopped due to the following error: (” An error occurred while taking a snapshot: Invalid change tracker error code “).

Troubleshooting:

  1. Since the swap file handles memory over-commitment, I tried to change the allocated amount of RAM.
  2. I added space to the Datastore on which the VM resided to make sure VMware had enough space to manage the swap file.
  3. I searched in the configuration file ( vmx ) for differences with respect to the configuration of the other VMs.

All tests and changes made did not solve the problem.

Aware that I would have to change the VM configuration, I implemented a simple strategy to:

  • Backup the VM through the Veeam Agent for Linux (The VAL operates at the Guest-OS level and not at the hypervisor level).
  • Write down all the changes that I would have made to the VMs (editor’s note: I had worn Hop-o’-My-Thumb‘s hat, that is, able to return to the initial configuration in a short time).

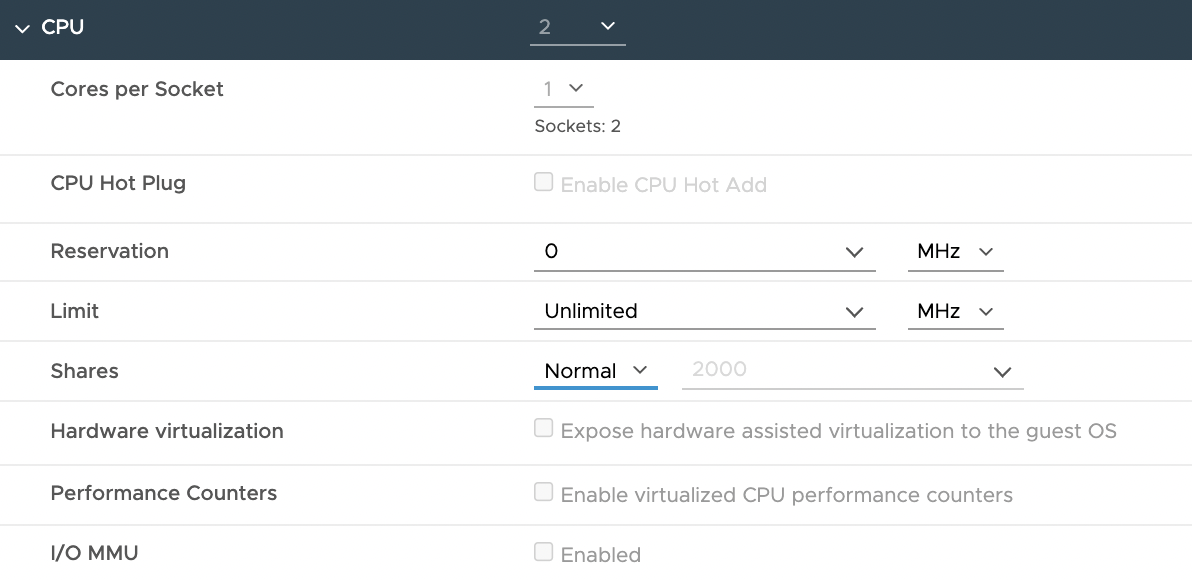
The methodical ” change, note, check and turn on” approach allowed me to discover that the problem was related to the CPU configuration of the Virtual Machine.

In fact, by resetting the ” CPU reservation ” values to Zero and ” CPU share” to Normal (see image 1), the problem went away, allowing me to start the VM and back it up.

Sapiens nihil affirmat quod non probet (A wise man says nothing that he cannot prove)

Picture 1

VMware VCSA 7.03b Backup

Dopo aver aggiornato i vCenter all’ultima versione disponibile, (7.0.3.00100), mi sono accorto che i backup precedentemente configurati non venivano completati con successo.

L’errore che compariva era il seguente: “Path not exported by the remote filesystem” (vedi immagine 1).

Immagine 1

Una veloce indagine sul sito VMware ha spiegato la ragione:

Quando la destinazione del  backup è una share di tipo SMB, la VCSA non è in grado di scrivere sul target i file di backup.  (https://kb.vmware.com/s/article/86069)

Riconfigurato il  job in modo tale che scrivesse verso un target di tipo NFS, speravo di aver risolto questo inconveniente ma … un nuovo errore ha fatto la sua comparsa.

“Db health is UNHEALTHY, Backup Failed. Disable health check to take backup in the current state”  (vedi immagine 2):

Immagine 2

Nuova indagine e nuova risposta esauriente da VMware.

Dalla kb 86084 (https://kb.vmware.com/s/article/86084) l’errore può comparire dopo aver installato la patch 7.0.3

La procedura è molto semplice e consiste nel collegarsi come utente root e via SSH alla VCSA e lanciare il seguente comando:

/usr/bin/dbcc -fbss embedded (vedi immagine 3).

Immagine 3

Completata l’operazione è possibile salvare la configurazione della VCSA (vedi immagini 4 e 5).

Immagine 4

Immagine 5

A presto!

Kubernetes: The components

In previous articles we have seen some details of how the Kubernetes architecture is built.

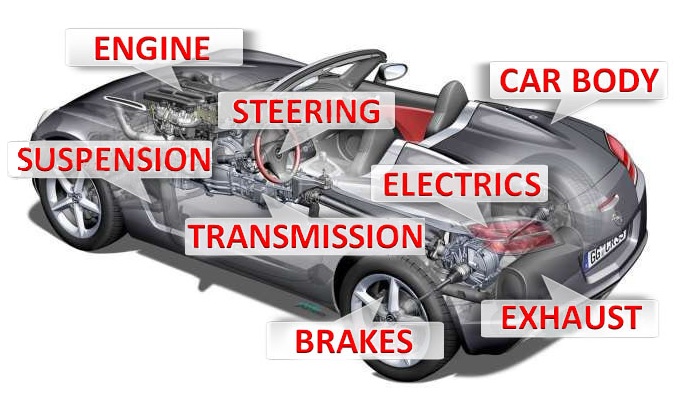
Today the working mechanisms of the Kubernetes engine will be described indicating the name of each component; to remain faithful to the comparison of the car engine, we will speak of the camshafts, valves, bearings, … that belong to the Cloud Native

Note 1: The installation of k8s in Datacenter, Cloud, and Laboratory will not be discussed, the network has already made comprehensive tutorials available.

To familiarize yourself with k8s I recommend using Minikube (Linux platform) Docker Desktop (Windows & Mac platform).

Let’s begin!

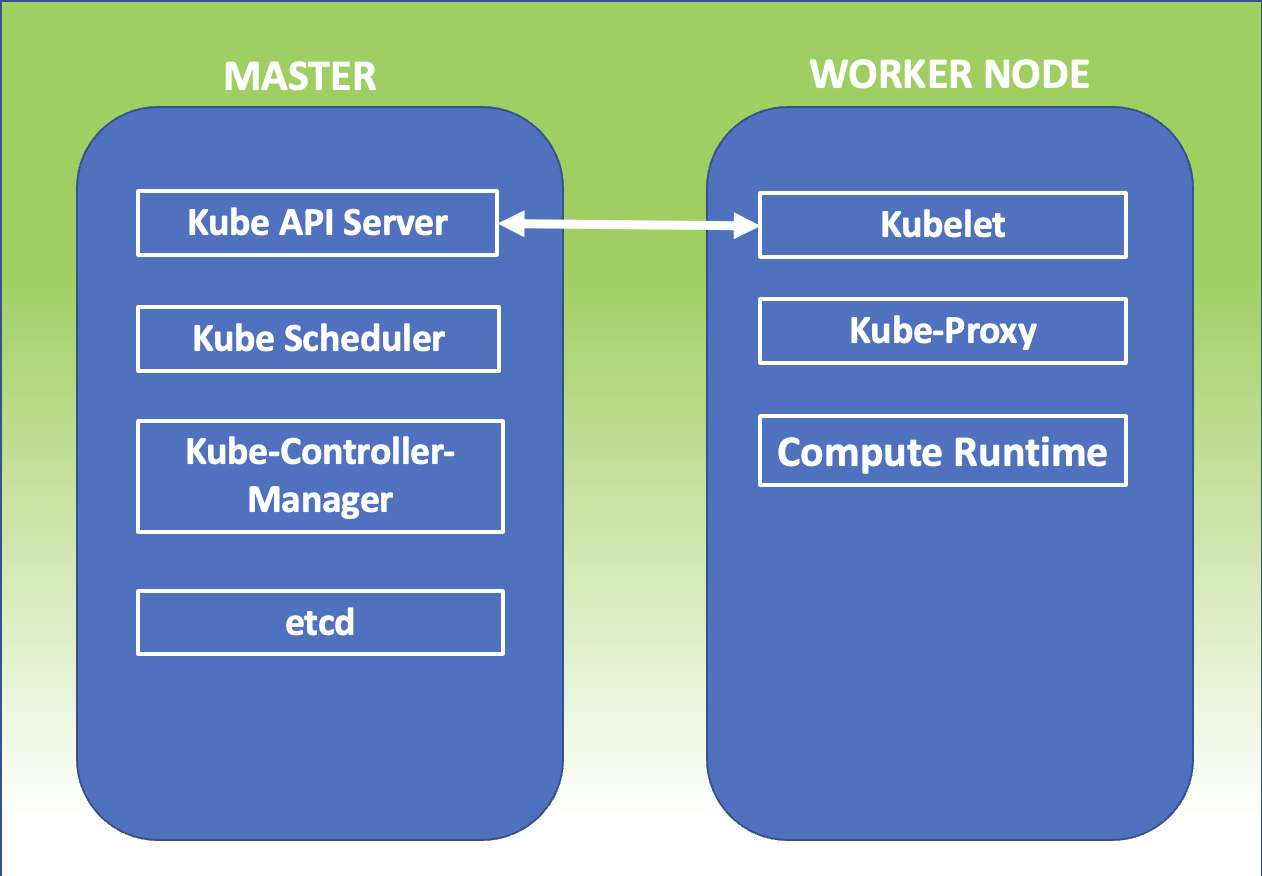
Kubernetes Master:It is the main node of the cluster on which three processes that are vital for the existence of the cluster run.

  • kube-apiserver
  • kube-controller-manager
  • Kube-scheduler

In the master node, there is also the DataBase etcd, which stores all configurations created in the cluster.

The nodes that take care of running the applications and therefore the services are said worker node. The processes present on the worker node I’m:

  • Kubelet
  • kube-proxy

kubectl : AND’ The official Kubernetes client ( CLI ) through which you can manage the cluster ( Kube-apiserver ) using the API.

Some simple examples of kubectl commands are:

  • kubectl version (indicates the version of k8s installed)
  • kubectl get nodes (find out the number of nodes in the cluster)
  • kubectl describe nodes nodes-1 (shows the health status of the node, the platform on which k8s is running (Google, AWS, ….) and the allocated resources (CPU, RAM)).

Kube-Proxy : He is responsible for managing networking, from Routing to Load Balancing rules.

Note 2 : K8s will try to use them all libraries available at the level of operating system .

Container Runtime : It is the foundation on which the k8s technology rests.

kubernetes supports several runtimes among which we remember, container-d , cri-o , rktlet .

Note 3 : The runtime Docker it has been deprecated in favor of those that use interfaces CRI ; Docker images will still continue to work in the cluster.

The objects Kubernetes base are:

  • Pod
  • Services
  • Volumes
  • Namespace

THE controller provide additional functionality and are:

  • ReplicaSet
  • Deployment
  • StatefulSet
  • DaemonSet
  • Job

Between Deployment it is imperative to mention Kube-DNS which provides name resolution services. Since kubernetes version 1.2 the name has changed to Core-dns.

Add-On : they are used to configure further cluster functions and are placed inside the name space kube-system (such as Kube-Proxy, Kube-DNS, kube-Dashboard)

Add-ons are categorized according to their use:

  • Add-on of Netwok policy . (For example the NSX-T add-on takes care of the communication between the K8s environment and VMware)
  • Add-on Infrastructural (For example KubeVirt which allows connection with virtual architectures)
  • Add-on of Visualization and Control (For example Dashboard a web interface for K8s).

For commissioning, Add-ons use controllers DaemonSet And Deployment .

The image in figure 1 summarizes what has just been explained.

Figure 1

Take care and see you soon.

Kubernets: Know the details

A good way to describe cloud-native environments is to refer to the image of your car.

The container is the engine, k8s is the electronic control unit that manages the proper functioning of the vehicle, the drivers, indicating the route and the destination, select the type of service to be provided.

Today’s article will reveal some architectural details to understand how “the car” manages to reach its destination in an efficient way.

Containers are of two types:

The first is called System Container. It is the bodywork of the car (I mean from the plates to seats, steering wheel, gear lever and accessories).

Often for simplicity of creation, it is a Virtual Machine (VM) with Linux operating system (it can also be Windows).

The most common services present in the VM are ssh , cron and syslog , the File System is of type ext3, ext4, etc.

The second type is called Application Container and is the place where the image will carry out the activities.

Note1: The image is not a single large file. They are usually multiple files which, through an internal cross-pointing system, allow the application to operate correctly.

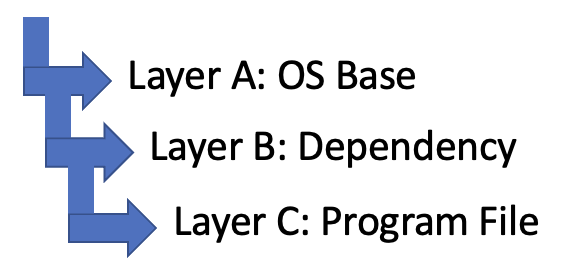
The Container application (from now on container only), has an operating mode based on a rigid logic, where all levels (layers) have the peculiarity of communicating with each other and are interdependent.

Figure 1

This approach is very useful as it is able to manage the changes that may occur over time in an effective and hierarchical way.

Let’s take an example: When a service configuration change occurs, for which Layer C is updated, Layer A and B are not affected, which means that they must NOT be modified in turn.

Since Developers like to refine their own images (program files) rather than dependencies, it makes sense to set the service logic in the mode indicated in figure 2 where the dependencies are not affected by a new image.

Figure 2

Note2 : The File system on which the images are placed (in the example of the car engine we are talking about pistons, connecting rods, shafts …) is mainly of three different types:

  • Overlay
  • Overlay 2
  • AUFS

Note3 : A good advice on the security side is not to build the architecture so that the passwords are contained in the images ( Baked in – Cooked)

One of the splendid innovations introduced in the container world is the management of images:

In a classic high-reliability environment, the application is installed on every single node of the cluster.

In containers, the application is downloaded and deployed only when the workload requires more resources than a new cluster node with a new image.

For this reason, the images are saved in “virtual” warehouses, which can be local or distributed on the internet. They are called “Register Server”.

The most famous are Docker Hub, Google Container Registry, Amazon Elastic Container Registry, Azure Container Registry.

We conclude this article by talking about the management of resources associated with a service.

The container platform uses two features called Cgroup and NameSpace to allocate resources that work at the kernel level.

The purpose of the Cgroup is to assign the correct resources ( CPU & RAM ).

Name spaces have the purpose of grouping the different processes and making sure that they are isolated from each other ( Multitenancy ).

The type of NameSpace can affect all the components of the service as indicated in the list below.

  • Cgroup
  • PID
  • Users
  • Mount
  • Network
  • IPC (Interprocess communication)
  • UTS (allows a single system to appear with different host and domain names and with different processes, useful in case of migration)

An example of limiting the resources of an application is shown in Figure 3 where thegable image, downloaded from the Register Server grcgp, has a limit of RAM and CPU resources allocated.

Figure 3

Soon