VBR & Cloud Business Model – Part 3

This article will cover the topic of license in VCSP scenarios.

Please refer to the official documentation to get more details on it.

The easiest way to explain the license model is by thinking of a basket.

a. What is present in the basket?
It is the container of the licenses. The licenses belong to the Service Provider.

b. What the Service Provider can do with licenses?
It can assign them to his customers (you can call them end-users or tenants).

c. Does the services consume different amounts of licenses?
The cost depends on the supplied service.

The example below will clarify the licensing method; the units I will use to explain the model are apples 🙂
(numbers written here are not real, contact the local Veeam sales representative to have a correct quote).

A Service Provider supplies three types of services to his customers;
DraaS, BaaS, RbcS(Remote Backup Copy Service)

Every single month the Service Provider buys 100 “apples” and put them into the basket.

Let’s suppose that:

1) DraaS consumes 10 apples for VM a month (VM/m)
2) BaaS 4 apples  VM/m
3) RbcS 6 apples VM/m
4) Every tenant has 5 VMs
5) Service Provider customers are: Green – White – Red
6) Green bought DraaS
7) White bought BaaS
8) Red bought RbcS

How can I measure the apple-eating?
With an easy math operation 🙂

Green = 5VM*DraaS = 50 apples
White = 5 VM*BaaS = 20 apples
Red=5VM*BbcS=30 apples

Total = 100 Apples

Note 1: If the Service Provider adds new customers or the present tenants more VMs the Service Provider license can be enlarged on-fly easily contacting the Veeam team.

But, if the license count it’s quite simple with few customers it can be more difficult with hundreds of them.

In aid of of the Service Provider Veeam released a  very useful and powerful software named  Veeam Service Provider Console (VSPC)

What are the common VSPC use cases?

1) Remote monitoring and management
2) Licensing engine and usage reporting
3) Billing
4) Integration and automation (RestFul API)
5) Multi-tenant serviceability

(To have more details please click here)

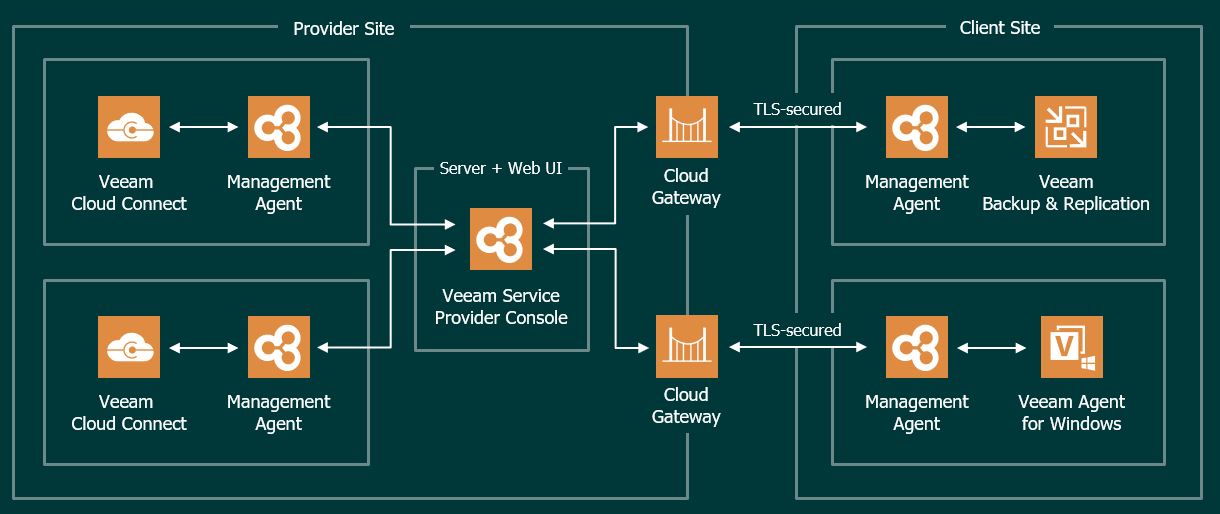
Picture 1 shows which services can be managed via VSPC.

Picture 1

Please remember that cloud connect is mandatory work with VCSP.

The official guide shows the requirements to work with it:

Note 2: The software provided by Veeam enables any partner to create his own cloud services. To example performing a backup service for workstations and laptops  of employees that working from home (a common scenario in these unlucky last months)

Note 3: To create a price list every single Service provider will have to add all costs of Infrastructure, Managing etc

That’s all for Cloud Modelling.

Check Replica Status – Before deleting it – Part 1

Last month, a partner had to face up a strange VBR behavior.

From the VBR console he deleted a VM’s replica (Picture 1), and suddenly the production VM has been also erased (don’t worry, before doing any activity he tested the backups using sure backup technology).

Picture 1

The reason why it happened become clear to me once I read the logs.

To do it shortly, some weeks before someone started a Failover directly from vCENTER console without doing any communication to the internal IT team.

This article wants to explain how to avoid this common mistake.

The first step is understanding some basic concepts:

a) VMware identify any single VM with a number named MorefID and a UUID.

b) Any single operating system has an identifier named Instance UUID (Universal Unique IDentifier); in my lab, I set-up  more than one replica job for a single VM

Table 1. row 2. shows the name of production VM (Ubuntu-02), its morefID  (vm2270), where it is running (Milan), the UUID (…bcc12) and its VM UUID … f58b.

Table 1. row 3-4 shows the name of  VMs replicas,  morefID, instance UUID and its UUID.

All tables shown in these articles have been created using Veeam One

Name PCName morefID DataCenter Instance UUID UUID
Ubuntu-02 ubuntu-02 vm-2270 Milan 502d2405-cc8f-de73-1a19-57e8496bcc12 564d013a-7835-9d1b-841e-32855790f58b
Ubuntu-02_Rep_VC01 ubuntu-02 vm-2694 Milan 502d2d90-d08f-08aa-efcf-d9feaa1d13f8 564d013a-7835-9d1b-841e-32855790f58b
Ubuntu-02_Rep_VCDR ubuntu-02 vm-399 Venice 501d517b-672e-30e0-665a-fd4b4af7dcb6 564d013a-7835-9d1b-841e-32855790f58b

Table-1

Picture 2 shows the VM  source (highlighted in yellow) from vCENTER console.

Picture 2

After checking up that the VM source is switched off, it’s possible to start a Failover (Picture 3).

Picture 3

The next five pictures show the step-by-step wizard to complete the procedure correctly.  As you can see from picture 4 the VM that has been replicated with two different jobs (Picture 5) is always Ubuntu-02.

Picture 4

Picture 5

Pictures 6-8 show the result of the failover.

Picture 6

Picture 7

Picture 8

What happens when you complete the task with the Permanent failover? (Picture 9/10/11)

Picture 9

Picture 10

Picture 11

First of all, comparing picture 3 with 12 it is possible to see that one of the Replica Ready VM, and precisely the VM in permanent failover, has been deleted.

Picture 12

Picture 13 shows that now the replica job contains 0 objects. The right behavior is confirmed by pictures 14,15,16 and 17  where it is shown that the replica is not available anymore.

Picture 13

Picture 14

Picture 15

Picture 16

Picture 17

The cloning job option didn’t change the correct behavior (Pictures 18 and 19)

Picture 18

Picture 19

Let’s sum up. Following the right procedure, the Failover works as aspected

Now …. why the VM has been deleted? The next article will explain it in detail.

Check Replica Status – Before deleting it – Part 2

My previous article explained the procedure to perform a failover from VBR console explaining why it is safe (Click here to read it)

In this second article, I’ll show you what can happen if you try a failover in a different way, answering the behavior that a partner had during a cleanup procedure.

In my lab, I created a new Replica Job where the original VM is still Ubuntu-02 (Picture 1) and the replica VM has the suffix _Rep_vc01-1-1 (Picture 2).

Picture 1

Picture 2

After the VM has been created (Picture 3) It is switched it on directly from the vCENTER console (Picture 4). To be sure it works as expected, it is possible to connect remotely.

Picture 3

Picture 4

Picture 5

Going back to VBR console it’s possible to see that nothing has changed (Picture 6) just because the power-on action has been performed directly from the  VMware console,

Picture 6

Attention point: If you try to perform a replica task it fails because the VM is running (picture 7)

Picture 7

Now the main point of the two articles:

It’s a bad choice to delete VMs from VBR “Ready Replica VM”  menu (picture 8/9) without knowing if the VMs have been started from vCENTER console. Why? Because also the production VM gets deleted as shown in picture 10.

Picture 8

Picture 9

Picture 10

Let’s get a little wild with some supposing:

1. If you see the “active” status icon switched on ( from VBR console) it means the failover is started (picture 11)

Picture 11

2. If a permanent failover was performed, the VM disappears from “Replica Ready” menu and replica job results to be empty (Picture 12)

Picture 12

3. If the replica job works fine it means that no permanent failover has been performed

4. If the replica Job works fine but when clicking on the delete button (from “Replica ready menu” of VBR console) (picture 13) the production VM disappears, it means that a new replica job has been re-created after the manual failover has been launched (picture 14).

Picture 13

Picture 14

Knowing that deleting a VM replicated from VBR console needs a little attention, especially if you do not have the continuous and complete control of the VMware architecture, the question is: is it possible to think an easy checking-up before deleting VM?

The answer is Yes and Veeam One can easily help just creating them.

a. From vCENTER: setting up a report that checks if the VM to be deleted is running (power state status) (Table 1)

b. From VBR: if a Replication job is setted-up for that VM (Table 2)

Table 1

Table2

Is there another way to check it up?

Yes. using Powershell scripts.

The example you can find here below is just the first idea that can be polished with a little bit of your effort.

NB1: I’m not a PowerShell expert, I just love writing scripts easy to read by anyone.

NB2: Before trying it please ask your PowerShell expert a consultant!

NB3: It is meant to be launched from VBR.

NB4: If you think that it can be a feature request write to me!

Table 3

That’s all for now guys!

VDrO-Baseline 2

Let’s continue the VDrO features description talking about scope (Picture 1).

Picture 1

The VDrO controls access to its functionality with the scopes.

A scope defines which operations users can perform.

Let’s back to my example, I created a SQL Production scope where only the users belonging to the SQL administrator group can manage and launch the DR process.

The plan components are probably the main VRrO attention point (Picture 2).

(Picture3)

From this menu, it’s possible to group as a single entity all objects you need to create a Disaster Recovery strategy.

I’m talking scope (first to select), VM (applications and services), recovery locations, plan steps, credentials, and jobs template.

To be clearer, it’s like creating a picnic basket and putting it inside different dishes.

Now you just have to lay the table.

How to do it? (Which dishes do I have to put into the basket?)

Just select scope (Picture 4), then from VM groups include the needed VMs source (Picture 5), from recovery locations, select the DR site (picture 6), and at the end select plan steps, credential, and Template Job.

Picture 4

Picture 5

Picture 6

The last point is the DataLabs assignment but I’m sure you can now include them on the right scopes.

Exit from the Administrator menu and move to the main menu to create the first Recovery Plan.

The wizard is very easy to be used:

Picture 7

Picture 8 shows how to select the Scope.

Picture 8

Picture 9 shows the detailed plan info and Picture 10 the plan type (next articles will deep how to set them up).

Picture 9

Picture 10

Pictures 11, 12, 13 show how it’s possibles to discover the VMs that belong to the group selecting VM group.

Picture 11

Picture 12

Picture 13

Picture 14 shows the control options for the DR plan. If something goes wrong the plan can be halted or not.

Picture 14

Picture 15 shows the steps, 16 the option to protect VMs switched on after the failover has been completed, 17 the RPO and RTO that the plan has to respect.

Picture 15

Picture 16

Picture 17

Picture 18 shows the template docs that will be used, while picture 19 shows a (for me) interesting mandatory check option.

Before doing any new activity the Readiness check analyzes that all components are correctly set up.

Picture 18

Picture 19

In my next article, I will cover two examples: DR-plan from Replica and DR-plan from backup. Keep in touch!