NUC upgrade to ESXi 7.0.1 – Part 2

Phase 2: Upgrading ESXi Host

In the previous article, I described how to prepare a customized ISO. If you lost it please click on this link.

Let’s continue!

Requirements: the task I performed before starting the procedure here described has been the vCenter upgrade to 7.0.1-c. I remind you that my starting point was Esxi 7.0.0.b that is fully supported by vCenter 7.0.1-c.

There are two main ways to upgrade the ESXi Hosts.

The first is related to the use of a VMware feature. It’s the vSphere Lifecycle Manager (vLCM) and you can taste part of its potential by watching this video guide.

Instead, I preferred to use an old approach working with a bootable USB pen with the custom ISO prepared in the previous article. The steps are:

1. Shutdown ESXi Hosts
2. Remove the USB-NIC
3. Insert the Pen Drive with custom ISO
4. Upgrade the host following the wizard (The main point is shown in Picture 1)
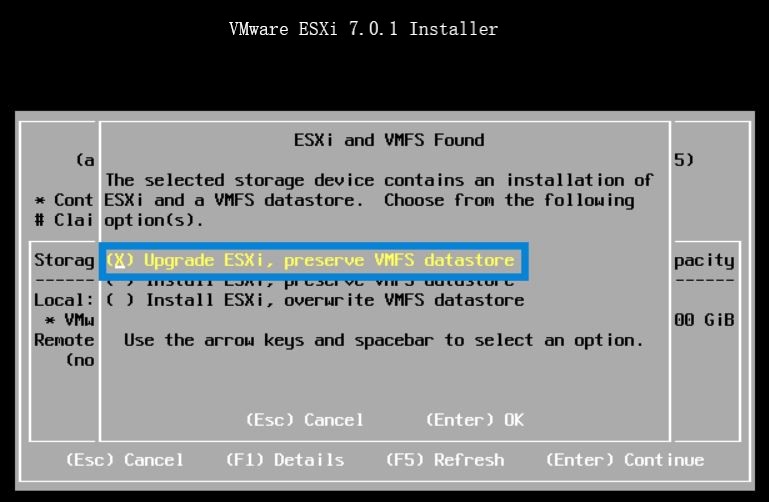
Picture 1

5. Reboot the host.

6. Now it’s time to install the USB-Nic Driver. It is available from “USB Network Native Driver for ESXi” web site and this article allows me to say thx to the excellent job of  Songtao Zheng and William Lam

Before proceeding please read the instruction carefully and DO NOT insert all the USB cards together. (I have got three USB-NIC cards)

Why? Because during the procedure, I have had more than one purple screen and after a deep analysis I discovered that it depended on the USB-NIC cards.

To get over this issue I created the following procedure.
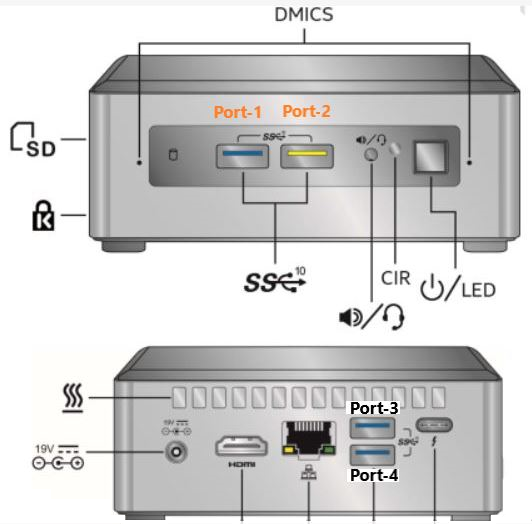
Picture 2

7. Switch off the ESXi NUC and insert the first USB-NIC card in port-1 and the second in port-4 (please refer to picture 2 to know the nomenclature of the port)

8. Now switch on the NUC and check if it boots correctly.

9. Switch off the NUC and insert the third USB-NUC on port-2.

10. Reboot NUC and check if it works as aspected.

Before ending this article I suggest creating a map between vmks and the physical MAC Address of the USB NIC. The main advantage is that it allows maintaining the same vmkusb address after a reboot also.

Some useful commands:

To Identify the Mac Address:
# esxcli network nic list |grep vusb |awk ‘{print $1, $8}’

To Check persisting binding:
# esxcli system module parameters list -m vmkusb_nic_fling

NUC upgrade to ESXi 7.0.1- Part 1

Last weekend I upgraded all my Servers to the last VMware ESXi release (7.0.1 C) and this article is meant to describe all steps I performed.

Just a recommendation before starting. I worked in my lab that it’s not a production environment.

MyLAB before upgrade:

  1. NUC8i7beh2
  2. VMware ESXi 7.0.0 (Build 16324942)
  3. Every NUC has three more network cards added to the embedded standard NIC. They have been obtained through the USB ports leveraging three adapter USB/Ethernet and the flings driver.  Please refer to the FLINGS website to get all info.

The procedure is composed of two main phases and this article will cover the first part.

Phase 1: Creating a customize ISO

Is this step required?

Oh well, it depends if the Standard ESXi VMware ISO has already the driver of your embedded network card inside. The standard ISO, unfortunately, does not contain the NUC8i7BEH network drive (it is named ne1000)

If you upgrade the ESXi through the standard ISO, the process fails with the error shown in picture 1.

Picture 1

How to get over it?

Before upgrading it, it’s necessary to know the driver used by the embedded NIC Card. If you don’t know it, please read the next instructions carefully (they are command launched on host ESXi you are going to upgrade):

1.   lspci -v | grep -A1 -i ethernet
take a note of the string composed of 4:4 values ( xxxx:yyyy)

2.   lspci -n | grep xxx:yyy
take a note of how the nic is named (in my case [vmnic0])

The next step is getting the name of the driver directly from the VMware website (Matrix compatibility).

From that web page, filling up the empty field with the value yyyy and filtering the result by IO Devices, it’s possible to get the device driver name.

For my LAB the result is shown in picture 2 where I highlighted the device driver name in yellow.

Picture 2

The last command to check if the driver is already installed (It should be present) is:

3.   vmkload_mod -l | grep “Device Driver”

In my case: vmkload_mod -l | grep ne1000
                          ne1000          1          352

Optional: if you use the USB ports to add more NIC, please uninstall the fling drivers before proceeding.

4.   esxcli software vib remove  –vibname=vmkusb-nic-fling (before vibname two scores –   –  )

It’s time to create our custom ISO

a- Download the offline bundle from VMware Site, for example:

VMware- ESXi-7.0U1c-17325551-depot.zip

b- Download the NUC ethernet driver for your device (ne1000 in my case).

I found an useful PowerShell script to get it:

#add the software repository
Add-EsxSoftwareDepot https://hostupdate.vmware.com/software/VUM/PRODUCTION/main/vmw-depot-index.xml
#define as variable the name of the driver
$vib = Get-EsxSoftwarePackage ne1000
$vib | select Name,Version | ft -AutoSize
$vib[4] | fl
#Get the driver
Invoke-WebRequest $vib[4].SourceUrls[0] -OutFile d:\pkg\ne1000_0.8.4-10vmw.700.1.0.15843807.vib

c- The PowerShell script to create a custom ISO is available on VMware Front Experience Site.

This great script has a lot of options; please refer to the official documentation to see how to create the ISO.

In my case I just launched the following command:

.\ESXi-Customizer-PS-v2.6.0.ps1 -v701 -izip D:\ISO\ESXi-7-0-1\VMware-ESXi-7.0U1c-17325551-depot.zip -pkgDir D:\pkg\ -OutDir D:\ISO\ESXi-7-0-1\ -nsc

d- The last step is creating a bootable USB pen using the just created custom ISO as a source.

I have chosen Rufus to perform this task.

In the next article, we are going to see the final step to upgrade the NUC