
 Persistent Data
In previous articles, we have seen that if a POD is decommissioned or the container is restarted, all data on the POD file system is erased.
It is a winning approach for all those stateless applications (for example a web front-end ) but it is not for stateful applications where, for example, not registering a record of a DataBase means losing vital information for the service provided.
Kubernetes brilliantly overcomes the obstacle through the use of Persistent Data technology.
It is the yaml file that defines the Persisten Data in the POD through the entries:
- Volumes describing the volumes available for the POD.
- VolumeMounts describing the path or usage of the volume (e.g. / mydata /)
Volumes are categorized into three main categories created based on their use:
1- Communication / synchronization
It is the shared volume to synchronize with the images of a remote Git.
The life of the volume is limited to the existence of the POD and the volume can be shared between multiple containers.
2- Persistent Data
To ensure high reliability and best performance, the PODs must be able to move freely between the nodes of the kubernetes cluster.
As a result, volumes that contain persistent and vital application information must always be reachable by the POD.
Kubernetes to ensure visibility supports many types of volumes such as NFS, iSCSI , Amazon’s Elastic Block Store, Azure File and Disk Storage, as well as Google Persistent Disk.
Note1: If you move your POD , Kubernetes can automatically unmount the volume from the old host and make it available on the new one.
3- Host filesystem
Some applications not only need a persistent volume, but also a file system available at the host level. The need is addressed through the hostPath volume (e.g. /var/mygp/).

Resource Management
The cost of operating a machine in a data center is independent of the amount of CPU & RAM that the single VM in operation uses.
On the other hand, ensuring that CPU & RAM resources are distributed in the best possible way within the infrastructure impacts the efficiency of the environment.
Example:
Let’s imagine two services. The former uses 20% of the memory of a VM configured with 5GB of RAM, the latter uses 50% of a second VM configured with 4GB RAM.
The total use of RAM memory is 1 + 2 = 3GB of the total 9GB allocated.
Utilization metric ( MU ) is defined as the percentage value between the ratio of the amount of actively used resources and the number of purchased resources.
In our example MU = 3/9 = 33%
In order to control resource usage, Kubernetes allows users to specify two different metrics at the POD level.
- Resource Request specifies the minimum amount that can be assigned to the resource.
- Resource limits specify the maximum amount that can be assigned to the application.
The example of Figure 1 shows an example of a resource limit
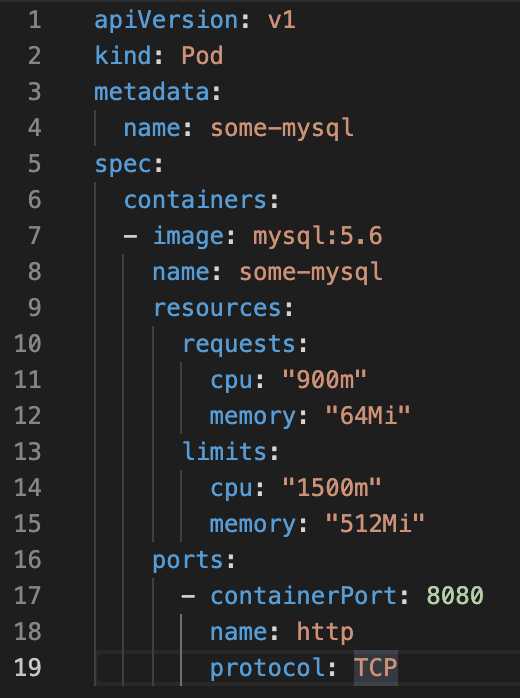 Figure 1
 Figure 1
 Figure 2
 Figure 3
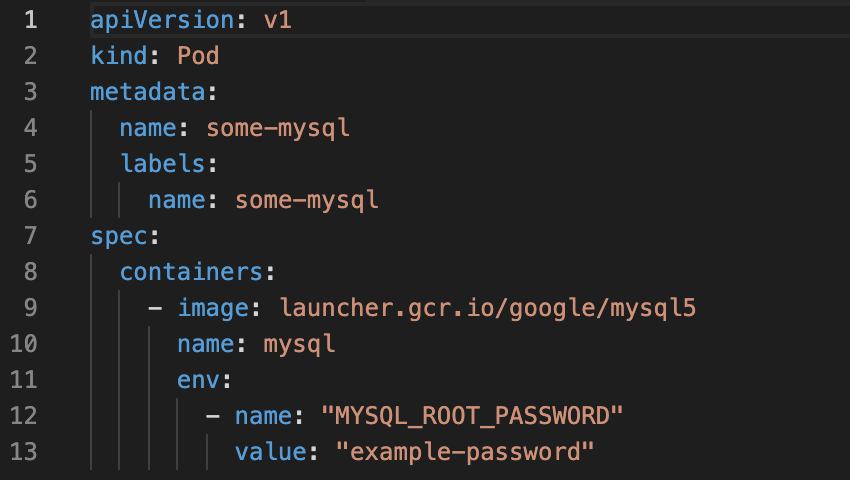 Figure 4
 Figure 1