Riprendiamo il percorso iniziato nei mesi scorsi sull’approccio Cloud-Native, per mostrare con un caso reale quanto risulti flessibile e potente la tecnologia kubernetes.
A tale scopo, l’articolo illustrerà come implementare in pochi passaggi una dashboard in grado di monitorare un un’architettura k8s.
Il progetto consta di due fasi:
Creazione del servizio Dashboard
Accesso via web-browsing alla Dashboard
1. Creazione del servizio: Nel mondo k8s il deploy di un servizio viene effettuato attraverso l’utilizzo di file descrittivi con estensione yaml. E’ un approccio detto dichiarativo che ha nell’imperativo il suo alterego.
Nel nostro scenario è sufficiente utilizzare il seguente comando:
Utilizzando il file presente su github recommended.yaml, viene creato in modalità automatica il servizio dashboard all’interno di un nuovo namespace denominato kubernetes-dashboard (vedi immagine 1).
Immagine 1
Per verificare che il servizio sia disponibile è possibile utilizzare il comando:
kubectl get services –namespace=kubernetes-dashboard (vedi immagine 2)
Immagine 2
2. Accesso alla Dashboard (via https)
In Kubernetes l’accesso alle risorse disponbili è basato su RBAC (Role-Base access control) che definisce la relazione tra utente, ruolo e risorse all’interno dell’organizzazione.
Per il servizio Dashboard è possibile utilizzare due file dichiarativi yaml:
a) service-account.yaml (che definisce le autorizzazioni per le risorse in ambito cluster/namespace)
Nota1: La concessione dei privilegi di amministratore all’account di servizio per Dashboard potrebbe rappresentare un rischio per la sicurezza. Chiedete al vostro security team.
Siamo quasi giunti al termine, un ultimo sforzo.
Con il comando: kubectl proxy viene esposta via https la Dashboard all’indirizzo: http://localhost:8001/api/v1/namespaces/kubernetes-dashboard/services/https:kubernetes-dashboard:/proxy/.
Con il comando kubectl -n kubernetes-dashboard create token admin-us viene creato il token che autorizza l’utente ad accedere alla console (vedi immagine 3)
Immagine 3
Il risultato dovrebbe essere quello mostrato nell’immagine 4.
The first two articles explained what a container is (article 1) and how they can talk to each other (article 2).
In this third article, I’m going to show how to deploy a service through this new and amazing container technology.
Note 1: I won’t cover the image flow deployment part (Git – Jenkins, Docker repository, and so on) because my goal is to explain how to implement a service, not how to write lines code.
Main Point:
As many of you already know, a service is a logical group of applications that talk to each other
Every single application can run as an image
Any image can run to a container
Conclusion: Deploying container technology is possible to build up any service
An example could clarify the concept.
Example: Web application
A classical web application is composed of a Front-End, a Back-End, and a DB.
In the traditional world, every single application runs on a single server (virtual or physical it doesn’t matter).
This old scenario required to work with every single brick of the wall. It means that to design correctly the service the deployers and engineers have to pay attention to all the objects of the stack, starting from OS, drivers, networks, firewall, and so on.
Why?
Because they are a separate group of objects that need a compatibility and feasibility study to work properly together and they require great security competencies also.
Furthermore, when the service is deployed and every single application is going to be installed, it often happens that remote support from the developer team is required. The reason is that some deployment steps are not clear enough just because they are not well documented (developers are not as good at writing documentation as they are at writing codes). The result is that opening a ticket to customer service is quite normal.
Someone could object and ask to deploy a service just using one server. Unfortunately, it doesn’t solve the issue, actually, it amplifies it up just because in that scenario, it’s common to meet scalability problems.
Let’s continue our example by talking about the architecture design and the components needed (Picture 1)
Front End: HTML and JavaScript
Back End: Node.js: It is a framework, which is used to write server-side Javascript applications (https://nodejs.org/it/)
Note 2: In the next rows, I will skip how to deploy the front and backend architecture as well as the docker technology because:
Writing HTML and Javascript files for creating a website is quite easy. On Internet, you can find a lot of examples that will meet your needs.
Node.js is a very powerful open-source product downloadable from the following website where it’s possible to get all the documentation needed to work with it.
Docker is open-source software; it can also be downloaded from the official open-source website. The installation is a piece of cake.
My focus here is explaining how to deploy and work with docker images. Today’s example is the Mongo DB and Mongo Express applications.
I wrapped up the steps in 4 main stages:
a. First point: Creating a Network
It allows communication from and to the images.
In our example, the network will be named “thegable-network”.
From the console (terminal, putty….) just run the following commands:
b. Download from docker hub the images needed
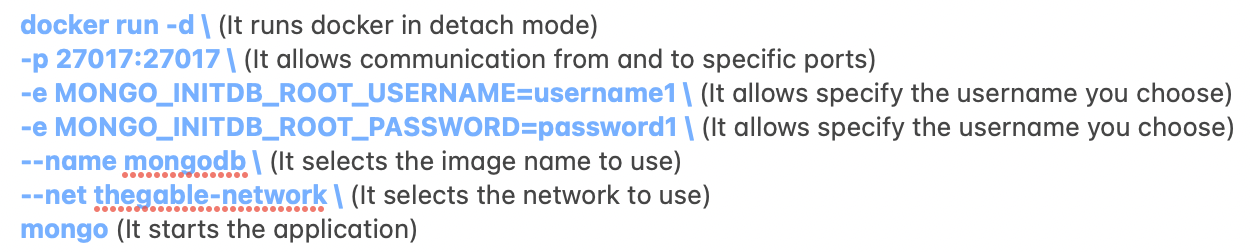
c) Running the mongo DB image with the correct settings:
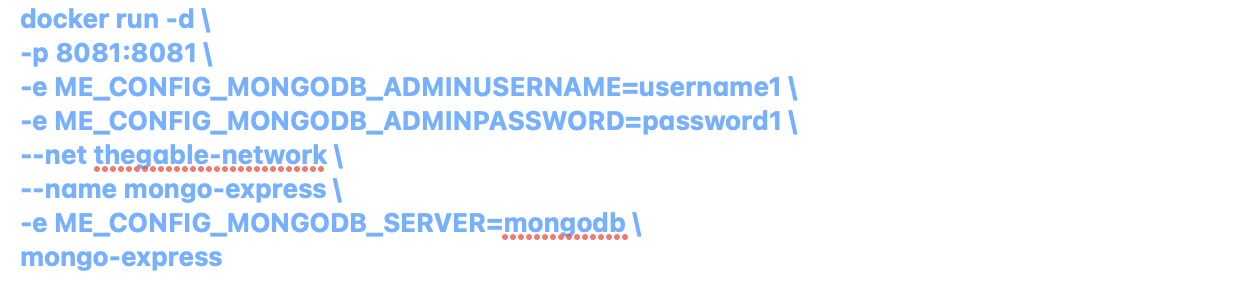
d) Run the mongo-Express image with the correct settings:
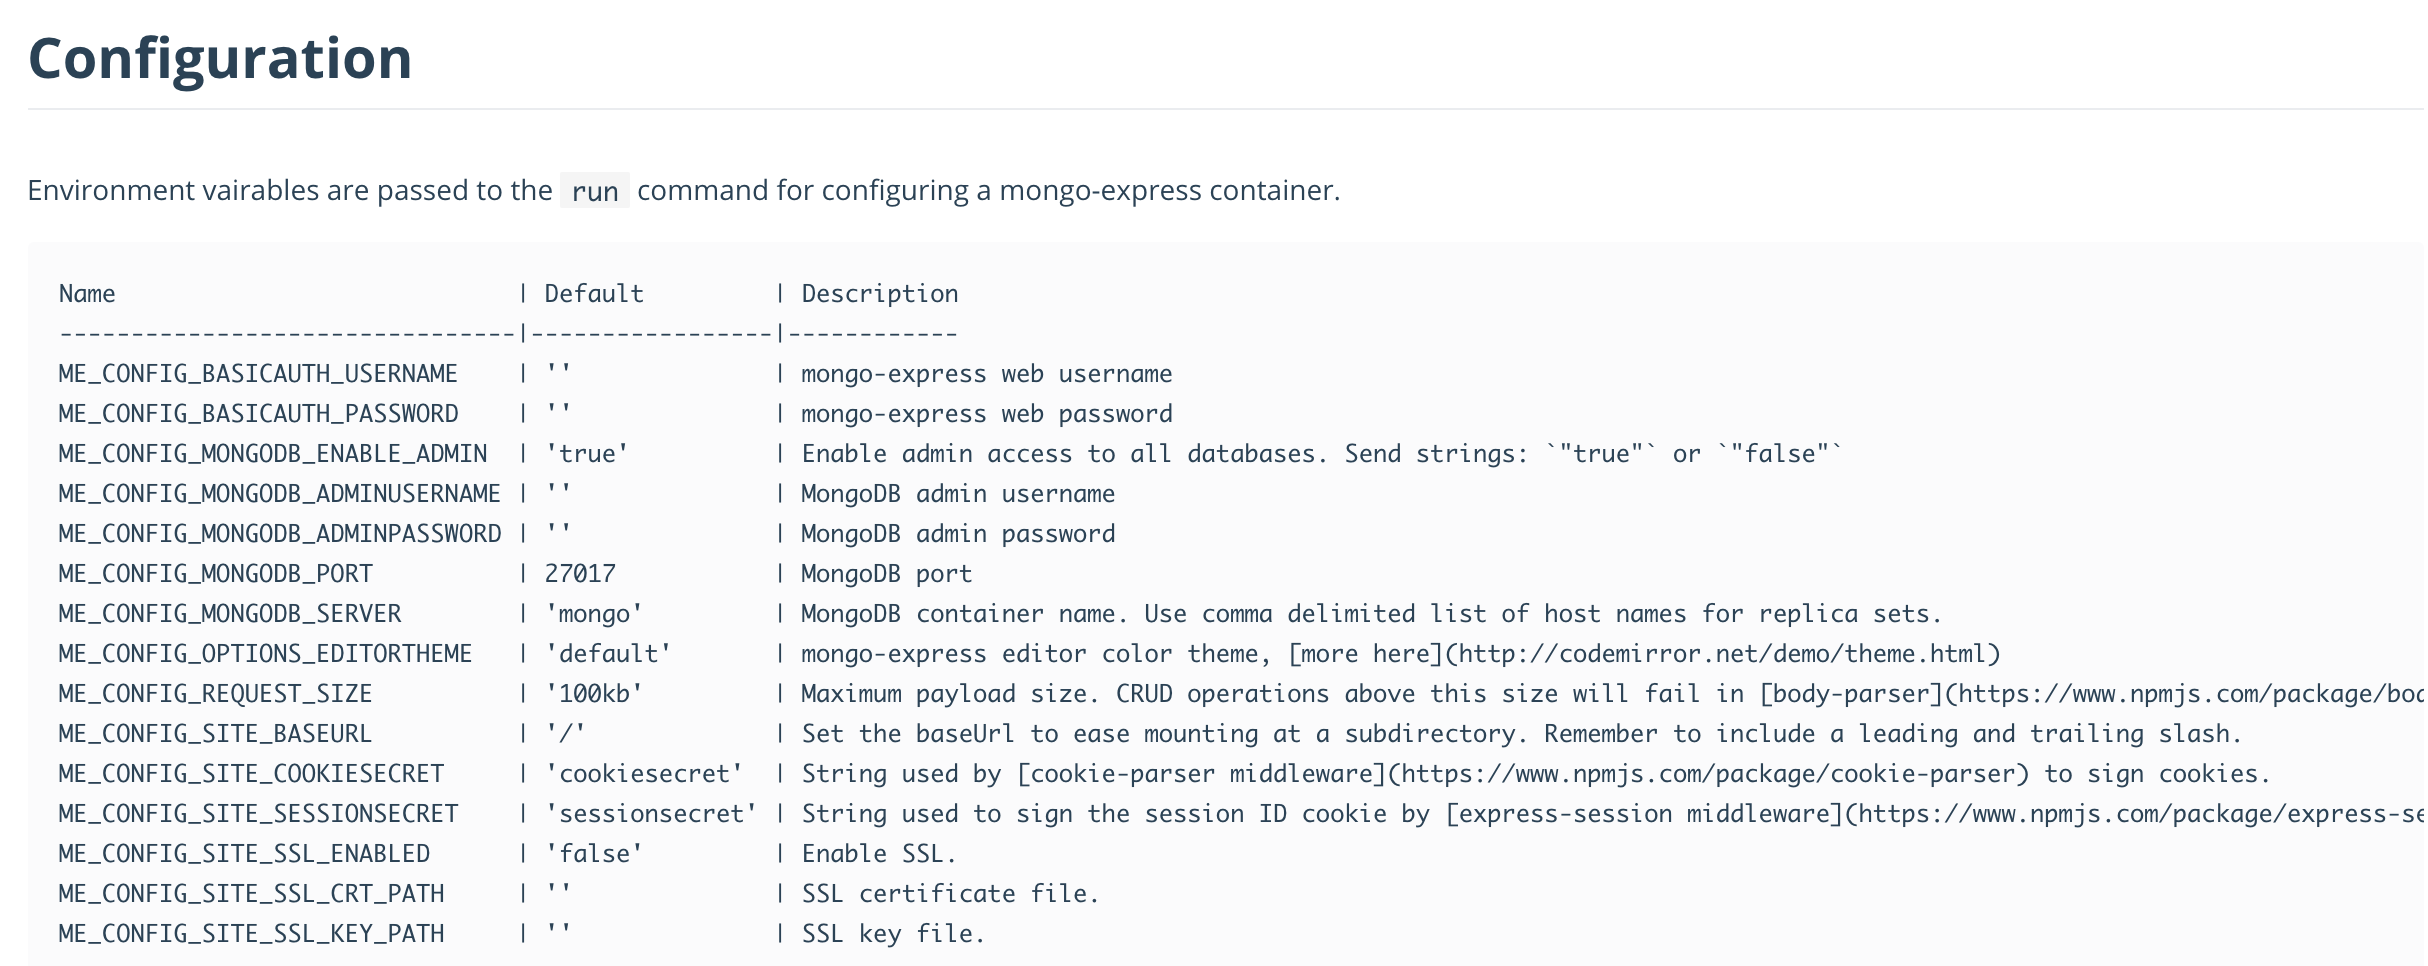
Note 3: The configurable settings are available directly from the docker images.
Connecting to the main web page of mongo-express (localhost: port), have to appear the mongo default Databases as shown in picture 3
Picture 2
Now creating new Mongo DBs (through the Mongo-Express web interface just for example create the DB named “my-GPDB“) and managing your javascript file, it’s possible to build up your own web application.
In the javascript file (normally is named server.js) the main points to connect to the DB are:
(Please refer to a javascript specialist to get all details needed)
Is it easy? Yes, and this approach allows having a fast and secure deployment.
In just a word, it is amazing!
That’s all folks for now.
The last article of this first series on modern applications is Docker Compose
In the last few days, I have been contacted by a Service Provider to design a solution to back up the Microsoft Office 365 environment.
Actually, four months ago, I wrote three articles to show how to set up the environment using a great job of Niels and Timothy, creators and deployers the Martini project.
Why the Service Provider needs a different way to implement this service?
I think that the two main reasons were:
1) SP has already a Cloud Connect architecture and it wants to use it in all possible scenarios.
2) SP needs always official support from Vendor before implementing any project and the Martini is not. To be clearer, the RestFul Api technology inside VBO is totally supported, the Martini portal isn’t because it is not a Veeam product.
Before continuing the read, there is one requirement to respect: VBR Cloud Connect and VBO-365 have to be installed on the same server (a Windows Server).
Let’s start!
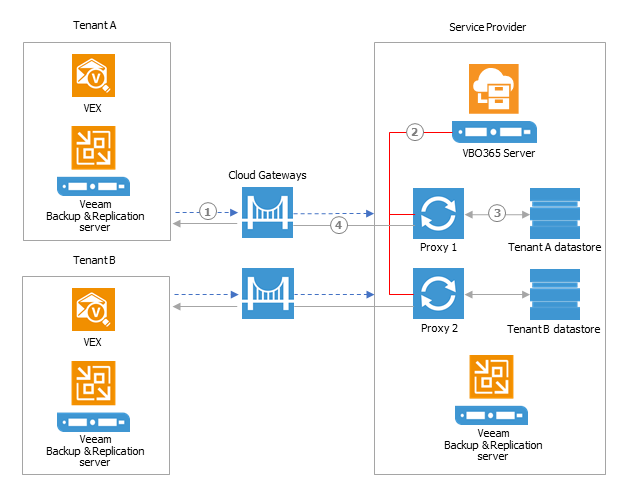
Picture 1 shows the high-level architecture.
Picture 1
The service provider architecture is shown on the right part of picture 1 and it is composed of VBO-365 and the Cloud Connect architectures, while the left part shows the tenant architecture where VBR Server has been installed.
Which are the actions that can be performed by the Tenant?
– Backup: the tenant can’t access the VBO-365 console. It means the Tenat can’t set up or launch any sort of backup. In other words, the backup tasks are a managed services.
– Restore: The tasks can be driven by the administrator of the Microsoft Office 365 organization through the use of Veeam Explores. The Cloud Connect technology creates the tunnel to connect the two entities.
Note 1: When VBR is installed by default all Veeam Explorers are installed.
I mean that not just the traditional Veeam Explorers (for Active Directory, SQL, Oracle, Exchange, Share-points) are installed but also the Explorer for One Drive and Teams. that are specific for Microsoft 365 technology.
Note 2: Does this scenario require VBR license?
Yes, but you can use the free community edition.
The point to highlight during the setup is the authentication task that allows the explorer to communicate with VBO-365:
From the VBO-365 console selecting “General Options” (Picture 2) and from the authentication tab enabling the tenant authentication you can catch your goal (please for security reason use your own certificate) (Picture 3)
Picture 2
Picture 3
Let’s switch to my demo environment:
1. The Service Provider VBO-365 console, has three Microsoft 365 organizations with a backup job each (Picture 4). Two of those use modern authentication, the third the basic one.
Picture 4
2. The Cloud-Connect architecture has been set up in order to create a tenant called Demo-VBO (Picture 5).
Picture 5
The VBR Tenant Console shows how the connection towards the service provider has been set up (Picture 6).
Picture 6
The following video shows the tasks performed by the tenant to restore his data (Exchange/Sharepoint/One-Drive/Teams items) located at the Service Provider site.
This third part will cover the restoration options.
If you need to know how to set the portal up or the option it can provide, please read the previous articles (Part-1 – Part-2)
Let’s start with Exchange Environment:
Clicking on the Exchange voice located on the top part of the web page (in picture 1 it is highlighted with a green arrow )
Picture 1
After selecting the organization you want to restore data from (in my case is myTEST-Environment as shown in picture 2), just choose the restore point you need (Picture 3).
Picture 2
Picture 3
Picture 4 shows the mail-boxes previously saved that you can restore.
Picture 4
What’s happening on VBO-365? As shown in picture 5 the portal has triggered a classical restore task.
Picture 5
Which are the restore option available in the portal for the Exchange environment? As shown in picture 6, you can download the mail as a pst file (it requires outlook client installed) or restore to the original or different location as shown in picture 7.
Picture 6
Picture 7
To finish the restore tasks just click on stop restore (Picture 8 and 9).
Picture 8
Picture 9
And what about restore of One-Drive and Sharepoint items?
The procedure is very similar and the restore options are shown in pictures 10 and 11.
Picture 10
Picture 11
VBO-365 v.5 has introduced support for Microsoft-365 Teams. It is not still available in this portal and I hope it will come soon. Stay tuned 🙂
This second article will complete the deployment scenario that began with Part 1. If you didn’t read it yet just click here.
The first important step is to enable VBO-365 to work with RestFul-API. Pictures 1 to 4 show the steps to perform the task
Picture 1
Picture 2
Picture 3
Picture 4
Now from a web browser insert the IP Address of the VBO-Portal.
Picture 5
The login credentials are: username Admin, password the one you choose during the setup ( ‘new_password‘).
After completing the login phase, add a name to the tenant and its e-mail address (don’t worry, nothing will be sent to that e-mail address for now). Click the save button and make a note of the automatically generated. password (Picture 7)
Picture 6
Picture 7
Now it’s time to add your VBO installation to the portal
On the left menu, click on “create instance” and after selecting the just created tenant (My-Lab-Environment), at the voice Instance Type select choose “Existing instance” as shown in Picture 3.
Picture 8
In the last blanks insert the data of your VBO installation.
Picture 9
Now log out and re-login with the credentials just created (new tenant) as shown in picture 10
Picture 10
The Dashboard is still empty (Picture 11), don’t worry it’s because the portal is not still connected to VBO.
Picture 11
On the left menu, select list instances and from there just select connect (Picture 12)
Picture 12
After the connection has been successfully completed (Picture 13), the dashboard is filled up (Picture 14) and you are ready to work with it.
Picture 13
Picture 14
Some interesting items to watch from now:
At the jobs menu, you can see the scheduling, disabling, or start the job (Picture 15)
Picture 15
Picture 16 shows the license status and 17 the activity restore logs.
Picture 16
Picture 17
In my next article, I’ll write about restoration options.
Stay tuned and see you soon.
8th December update: If you see the connection is looping please download from this link the securerestore.php file and replace the old one.
Restart the configuration steps from picture 5.
8th January update: Good news, it works with VBO-365 v.5 too!
The only modify to perform is to change an entry inside the file named veeam.vbo.class.php located in /var/www/html/core.
At line 35
From: ‘base_uri’ => ‘https://’.$host.’:’.$port.’/v3/’
A service provider asked me to help him to design a backup service where the main topic was Microsoft 365.
I’m sure many of you already know and already use Veeam Backup for Office 365.
It is an excellent solution to address an end-user request and to allow a Service provider to supply a managed service.
But what about unmanaged service?
In other words: is it possible to give an admin of an organization a way to perform backup and restore by himself in a multi-tenant architecture?
The answer came from the great job of two Veeam guys.
Niels Engelen and Timothy De Win have developed a web portal leveraging the native VBO-365 RESTFul-API that allows the service provider to score the goal. The project is called MARTINI.
Just a note before starting: the articles have been written “for dummy”; the scope is explaining step by step the procedure I followed to design service.
To remember:
This is not a Veeam Project so it is NOT officially supported.
It requires and automatically installs the following packages:
apache2, mysql-server mysql-client, PHP, php-xml, composer, zip unzip php-mysql and Terraform.
At the end of this setup the screen output shows the following output.
#MySQL commands:
CREATE DATABASE martini;
CREATE USER ‘martinidbo’@’localhost’ IDENTIFIED WITH mysql_native_password BY ‘mypasswordthatissupersecret’;
GRANT ALL ON martini.* TO ‘martinidbo’@’localhost’;
# Ubuntu older
GRANT USAGE ON *.* TO ‘martinidbo’@’localhost’ WITH MAX_QUERIES_PER_HOUR 0;
# Ubuntu 20.04
GRANT USAGE ON *.* TO ‘martinidbo’@’localhost’;
Now connect to mySQL DB using the following command:
mysql -u root -p
If the error shown in picture 1 appears it is necessary to follow the procedure described below:
Picture 1
– sudo mysql – select user,host,plugin from mysql.user; output -> root | localhost | auth_socket
the output is shown in picture 2 and it checks the plugin used for any MySQL users.
Picture 2
If it is auth_socket to user root just change it with the following command
– update mysql.user set plugin=’mysql_native_password’ where user=’root’; – select user,host,plugin from mysql.user; output root | localhost | mysql_native_password
the output shown in picture 3 confirms it is correctly changed.
Picture 3
– flush privileges;
– quit
Now retype the previous command (mysql -u root -p) and please continue with the procedure if it still doesn’t work as shown in picture 4 :
– ALTER USER ‘root’@’localhost’ IDENTIFIED BY ‘new_password‘;
– flush privileges; – quit
at this point reboot the server.
The command mysql -u root -p shows the following output:
Copyright (c) 2000, 2020, Oracle and/or its affiliates. All rights reserved. Oracle is a registered trademark of Oracle Corporation and/or its affiliates. Other names may be trademarks of their respective owners. Type ‘help;’ or ‘\h’ for help. Type ‘\c’ to clear the current input statement.
Let’s go back to martini checking if the database and the new user have been created with the command:
mysql> show databases;
If it doesn’t appear use the following steps: – use mysql – show tables; – CREATE USER ‘martinidbo’@’localhost’ IDENTIFIED BY ‘mypassword-‘; – GRANT ALL PRIVILEGES ON * . * TO ‘martinidbo’@’localhost’; – FLUSH PRIVILEGES; – CREATE DATABASE martini;
Now re-launch the martini setup command
– sudo martini-cli setup
selecting no when the prompt asks if it is the first run and follow the easy wizard as shown in picture 5.

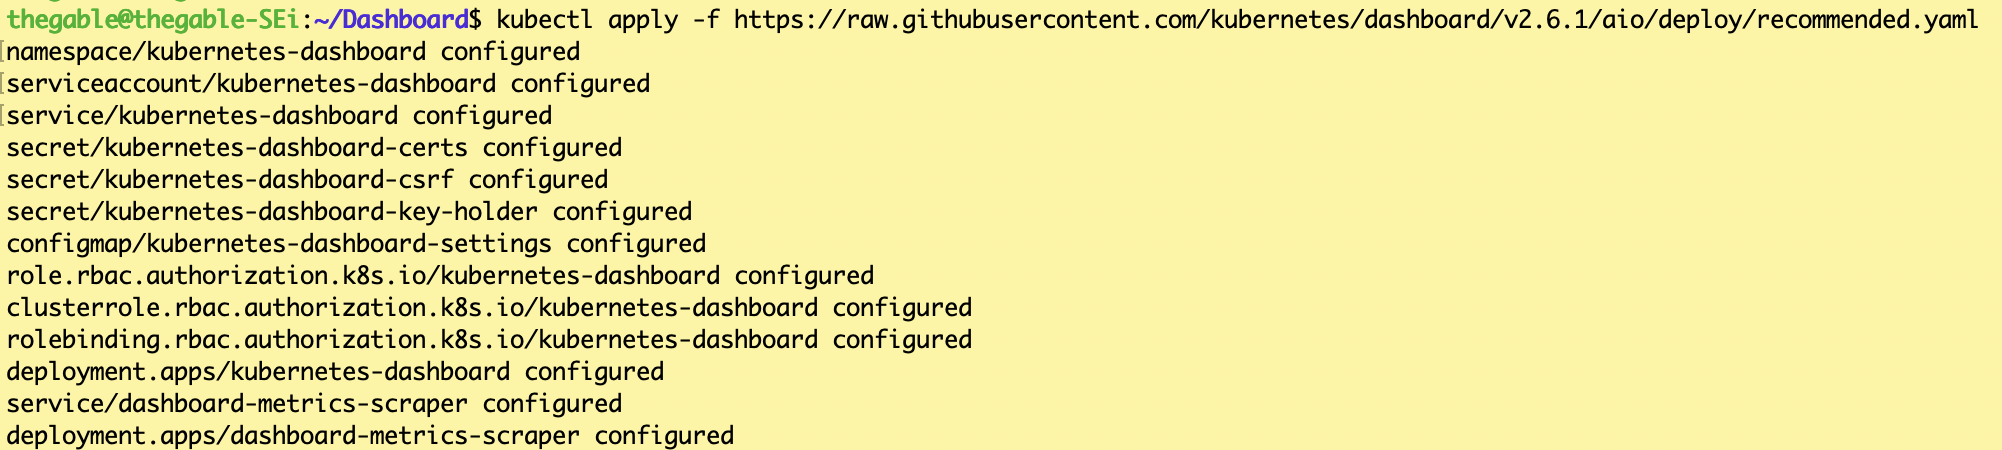 Immagine 1
 Immagine 2
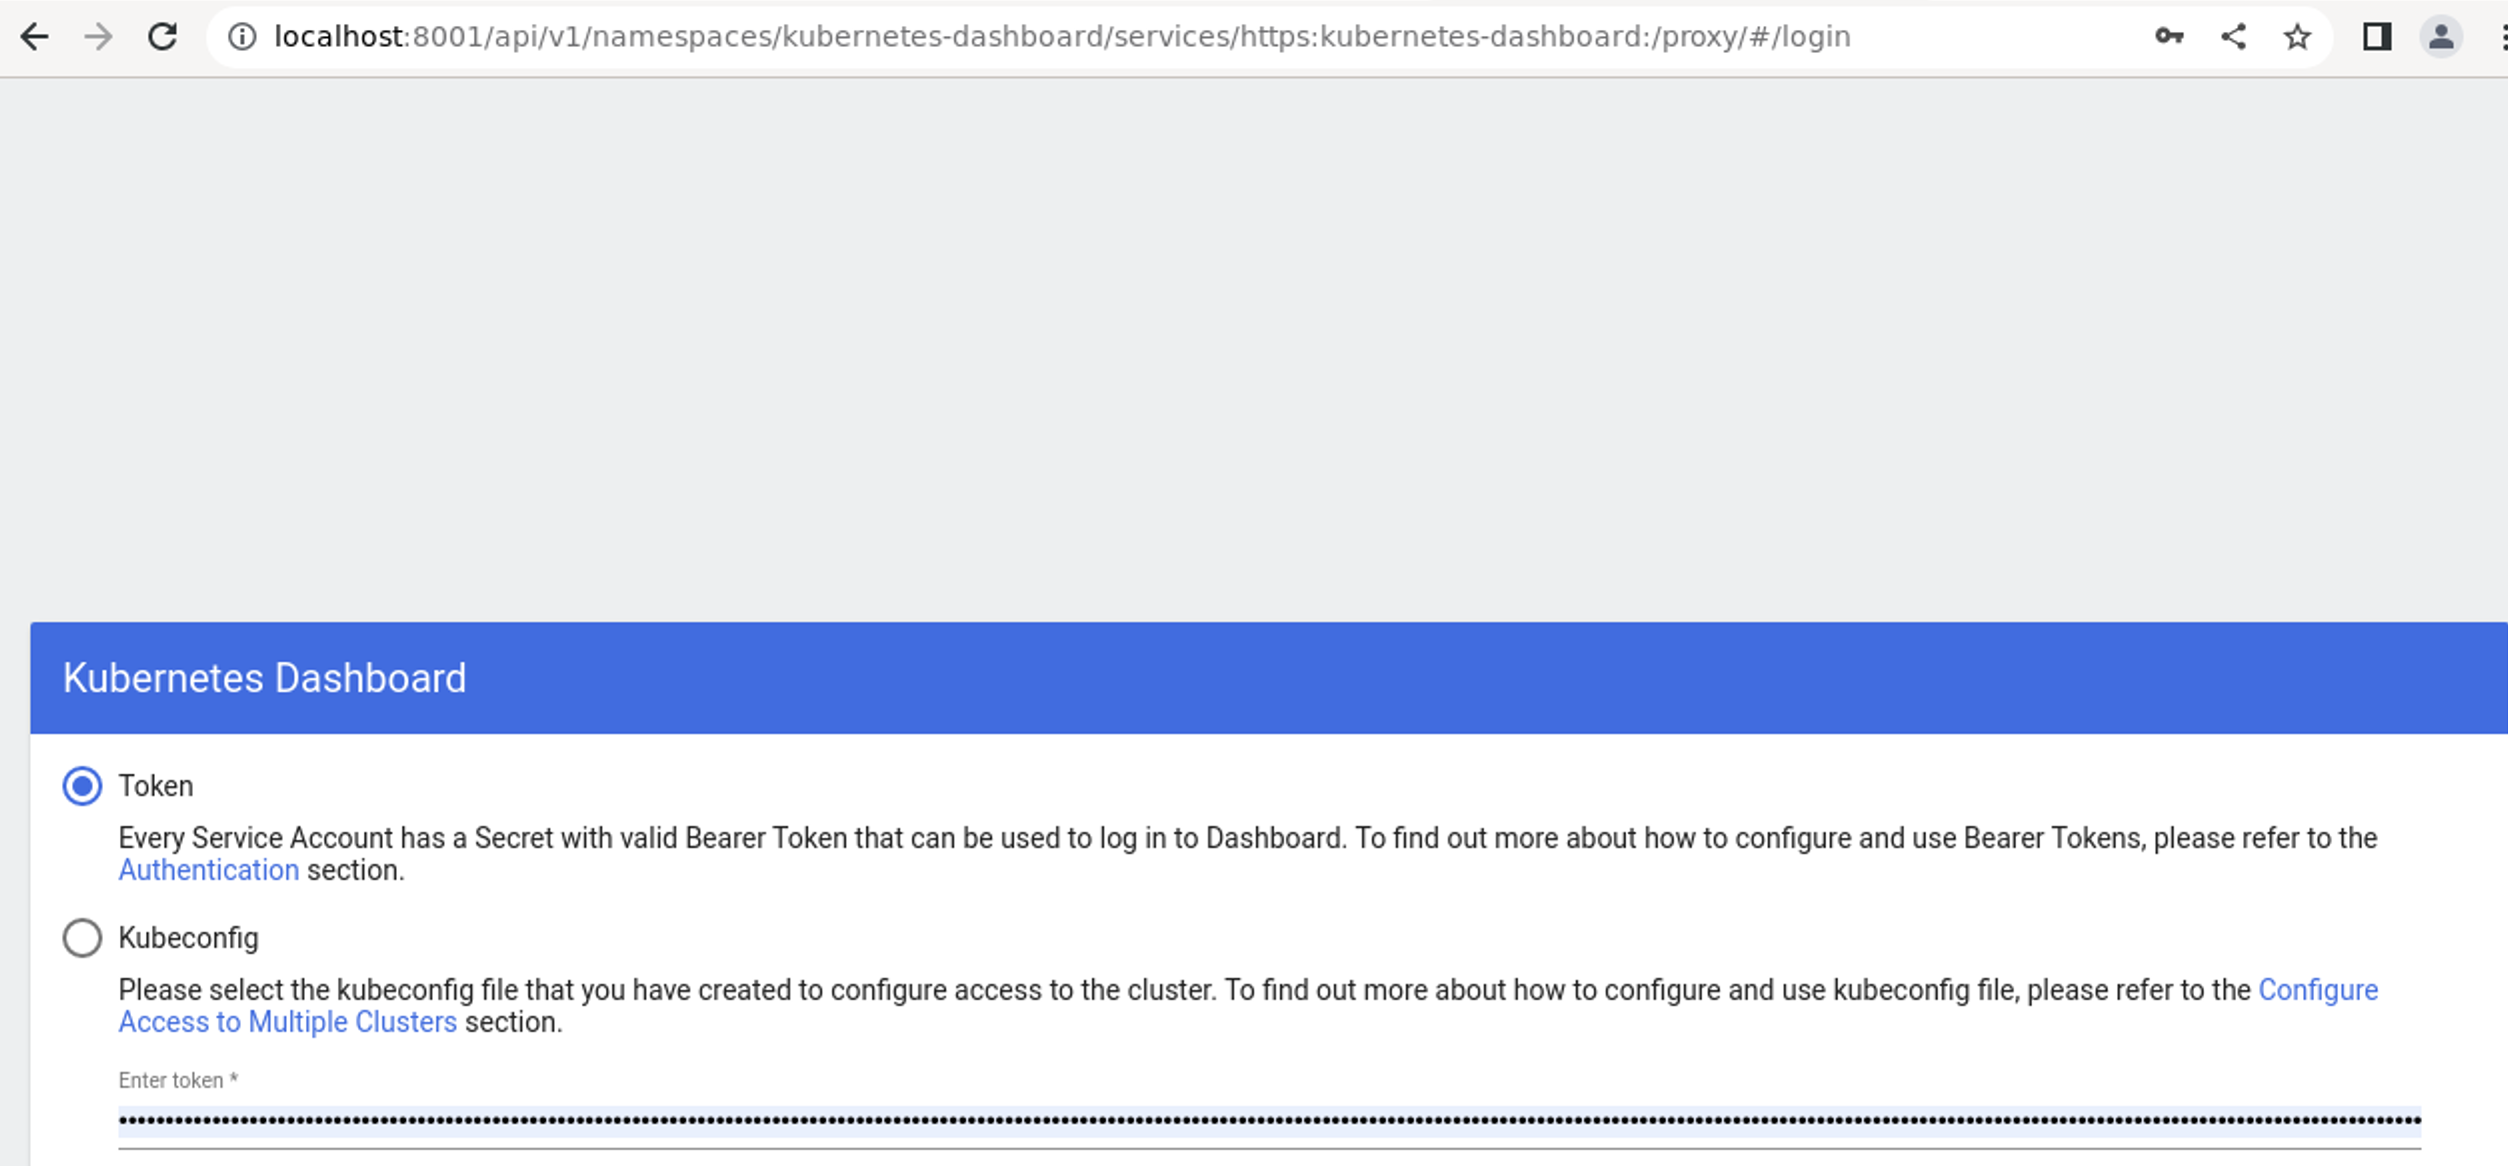 Immagine 3
 Immagine 4
 Picture 1


 Picture 1
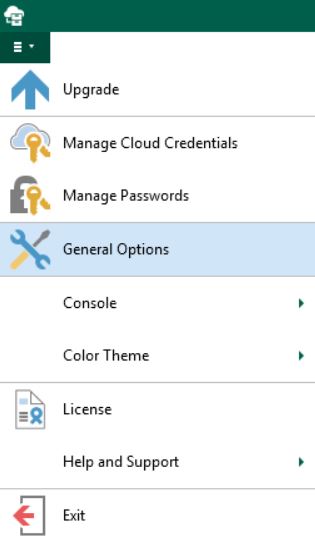 Picture 2
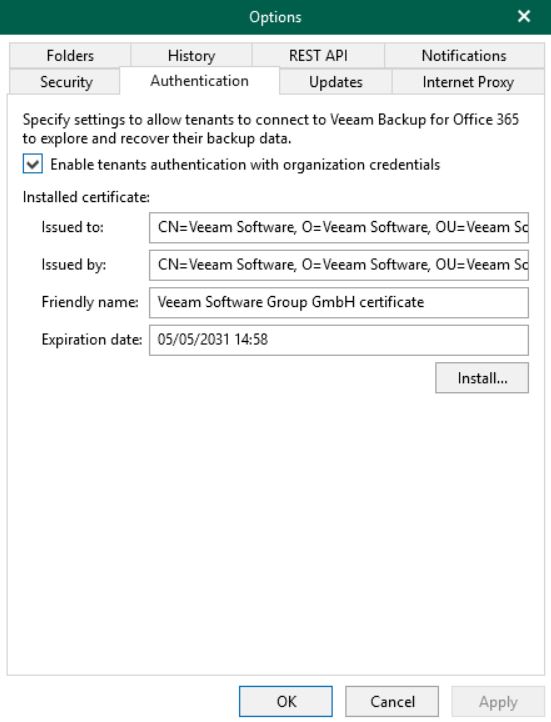 Picture 3
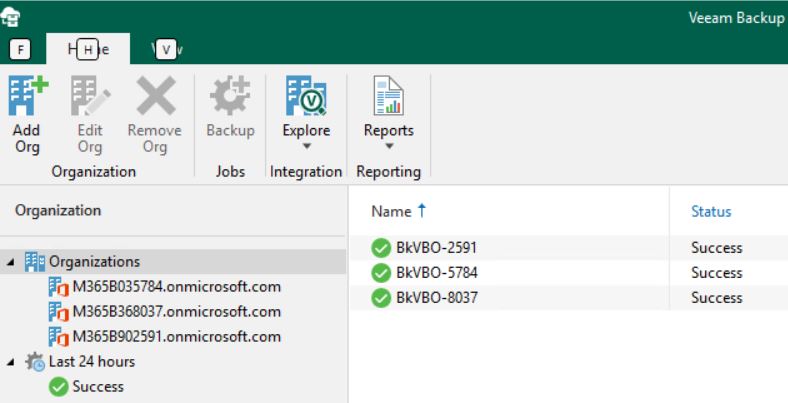 Picture 4
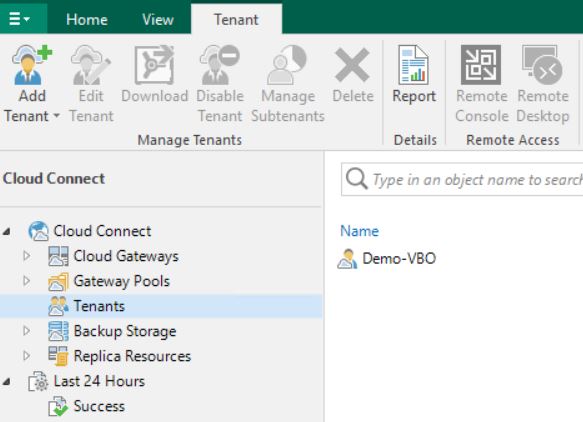 Picture 5
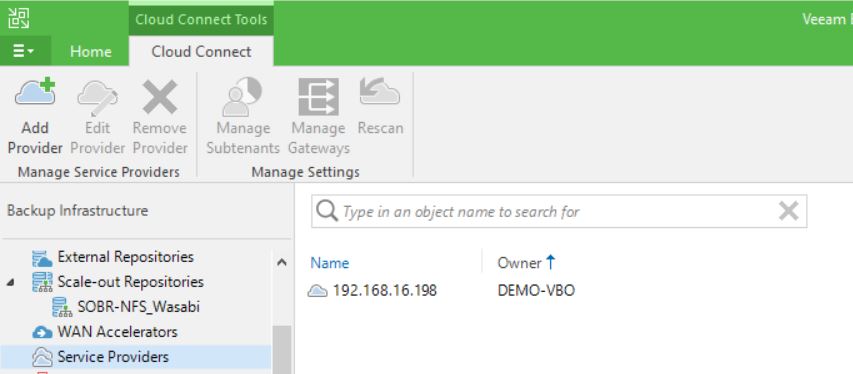 Picture 6
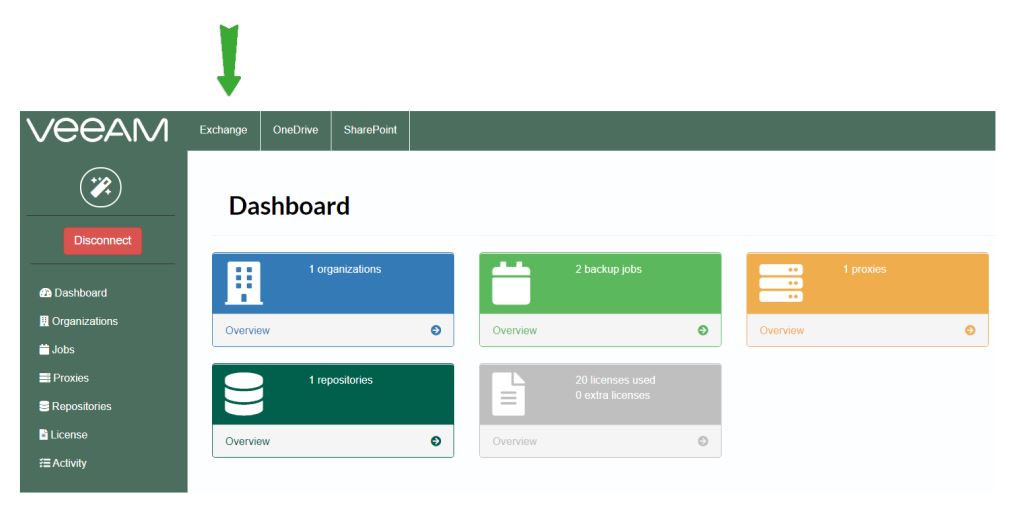 Picture 1
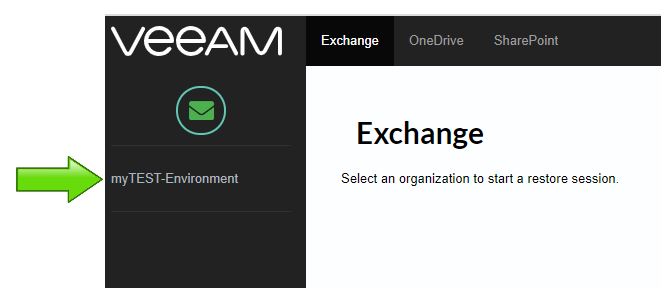 Picture 2
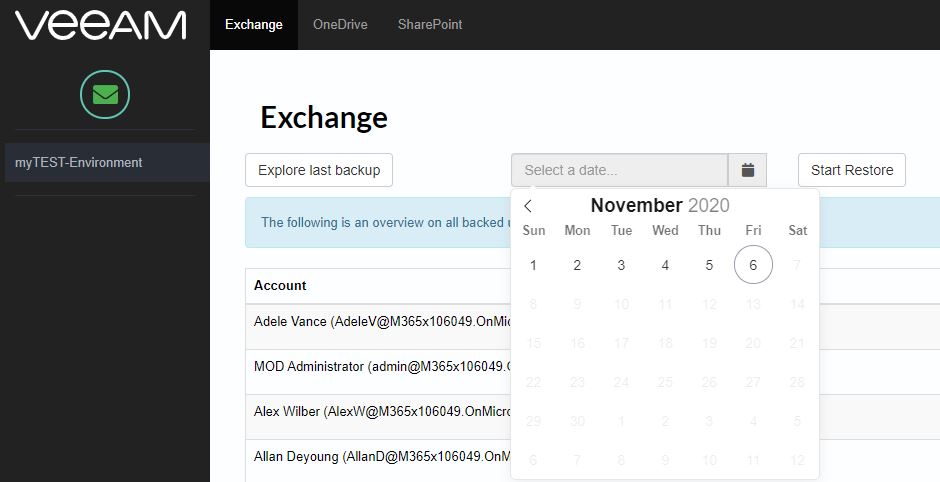 Picture 3
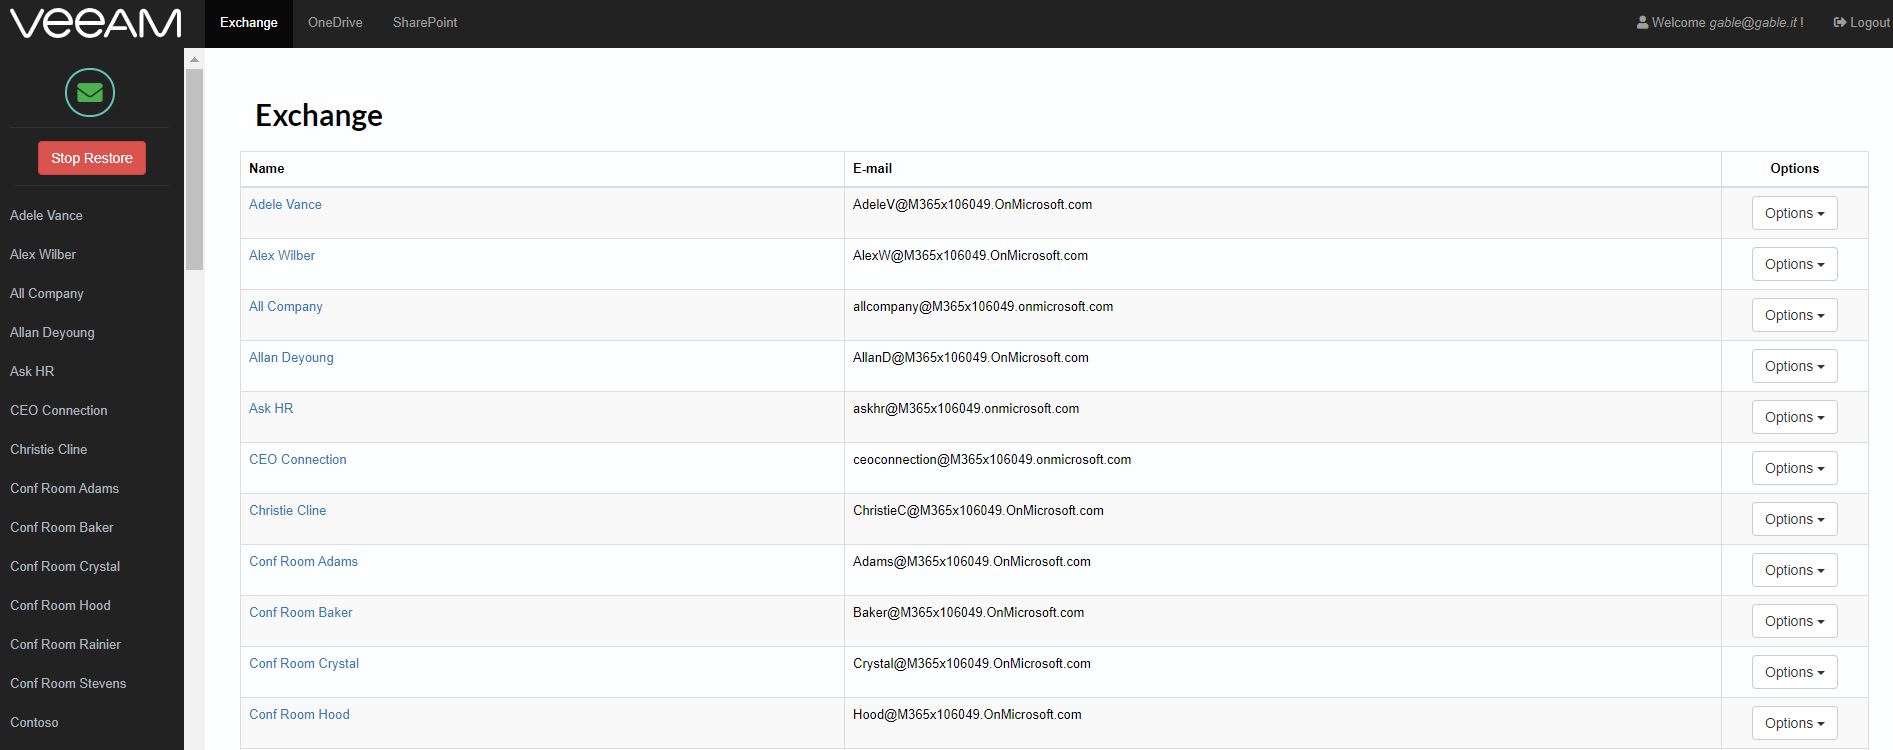 Picture 4
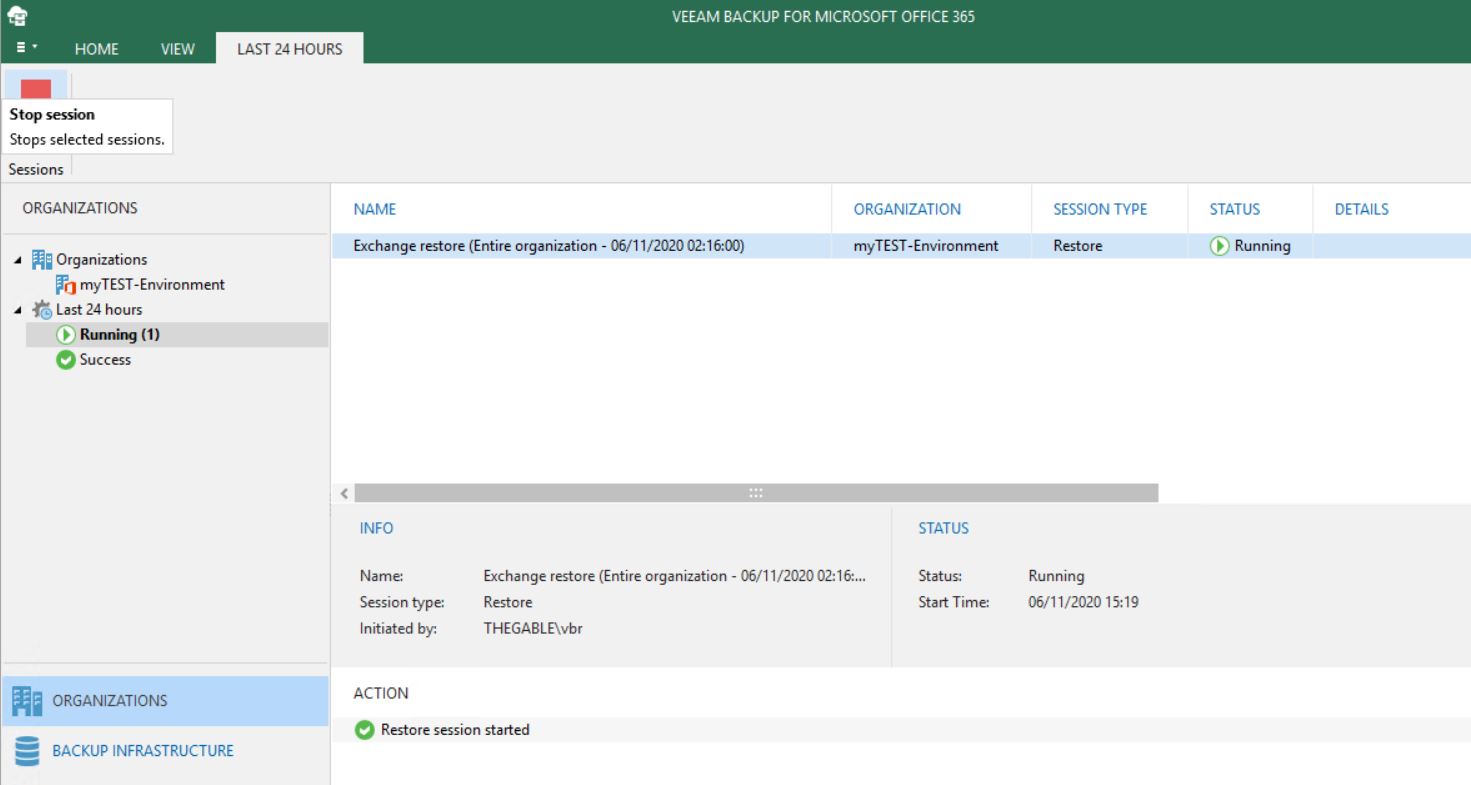 Picture 5
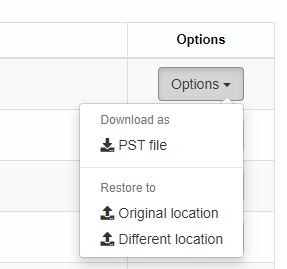 Picture 6
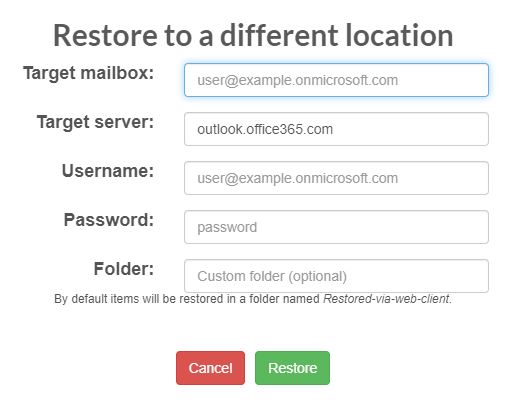 Picture 7
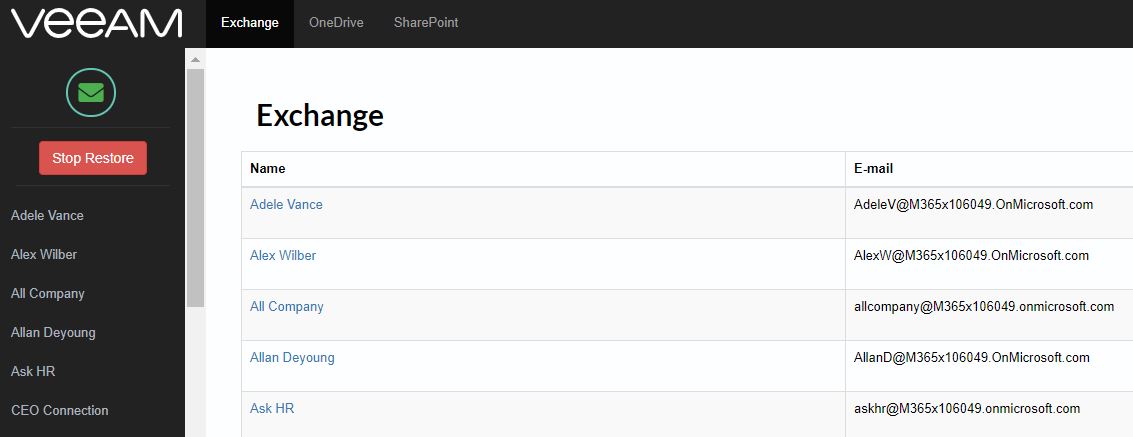 Picture 8
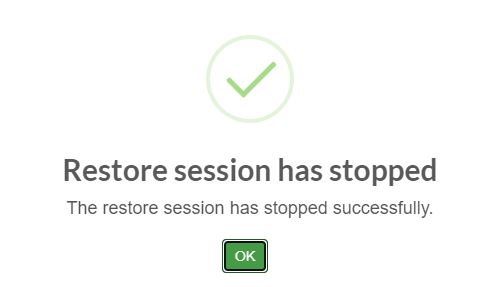 Picture 9
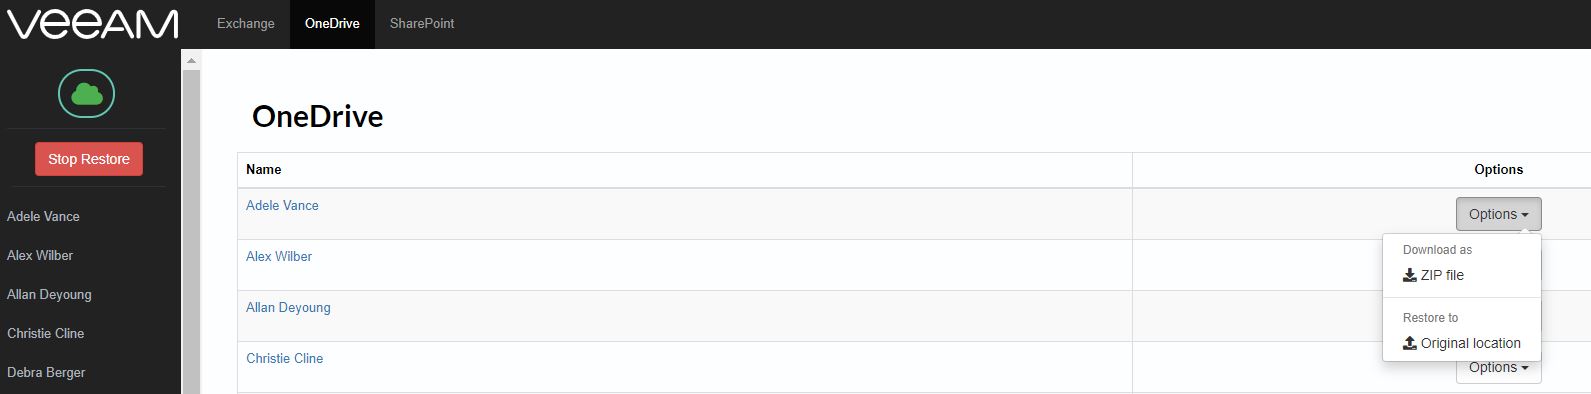 Picture 10
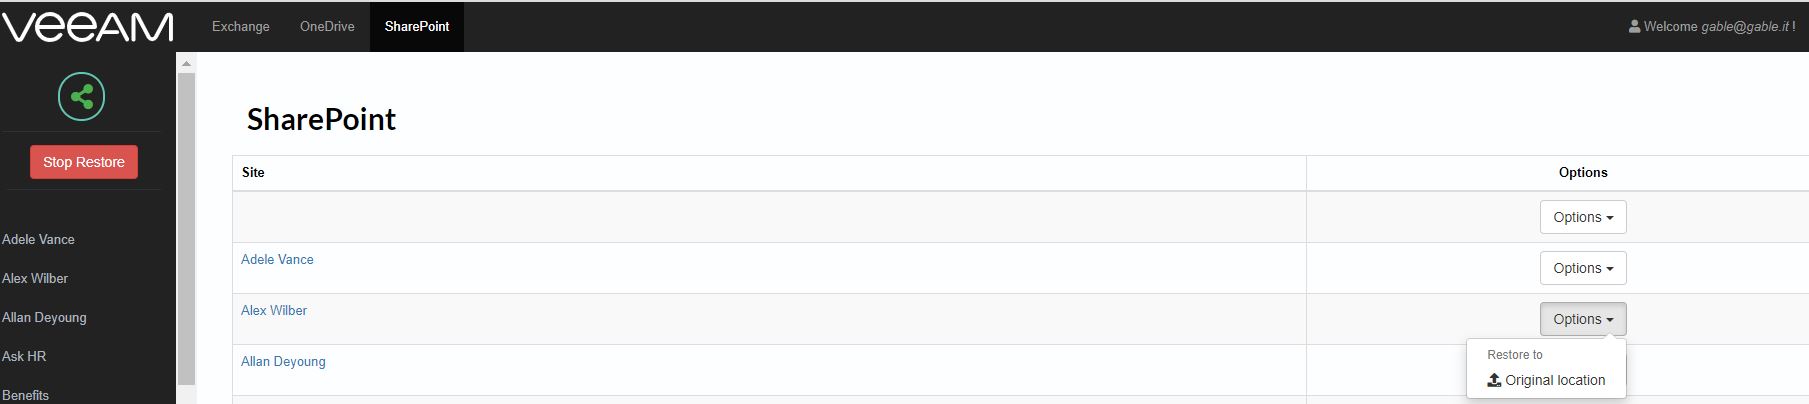 Picture 11
 Picture 1
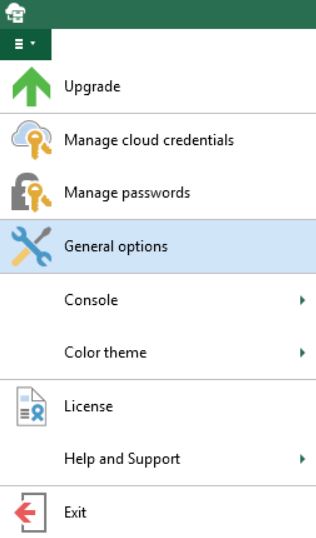 Picture 2
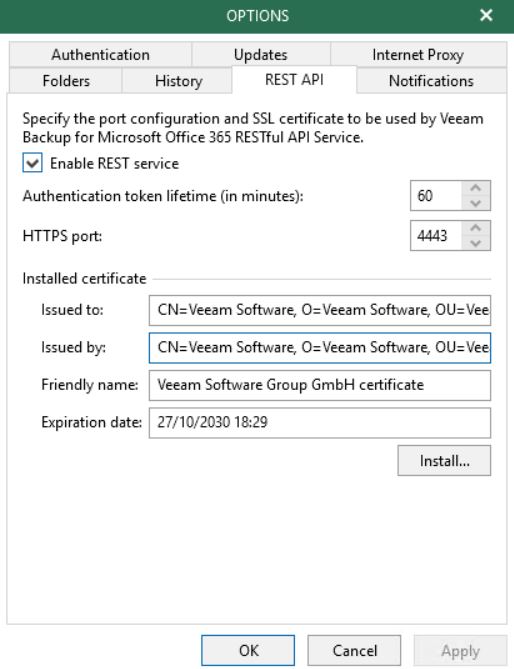 Picture 3
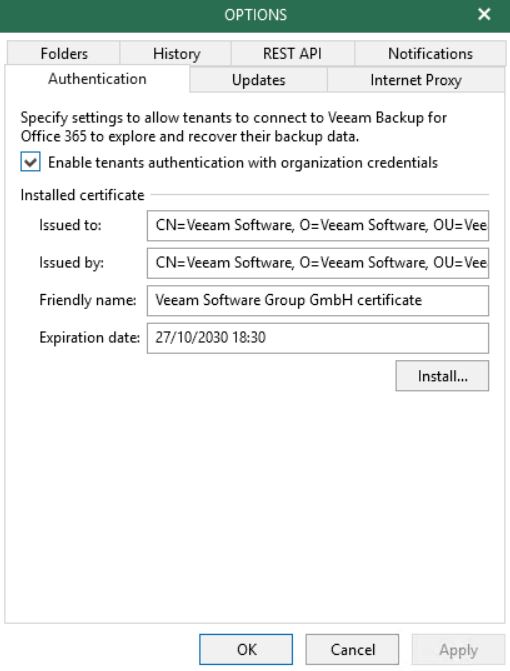 Picture 4
 Picture 5
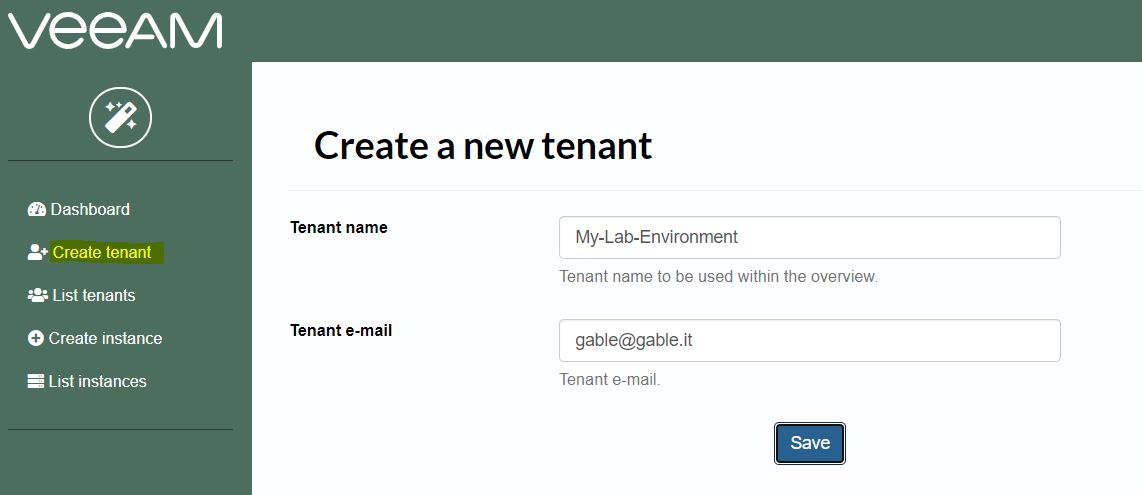 Picture 6
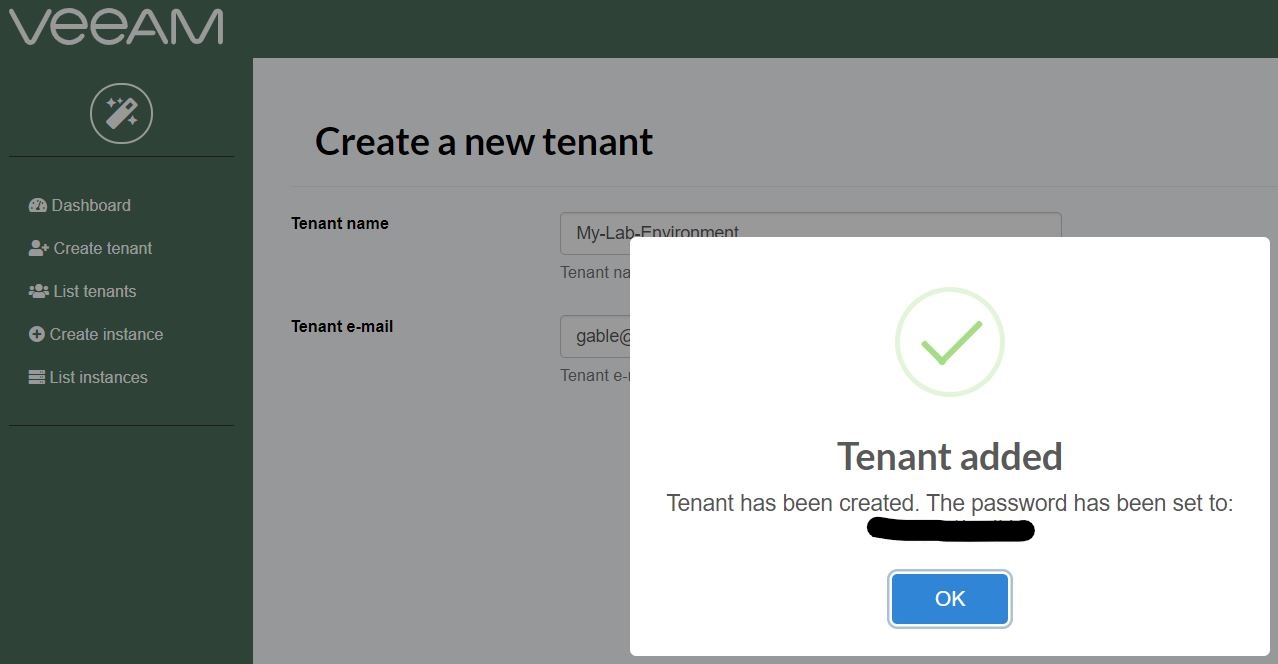 Picture 7
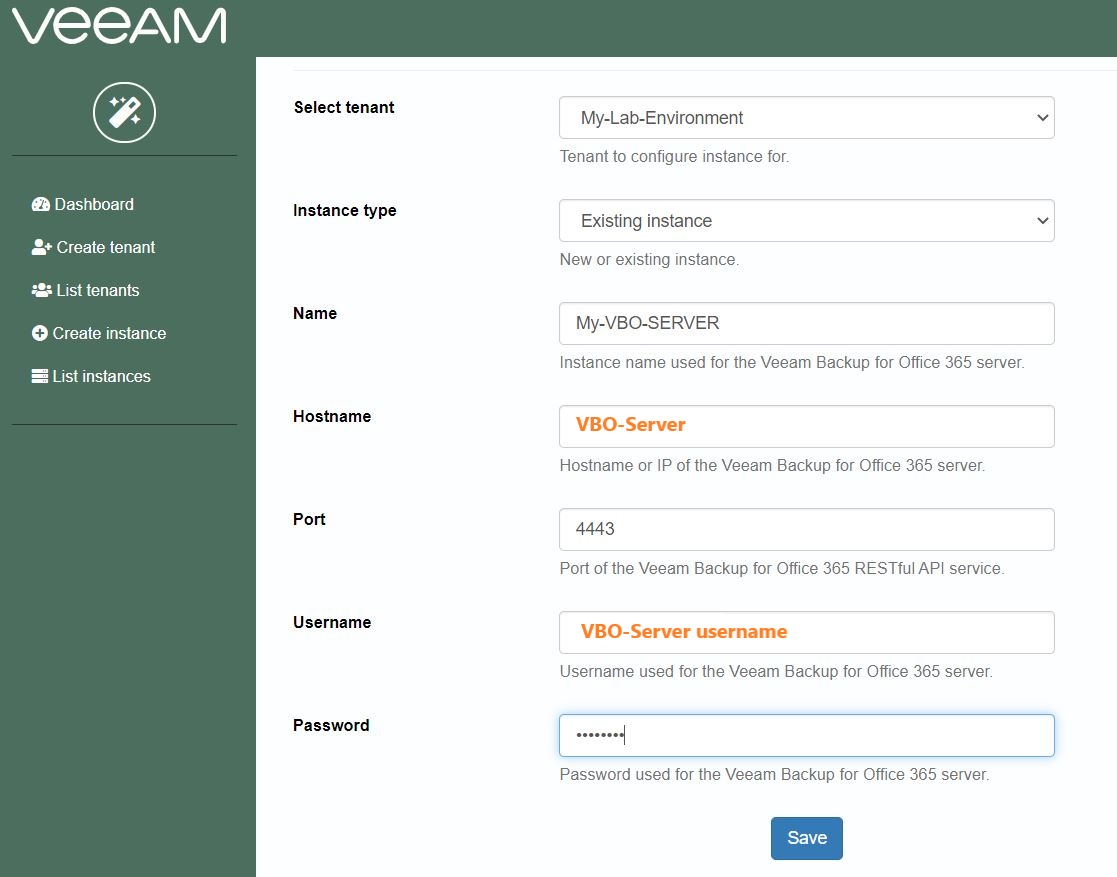 Picture 8
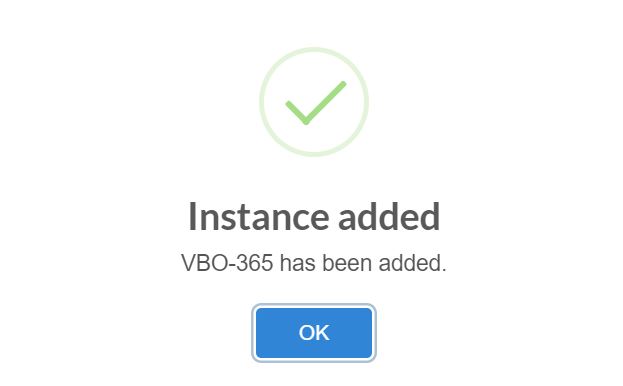 Picture 9
 Picture 10
 Picture 11
 Picture 12
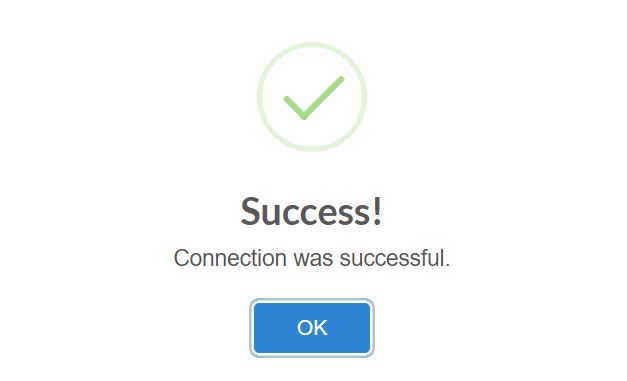 Picture 13
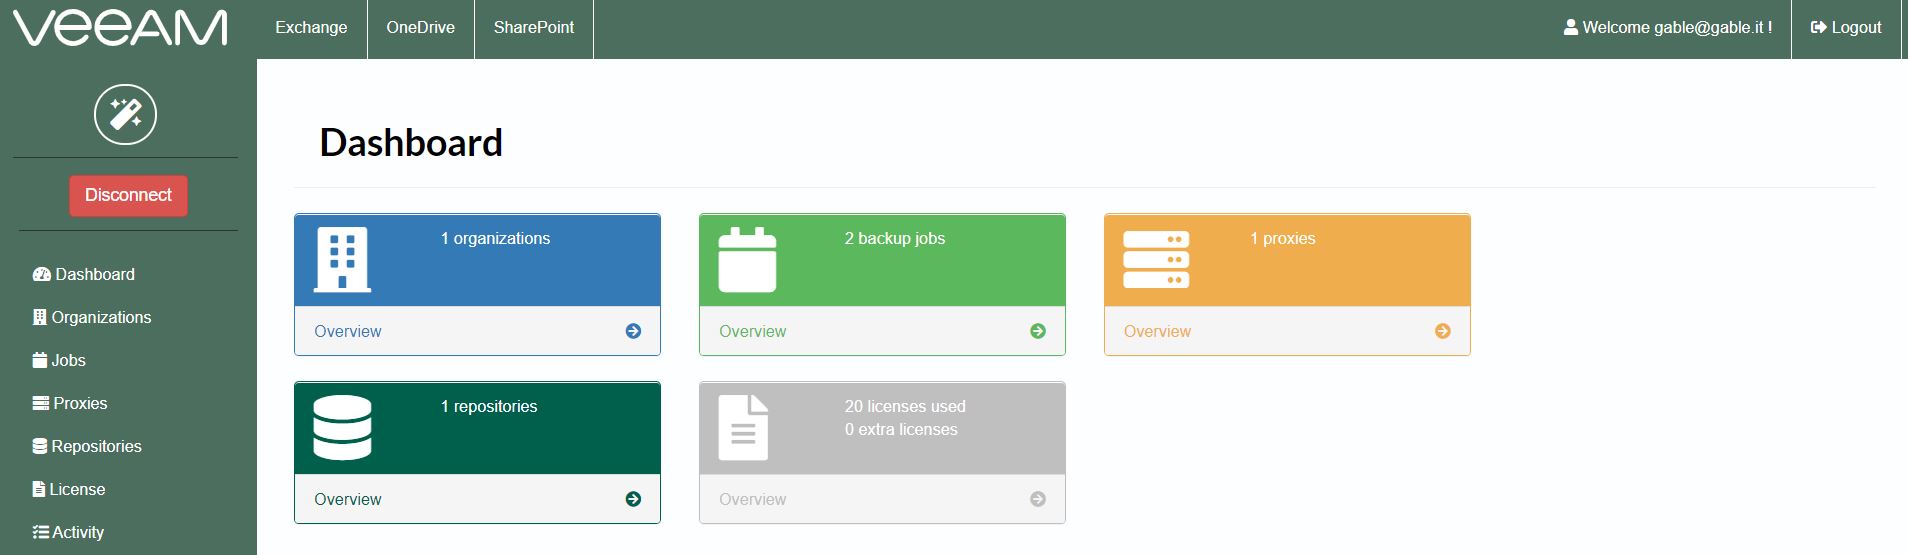 Picture 14
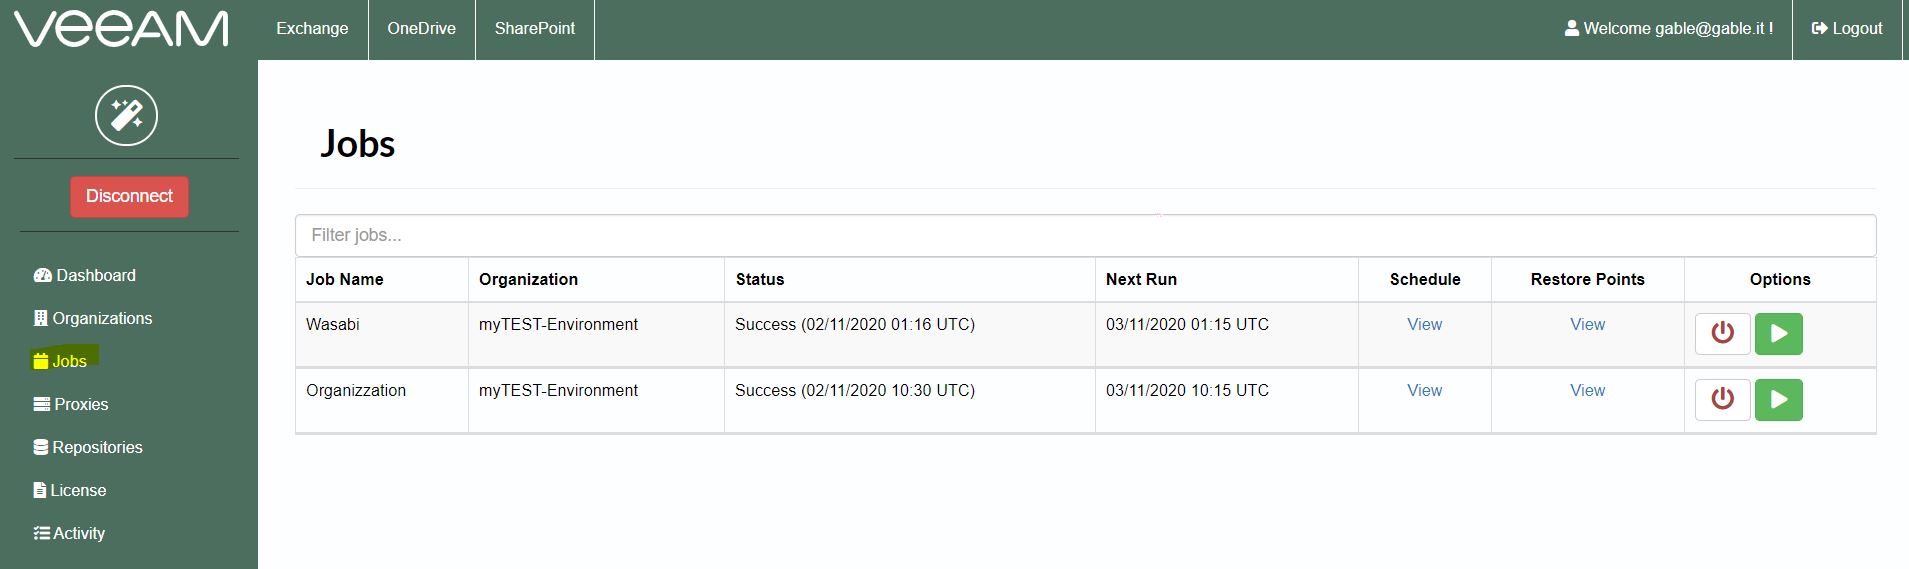 Picture 15
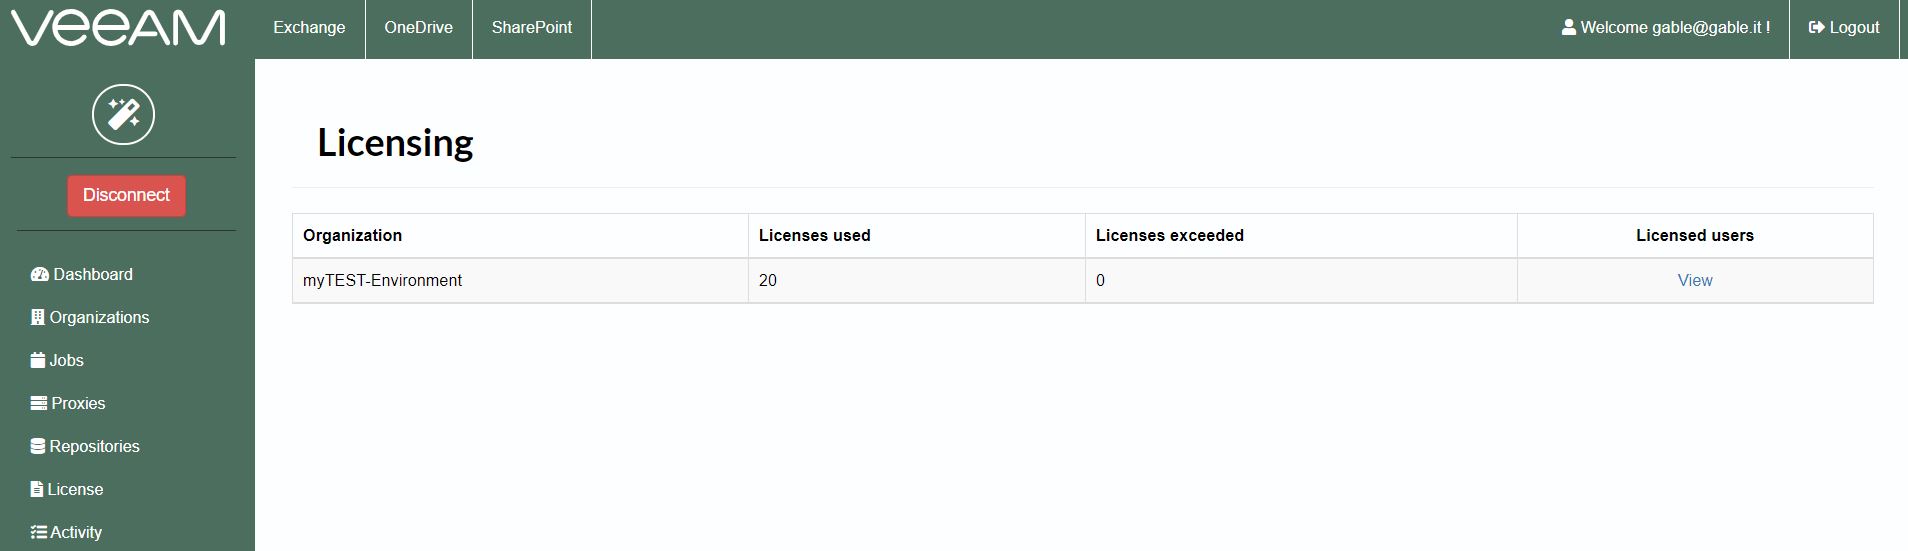 Picture 16
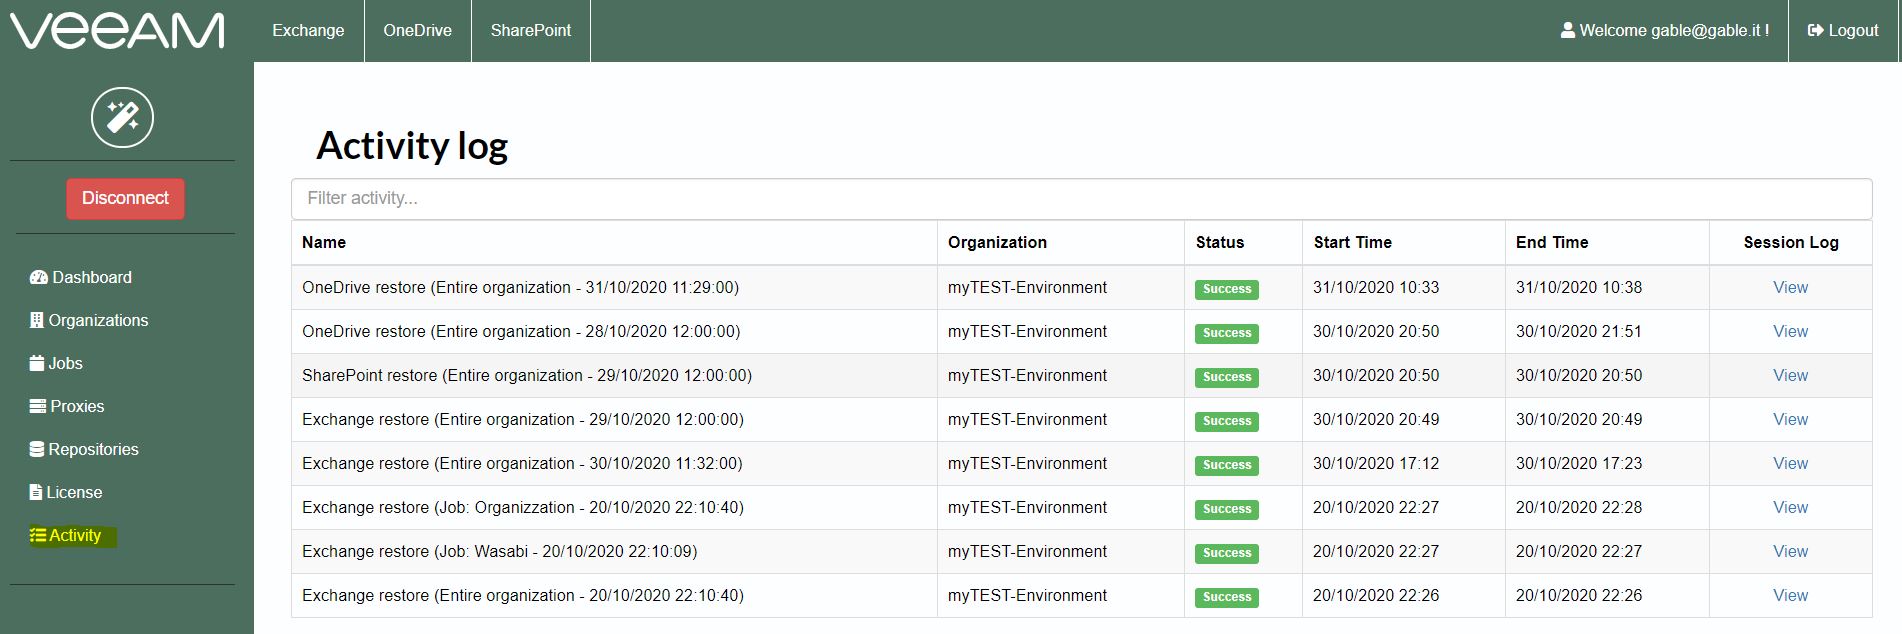 Picture 17
 Picture 1
 Picture 2
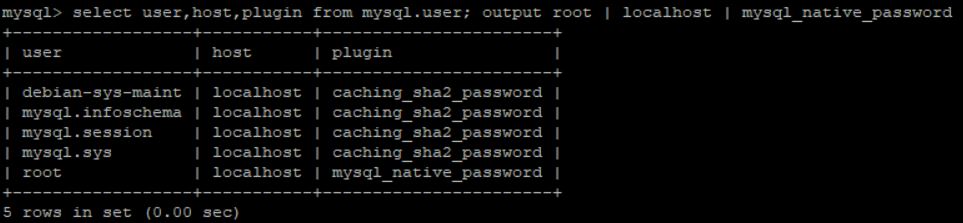 Picture 3
 Picture 4
 Picture 5