Today I’m covering how to enable VBR to use VUL licensing to backup Physical Machines (they could be server or workstation both)
If you need more details to understand better the implementation scenarios please refer to the three articles I already wrote
Veeam Agent Part 1 Veeam Agent Part 2 Veeam Agent Part 3
As many of you already know it is possible to work with the free Veeam Agent version and a paid VBR version.
The only thing that this architecture allows is using the VBR repositories as a global backup container.
What customers forget is that you can’t have a mixed infrastructure composed of free and paid agents.
Let’s see an example:
An end-user with already 10 VBR sockets license has a new project to protect 30 workstations and he wants to use Veeam agent Free.
The end-user just has to install and set up on every single workstation the free agent to write backup data to VBR repository.
From VBR version 9.5.u4, Veeam is gifting 1 VUL license for every socket customer bought (up to 6 sockets). In our example it means the end-user can protect up to 6 Physical Server or 18 Workstation (1 Vul x 3 Workstation) for free or a mixed architecture.
What happens if you enable VBR to assign the gifted license from your VBR server?
First thing how to enable it? The next three pictures (Picture 1, 2 and 3) explain how to perform it
Picture 1
Picture 2
Picture 3
From now on VBR will use the agent license up to consuming them.
In our example, the end-user will protect 18 Workstations but the last 12 will be out from the backup procedure.
Which is the solution?
Easy one, just Buying a new license pack.
Why you should have to buy new licenses?
There are at least three good reasons:
a) It is possible to manage your workstation architecture directly from VBR console.
b) There are more restore options.
c) Veeam support.
Gems:
1) One of the good news about the licensing of VBR v.10 is that from now on the license bought will be added to the gifted one. It means that you buy just a VUL packet (10 Vul) and have a total of 16 licenses.
2) If you have two license files (the first for VBR, the second for Veeam Agent) you have to merge them in just one license file.
The License rule and the procedure are available reading the following links https://www.veeam.com/kb3085 (rule) https://www.veeam.com/kb3116 (procedure)
In these last days, I had enough time to analyze my personal lab performances.
For testing purposes, I launched the backup of the whole architecture at the same time; the VM that suffered more was the backup server (VBR) and in particular the SQL Service.
This article will explain the steps I followed to move the VBR Database SQL Express from Backup & Replication to a SQL Server standard using SQL-Management Studio as a migration tool.
Before continuing reading the article, please watch at the following Veeam KBs and contact the Veeam Support
To make the description easier I’ll use the following acronyms :
VBR = Backup Server
SQLServer = Target Server where SQL Standard is installed
SQLExpress = Source DB
DB = VeeamBackup
DBFile = VeeamBackup.mdf & VeeamBackup.ldf
The main steps to get the goal are:
Stopping the Veeam service on VBR server
Detaching DB from SQLExpress
Copying DBFile from VBR to SQLServer
Attaching DB to SQL Server
Using the Veeam Migration tool
Changing the service account name on VBR Service (optional)
Checking up the register key
Launching Backup and Restore tests
Let’s go!
The first step is quite easy. Just connect to VBR, click on service and stop the SQL instance (Picture 1).
Picture 1
2. The second step is detaching the DB from SQL Express using SQL Management Studio (Picture 2).
Picture 2
If you need a good and short video guide to install SQL Management Studio please refer to the following link:
Another interesting video guide to understand how to enable the remote connection with SQL server is available here
Remember: for enabling SQL Server to talk via Network (1433 is default port) you also have to set-up the firewall correctly.
3. Now it’s time to copy DBFiles from VBR to SQLServer
Pay attention to the default path where the files have to be copied and pasted.
Generally, it is in C:\Program Files\Microsoft SQLServer\ MSSQL.xx.INSTANCENAME\MSSQL\DATA (Picture 3).
Picture 3
4. Next step is attaching the DB to the new SQL server following the easy SQL Management studio menu ((Picture 4).
Picture 4
5. Now from the programs menu of VBR server, just select the voice Veeam and then “Configuration DataBase Connection Settings“.
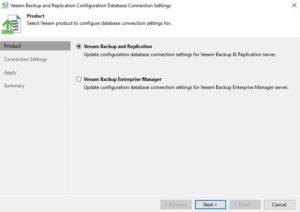
Now choose which DBs you want to move to the new architecture. It can be Backup & Replication or the Enterprise Manager or both (Picture 5)
(Picture 5)
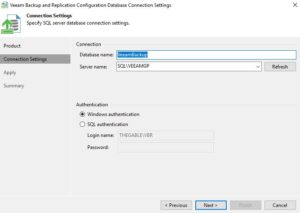
Now fill in the Database Name and Server/Instance and proceeding with the final step migration (Picture 6).
Picture 6
If everything is correctly configurated you have finally migrated your DBs.
Troubleshooting:
TS-1
If you see that the process runs out of time (600 seconds), it means that the VBR service account can’t access the database
How to solve it?
Please contact your DB experts before doing any tasks!!!
6. The first thing is creating a user able to manage the SQL services.
The procedure is quite easy using a Domain Controller (Picture 7-9)
Picture 7
Picture 8
Picture 9
Now you have to add the new user to Domain Users and Domain Admin groups (Picture 10-12).
Picture 10
Picture 11
Picture 12
From the Veeam Services window, select the Logon Service tab and set up the right user (and for all services that need it) (Picture 13 & 14)
Picture 13
Picture 14
Re-apply the procedure shown at point 5.
In my case, I’ve had another issue.
TS-2
The issue I unlucky met during my setup was the following:
When I tried to connect to remote DB with the “Configuration DataBase Connection Settings” command appeared the following error (Picture 15).
Picture 15
This issue happens when the SQL Server driver on a client computer that uses integrated security and the Windows security token, can’t connect to the SQL Server
If you want to have all details please refer to the following Microsoft article:
Please contact your DB experts before doing any tasks!!!
After some google research and test, I found a solution that addressed my issue always working with Domain Controller.
The AD console needs to be switched to advanced (Picture 16).
Picture 16
Now left-click on the SQL server and select “attribute editor”
From this menu, you have to delete all the entries with the writing MSSQL.svc (Picture 17)
It also needs a server reboot.
Please contact your DB experts before doing any tasks!!!
Picture 17
For the last two points (7 and 8), check-up, if the procedure followed, has solved the request.
TS-3
If you are not able to discover the SQL server, please check on the target Server if the SQL Server browser is up and running
Picture 18
From VBR Server open the register key (HKEY_LOCAL_MACHINE\ Software\Veeam\Veeam Backup and Replication) and check up if the items SqlDatabaseName, SQLinstanceName e SqlServerName are correctly filled in (Picture 19).
Do the same check-up for HKEY_LOCAL_MACHINE\Software\Veeam\Veeam Backup Catalog) (Picture 20).
Picture 19
Picture 20
Now start backup Jobs and do some restore tasks to be sure that your Backup architecture is up and running.
In my case, the Backup Server can manage more tasks without any issue.
One more recommendation before ending the article:
Before doing any activities please read the official documentation and ask Veeam support
One of the lesser-known VBR features is replication.
In this article, I’ll cover a special use case: how to throttle the network use.
There are several examples where this option is required.
Probably the most common is when you need to create a DR strategy to an external site and it is not possible to use all the band to transfer the source Data.
From the VBR console just select the “Network traffic rules” as shown in picture 1:
Picture 1
Now it’s possible to add a rule just selecting add Button (Picture 2)
Picture 2
In this example, I just input a network rule between the source proxy (192.168.16.72) and the target proxy (192.168.16.73) and set the amount of data (1 Mbps) that can pass through (Picture 3)
Picture 3
Picture 4 shows how to set up the throttling rule during any hour of the week
Picture 4
It is also possible to set up a number of streams. It helps to configure a multi-thread strategy to accelerate the data transfer (it specifies the number of ports that will be opened on the target device) (Picture 5)
Picture 5
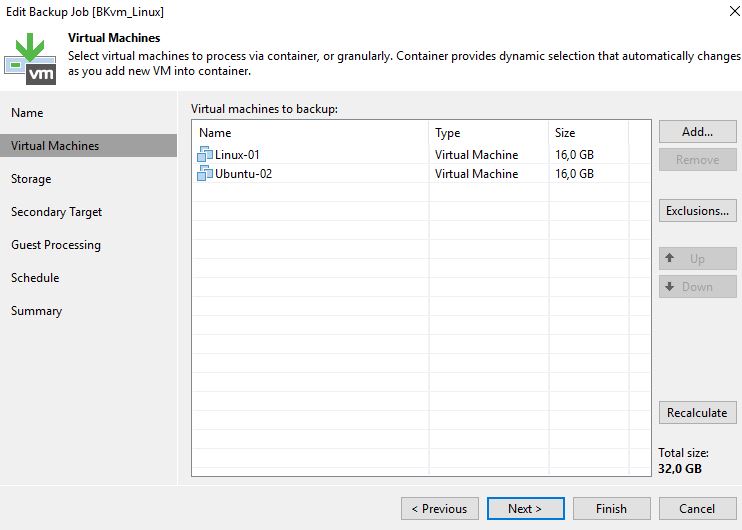
The next two pictures show how the Hot-Add protocol works. It mounts the disks that have to be copied from the source (Ubuntu-02) to target (Ubuntu-Proxy). It is faster than using a Network protocol.
Picture 6
Picture 7
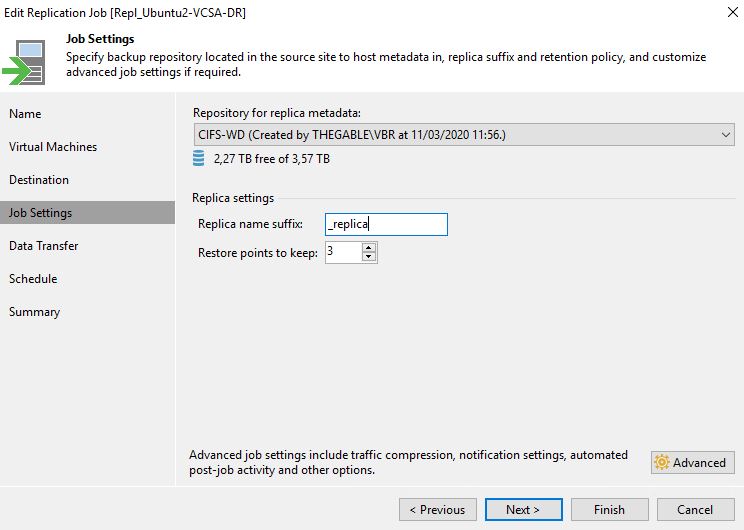
Now you can configure a Replica Job and check if the network throttling works as expected (Picture 8)
Picture 8
and yes it just works!
One more tip: if you have more than 1 Network adapter on your proxy or Repository VBR architecture, you can select which network has to be used by clicking on the Networks Button (Picture 9)
It’s a smart way to help VBR to create a Full Restore point downloading just an incremental backup from production.
The process is composed of two phases.
Firstly it creates a normal incremental backup.
Then it creates a full backup file stacking all previous backups (full and incremental).
This process normally needs a lot of work because VBR commands the repository to copy, paste and delete the data blocks.
The XFS integration, allows the system to do not move any block. In fact, the filesystem is able to re-point his metadata creating a Full Backup in One-Shot.
The result is super fast Full Backup creation.
Let’s see with an example:
A classic Full Backup has lasted 7 mins (Picture 1).
Picture 1
An Incremental Backup has lasted 2 mins and 30 sec (Picture 2).
Picture 2
What about a Synthetic Full?
Picture 3 shows that it needs less than 30 seconds (plus the time needs to download the incremental data).
So Amazing technology and Veeamzing integration!!!
Picture 3
That’s all, for now, guys, see you soon and take care.

 Picture 1
 Picture 2
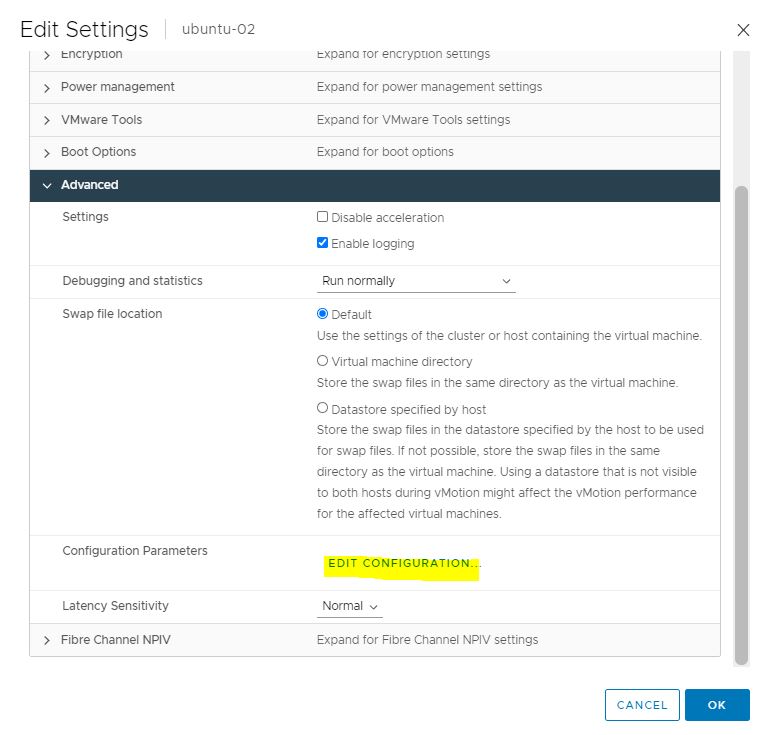 Picture 3
 Picture 4
 Picture 5
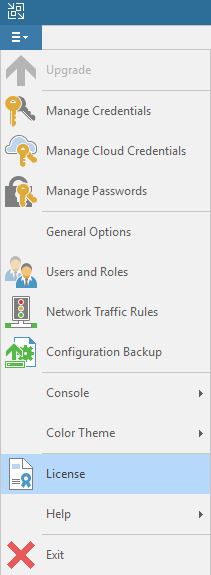 Picture 1
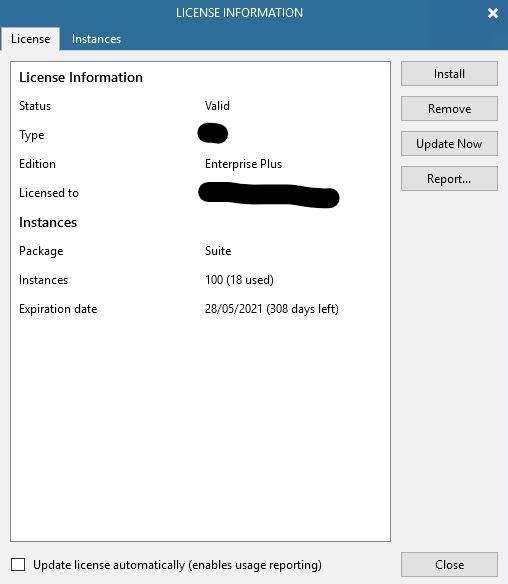 Picture 2
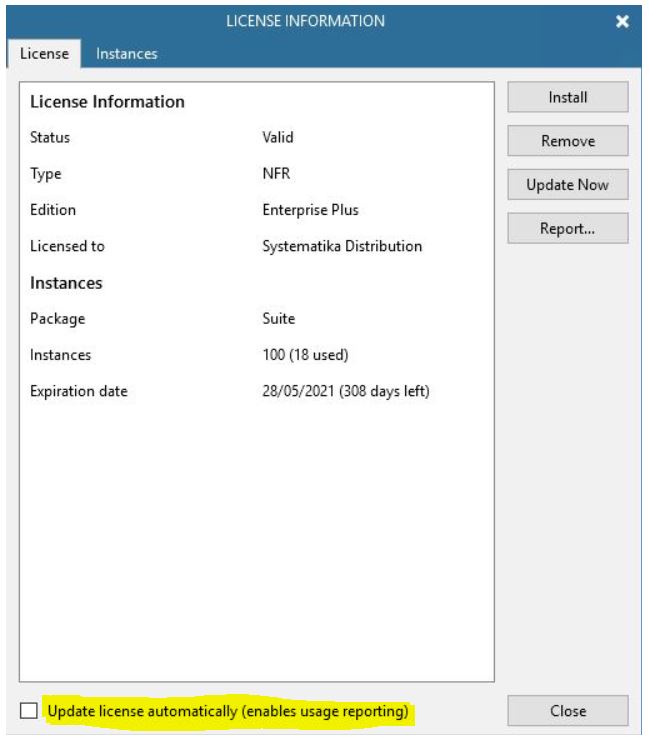 Picture 3
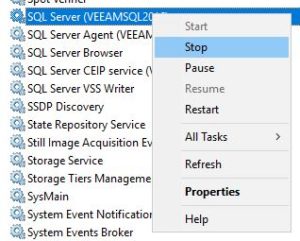 Picture 1
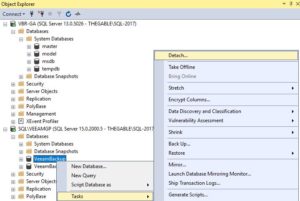 Picture 2
 Picture 3
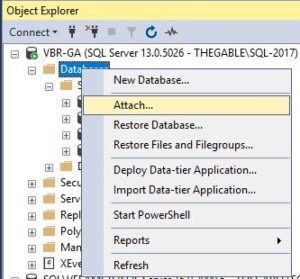 Picture 4
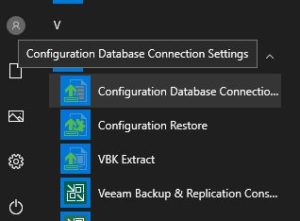
 Picture 6
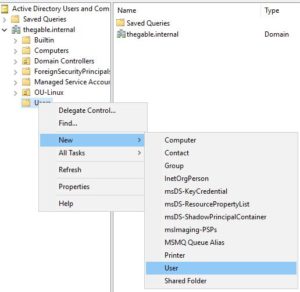 Picture 7
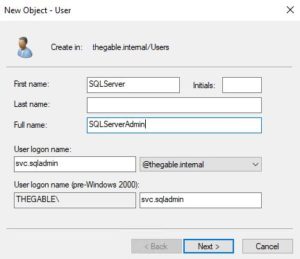 Picture 8
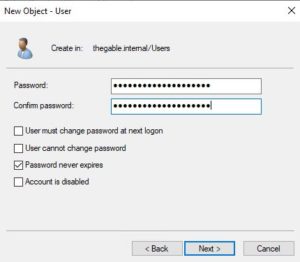 Picture 9
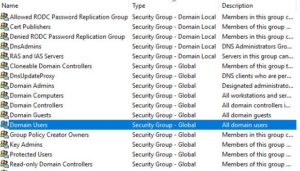 Picture 10
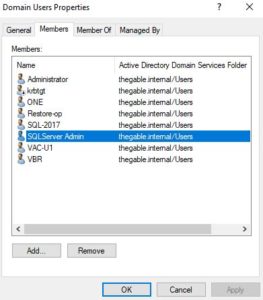 Picture 11
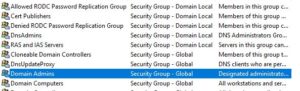 Picture 12
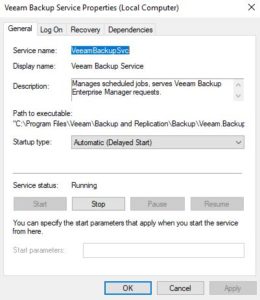 Picture 13
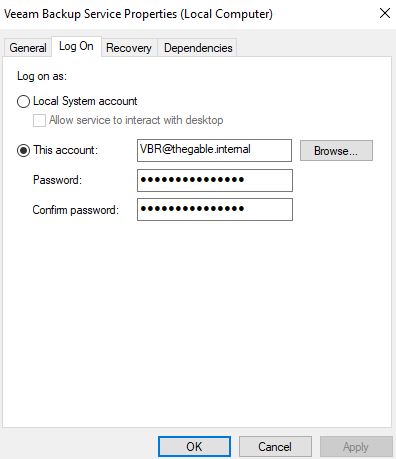 Picture 14
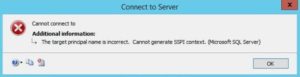 Picture 15
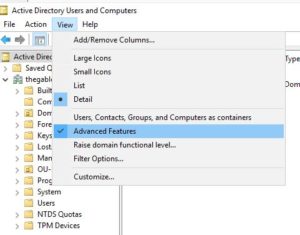 Picture 16
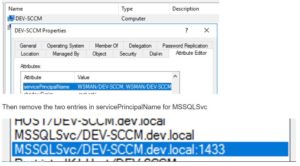 Picture 17
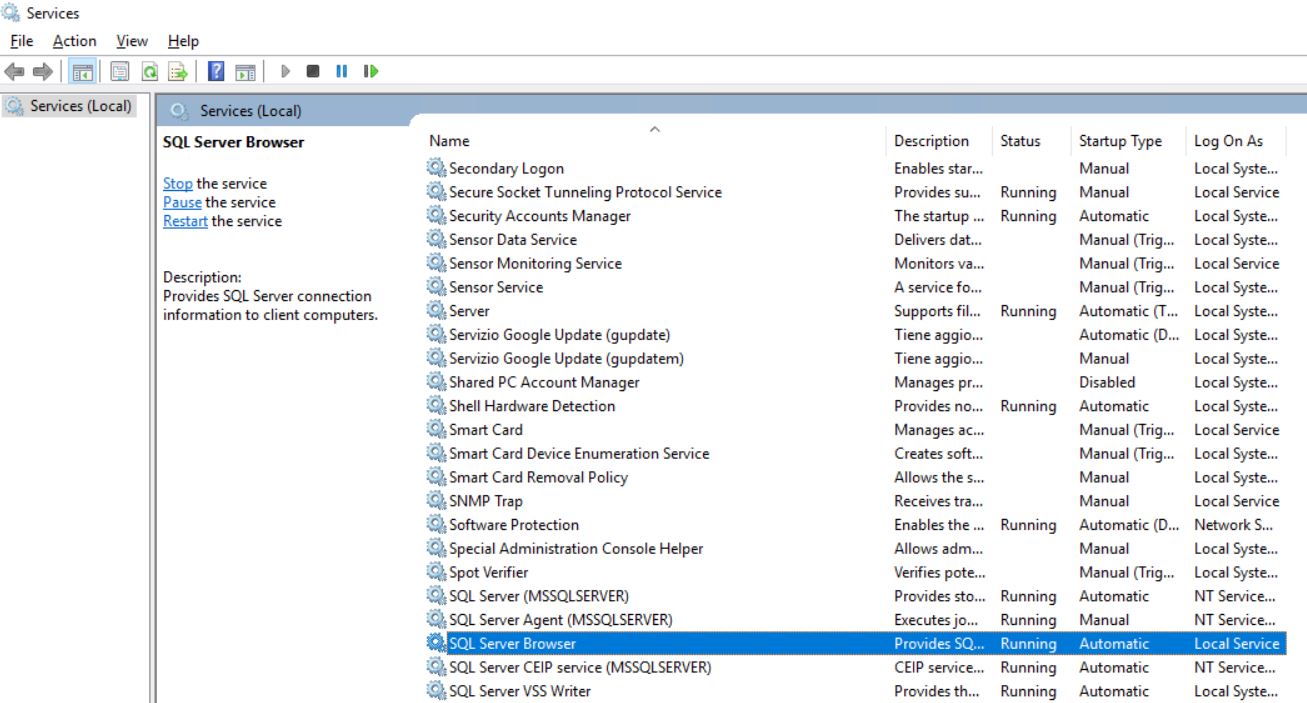 Picture 18
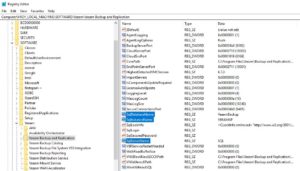 Picture 19
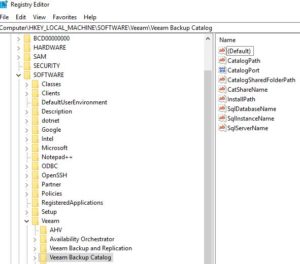 Picture 20
 Picture 2
 Picture3
 Picture 4
 Picture 5
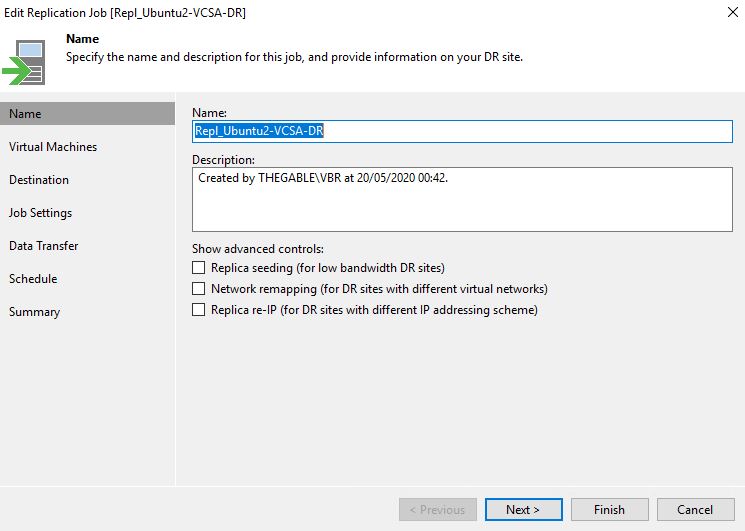 Picture 6
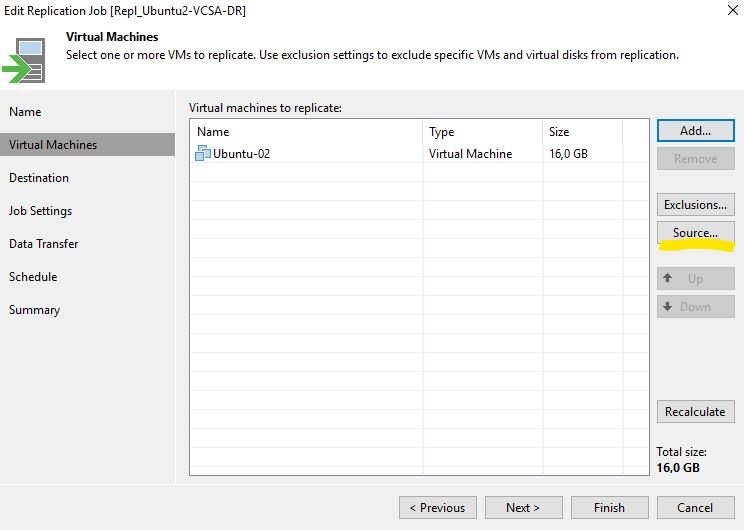 Picture 7
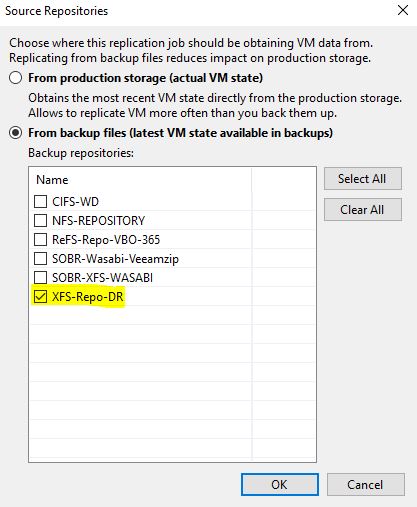
 Picture 9
 Picture 10
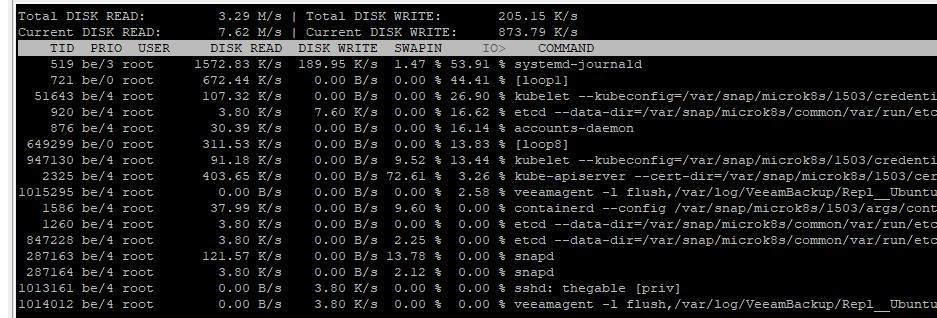 Picture 11
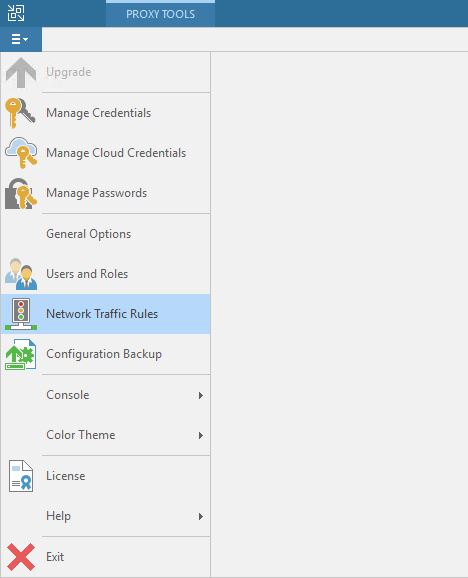 Picture 1
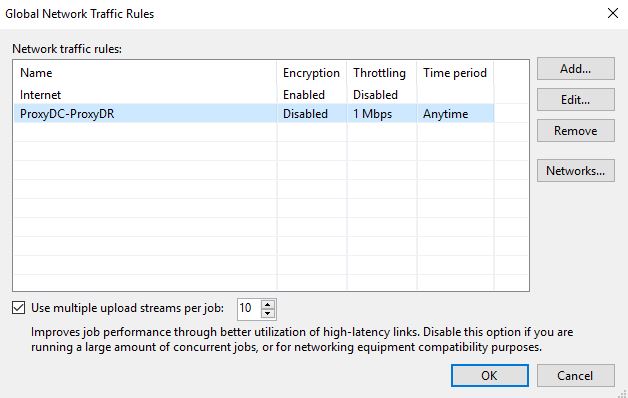 Picture 2
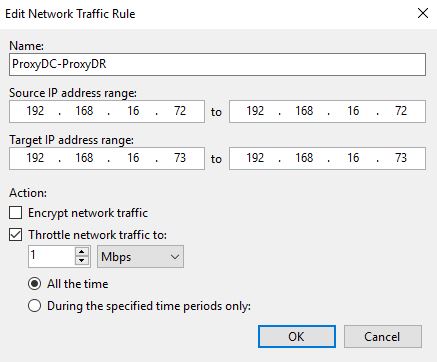 Picture 3
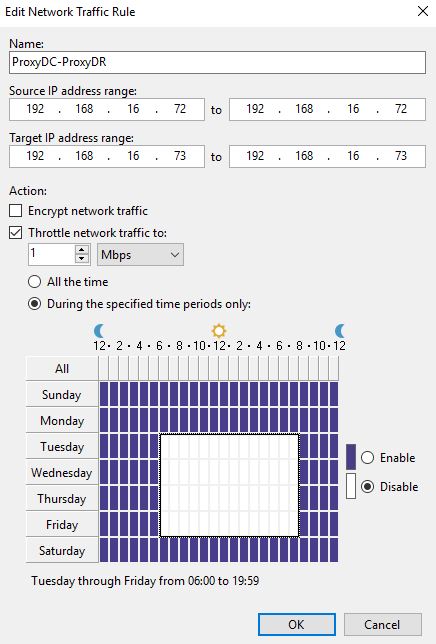 Picture 4
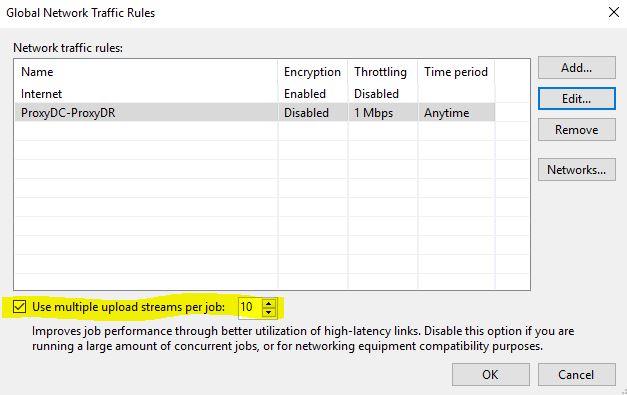 Picture 5
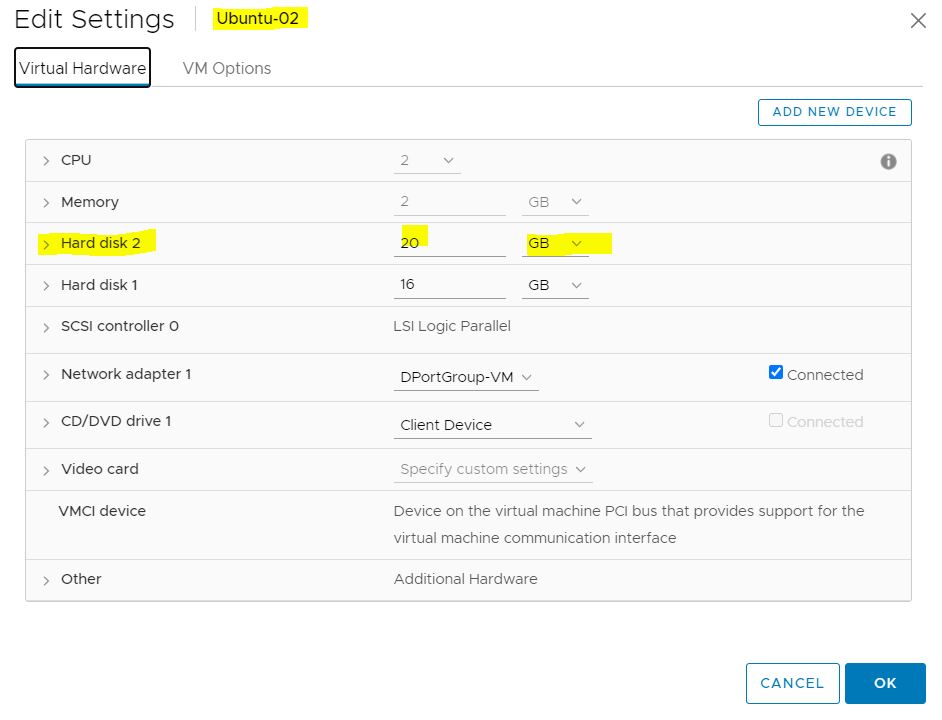 Picture 6
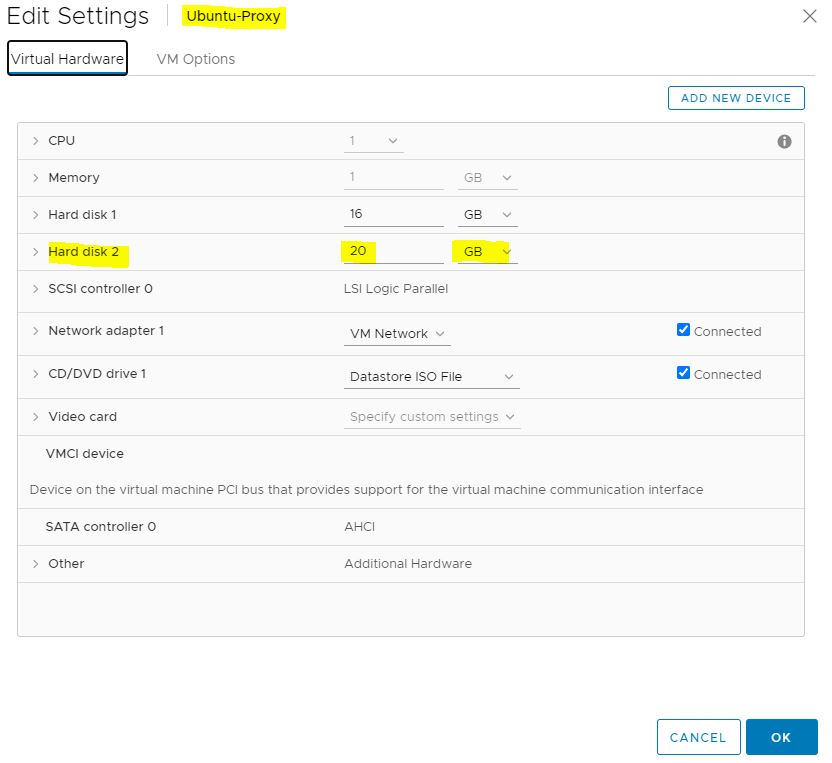 Picture 7
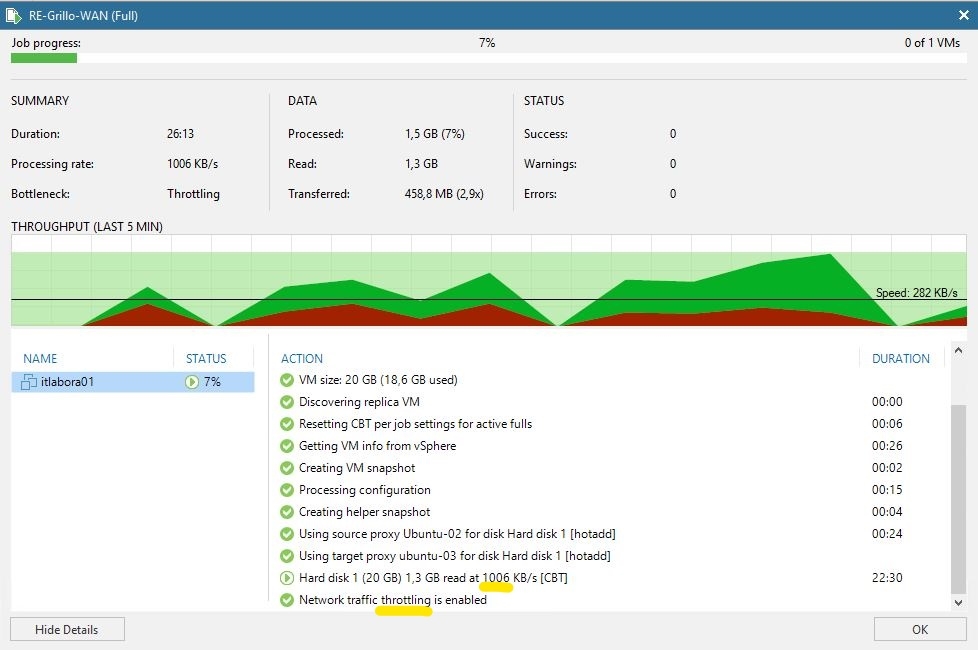 Picture 8
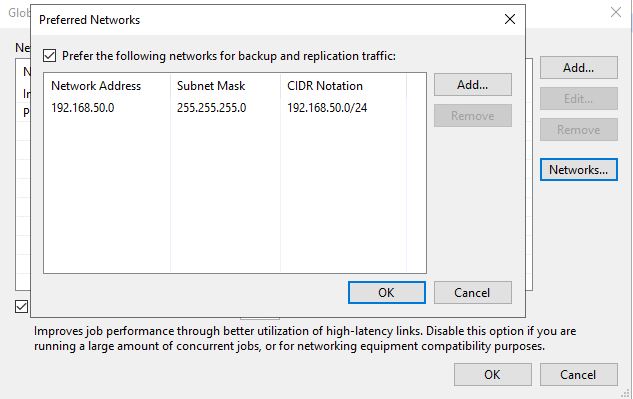 Picture 9
 Picture 1
 Picture 2
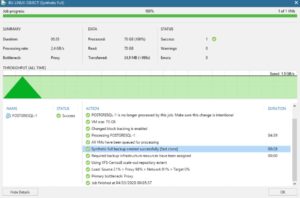 Picture 3