MySQL Backup & Veeam Backup & Replication Parte 2

In questo secondo articolo è illustrato dove ricercare gli script per realizzare backup consistenti di DataBase MySQL con Veeam Backup & Replication.

Per scoprire perché sia necessario utilizzare script, vi raccomando di leggere il precedente articolo.

Hot Backup Database Online Dump (Linux)

L’opzione prevede di integrare negli script il comando mysqldump.

Due esempi sono consultabili al seguente sito:

HotBackup Database Freeze (Linux)

L’opzione prevede di effettuare a caldo il flush delle tabelle.

Due esempi sono consultabili al seguente sito:

Cold Backup Database Shutdown (Linux)

L’opzione prevede di fermare il servizion MySQL prima di realizzare il backup.

Due esempi sono consultabili al seguente sito:

Hot Backup Database Online Dump (Windows)

Il seguente esempio in poweshell è puramente dimostrativo. Il mio consiglio è quello di chiedere al vostro esperto in powershell di crearne uno che rispetti le politiche aziendali di gestione e sicurezza.

Pre command (avvia lo script mySQLdump.ps1 sul server YOURMYSQLSERVER)

$password = ConvertTo-SecureString “YOURPWD” -AsPlainText -Force

$Cred = New-Object System.Management.Automation.PSCredential (“DOMAIN\USER”, $password)

New-PSSession -ComputerName mySQL-WIN -Credential $Cred

#Enter-PSSession -ComputerName YOURMYSQLSERVER

#Invoke-Command -Session 6 -FilePath “C:\Script\script-7.ps1” -ComputerName mySQL-WIN

Invoke-Command -ComputerName mySQL-WIN -Credential $Cred -ScriptBlock { C:\Script\mySQLdump.ps1}

mySQLdump.ps1 (Crea il file .sql che viene memorizzato in una specifica cartella sul server YOURMYSQLSERVER)

# Declare variables

$path = “/backups”                      # path of backup folder

$logFile = “automate-mysqldump.log”     # path of log file

$configFile = “C:\ProgramData\MySQL\MySQL Server 5.6\my.ini”           # path of my.cnf file

# Navigate to the backups folder

Set-Location $path

# get today’s date to name today backup folder

$date = Get-Date -UFormat “%Y-%m-%d”

# Check for log file

# Create if not found

if (-NOT (Test-Path $logFile)) {

    New-Item -Path . -Name $logFile -ItemType “file”

    Add-Content $logFile “Created on: $date`n”

}

# enter directory

# create today’s backup directory if it does not exist

if (-NOT (Test-Path $date)) {

    New-Item -ItemType “directory” $date

    Add-Content $logFile “[$date]: New $date directory is created”

}

# Set-Location $date

Add-Content $logFile “[$date]: Starting mysqldump”

# invoke mysqldump – insert mysqldump statement

mysqldump –defaults-file=$configFile -r $date/database-backup.sql –all-databases

Add-Content $logFile “[$date]: Backup for databases are completed”

Add-Content $logFile “”

# pause

 Post command (chiude la sessione remota)

Remove-PSSession -ComputerName YOURMYSQLSERVER

Nel prossimo articolo sarà illustrato come integrare gli script in Veeam Backup & Replication.

Veeam Backup & Replication: Conteggio delle licenze

A partire dal 1 luglio 2022, la vendita di licenze perpetue per socket di Veeam Backup & Replication™, Veeam Availability Suite™, Veeam Backup Essentials™ e Veeam ONE™ cesserà sia ai clienti nuovi che a quelli esistenti.

I prodotti attualmente in esercizio, continueranno a funzionare ma non sarà possibile acquistare nuove licenze a Socket per effettuare un upgrade.

Le licenze acquistabili e disponibili sono le Veeam Universal License (VUL) che utilizzano come unità di misura il singolo workload.

I vantaggi più importanti del modello VUL possono essere riassunti in:

  1. Possibilità di proteggere qualsiasi workload supportato (ad esempio le istanze in AWS, Azure e GCP) e non solo le Virtual Machine VMware e Hyper-V.
  2. Libertà di muovere le licenze a seconda della necessità tra tutti i workload supportati.

Nota 1: Ogni istanza può essere utilizzata per proteggere 500 GB dati sorgente di un NAS

Nota 2: Facciamo un esempio per semplificare il conteggio: ipotizziamo di dover proteggere un ambiente composto da 50 VM Hyper-V, 30 istanze in Azure (oppure in Aws oppure in GCP), 10 server fisici e 5 TB di dati.

Il numero totale di istanze è la somma algebrica di:

a. 50 (VM-HV) + 30 (Azure) + 10 (Server) + 10 (NAS)=  100 istanze = 10 VUL

Se in un processo di ammodernamento 20 VM in Hyper-V sono migrate in Azure, il conteggio si trasforma in

b. 30+50+10+10 = 100 istanze = 10 VUL

Come potete osservare il numero totale di istanze non cambia.

La buona notizia è che Veeam ha messo a disposizione un piano per aiutare i clienti nella fase di migrazione delle licenze.

Il vostro referente commerciale in Veeam potrà indicarvi le migliori opzioni disponibili.

Nota 3: In questo scenario è indispensabile fornire al referente Veeam i file di log.

Quello che descrive le licenze utilizzate è denominato VMC.log

A presto

VBR – Mac Backup

Veeam Backup & Replication (VBR) version 11 has a new feature and Mac users will fall in love with it.

It is now available for the backup and restores of your MACOS files.

It supports the last Operating Systems starting from High-Sierra (Big Sur 11.X.X / Catalina 10.15.X / Mojave 10.14.X / High Sierra 10.13.6).

Note 1: The Veeam Agent for Mac (VAM) version 1 supports the M1 processor via Rosetta.

Note 2: The VAM supports consistent data backup with snapshots for the APFS file system.

In the other file systems, the backup is created via a snapshot-less approach.

Note 3: At the moment it’s possible to perform the backup of user data (with a custom scope too). The image of the entire machine and a Bare Metal Restore are not available yet.

The configuration steps are quite easy as shown in the official guide:

To recap, the procedure consists of:

  1. From the VBR console create a resource group using a flexible scope
  2. Copy the files generated from VBR to the MAC to protect
  3. Install the package to your machine and import the created configuration. (It allows the communication between VBR and the Mac)
  4. From the VBR console creating the backup policy and apply it

The following video shows how it works in a managed VBR architecture.

Take care and see you soon.

VDrO v.4 – Run a DR plan

This is the last article about how to integrate the Continuous Data Protection (CDP)  technology (available from VBR v.11) and VDrO v.4 (former VAO).

In this part, we are going to see what happens when an orchestration plan is launched.

Yes, I wrote the word “see” because I created a short video showing the tasks that are automatically completed when a Disaster Recovery is occurring.

If you need more details about how to set up the environment, please read the previous articles.

Let me know if videos and youtube platform are a good way to expose technological valuable topics.

Thx for reading and watching and take care

VBR – Proxy linux server UUID

When a Linux VM is added to Veeam console as a Proxy Server,  you can fall out in the error shown in picture 1

Picture 1

The reason for this behavior is that the default VM config does not allow another software to see the UUID of the VM.

What is UUID?

It’s the unique identifier used to uniquely identify partitions in Linux operating systems.

Why is it important to use it?

A backup where the proxy is a Linux VM only works with virtual appliance transport mode. It uses the VMware hot add capability.

Easier: when a job starts, the proxy Linux mounts the disks of the VM that have to be processed and then send a copy of data to the Veeam Repository.

If the backup server knows which are the proxy disks it can process the others easily and without errors.

The result is that it’s mandatory to set it up correctly as shown in the user guide and in Veeam forum

Note 1: the Linux command to show UUID is blkid

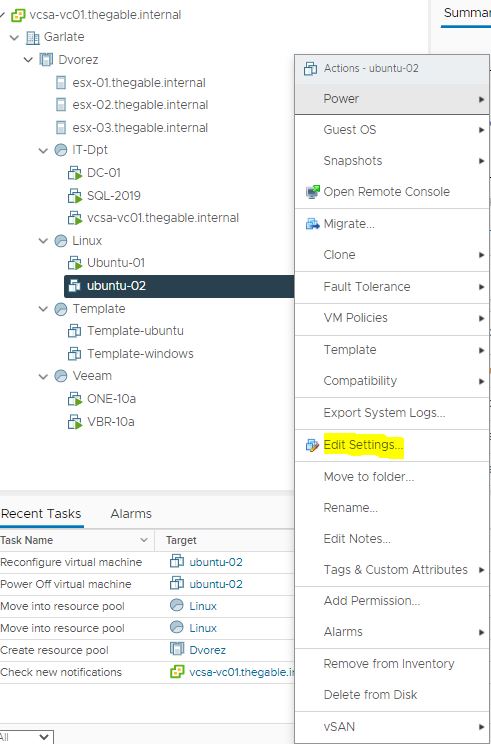
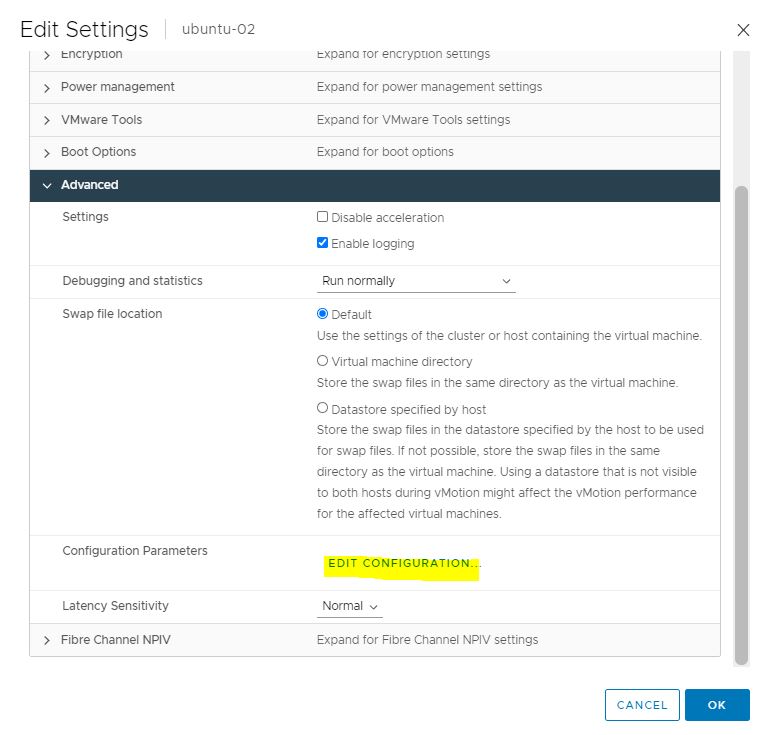
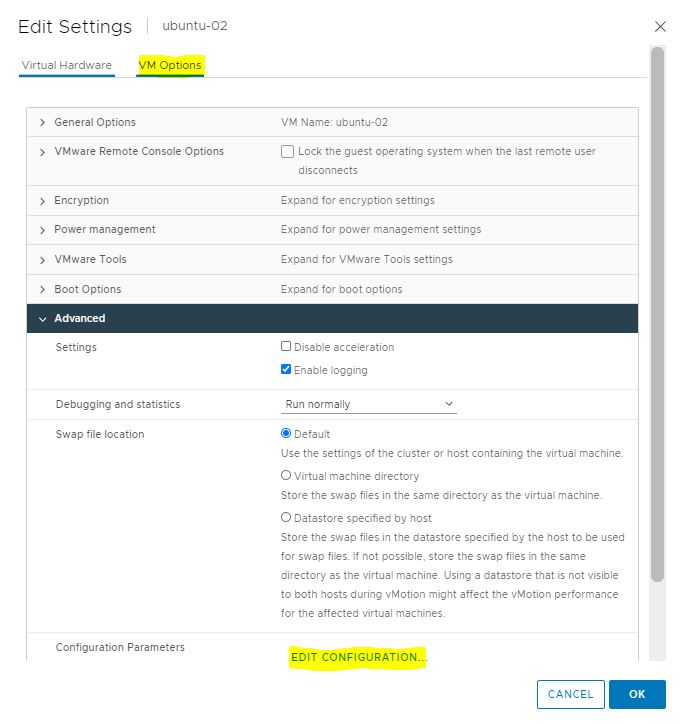
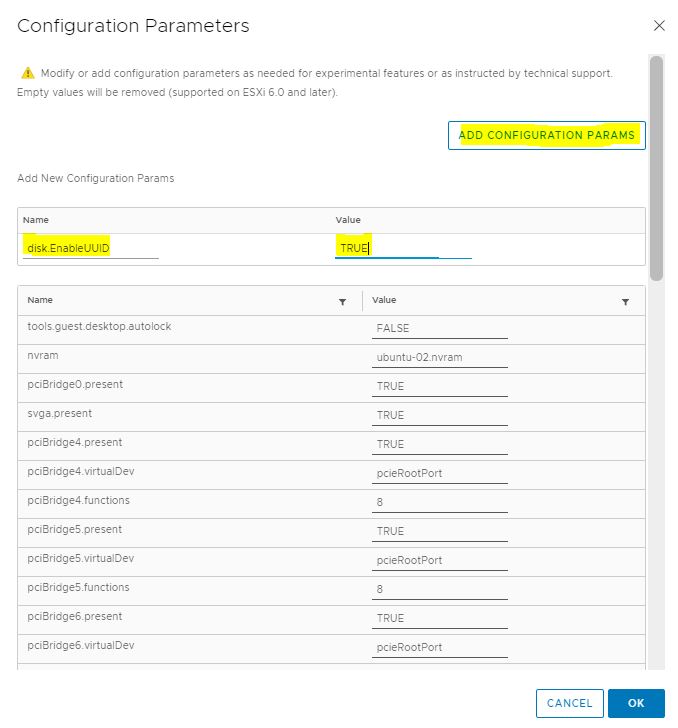
To address the issue just switch off the VM and, from vCENTER Console, follow the procedure showed in the next 4 pictures highlighted in yellow.

Picture 2

Picture 3

Picture 4

Picture 5

That’s all folks