Presume or Suppose, this is Bridge !

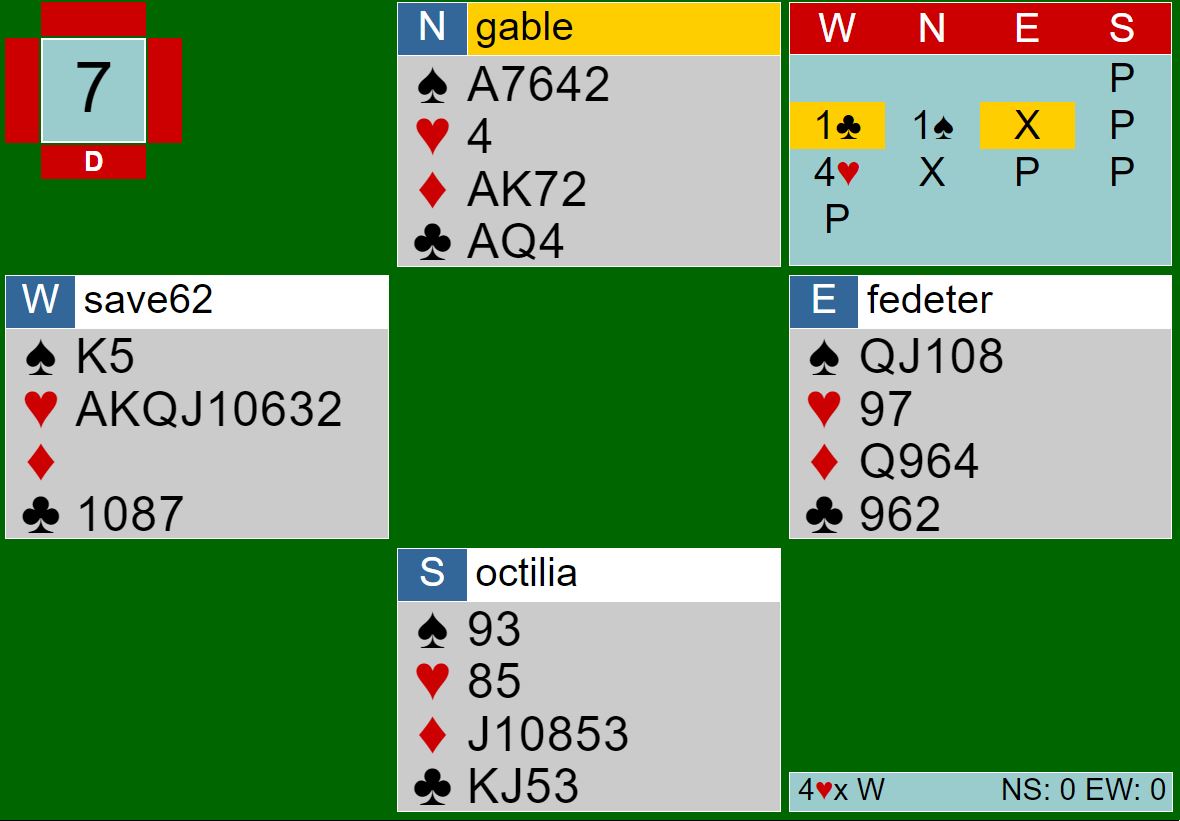
I’m playing the Brianza Bridge Tournament on BBO with a great player, Octilia.

In our last match, board 7 I held  A7642-4-AK72-AQ4. 

North seated while I was lulling my beautiful cards Est bid 1showing 17+ HCP.

I was a little bit disappointed but I could easily bid 1.

West joined the conversation with a double, showing 4-6 points, my pard passed (you could bet on that) and  Est bid a conclusive 4.

It is my turn,  can you please help me?

Which is your bid? Pass, Dbl or what else (Nespresso???)?

I preferred Dbl that remained the final contract.

Normal lead is Aand dummy showed these cards:

QJTx-97Q964-962

While I was counting my tricks, 1, 1, and 2 =  1 off,  your pd played the three, and …. the player ruffed and played immediately the K.

Ohhh Nooo, my first thinking was wrong, and on the second card, I had to make the right decision.

To duck or not to duck, this is the question. It’s one of the most common bridge saying.

What helped me playing a small was that if my pard had three cards she would probably bid 4.

Do you agree?

Never mind, pard played 9.

Now Est continued with 5 that I won with the Ace while your pd showed 3.

And Now?

Which is the best play you can do?

I guessed EST hand could be 2-8-3 , and to justify the 1 opening , with K also.

Dummy now held: QJ-9x-Qxx-xxx

I’m giving you other 30 seconds to get the right decision.

Do you think the dummy is now unreachable? If so, you put on the table  K …… and the tragedy is finally completed! (I also played this way)

Why?

Est ruffed , played A and a small to 9.

My pard held 8 and 5 and she was not able to get the trick…

Result ?

14 MP lost by my team.

Was this contract beatable?

The answer is ….. Yes!

Why?

Angy held the K but I was not able to get this important info.

Is there a clear solution?

Yes, make a call :), Just kidding !

After a whole thinking night, I found a possible solution. It’s not easy to get, do you figure it out?

if 3  it’s a mandatory card to give the count, the key point is on  cards.

Does it make sense to give the count to your partner at trick two when he already choose to duck the K?

Now when he won with Ace the second card, he had a clear message.

Which one?

You gave him a miss-count !!!

It should be a great allowed signal to play a different suite and in this case

Was it easy?

I don’t think so,  and I wouldn’t have had the solution at the table, but it is a very tricky way to inform pd to play another suite.

And you?

Did you find the solution?

VEEAM AGENT FOR WINDOWS – REMOTE COPYING DATA – 1

In the last weeks, I’ve been requested to understand how to set up a strategy of remoting Backup Data when the source is a Veeam Agent.

The answer is not just the “Use the backup copy job” option because it can be used in one of three scenarios I’m going to cover in the next three articles.

So, let’s move fast forward

My Lab Environment is composed of VBR + 2 Windows 10 Physical Laptops

I do not cover the first part regarding how to create a protection group. There is more than one online guide that explains how to add a protection group to VBR.

My two suggestions are:

  1. Check if the Firewall ports are correctly open (click here)
  2. Check on Laptop if Admin share (c$) is available.

If the second point failed just follow this simple procedure. Launch a cmd as administrator and write the following command:

REG ADD HKLM\SOFTWARE\Microsoft\Windows\CurrentVersion\Policies\system /v LocalAccountTokenFilterPolicy /t REG_DWORD /d 1 /f

Scenario 1: VBR as central Manager – VAW configurated as Server

Let’s see how to configure a primary VAW  backup Job

From the wizard select Windows Computer as shown in picture 1

Picture 1

from the Job Mode Select Server (Picture 2)

Picture 2

Now add the Backup Job name and follow the simple wizard (Pictures 3 to 9)

Picture 3

Picture 4

Picture 5

Picture 6

Picture 7

Picture 8

Picture 9

Now you can check if the backup up has been completed correctly (Picture 10)

Picture 10

Now it’s time to configure a Backup Copy job and run it (Pictures 11 to 16)

Picture 11

Picture 12

Picture 13

Picture 14

Picture 15

Picture 16

Now you can see different restore points on disks (Pictures 17 to 19)

Picture 17

Picture 18

The last step is watching how many licenses have been used

Picture 19

In the next article, we are going to see what will change if we work on the “select mode” option.

VEEAM AGENT FOR WINDOWS – REMOTE COPYING DATA – 2

In this second article, we are going to cover what happens if we set up a VAW backup job working “managed by agent”.

Let’s see the main differences from the wizard (to know all the procedure please refer to the official guide or to my previous article)

Picture 1

Before going on, have a look at the manual to understand what happens in this scenario:

helpcenter.veeam.com (click here)

“Veeam Backup & Replication uses the backup policy as a saved template and applies settings from the backup policy to Veeam Agents that run on computers specified in the backup policy”.

In other words,  the policies are pushed to the VAW; So the laptop is able to protect its data even without a VBR start command.

Ok, following the wizard, input a backup name and select the Laptop to protect (Pictures 2 and 3)

Picture 2

Picture 3

After selecting Target and Repository it’s possible to complete the job creation (Pictures 4,5 and 6).

Picture 4

Picture 5

Picture 6

Now check if the backup policies are correctly applied and then launch the backup job (Pictures 7,8,9,10)

Picture 6

Picture 7

Picture 8

Picture 9

Picture 10

Checkpoint:

If you now try to create a backup copy job from the VBR console, you will find a problem because it is not available if you are going to select Periodic Copy (Immediate copy is available from version 11 of VBR)

Why?

Because in this scenario the policy commands the backup process. It’s like saying the Agent is the master of the backup.

How to go over?

  • Just select Immediate copy or
  • Add a new backup policy !” (Pictures 11 to 14)

Picture 11

To know: if you use a remote desktop and connect to your saved laptop, you can find the Veeam icons. When you click on them you get the classic interface (as standalone installation)

Picture 12

To Remember: from here you can not add a new job. You always have to set it up from the VBR console:

Picture 13

And the last thing? What about licensing? It consumes a single VUL

Picture 14

Wrap-up:

  1. If you need to have more than a copy, just create a new policy backup. My two cents are:
    a) Use a forever forward incremental chain.
    b) The repository should have a block cloning technology as ReFS/ XFS.
  2. If you plan to use a Backup copy job you have to configure the Agent as managed by the backup server or on the backup copy job select the immediate copy job.
  3. Licensing does not have any impact, it always uses a VUL license.

The next and last article will cover the workstation backup approach. See you soon

VEEAM AGENT FOR WINDOWS/LINUX – REMOTE COPYING DATA – 3

Today I’m going to cover what’s happening if you set the protection policy up as a workstation.

In this article, I’m covering the Veeam Agent for Linux (VAL) also,  to widen the range of my site and answer friends asking me to talk about their workstation based on Ubuntu.

After creating the protection group  (please refer to the previous articles), let’s create a new job and set it up as a workstation job (image 1)

Image 1

Now add the laptop (ubuntu2 in my case) and follow the wizard pointing as repository the VBR server (image 2-5).

Image 2

Image 3

Image 4

Image 5

After completing the task, check that the configuration has been rightly applied to the laptop and then launch the first backup (image 6).

image 6

Now it’s time to connect via SSH to the Linux laptop and lunch  the command Veeam as root (image 7)

Image 7

it shows your backup status (image 8)

Image 8

and from here you can lunch the same job another time (image 9)

Image 9

But what happens if you try to add a new backup from this interface? As previously in Windows case, it is not allowed, because it is managed by VBR.

A good step is to check that the license work in workstation-mode (image 10)

Image 10

But if you remember well, my first goal was having a backup outside the primary site.

I already wrote in my last article (VEEAM AGENT FOR WINDOWS/LINUX – REMOTE COPYING DATA – 2 ) how to set up a new backup job from the VBR console (I’m pretty sure you are now ready to do it without any help) (image 11 – 15)

Image 11

Image 12

Image 13

Image 14

After applying the configuration let’s start the Backup job

Image 15

This is what happens, It FAILED !!! (image 16)

Image 16

Why?

The answer is inside the workstation limitation that you can find on the following Veeam web page (Veeam Edition comparison).

https://lnx.gable.it/wp-content/uploads/2020/05/1-art3.jpg

It is clearly written that if you use the agent as a workstation, you can perform the second/third backup job just writing backup data to a Cloud repository?

Veeam Agent uses case summary:

Backup Type Managed by BCJ + Backup Job to + destinations 1+Backup CC VUL
Server VBR Y Y Y 1
Server Agent N Y Y 1
Workstation Agent              Y                (immediate copy) N Y 1/3


1+ Backup 1+Backup CC VUL
Server Y Y 1
Workstation N Y 1/3

I hope the article series will help to set up correctly your environment.

Take care

Unifi USG – VLAN and Routing Configuration

INTRODUCTION:

A virtual LAN (vLAN) is any broadcast domain that is partitioned and isolated in a computer network at the data link layer (OSI layer 2) (wikipedia)

vLANs works by applying tags to network frames and handling these tags in networking systems.

——

I love how USG has faced up the vLAN challenge.

Their starting point is working with vLAN as if it were a layer 3 object and not layer 2 of the OSI model.

The idea behind USG is thinking vLAN is a new LAN with a different IP Address”.  Are you a little bit confused? Yes? I also was at the beginning but now I’m enthusiastic of this new approach.

Let’s explain better with an example directly from my Lab Network.

In my Environment I needed to create 2 vLAN. The first one to address the iSCSI protocol and the second to manage the Backup traffic.

I chose #40 to point up iSCSI vLAN and #50 the Backup.

I went directly to USG user interface and created the vLANs from Network menu  as shown in figure 1, 2 and 3

Figure 1

Figure 2

Figure 3

The next step is enabling routing between the new networks and the original  LAN.

The task is performing selecting Switch ports from Profiles Menu.

As shown on figure 4 I set up  an easy rule to let the networks talk to “each other”. In this case LAN to iSCSI as Figure 4

Figure 4

Now the last step. Enabling traffic from and to the Networks. In a simple word I worked at Firewall level.

I spent some hours to understand the options the USG can offer to their customers because it’s possible to set up many rules to manage traffic among LAN (LAN-IN and OUT), WAN (WAN-IN and OUT), GUEST (IN and OUT) and LOCAL (WAN/LAN/GUEST)

Really many many options but with a little patience, you can tune your networks answering to any security design.

In this example, I just created rules to manage the traffic LAN IN (FIGURE 5 and 6)

https://lnx.gable.it/wp-content/uploads/2020/05/4-vlan.jpg

FIGURE 5

FIGURE 6

Before ending this article two more notes:

If you want to grant the Servers connected to LAN to surf on Internet,  you just  need to set up a LAN-IN and a LAN-OUT rule.

To work with vLAN you need to buy an Ethernet Switch vLAN compliant

Unifi USG – Setup and configuration

Last device I added to my lab is the Ubiquity Unify Security Gateway (from now on USG)

I need it because I have to work with a great number of vLAN in my demo lab.

Let’s see what I learned in the last test weeks and how I set it up to address my needs.

The hardware installation is quite easy. After unpacking the box you just need to plug-in the power supply and two ethernet cables, the first one on LAN Port and the second to WAN port.

The USG setup is composed of 5 configuration phases

  1. LAN / WAN
  2. Unifi-Controller
  3. VPN
  4. VLAN
  5. Routing

In this first article, we are going to cover the three first phases.

I – LAN /WAN Configuration

  1. On your PC set up the Ethernet IP Address as 192.168.1.x/24 and plug the LAN cable. Now ping the 192.168.1.1 address to be sure you can reach the USG. Open a Browser and  you’ll be able to configure LAN and WAN interfaces from 192.168.1.1 address.

Figure 1

My personal router works on 192.168.18.x while I choose to set up the LAN on 192.168.16.x address

After “applying the changes”, you have to re-change the IP address of your PC to a LAN address (192.168.16.99 for example) and test the USG answer to ping.

II Unify Controller

After creating an account on the Ubiquity site (https://account.ui.com/register), download and install the Unifi Controller (https://www.ui.com/download/unifi-switching-routing) on your local PC.

Let’s see the most important steps on the wizard:

Click on “Launch a Browser to manage the network” button (Figure 2)

Figure 2

Log-in to Ubiquiti account

Figure 3

Checking if the USG device is properly discovered

Figure 4

After the wizard has been completed you can start to play with the friendly user interface. Figure 5 and 6 show the USG Device status (the fourth icons on the left panel (device))

Figure 5

Figure 6

III VPN Creation

The Wizard consists in:

  1. Creating a new Network (Figure 6) selecting the options “Remote user VPN” and L2PT server. On Radius menu you must add a new profile as shown in (Figure 7)

Figure 6

Figure 7

2) Enable Radius Server as shown in figure 8

Figure 8

Now you can set on your windows/linux/mac/android device the VPN connection and test it

Before ending the article two more notes.

  1. If you see the provisioning entry on the web interface, it means USG is loading and saving the new configuration.
  2. You can have all detail about USG products at the following internet address:  https://www.ui.com/unifi-routing/usg/